This butterfly has wings from a cardboard plate and a body of pearls and pipe cleaner wire.
A nice craft offer for spring or summer. Take a look at the step by step instructions and simply join in! Have fun.
Media Education for Kindergarten and Hort

Relief in everyday life, targeted promotion of individual children, independent learning and - without any pre-knowledge already usable by the youngest!
Put everything in place, put out a craft pad and put on a paint coat.
First you need the little white paper plate.
![Bild zum Schritt 1 für das Bastel- und DIY-Abenteuer für Kinder: '[Eltern]Legt alles bereit., legt eine Bastelunterlage aus und zieht einen...'](https://abenteuer-markt.de/wp-content/uploads/cooked/images/recipes/13296/directions/99388581-891E52C1-2FF4-4765-8C4D-8C354B1EBDF2-scaled.jpeg)
Fold the cardboard plate in half.
![Bild zum Schritt 2 für das Bastel- und DIY-Abenteuer für Kinder: '[Eltern]Faltet den Pappteller zur Hälfte zusammen.[/Eltern] [Kind]Falte den Pappteller...'](https://abenteuer-markt.de/wp-content/uploads/cooked/images/recipes/13296/directions/71305890-DB3520C6-B645-4352-A66F-BEA9850883AF-scaled.jpeg)
Knock the rupture and strip it.
![Bild zum Schritt 3 für das Bastel- und DIY-Abenteuer für Kinder: '[Eltern]Knickt den Bruch und streift ihn aus.[/Eltern] [Kind]Streift die...'](https://abenteuer-markt.de/wp-content/uploads/cooked/images/recipes/13296/directions/56214737-741FB7F4-D5A7-469D-9330-18B44FF1FA94-scaled.jpeg)
Then you fold the plate apart again. Now place the break so that it points at you (see picture).
![Bild zum Schritt 4 für das Bastel- und DIY-Abenteuer für Kinder: '[Eltern]Dann klappt ihr den Teller wieder auseinander. Legt jetzt den...'](https://abenteuer-markt.de/wp-content/uploads/cooked/images/recipes/13296/directions/35344609-8BF5FC5B-4313-424F-AE91-D06CCC974BCD-scaled.jpeg)
Now you cut the plate along the break.
![Bild zum Schritt 5 für das Bastel- und DIY-Abenteuer für Kinder: '[Eltern]Jetzt schneidet ihr den Teller am Bruch entlang auseinander. [/Eltern]...'](https://abenteuer-markt.de/wp-content/uploads/cooked/images/recipes/13296/directions/96317456-E37AA8A9-186C-40B0-BCD8-4514FC308DF5-scaled.jpeg)
[Parents][/Parents][Child][/Child]
![Bild zum Schritt 6 für das Bastel- und DIY-Abenteuer für Kinder: '[Eltern][/Eltern][Kind][/Kind]'](https://abenteuer-markt.de/wp-content/uploads/cooked/images/recipes/13296/directions/26194688-6F2EACA3-6256-4239-8E64-10C05D675C01-scaled.jpeg)
Now paint the wing section on a cutting edge.
![Bild zum Schritt 7 für das Bastel- und DIY-Abenteuer für Kinder: '[Eltern]Malt nun an einer Schnittkante den Flügelausschnitt auf. [/Eltern] ...'](https://abenteuer-markt.de/wp-content/uploads/cooked/images/recipes/13296/directions/19527220-7CE85545-8E2B-418A-A1B7-461123E6290E-scaled.jpeg)
Then you put both plates on top of each other and cut both plates at the same time.
Tip: If the cutting is too heavy, then cut a plate and use it as a template for the second plate.
![Bild zum Schritt 8 für das Bastel- und DIY-Abenteuer für Kinder: '[Eltern]Anschließend legt ihr beide Teller übereinander und schneidet beide Teller...'](https://abenteuer-markt.de/wp-content/uploads/cooked/images/recipes/13296/directions/33393285-8FA22A3D-6B00-41CB-8410-2D1D45A1114C-scaled.jpeg)
Thus, you may cut the halves individually.
![Bild zum Schritt 9 für das Bastel- und DIY-Abenteuer für Kinder: '[Eltern]Somit schneidet ihr eventuell die Hälften einzeln zu. [/Eltern] ...'](https://abenteuer-markt.de/wp-content/uploads/cooked/images/recipes/13296/directions/13623660-8CF2883F-35E7-4991-B318-BEB3BC56CE5F-scaled.jpeg)
Now lay the wings together with the curves inwards.
Now you can paint the wings with pens, water colors or finger colors. You can also glue them with paper snippets or try the following idea:
![Bild zum Schritt 10 für das Bastel- und DIY-Abenteuer für Kinder: '[Eltern]Legt nun die Flügel mit den Rundungen nach innen aneinander....'](https://abenteuer-markt.de/wp-content/uploads/cooked/images/recipes/13296/directions/31253852-9D046EBA-BCBC-4436-9D4A-A52A5B24CB5C-scaled.jpeg)
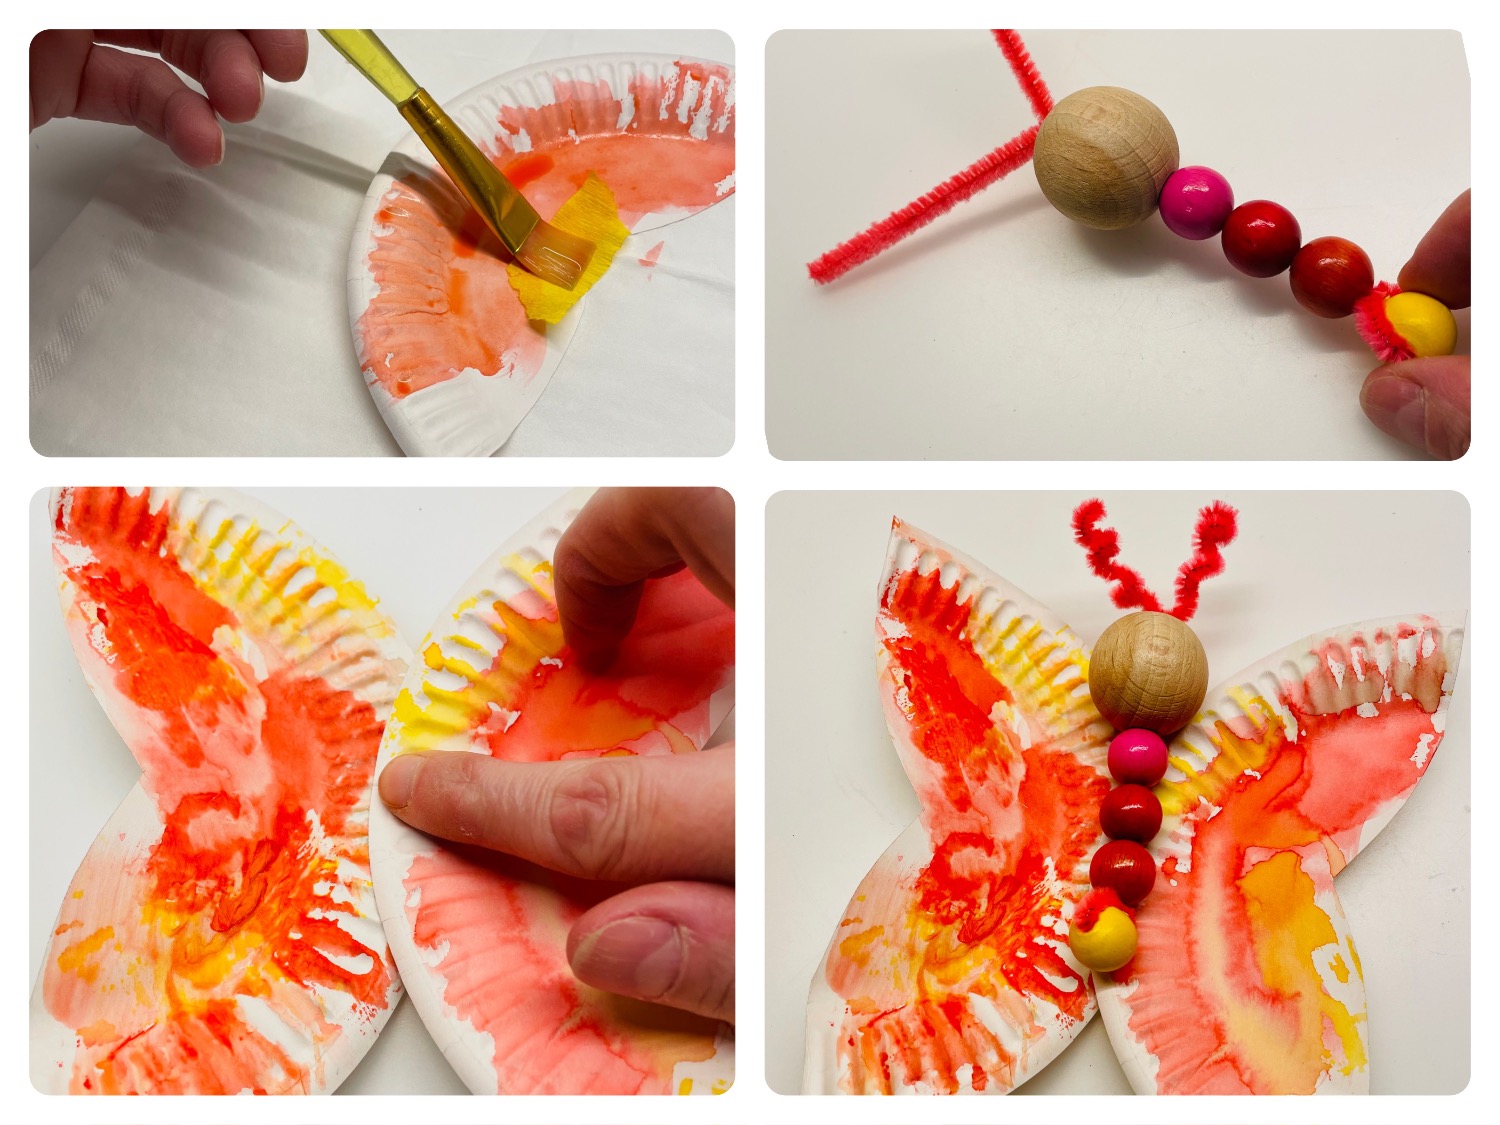
Pull a few snippets out of colorful crepe paper.
![Bild zum Schritt 12 für das Bastel- und DIY-Abenteuer für Kinder: '[Eltern]Reißt dazu ein paar Schnipsel aus bunten Krepppapier. [/Eltern] ...'](https://abenteuer-markt.de/wp-content/uploads/cooked/images/recipes/13296/directions/50862320-486A0A82-3336-4459-9691-ADFB70C33ABD-scaled.jpeg)
Now put the crepe paper snippets on the half of the plate.
![Bild zum Schritt 13 für das Bastel- und DIY-Abenteuer für Kinder: '[Eltern]Nun legt ihr die Krepppapier-Schnipsel auf die Tellerhälften. [/Eltern] ...'](https://abenteuer-markt.de/wp-content/uploads/cooked/images/recipes/13296/directions/60128656-A7C1C773-CC75-40C3-83FD-1C75DA240E92-scaled.jpeg)
Then you pint the snippets with water.
![Bild zum Schritt 14 für das Bastel- und DIY-Abenteuer für Kinder: '[Eltern]Dann bepinselt ihr die Schnipsel mit Wasser. [/Eltern] [Kind]RAUS[/Kind]'](https://abenteuer-markt.de/wp-content/uploads/cooked/images/recipes/13296/directions/91952117-0987E6B8-E998-4806-A6C0-F8DBBD2C57BA-scaled.jpeg)
Wait for a moment until the moisture is absorbed. Then carefully remove the snippet. The colour of the crepe paper then remains on the plate.
Attention: This only works if the cardboard plate is not coated.
![Bild zum Schritt 15 für das Bastel- und DIY-Abenteuer für Kinder: '[Eltern]Wartet kurz ab, bis die Feuchtigkeit etwas eingezogen ist. Dann...'](https://abenteuer-markt.de/wp-content/uploads/cooked/images/recipes/13296/directions/77111043-62AF10B9-E211-47FE-99F7-7EB84884FBBA-scaled.jpeg)
Repeats the process with different colored snippets.
![Bild zum Schritt 16 für das Bastel- und DIY-Abenteuer für Kinder: '[Eltern]Wiederholt den Vorgang mit verschieden farbigen Schnipsel.[/Eltern] [Kind]RAUS[/Kind]'](https://abenteuer-markt.de/wp-content/uploads/cooked/images/recipes/13296/directions/74650062-6EBD73BD-4403-441D-AA65-0CF5AA5F933E-scaled.jpeg)
Pull off each snippet individually.
![Bild zum Schritt 17 für das Bastel- und DIY-Abenteuer für Kinder: '[Eltern]Zieht dabei jeden Schnipsel einzeln ab.[/Eltern] [Kind]RAUS[/Kind]'](https://abenteuer-markt.de/wp-content/uploads/cooked/images/recipes/13296/directions/42082240-9665F782-ABF9-47A8-8931-FDB26868B7D4-scaled.jpeg)
Then put the cardboard plates to dry.
![Bild zum Schritt 18 für das Bastel- und DIY-Abenteuer für Kinder: '[Eltern]Anschließend legt ihr die Pappteller zum Trocknen.[/Eltern] [Kind]Falls die...'](https://abenteuer-markt.de/wp-content/uploads/cooked/images/recipes/13296/directions/16451667-7A2F6AB7-3055-4793-A03F-25457CE6181D-scaled.jpeg)
Then stick together the dried cardboard plates. To do this, put a piece on top of each other in the middle.
Uses a glue pen or the hot glue gun.
![Bild zum Schritt 19 für das Bastel- und DIY-Abenteuer für Kinder: '[Eltern]Danach klebt ihr die getrockneten Pappteller-Hälften zusammen. Dafür legt ihr...'](https://abenteuer-markt.de/wp-content/uploads/cooked/images/recipes/13296/directions/85652473-FC20F298-00AC-446F-8DC3-0B2DDCA96274-scaled.jpeg)
Press the two wings firmly on each other.
![Bild zum Schritt 20 für das Bastel- und DIY-Abenteuer für Kinder: '[Eltern]Drückt die beiden Flügel fest aufeinander. [/Eltern] [Kind]Klebe die...'](https://abenteuer-markt.de/wp-content/uploads/cooked/images/recipes/13296/directions/65629267-0B7949FF-A5AE-4721-8D3D-9CDB8FC2B0CB-scaled.jpeg)
Now the body of the butterfly is missing.
![Bild zum Schritt 21 für das Bastel- und DIY-Abenteuer für Kinder: '[Eltern]Nun fehlt noch der Körper des Schmetterlings.[/Eltern] [Kind]RAUS[/Kind]'](https://abenteuer-markt.de/wp-content/uploads/cooked/images/recipes/13296/directions/47569215-55D797D7-7082-4971-B96F-3595EBBD4B8C-scaled.jpeg)
For the body you prepare a pipe cleaner and pearls.
![Bild zum Schritt 23 für das Bastel- und DIY-Abenteuer für Kinder: '[Eltern]Für den Körper legt ihr euch einen Pfeifenputzer und Perlen...'](https://abenteuer-markt.de/wp-content/uploads/cooked/images/recipes/13296/directions/74996099-FB54A2C5-0442-49CB-B22B-28824D18502E-scaled.jpeg)
First put a pearl on the pipe cleaner and push it into the middle.
Then you bend the pipe cleaner in half. The pearl is in the kink.
![Bild zum Schritt 24 für das Bastel- und DIY-Abenteuer für Kinder: '[Eltern]Steckt zuerst eine Perle auf den Pfeifenputzer und schiebt sie...'](https://abenteuer-markt.de/wp-content/uploads/cooked/images/recipes/13296/directions/29480458-B55C0420-6142-425A-A1A1-484AB2C21CE7-scaled.jpeg)
The next beads are threaded through both pipe cleaner wires.
![Bild zum Schritt 25 für das Bastel- und DIY-Abenteuer für Kinder: '[Eltern]Die nächsten Perlen fädelt ihr durch beide Pfeifenputzer-Drähte.[/Eltern] [Kind]Die...'](https://abenteuer-markt.de/wp-content/uploads/cooked/images/recipes/13296/directions/26026389-53F66094-476D-441C-9342-34D3882D49D3-scaled.jpeg)
Push the beads to the first pearl.
![Bild zum Schritt 26 für das Bastel- und DIY-Abenteuer für Kinder: '[Eltern]Schiebt die Perlen zur ersten Perle. [/Eltern] [Kind]Schiebe die...'](https://abenteuer-markt.de/wp-content/uploads/cooked/images/recipes/13296/directions/29684327-E86E88DF-E22D-4441-82C0-F5F747006AEF-scaled.jpeg)
[Parents][/Parents][Child][/Child]
![Bild zum Schritt 27 für das Bastel- und DIY-Abenteuer für Kinder: '[Eltern][/Eltern][Kind][/Kind]'](https://abenteuer-markt.de/wp-content/uploads/cooked/images/recipes/13296/directions/97532785-A48C952B-FEC9-4703-97C2-56BFFE550E4D-scaled.jpeg)
[Parents][/Parents][Child][/Child]
![Bild zum Schritt 28 für das Bastel- und DIY-Abenteuer für Kinder: '[Eltern][/Eltern][Kind][/Kind]'](https://abenteuer-markt.de/wp-content/uploads/cooked/images/recipes/13296/directions/32153020-D60CA6FA-DC76-44CC-B7F3-C39A99896F46-scaled.jpeg)
The last pearl is a large pearl. It becomes the head of the butterfly.
![Bild zum Schritt 29 für das Bastel- und DIY-Abenteuer für Kinder: '[Eltern]Die letzte Perle ist eine große Perle. Sie wird der...'](https://abenteuer-markt.de/wp-content/uploads/cooked/images/recipes/13296/directions/46061509-64D2989E-D204-4ACC-804F-D74A3DA6CCAB-scaled.jpeg)
Now you bend overstanding pipe cleaner wires a bit apart as a feeler.
You can leave the feelers like this or you turn them in. See for yourself what you like better.
![Bild zum Schritt 30 für das Bastel- und DIY-Abenteuer für Kinder: '[Eltern]Jetzt biegt ihr überstehenden Pfeifenputzer-Drähte als Fühler etwas auseinander. ...'](https://abenteuer-markt.de/wp-content/uploads/cooked/images/recipes/13296/directions/41035281-A3D41D42-F8FF-44BC-AC68-A63EDB238C22-scaled.jpeg)
You use a wooden stick or pen to turn it on. Then you wrap the pipe cleaner around the wooden stick.
![Bild zum Schritt 31 für das Bastel- und DIY-Abenteuer für Kinder: '[Eltern]Zum Eindrehen verwendet ihr einen Holzstab oder Stift. Dann wickelt...'](https://abenteuer-markt.de/wp-content/uploads/cooked/images/recipes/13296/directions/58846811-EE21BFB1-39E7-4477-B455-3BD17C3F7FAD-scaled.jpeg)
Then you pull out the staff.
![Bild zum Schritt 32 für das Bastel- und DIY-Abenteuer für Kinder: '[Eltern]Anschließend zieht ihr den Stab heraus. [/Eltern] [Kind]Zum Eindrehen...'](https://abenteuer-markt.de/wp-content/uploads/cooked/images/recipes/13296/directions/71221411-C3FCB4D2-149E-4831-BA73-0E1AB451E746-scaled.jpeg)
Travel as well with the second probe.
![Bild zum Schritt 33 für das Bastel- und DIY-Abenteuer für Kinder: '[Eltern]Verfahrt ebenso mit dem zweiten Fühler.[/Eltern] [Kind]RAUS[/Kind]'](https://abenteuer-markt.de/wp-content/uploads/cooked/images/recipes/13296/directions/32091952-7054EF7E-DF81-4537-B33F-067179A94E81-scaled.jpeg)
The butterfly body is ready.
Maybe you'll paint another face on the butterfly.
![Bild zum Schritt 34 für das Bastel- und DIY-Abenteuer für Kinder: '[Eltern]Fertig ist der Schmetterlingskörper. Vielleicht malt ihr noch...'](https://abenteuer-markt.de/wp-content/uploads/cooked/images/recipes/13296/directions/35051158-195CBCF9-B948-4C3C-A635-4949AE1BE20C-scaled.jpeg)
Now her body is glued to the wings in the middle.
![Bild zum Schritt 35 für das Bastel- und DIY-Abenteuer für Kinder: '[Eltern]Jetzt klebt ihr den Körper mittig auf die Flügel. [/Eltern]...'](https://abenteuer-markt.de/wp-content/uploads/cooked/images/recipes/13296/directions/34651194-DB0A2185-9E68-4E39-ABE9-6F2A2D2925F9-scaled.jpeg)
The best way to do this is to use hot glue. Attention: Let an adult help you with this - burn risk!
![Bild zum Schritt 36 für das Bastel- und DIY-Abenteuer für Kinder: '[Eltern]Verwendet dafür am besten Heißkleber. Achtung: Lasst euch dabei von...'](https://abenteuer-markt.de/wp-content/uploads/cooked/images/recipes/13296/directions/12778370-B57357A9-2924-4DF0-9D8D-161BF7559DF7-scaled.jpeg)
The butterfly is ready.
![Bild zum Schritt 37 für das Bastel- und DIY-Abenteuer für Kinder: '[Eltern]Fertig ist der Schmetterling. [/Eltern] [Kind]Super der...'](https://abenteuer-markt.de/wp-content/uploads/cooked/images/recipes/13296/directions/56031782-4482C147-69BE-48EB-8444-88251B72C07D-scaled.jpeg)
This butterfly is a beautiful decoration or you make it to give away.
![Bild zum Schritt 38 für das Bastel- und DIY-Abenteuer für Kinder: '[Eltern]Dieser Schmetterling ist eine wunderschöne Dekoration oder ihr bastelt ihn...'](https://abenteuer-markt.de/wp-content/uploads/cooked/images/recipes/13296/directions/54256271-60186978-3721-4504-A36B-B25E1B46A3F1-scaled.jpeg)
Have fun trying out.
Materials
Directions
Put everything in place, put out a craft pad and put on a paint coat.
First you need the little white paper plate.
Fold the cardboard plate in half.
Knock the rupture and strip it.
Then you fold the plate apart again. Now place the break so that it points at you (see picture).
Now you cut the plate along the break.
[Parents][/Parents][Child][/Child]
Now paint the wing section on a cutting edge.
Then you put both plates on top of each other and cut both plates at the same time.
Tip: If the cutting is too heavy, then cut a plate and use it as a template for the second plate.
Thus, you may cut the halves individually.
Now lay the wings together with the curves inwards.
Now you can paint the wings with pens, water colors or finger colors. You can also glue them with paper snippets or try the following idea:
Pull a few snippets out of colorful crepe paper.
Now put the crepe paper snippets on the half of the plate.
Then you pint the snippets with water.
Wait for a moment until the moisture is absorbed. Then carefully remove the snippet. The colour of the crepe paper then remains on the plate.
Attention: This only works if the cardboard plate is not coated.
Repeats the process with different colored snippets.
Pull off each snippet individually.
Then put the cardboard plates to dry.
Then stick together the dried cardboard plates. To do this, put a piece on top of each other in the middle.
Uses a glue pen or the hot glue gun.
Press the two wings firmly on each other.
Now the body of the butterfly is missing.
For the body you prepare a pipe cleaner and pearls.
First put a pearl on the pipe cleaner and push it into the middle.
Then you bend the pipe cleaner in half. The pearl is in the kink.
The next beads are threaded through both pipe cleaner wires.
Push the beads to the first pearl.
[Parents][/Parents][Child][/Child]
[Parents][/Parents][Child][/Child]
The last pearl is a large pearl. It becomes the head of the butterfly.
Now you bend overstanding pipe cleaner wires a bit apart as a feeler.
You can leave the feelers like this or you turn them in. See for yourself what you like better.
You use a wooden stick or pen to turn it on. Then you wrap the pipe cleaner around the wooden stick.
Then you pull out the staff.
Travel as well with the second probe.
The butterfly body is ready.
Maybe you'll paint another face on the butterfly.
Now her body is glued to the wings in the middle.
The best way to do this is to use hot glue. Attention: Let an adult help you with this - burn risk!
The butterfly is ready.
This butterfly is a beautiful decoration or you make it to give away.
Have fun trying out.
Follow us on Facebook , Instagram and Pinterest
Don't miss any more adventures: Our bottle mail


What a nice idea! For our little one who loves to stick and pans just the right adventure. Thank you!?