Bird food - Build a place

AdventurerKatzi
Rating5.03.6 Thousand times & (2) DifficultyAdvanced

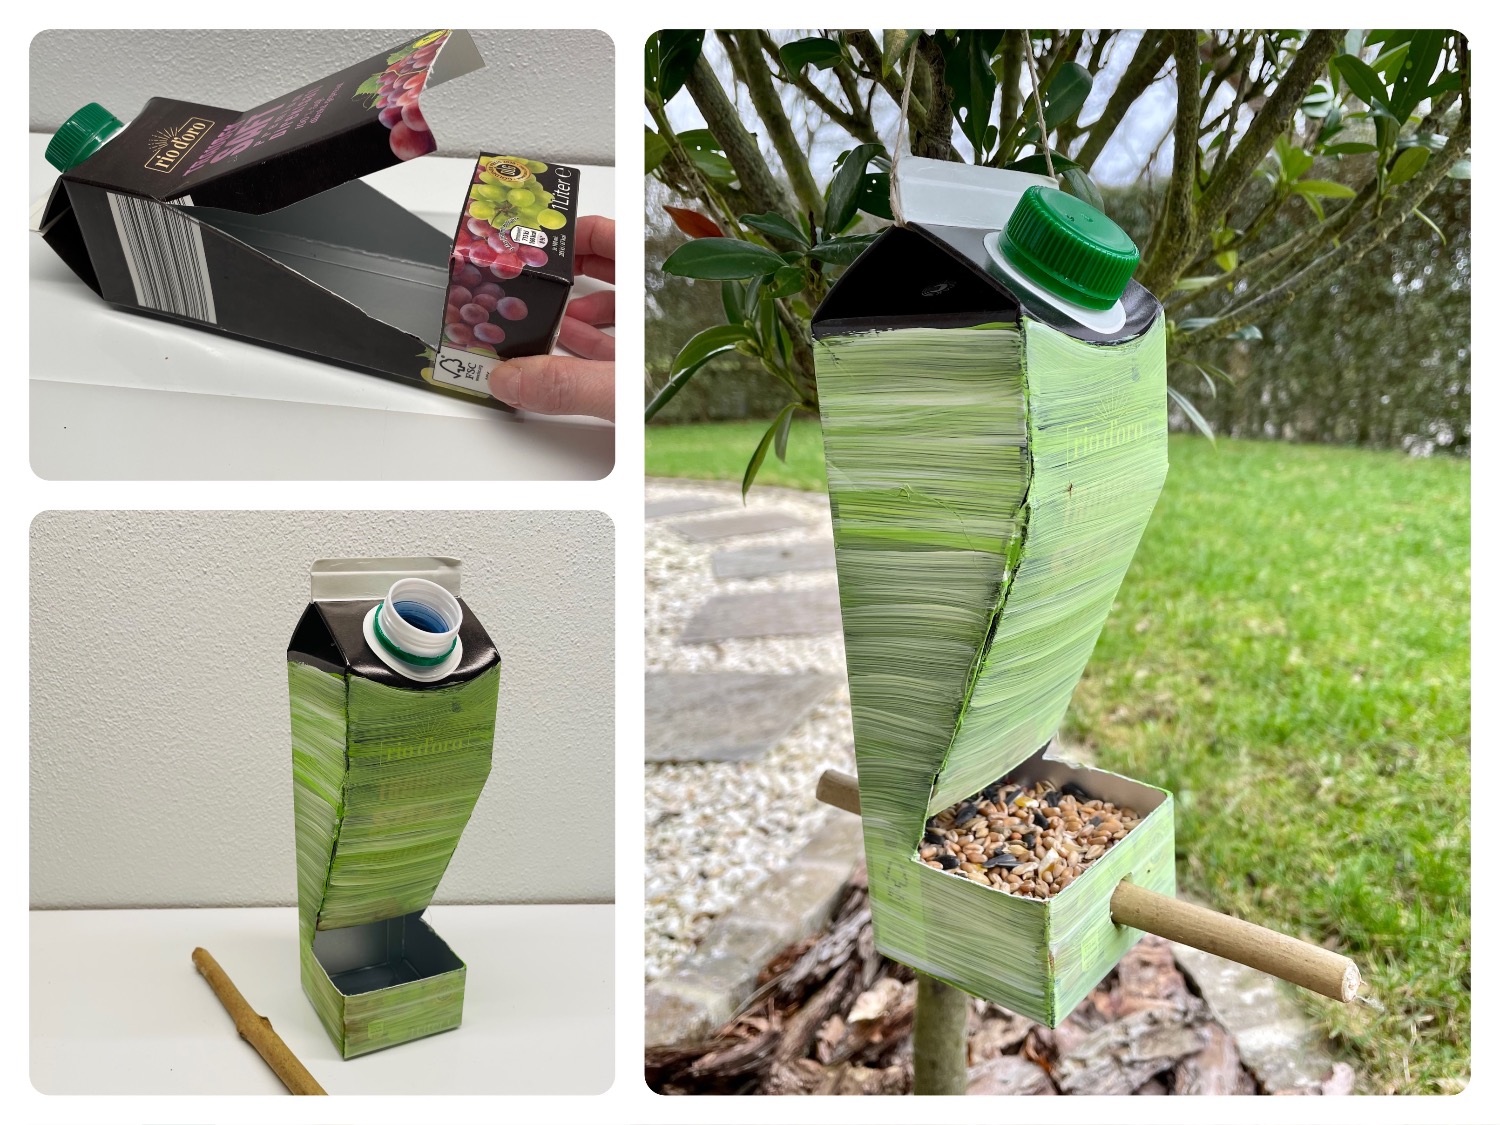
Do you also feed birds in winter? Then this craft idea would certainly be worth an action. From an empty Tetrapack it is cut and glued. With a wooden stick as landing area for the birds it is already complete. Creatively you can romp out with waterproof colors and after drying only the food has to be filled. If you have found a place in the garden, the suspension is also fast attached. Alternatively you can attach the bird house to a plug. In addition there is also an offer.
Look at the individual steps, they are explained in detail and illustrated. Have fun trying out.

Media Education for Kindergarten and Hort

Kind bastelt eine Rassel mit dem Navi
The Adventure Navi, the app for DIY projects, enables media education for the youngest.

Relief in everyday life, targeted promotion of individual children, independent learning and - without any pre-knowledge already usable by the youngest!


Titelbild zur Bastel- und DIY-Idee für Kinder '(980) Vogelfutter – Stelle bauen'
Material for1 Child
Prep Time10 min.Adv. Time45 min.Total Time55 min.
 1 Tetrapack beverage cartonnarrow
 1 wooden stick 17cm longStuck/thick branch
 Colour waterproof E.g. acrylic paint
 1 Ruler
 1 Ballpoint pens or felt pens
 1 Cutter knife
 1 Brushes
 1 Colour shellsBase plate/screw glass lid
 1 Water glass
 1 Paint coatsor old shirt
 1 Colouring documente.g. old newspaper
 1 Builder's pad
 1 Hot glue gun
 1 Wrap cord thin20cm long
 1 Chestnut drills or screwdriver thin
 1 Needle long, thick, dull
 1 Cup of bird food grains
 1 Kitchen crepe
All links marked with a shopping cart lead to Amazon - here we have selected products that we would order ourselves and in part also ordered. In a qualified purchase via the advertising link, we as Amazon partner receive a commission, for you there are no costs. You thus support our cost- and advertising banner-free, educational offer.
1

Get your craft paper ready.
This is the template for an empty and rinsed beverage box.
First place the box with the front (see picture) upwards on the table. Now draw the lines for the cut. Begin on the front with a line that is 4cm from the bottom edge. Measure the lines best with a ruler.
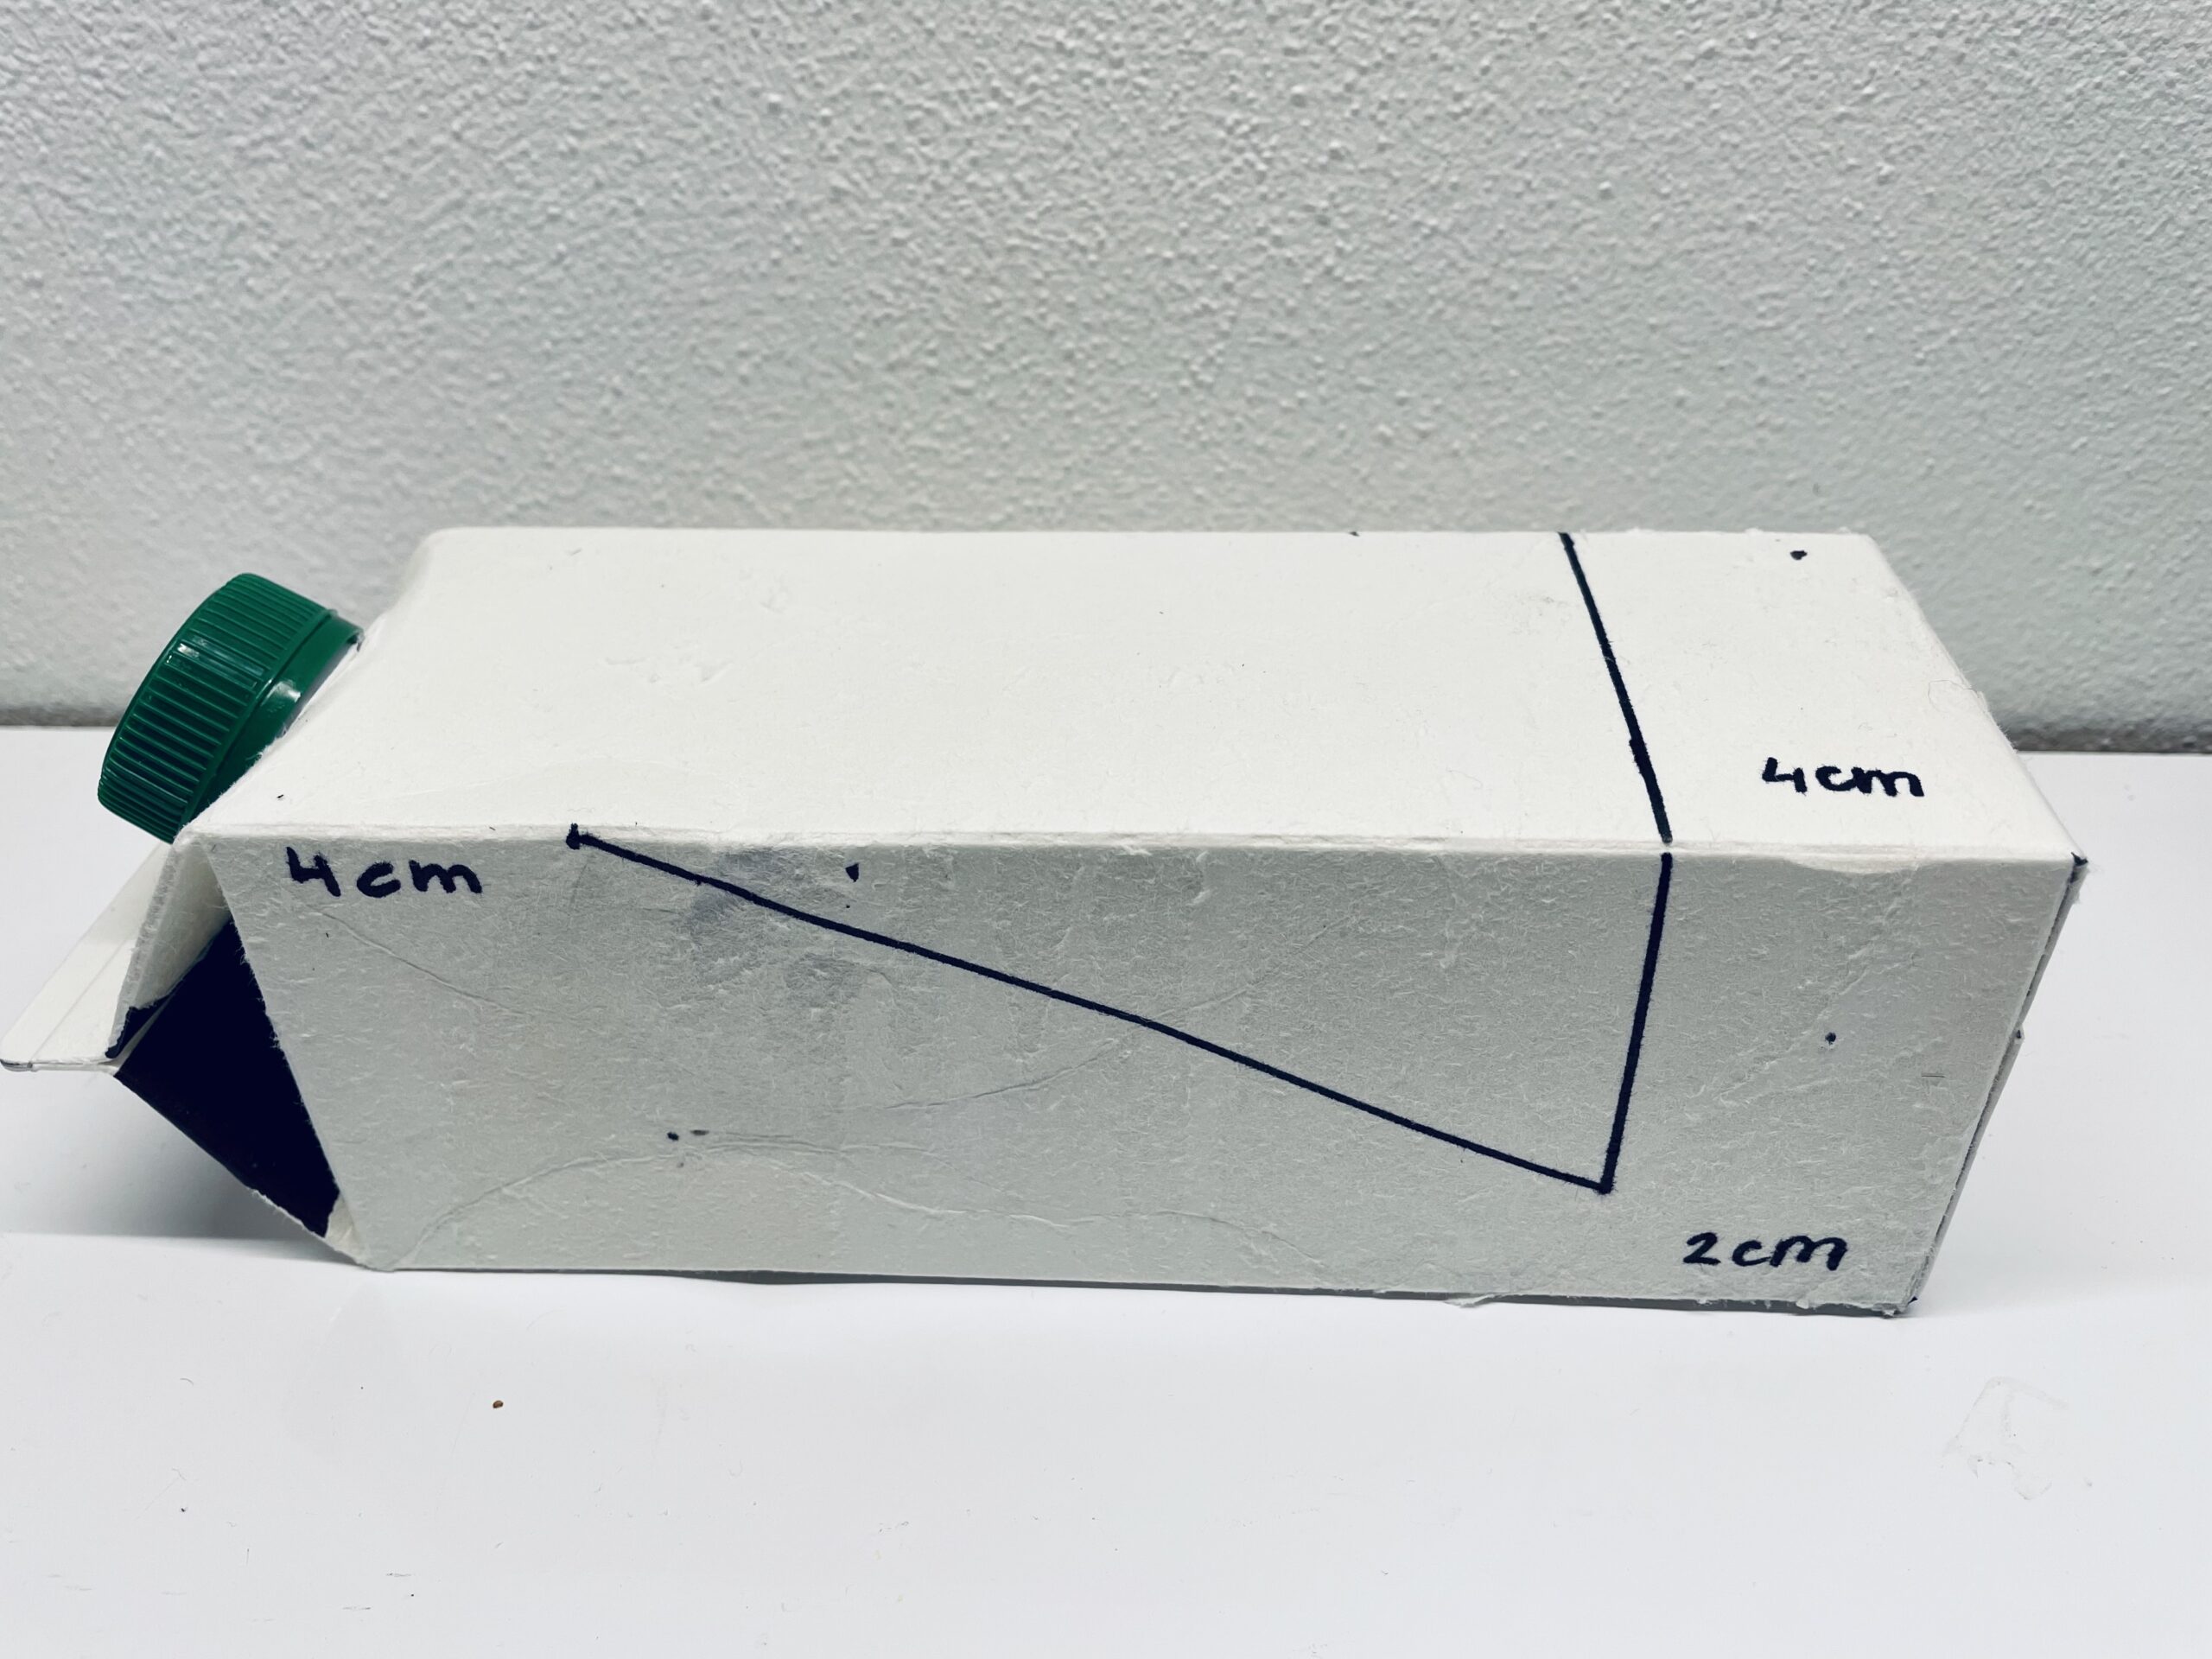
Bild zum Schritt 1 für das Bastel- und DIY-Abenteuer für Kinder: 'Lege dir deine Bastelunterlage bereit.   Das ist die...'

2

Then you paint two lines on the side, each one on the left and right side an extension of the front.
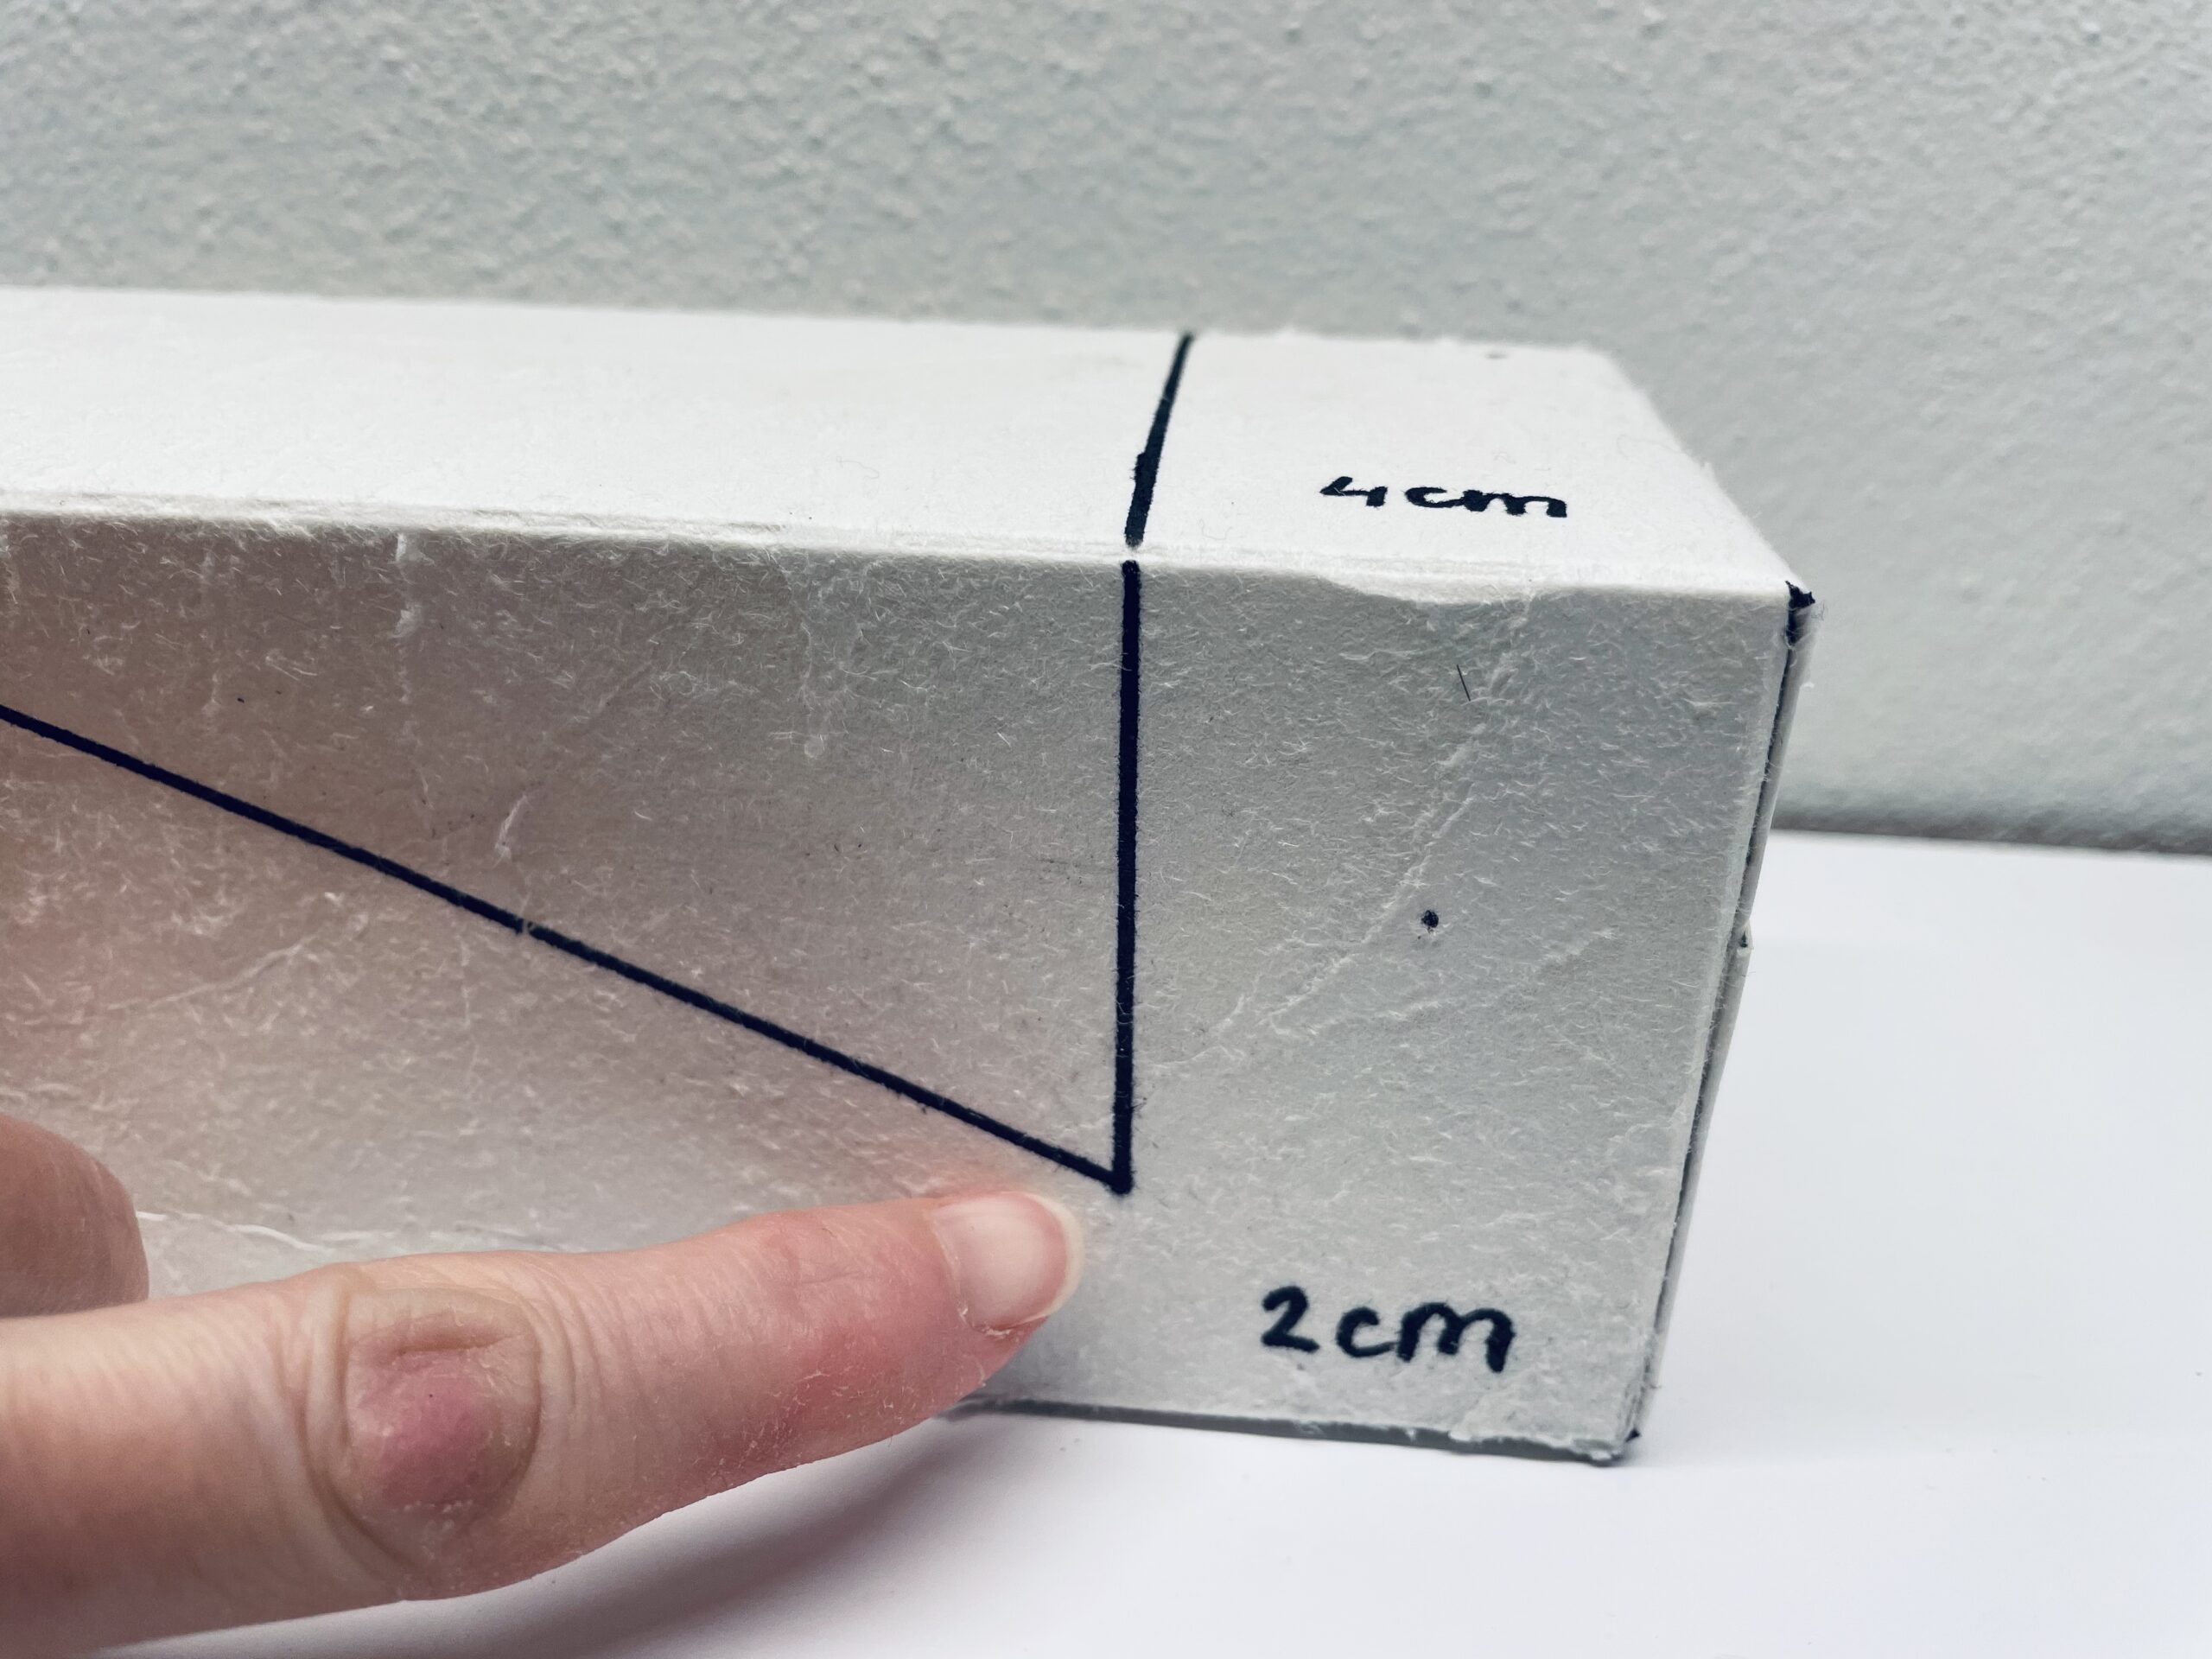
Bild zum Schritt 2 für das Bastel- und DIY-Abenteuer für Kinder: 'Anschließend malt ihr seitlich zwei Linien auf, die jeweils links...'

3

Measure 4cm from the top on each side and mark the position that you now connect narrowly to the top. Repeat the recording of the diagonally running line on the other side.

Bild zum Schritt 3 für das Bastel- und DIY-Abenteuer für Kinder: 'Messt an den Seiten je 4cm von oben ab und...'

4

Now you cut the lines with the cutter knife. Attention: Be supported by an adult - risk of injury!

Bild zum Schritt 4 für das Bastel- und DIY-Abenteuer für Kinder: 'Jetzt schneidet ihr die Linien mit dem Cuttermesser nach. Achtung:...'

5

2. Bild zum Schritt 4 für das Bastel- und DIY-Abenteuer für Kinder: 'Jetzt schneidet ihr die Linien mit dem Cuttermesser nach. Achtung:...'

6

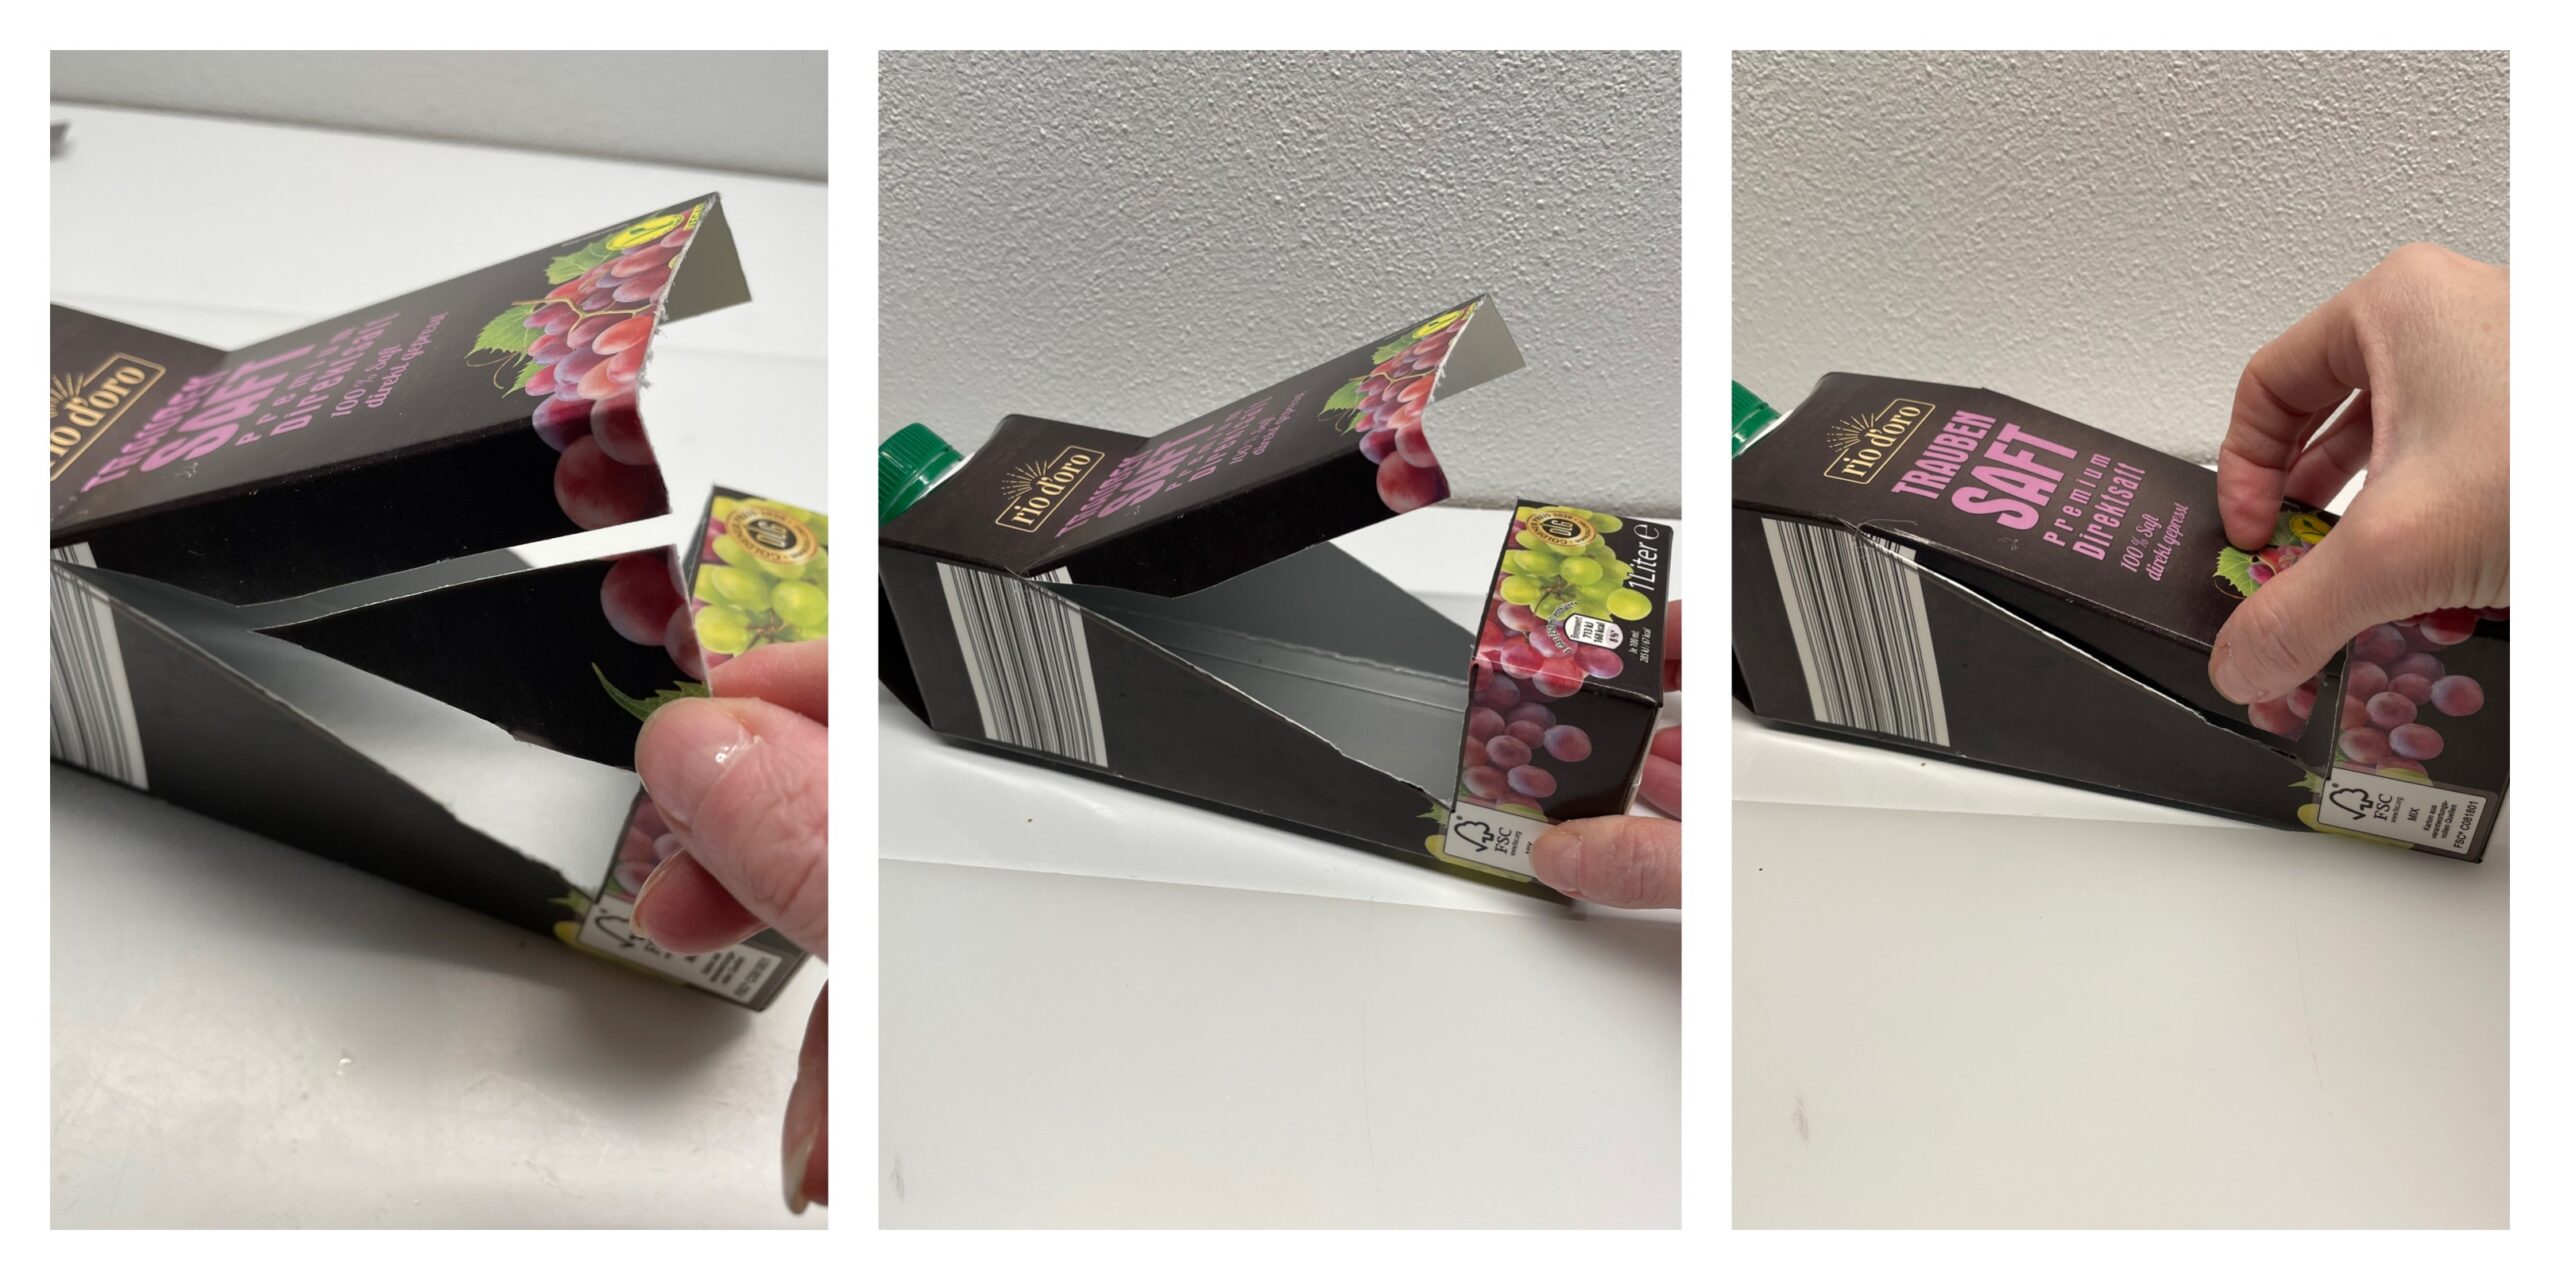
A variable opening is created, which now gently folds upwards.

Bild zum Schritt 6 für das Bastel- und DIY-Abenteuer für Kinder: 'Es entsteht eine variable Öffnung, die ihr jetzt vorsichtig nach...'

7

Fold the opening as far as it goes back, then knock the box over.
Possibly existing moisture in the tetrapack dries it with a kitchen crepe.

Bild zum Schritt 7 für das Bastel- und DIY-Abenteuer für Kinder: 'Klappt die Öffnung so weit es geht zurück. Dann knickt...'

8

Then cut off the tip on the triangular sides (stretched line).

Bild zum Schritt 8 für das Bastel- und DIY-Abenteuer für Kinder: 'Anschließend schneidet ihr die Spitze an den dreieckigen Seiten ab...'

9

Use a pair of scissors for this.

Bild zum Schritt 9 für das Bastel- und DIY-Abenteuer für Kinder: 'Verwendet dafür eine Schere.'

10

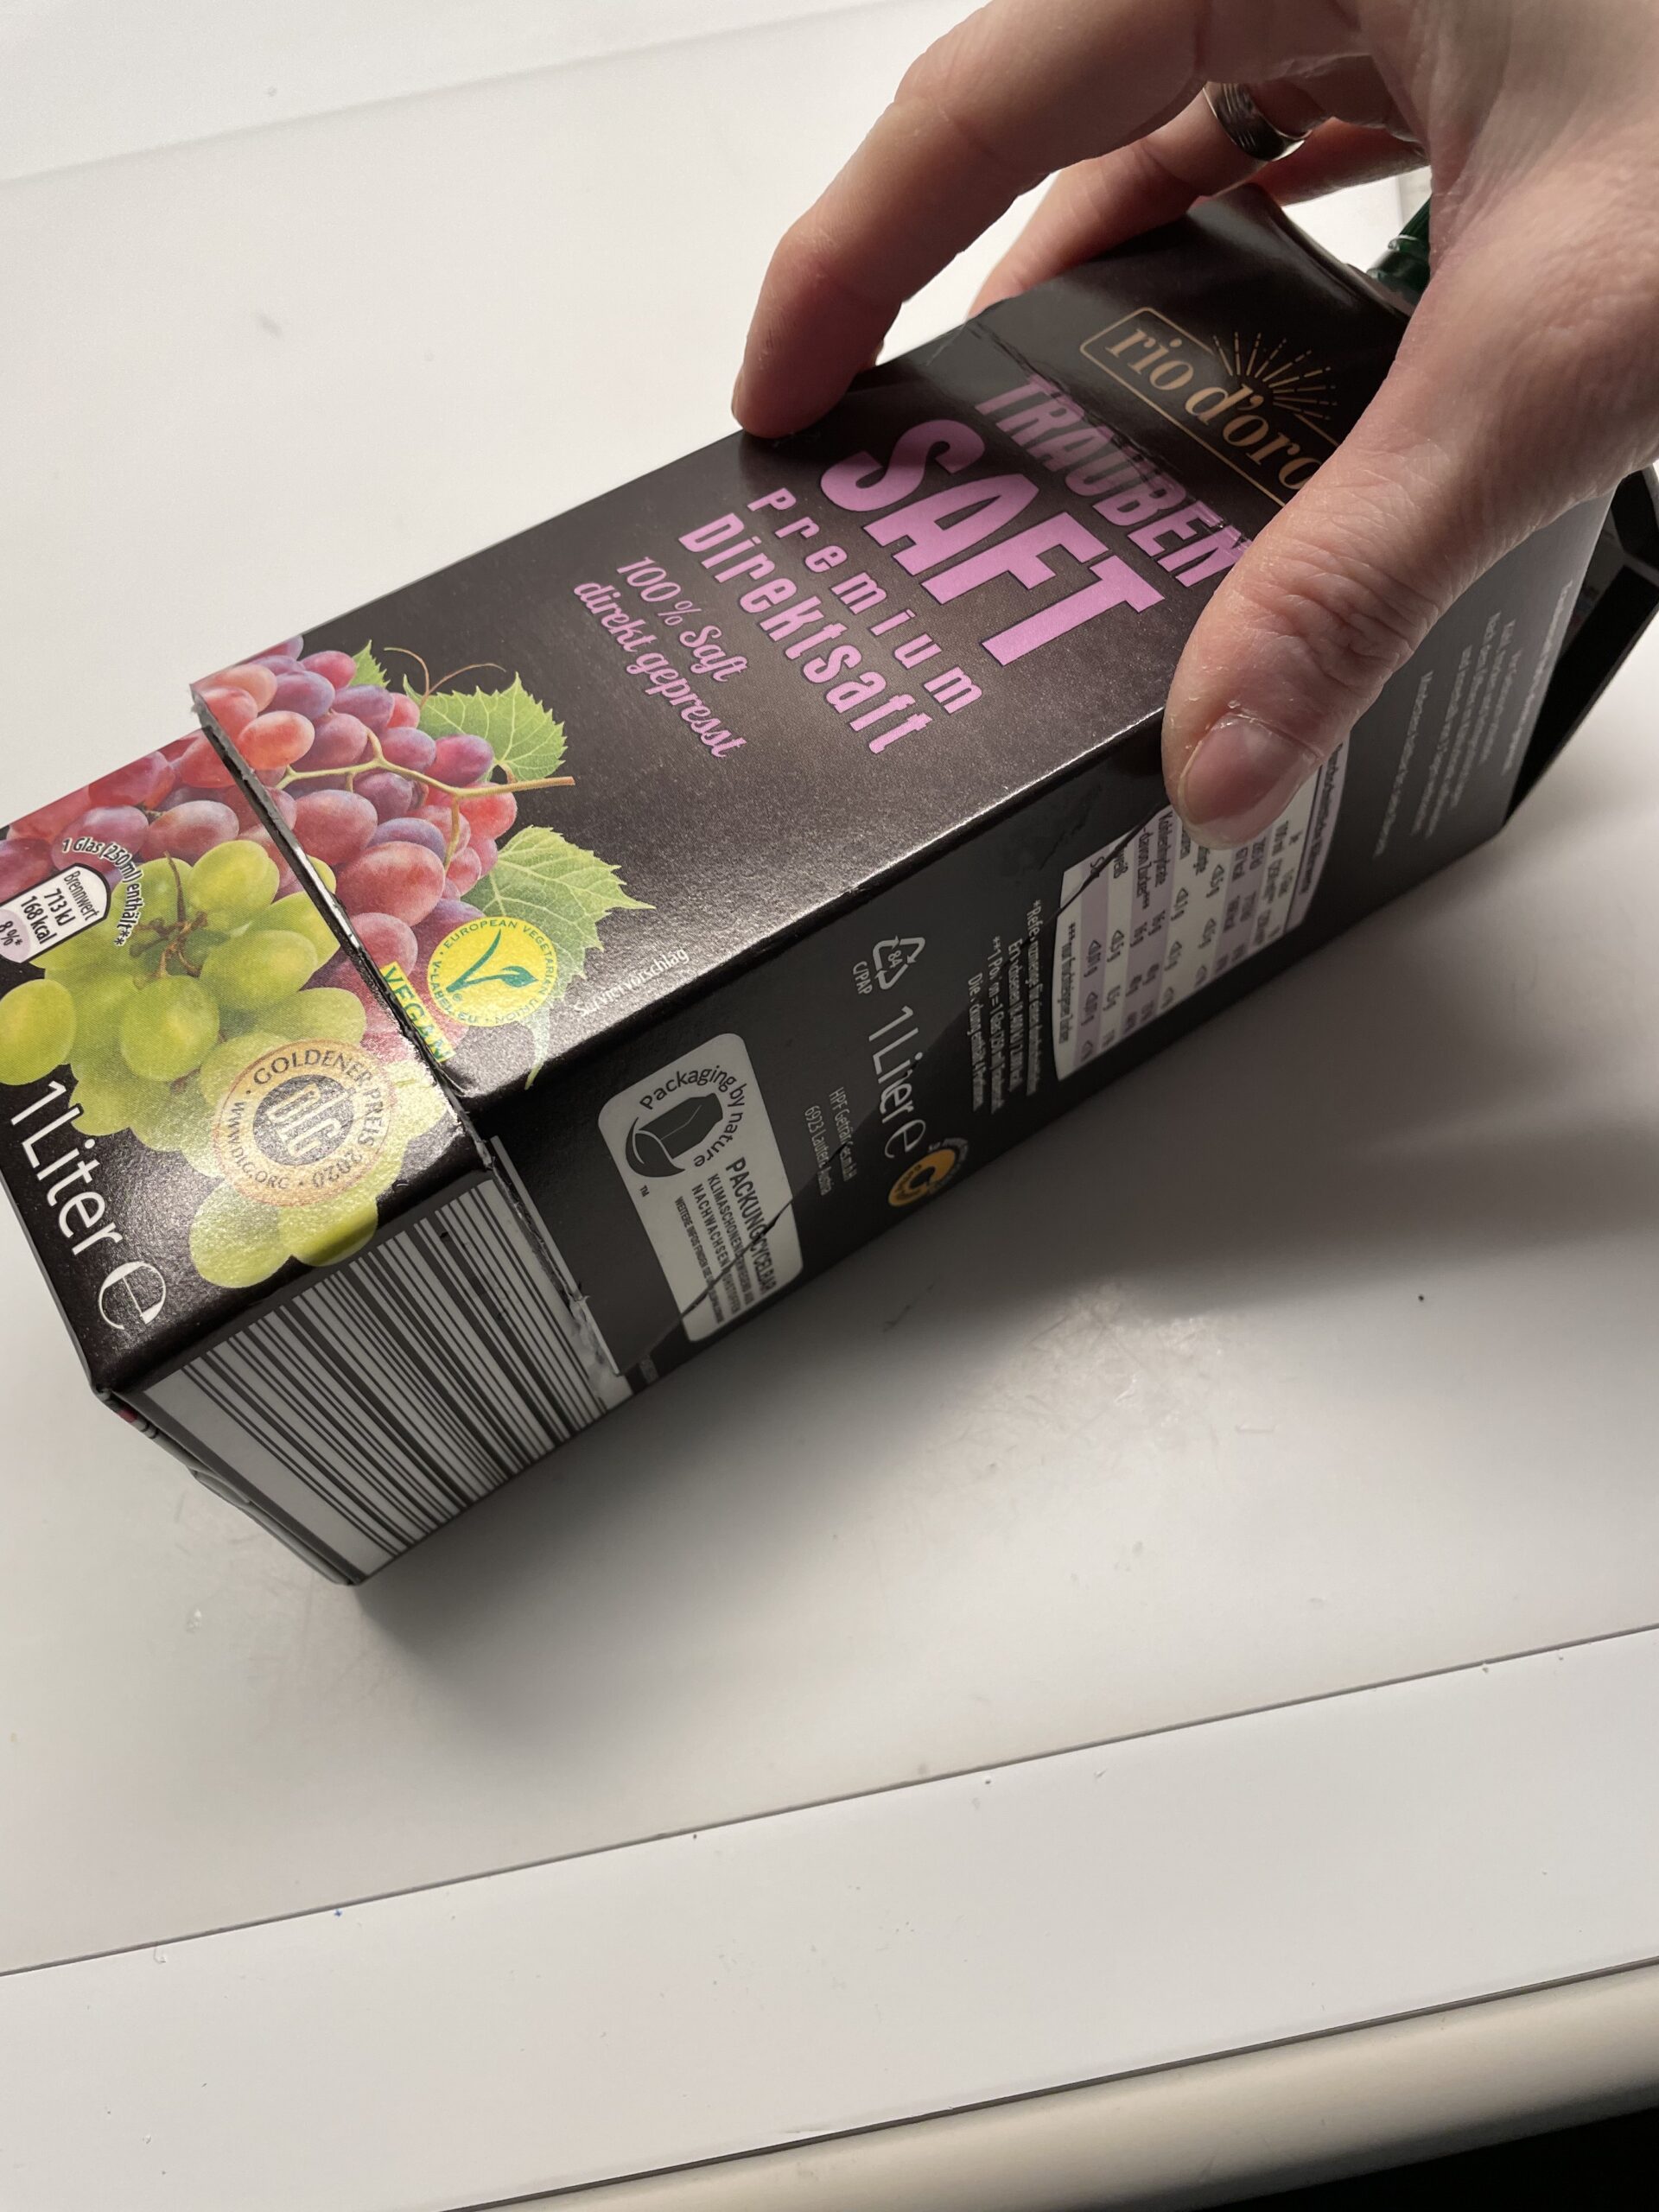
Now bend the side parts of the lid inside and press the front on it. The front now closes flush with the height of the oblique cut surface. Fix the sides with some glue or tesa film. Attention when handling the hot glue - risk of injury!

Bild zum Schritt 10 für das Bastel- und DIY-Abenteuer für Kinder: 'Jetzt biegt ihr die seitlichen Teile des Deckels innen und...'

11

The glued blank of the bird feed house is ready.

Bild zum Schritt 11 für das Bastel- und DIY-Abenteuer für Kinder: 'Der geklebte Rohling des Vogelfutter-Hauses ist fertig.'

12

Put on a Mahler coat.
Now you put an old newspaper under the blank and paint it with acrylic paint.

Tip: Drip a tink of paint on a screw glass lid. This makes working with paint easier.

Bild zum Schritt 12 für das Bastel- und DIY-Abenteuer für Kinder: 'Ziehe dir einen Mahlerkittel an.   Jetzt legt ihr...'

13

The paint may not cover enough on the first paint. Then let the paint dry and then paint another layer over it.

Bild zum Schritt 13 für das Bastel- und DIY-Abenteuer für Kinder: 'Die Farbe deckt beim ersten Anstrich eventuell nicht ausreichend. Dann...'

14

When the blank is dried, you push the scissors into the lower part of the carton and cut out a hole. For this, you cut out radially from the puncture point and press the incisions with a pen inwards.
At the same place on the back you repeat the process.

Bild zum Schritt 14 für das Bastel- und DIY-Abenteuer für Kinder: 'Ist der Rohling getrocknet, stecht ihr mit der Schere in...'

15

Then push the wooden stick through the box. The wooden stick looks out at the front and back and sits tight so that the birds can land on it.

Bild zum Schritt 15 für das Bastel- und DIY-Abenteuer für Kinder: 'Danach schiebt ihr den Holzstab durch den Karton. Der Holzstab...'

16

Take the punch and punch two holes in the top fold of the box.

Alternative: In order to hang the feed house, you now drill a hole with the chestnut drill into the roof of the feed house.
Tip: If the chestnut drill is turned when pierced, it will work easier.

Bild zum Schritt 16 für das Bastel- und DIY-Abenteuer für Kinder: 'Nimm den Locher und stanze zwei Löcher in den oberen...'

17

Thread the package line through the two punched holes and knot them.

Alternative: Now cut off a package line with a length of 20cm and thread it into the ear of a large, thick needle. Then thread the cord through the drilled holes and knot the ends.

Bild zum Schritt 17 für das Bastel- und DIY-Abenteuer für Kinder: 'Fädle die Paketschnur durch die beiden gestanzten Löcher und verknote...'

18

The suspension for your bird feed house is ready.

Bild zum Schritt 18 für das Bastel- und DIY-Abenteuer für Kinder: 'Fertig ist die Aufhängung für euer Vogelfutter-Haus.'

19

Now fill the bottom of the forage with loose bird food.

Bild zum Schritt 19 für das Bastel- und DIY-Abenteuer für Kinder: 'Befüllt jetzt das Unterteil des Futterhauses mit losem Vogelfutter.'

20

The birdhouse is ready.

Tip: Fill the bird food also with the screw cap. For this you use a funnel (alternatively fold one out of paper) because this way the food slips from above as required. The upper part of the carton is, so to speak, the storage container, which is protected from rain by the screw cap.

Bild zum Schritt 20 für das Bastel- und DIY-Abenteuer für Kinder: 'Fertig ist das Vogelhaus.     Tipp: Füllt...'

21

Finally, she hangs the forage house to a sheltered place in the garden.

Bild zum Schritt 21 für das Bastel- und DIY-Abenteuer für Kinder: 'Abschließend hängt ihr das Futterhaus an einen geschützten Ort in...'

22

Have fun doing crafts and watching birds!

Materials

 1 Tetrapack beverage cartonnarrow
 1 wooden stick 17cm longStuck/thick branch
 Colour waterproof E.g. acrylic paint
 1 Ruler
 1 Ballpoint pens or felt pens
 1 Cutter knife
 1 Brushes
 1 Colour shellsBase plate/screw glass lid
 1 Water glass
 1 Paint coatsor old shirt
 1 Colouring documente.g. old newspaper
 1 Builder's pad
 1 Hot glue gun
 1 Wrap cord thin20cm long
 1 Chestnut drills or screwdriver thin
 1 Needle long, thick, dull
 1 Cup of bird food grains
 1 Kitchen crepe
All links marked with a shopping cart lead to Amazon - here we have selected products that we would order ourselves and in part also ordered. In a qualified purchase via the advertising link, we as Amazon partner receive a commission, for you there are no costs. You thus support our cost- and advertising banner-free, educational offer.

Directions

1

Get your craft paper ready.
This is the template for an empty and rinsed beverage box.
First place the box with the front (see picture) upwards on the table. Now draw the lines for the cut. Begin on the front with a line that is 4cm from the bottom edge. Measure the lines best with a ruler.

Bild zum Schritt 1 für das Bastel- und DIY-Abenteuer für Kinder: 'Lege dir deine Bastelunterlage bereit.   Das ist die...'

2

Then you paint two lines on the side, each one on the left and right side an extension of the front.

Bild zum Schritt 2 für das Bastel- und DIY-Abenteuer für Kinder: 'Anschließend malt ihr seitlich zwei Linien auf, die jeweils links...'

3

Measure 4cm from the top on each side and mark the position that you now connect narrowly to the top. Repeat the recording of the diagonally running line on the other side.
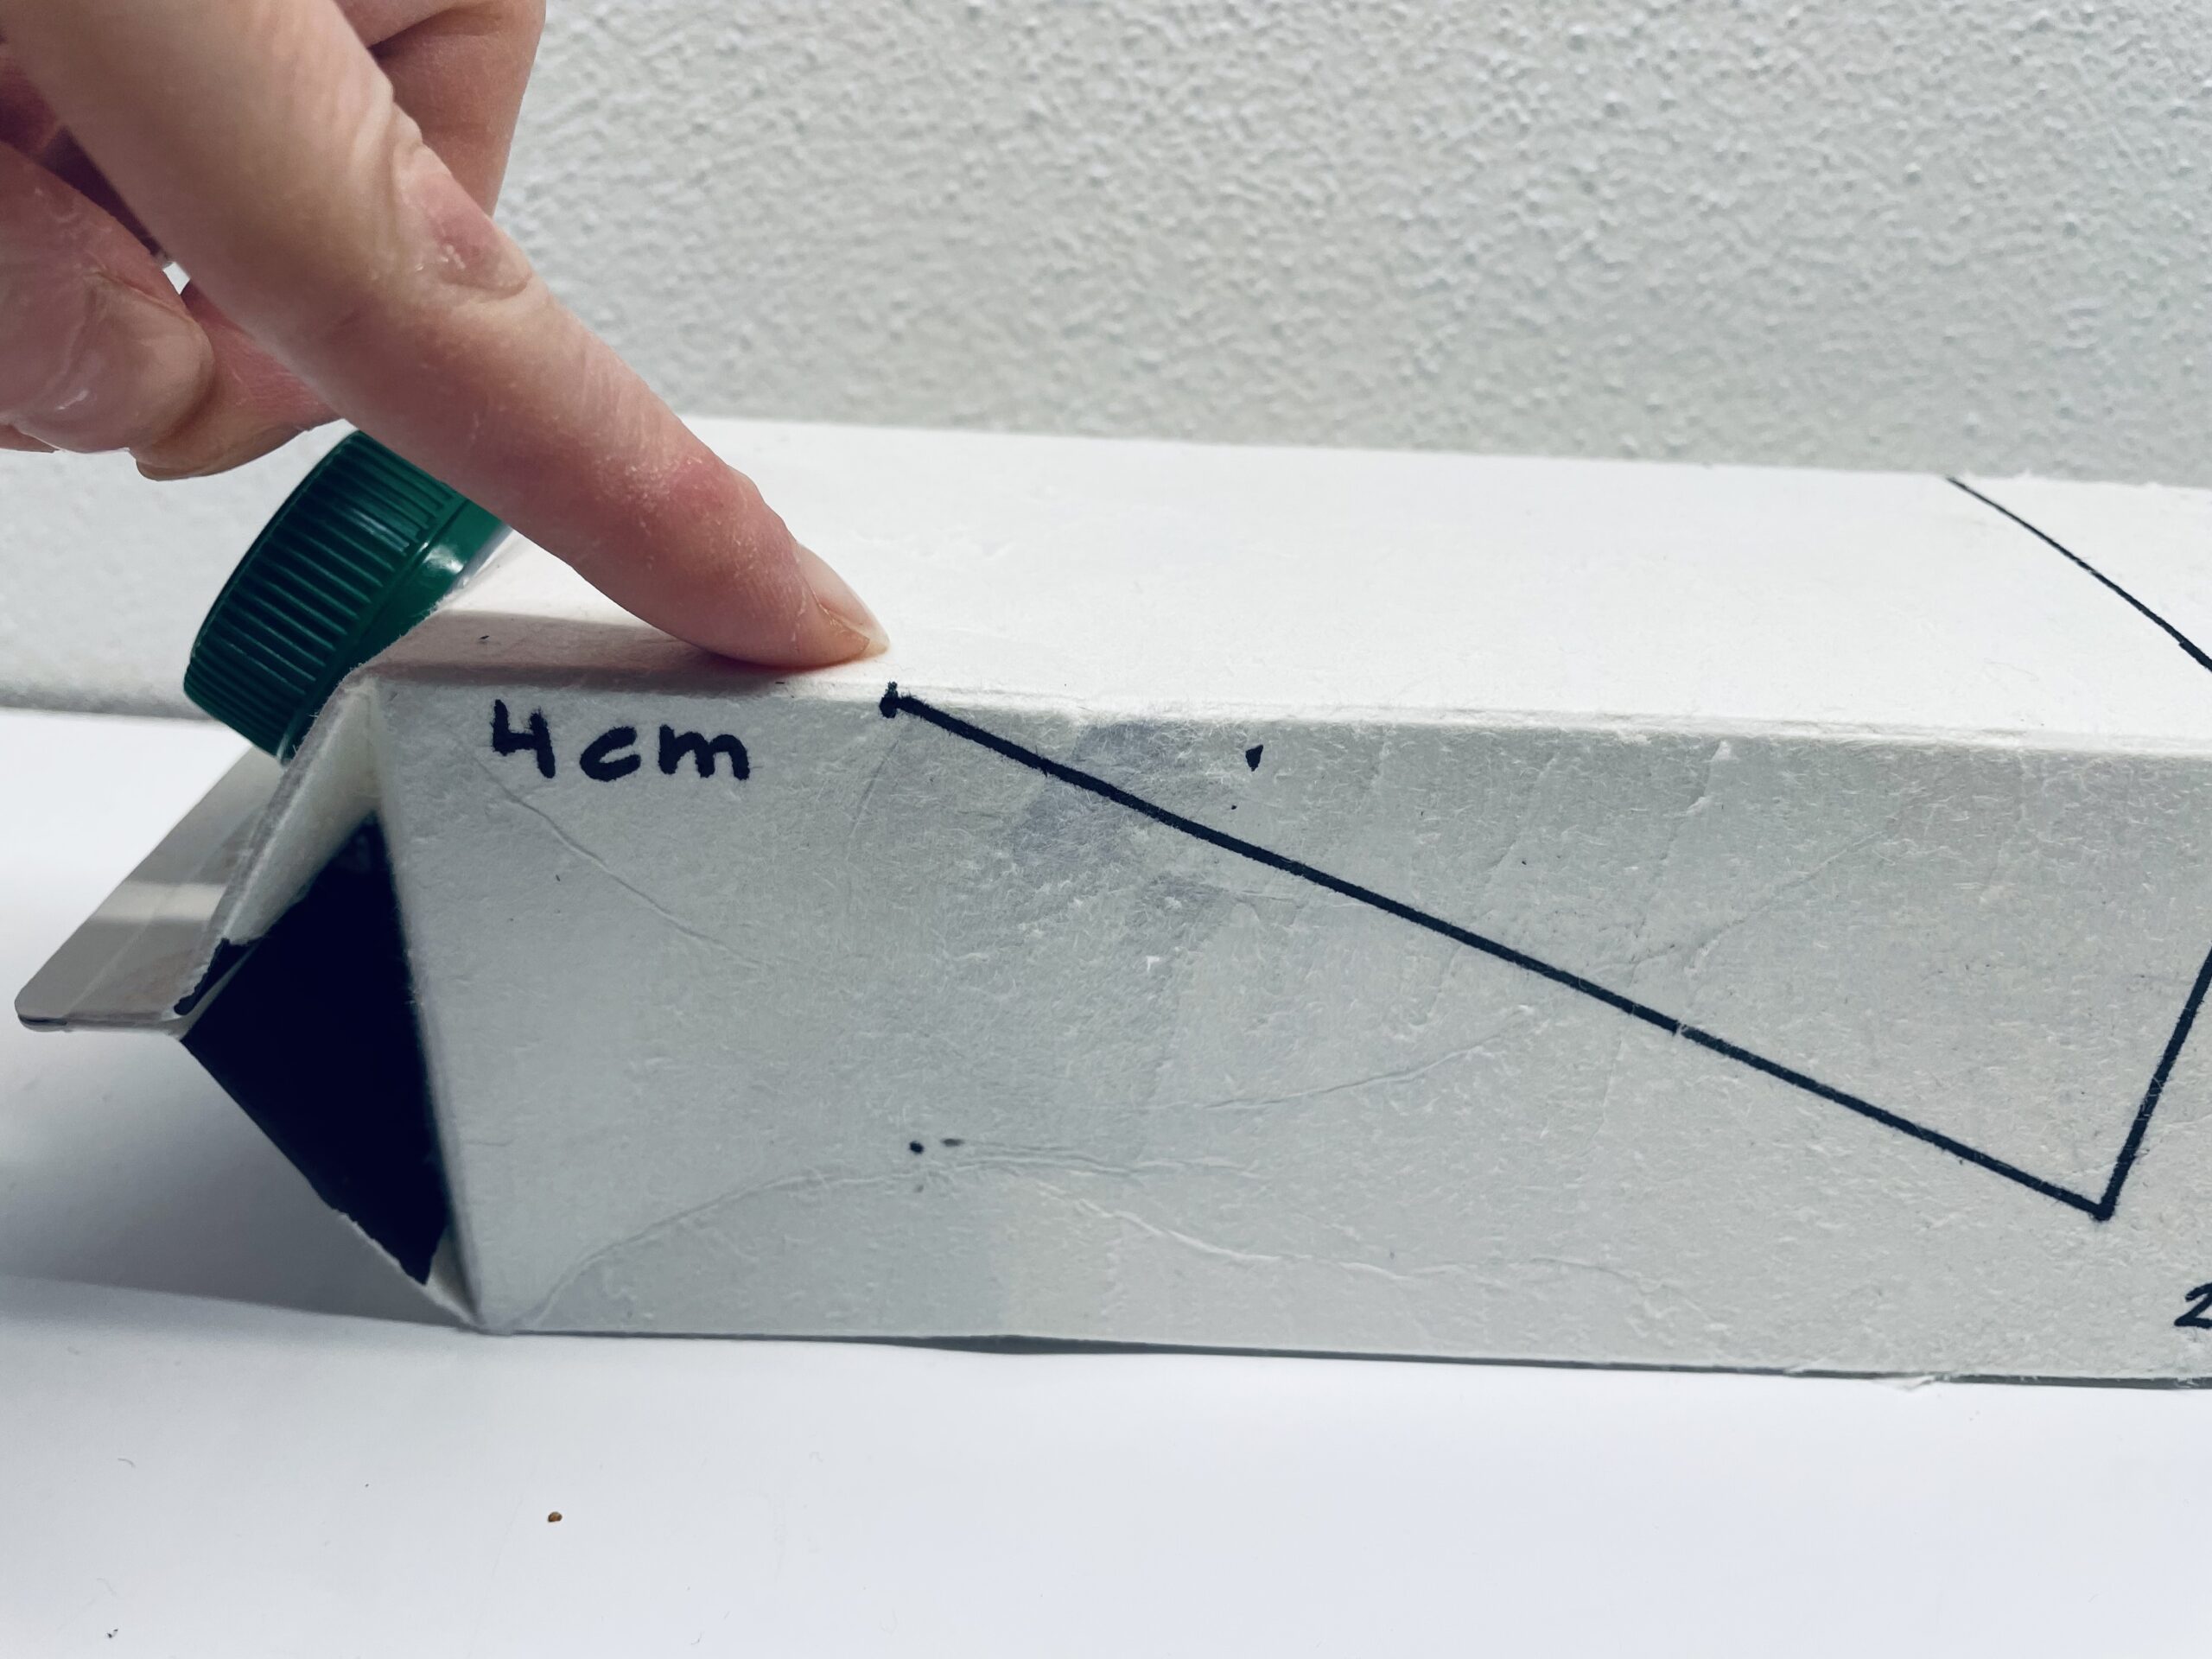
Bild zum Schritt 3 für das Bastel- und DIY-Abenteuer für Kinder: 'Messt an den Seiten je 4cm von oben ab und...'

4

Now you cut the lines with the cutter knife. Attention: Be supported by an adult - risk of injury!

Bild zum Schritt 4 für das Bastel- und DIY-Abenteuer für Kinder: 'Jetzt schneidet ihr die Linien mit dem Cuttermesser nach. Achtung:...'

5

2. Bild zum Schritt 4 für das Bastel- und DIY-Abenteuer für Kinder: 'Jetzt schneidet ihr die Linien mit dem Cuttermesser nach. Achtung:...'

6

A variable opening is created, which now gently folds upwards.
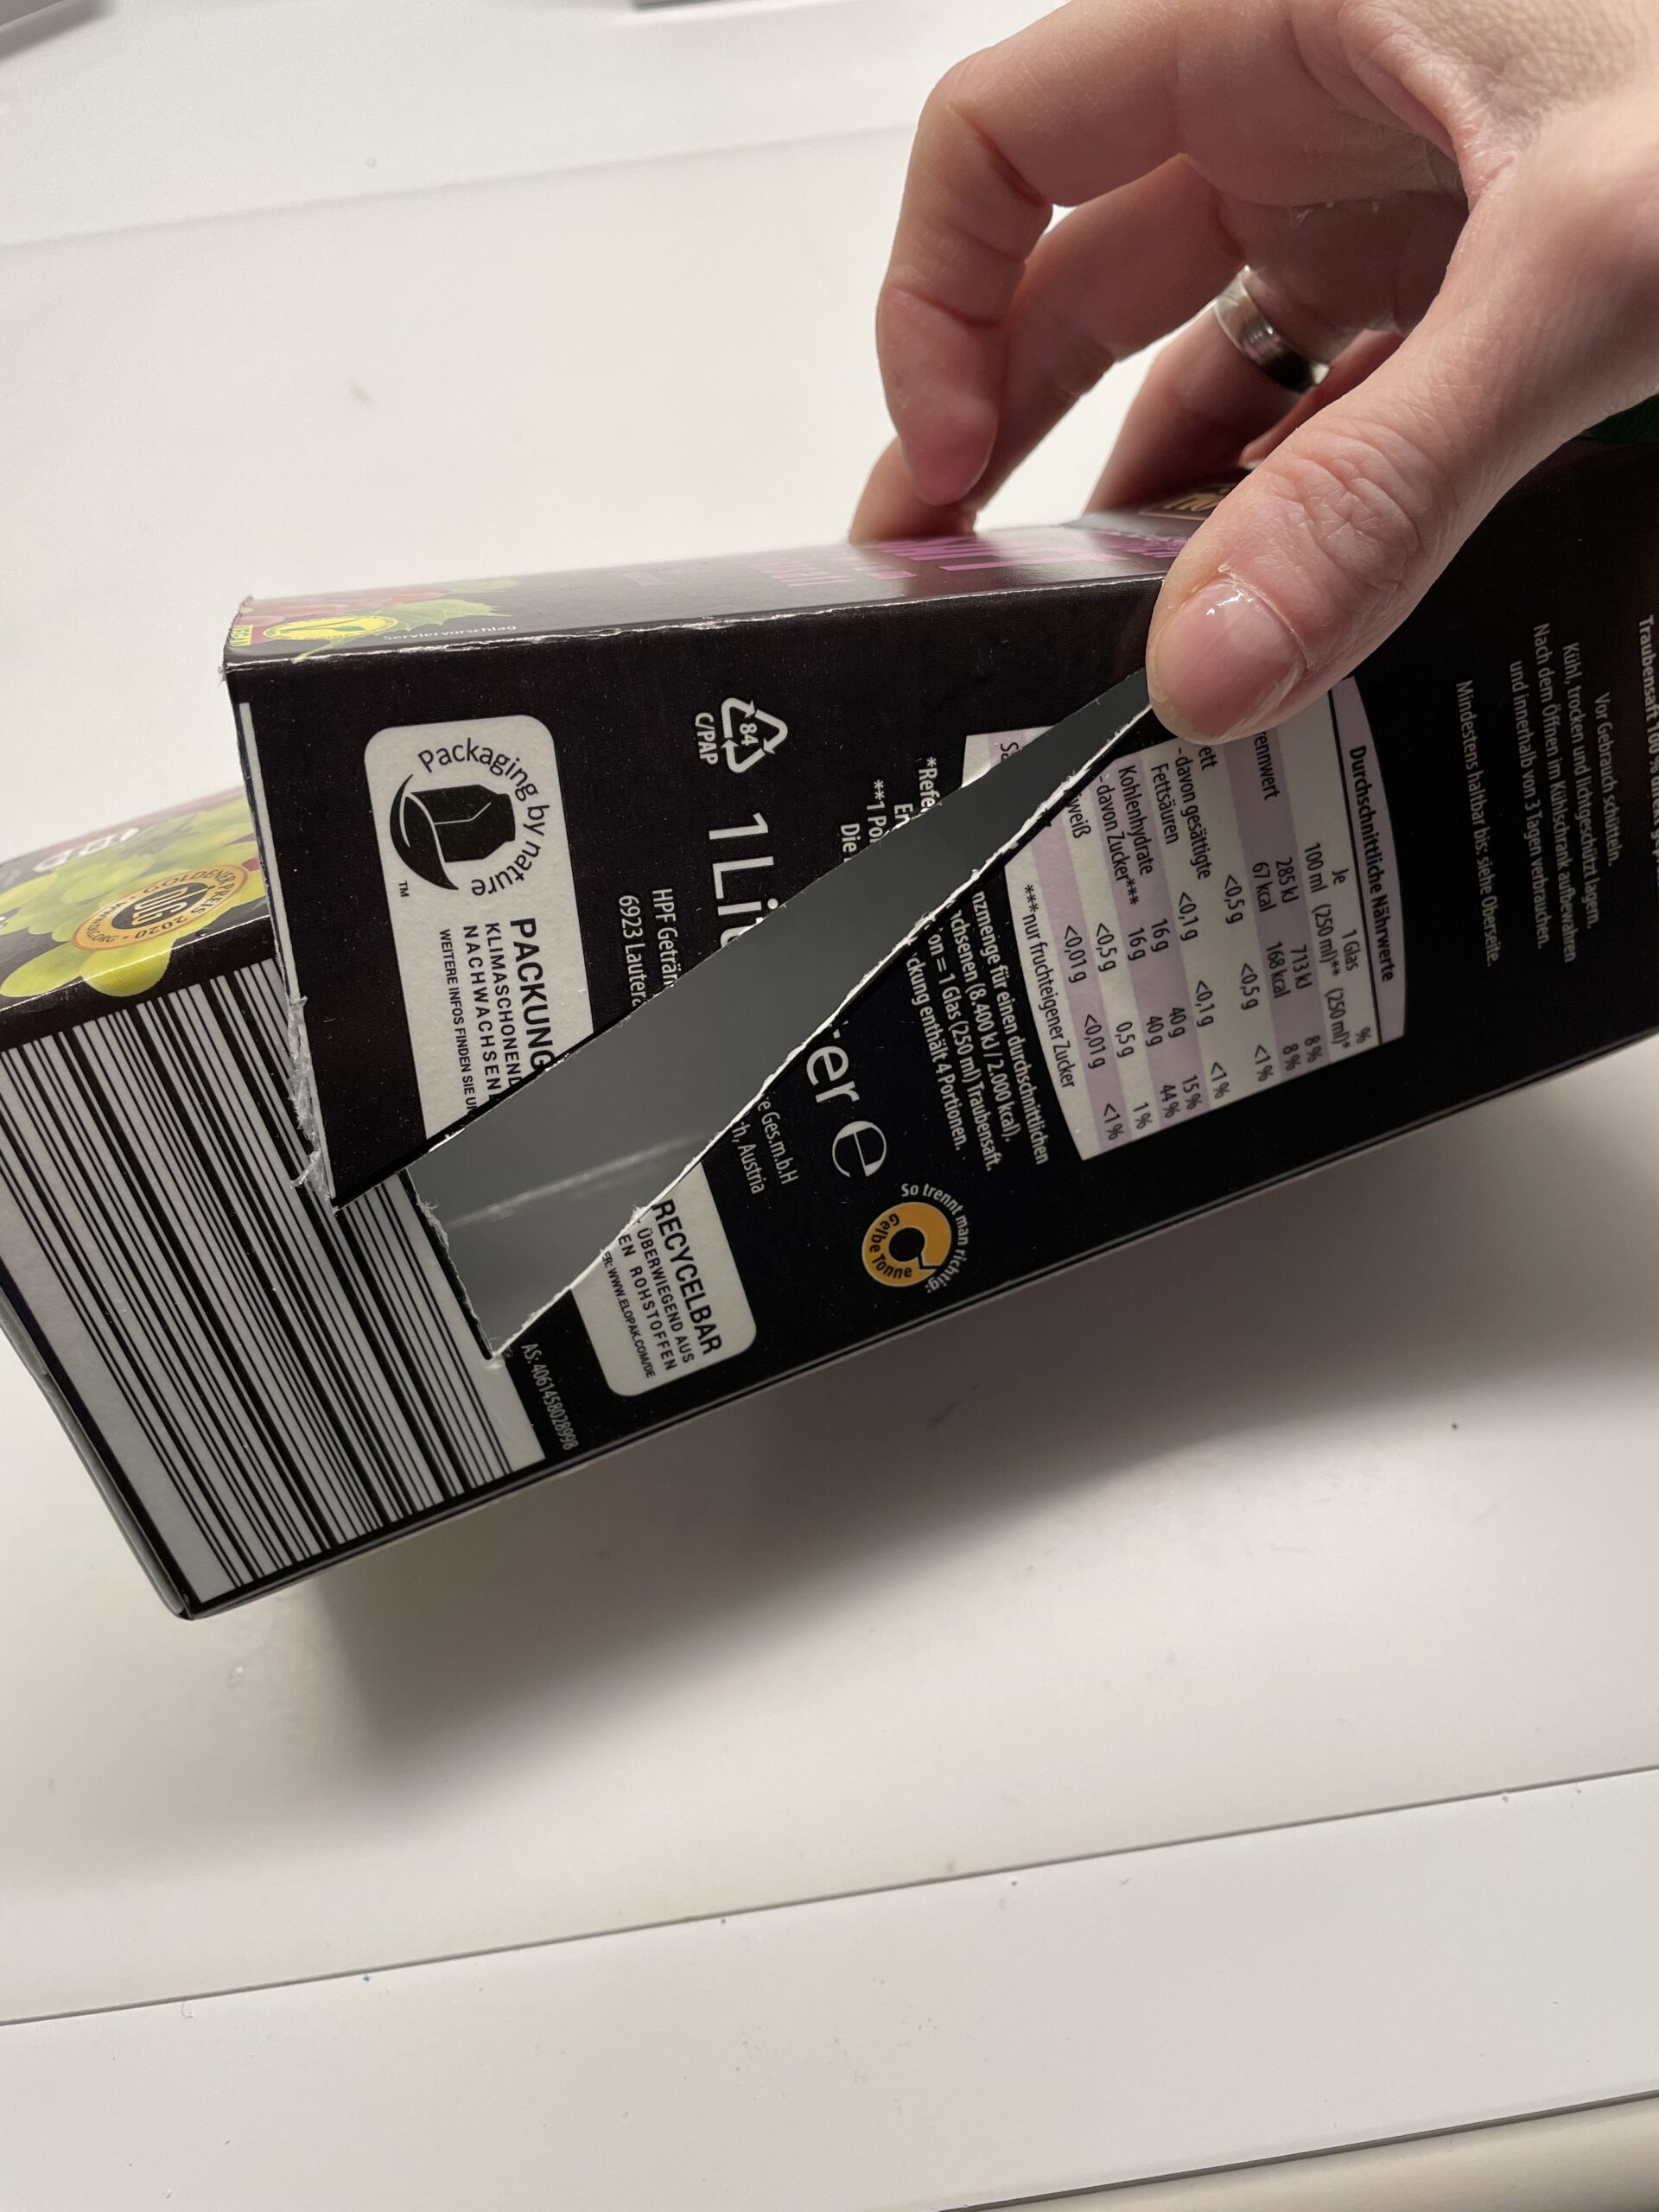
Bild zum Schritt 6 für das Bastel- und DIY-Abenteuer für Kinder: 'Es entsteht eine variable Öffnung, die ihr jetzt vorsichtig nach...'

7

Fold the opening as far as it goes back, then knock the box over.
Possibly existing moisture in the tetrapack dries it with a kitchen crepe.

Bild zum Schritt 7 für das Bastel- und DIY-Abenteuer für Kinder: 'Klappt die Öffnung so weit es geht zurück. Dann knickt...'

8

Then cut off the tip on the triangular sides (stretched line).
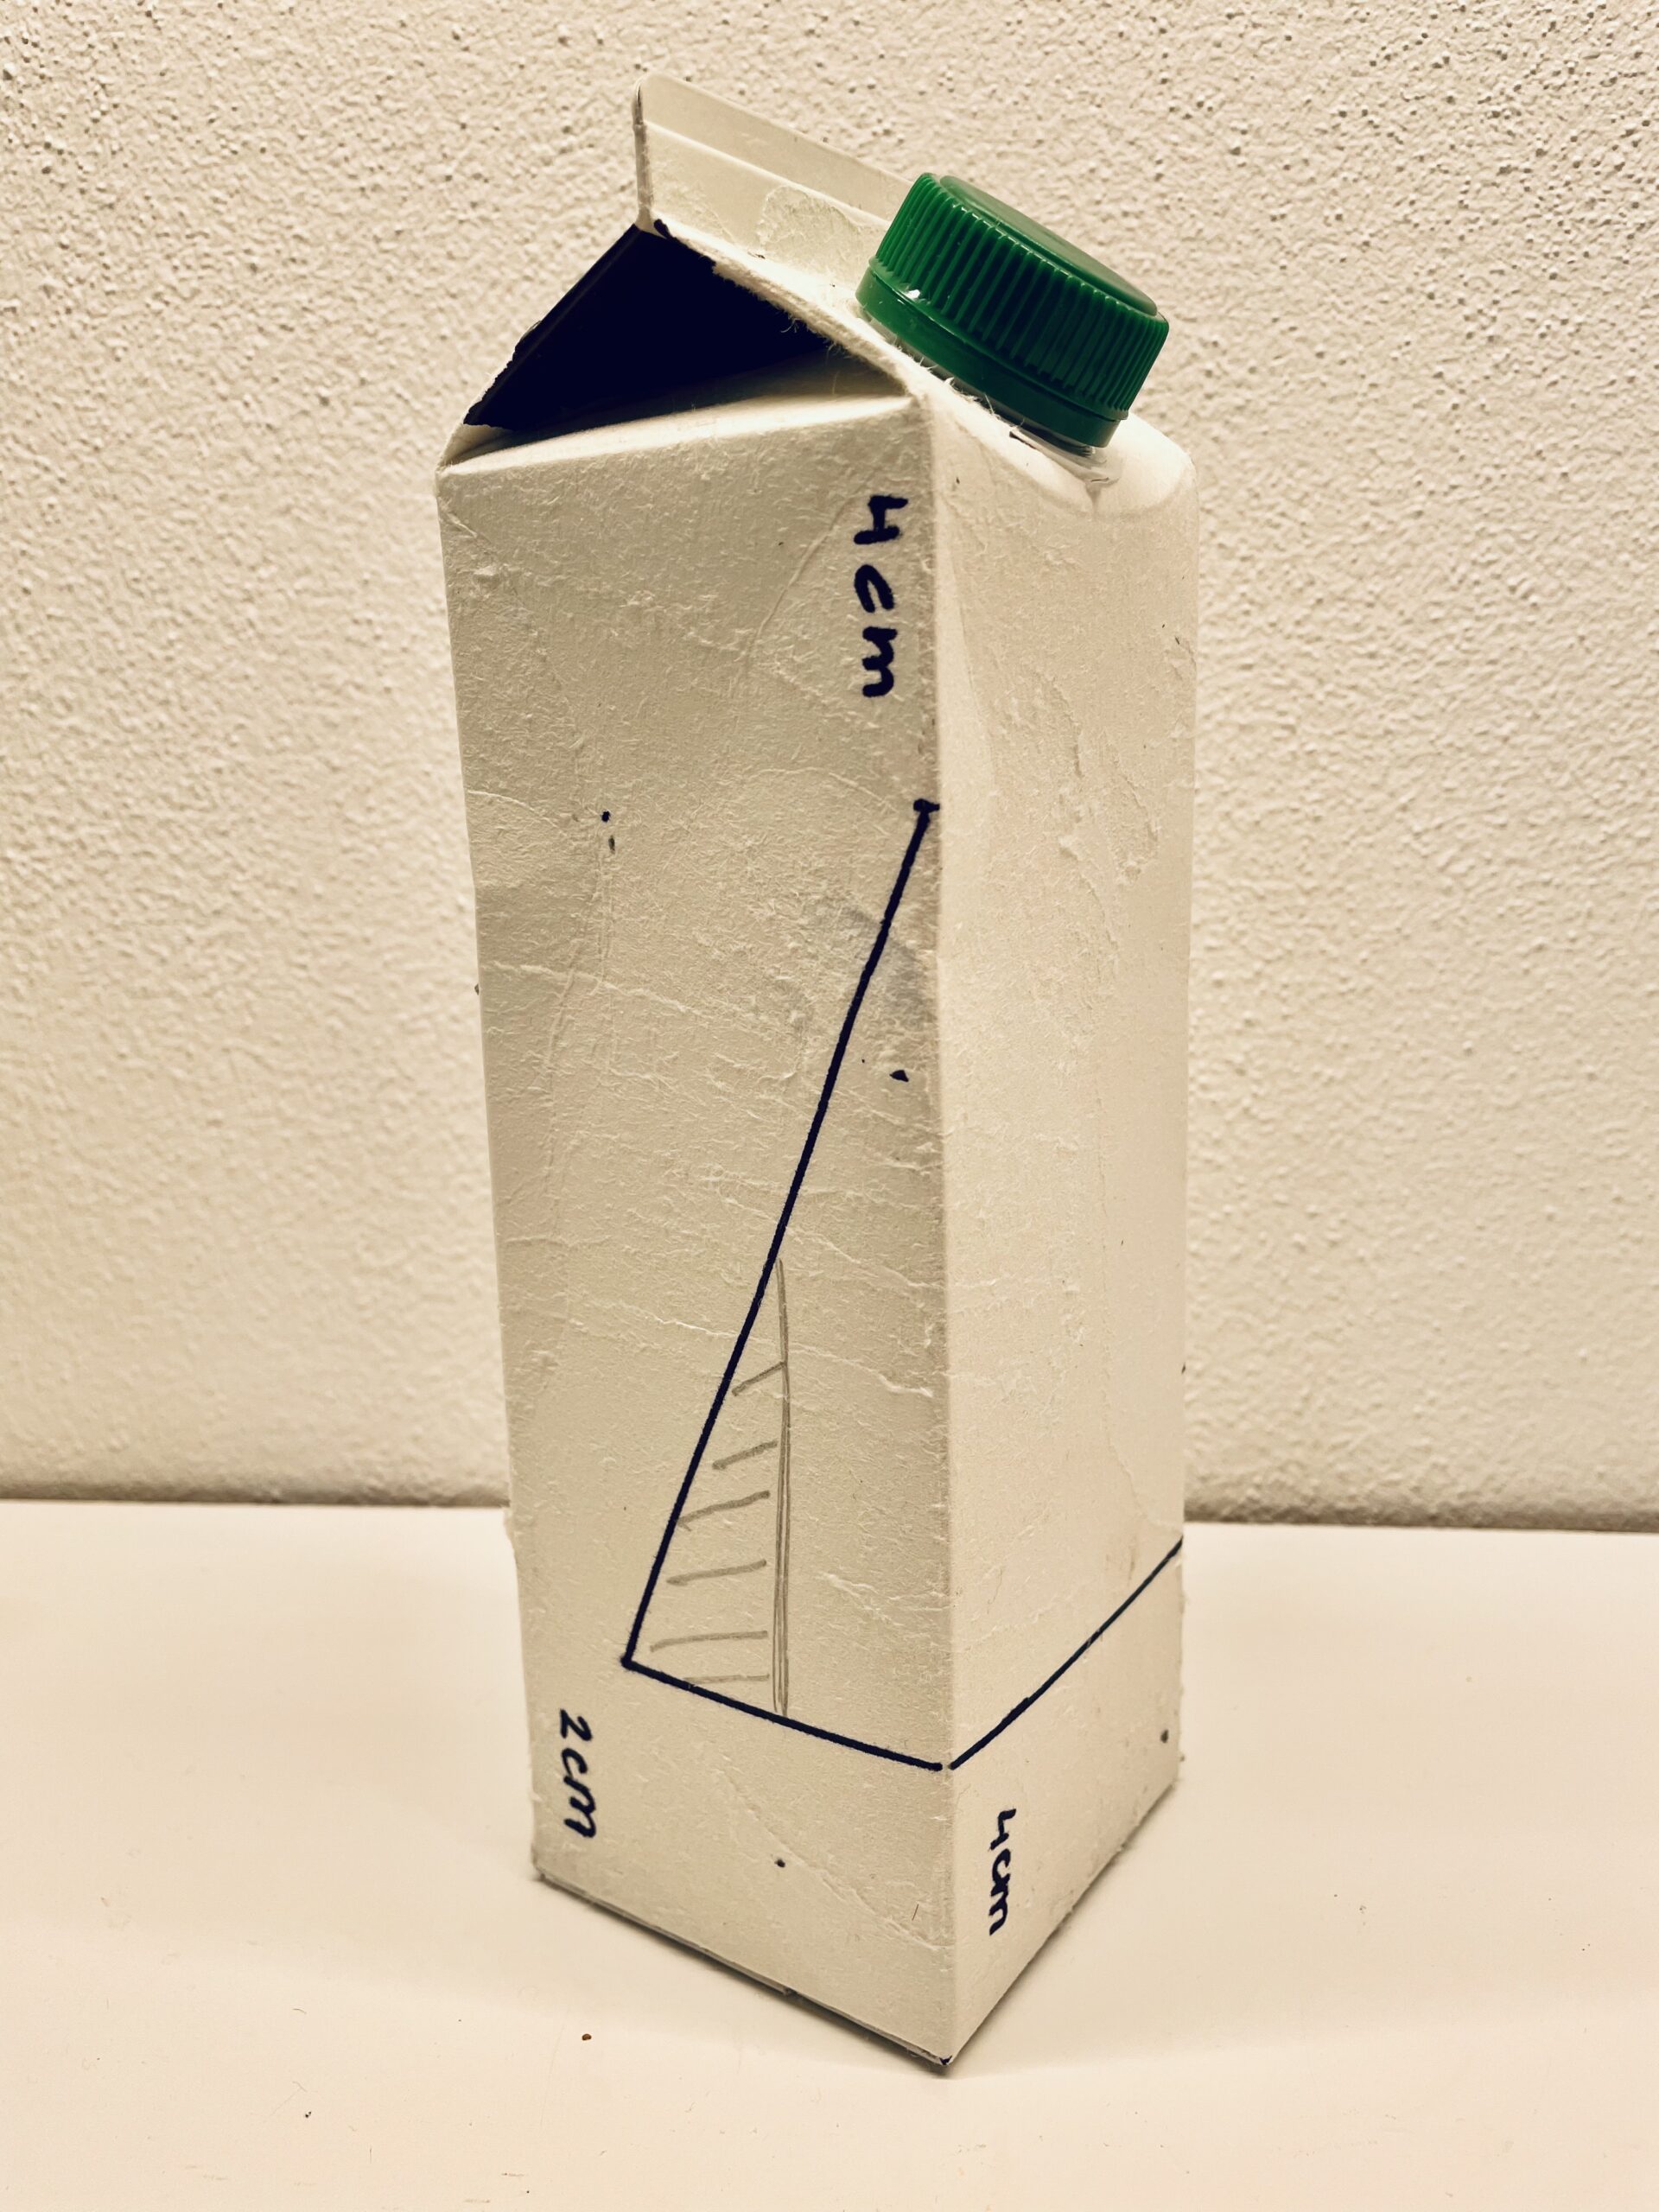
Bild zum Schritt 8 für das Bastel- und DIY-Abenteuer für Kinder: 'Anschließend schneidet ihr die Spitze an den dreieckigen Seiten ab...'

9

Use a pair of scissors for this.

Bild zum Schritt 9 für das Bastel- und DIY-Abenteuer für Kinder: 'Verwendet dafür eine Schere.'

10

Now bend the side parts of the lid inside and press the front on it. The front now closes flush with the height of the oblique cut surface. Fix the sides with some glue or tesa film. Attention when handling the hot glue - risk of injury!
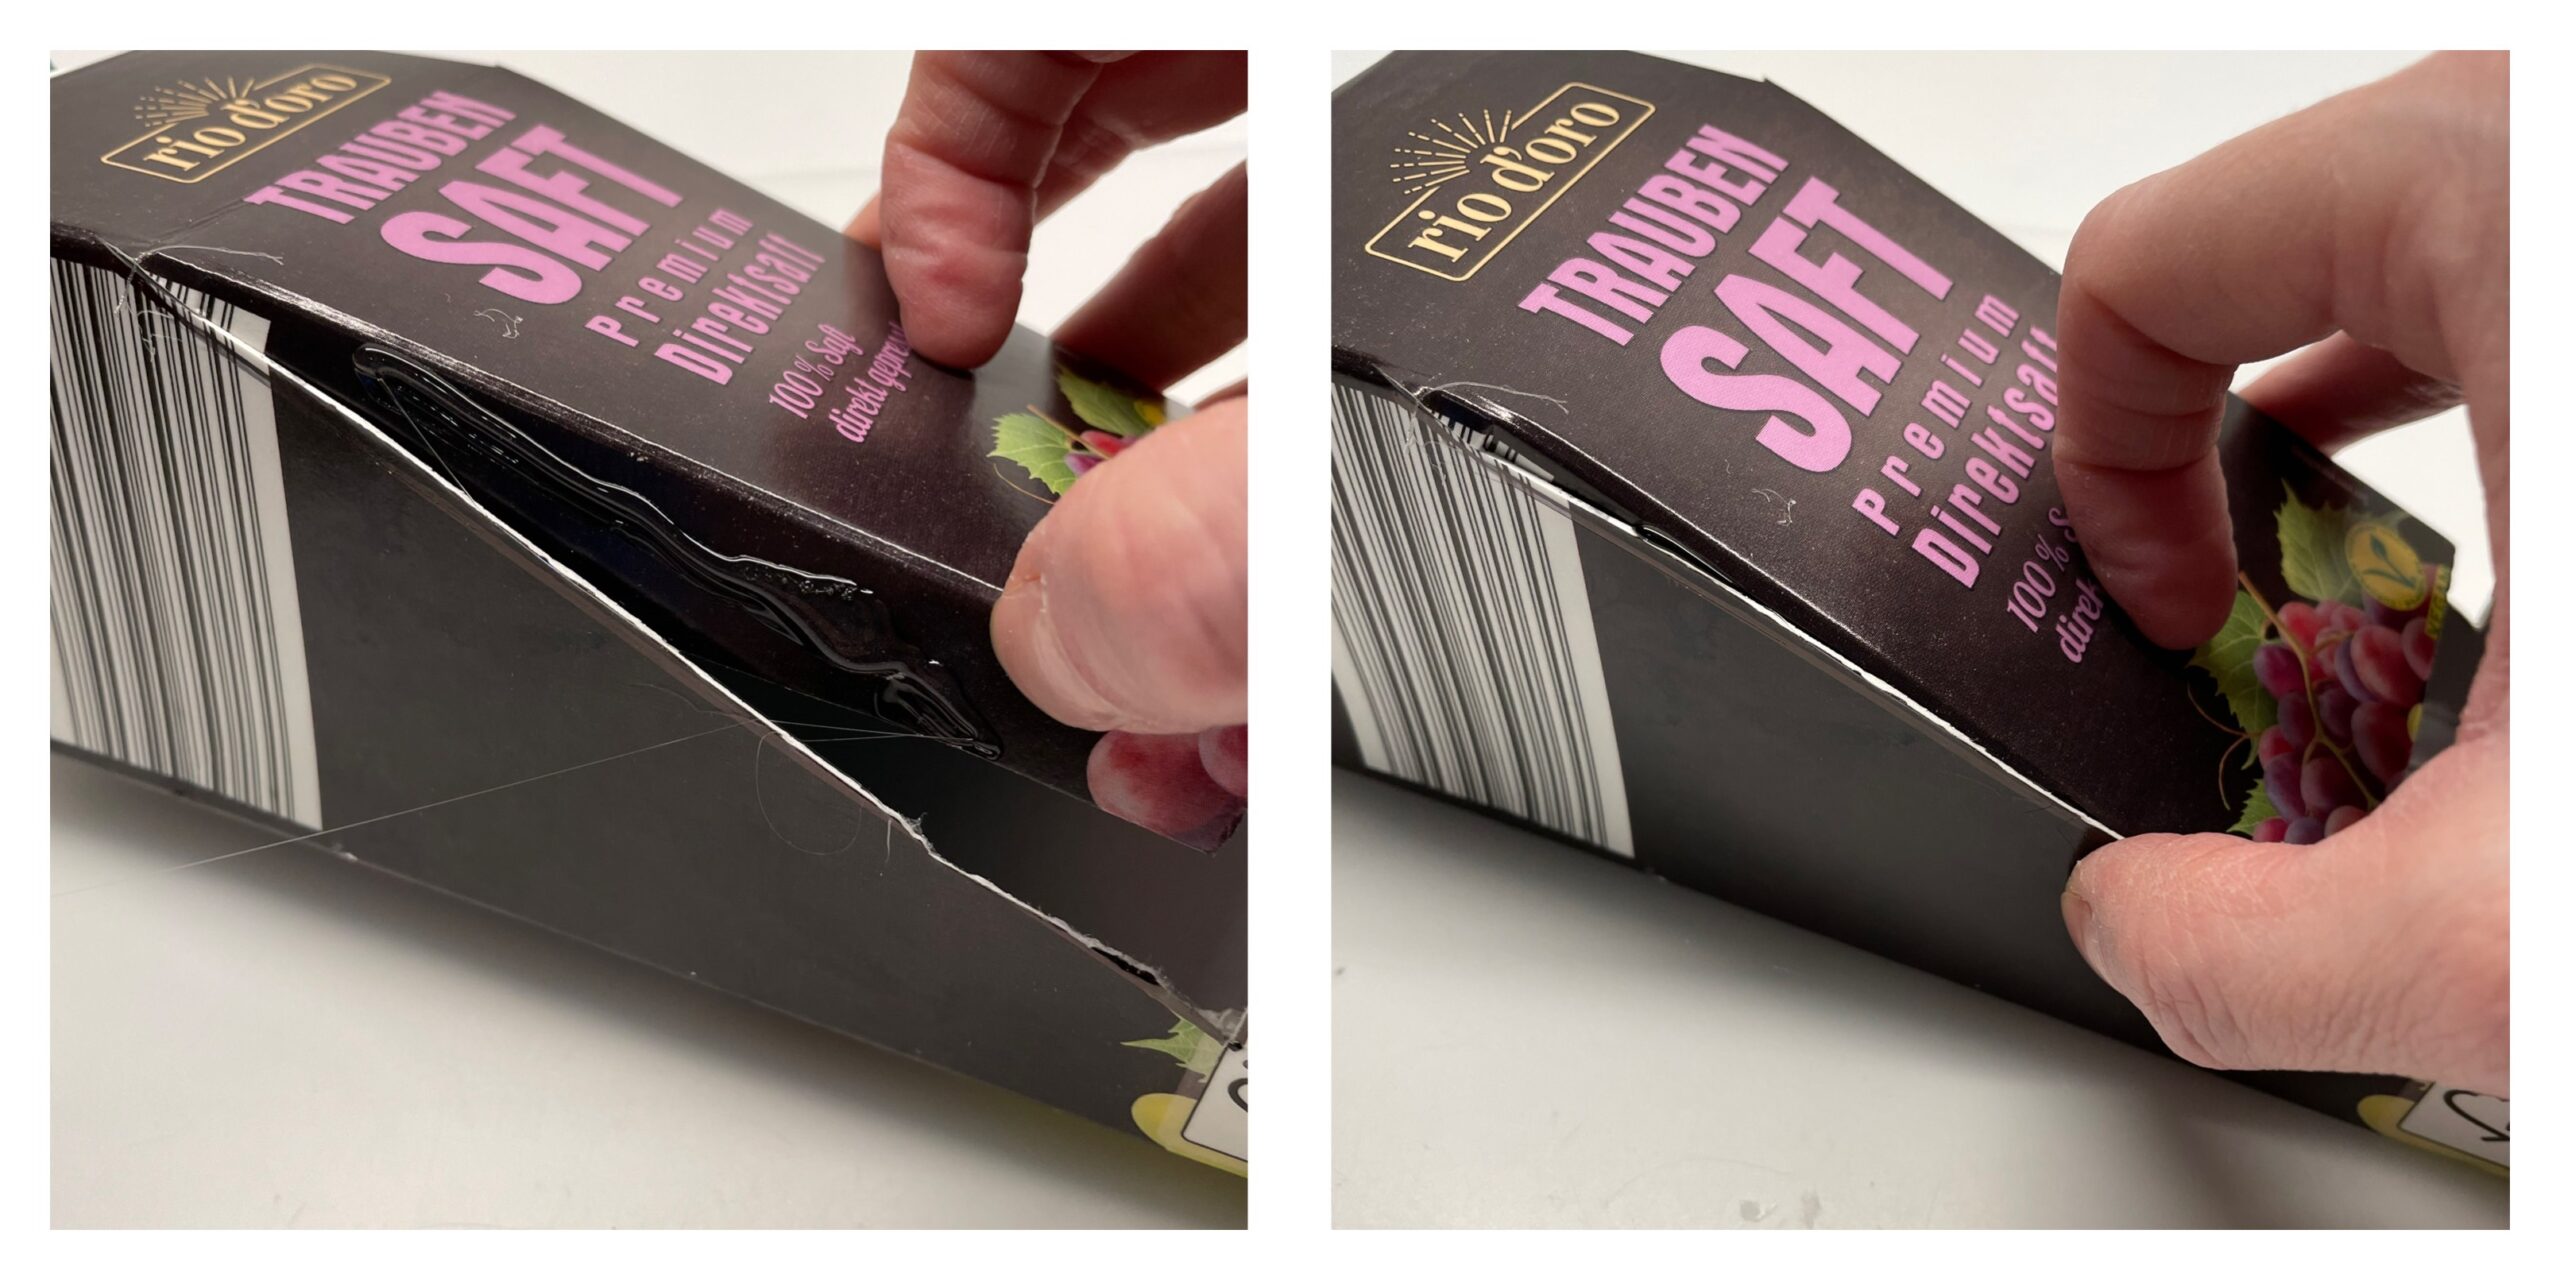
Bild zum Schritt 10 für das Bastel- und DIY-Abenteuer für Kinder: 'Jetzt biegt ihr die seitlichen Teile des Deckels innen und...'

11

The glued blank of the bird feed house is ready.
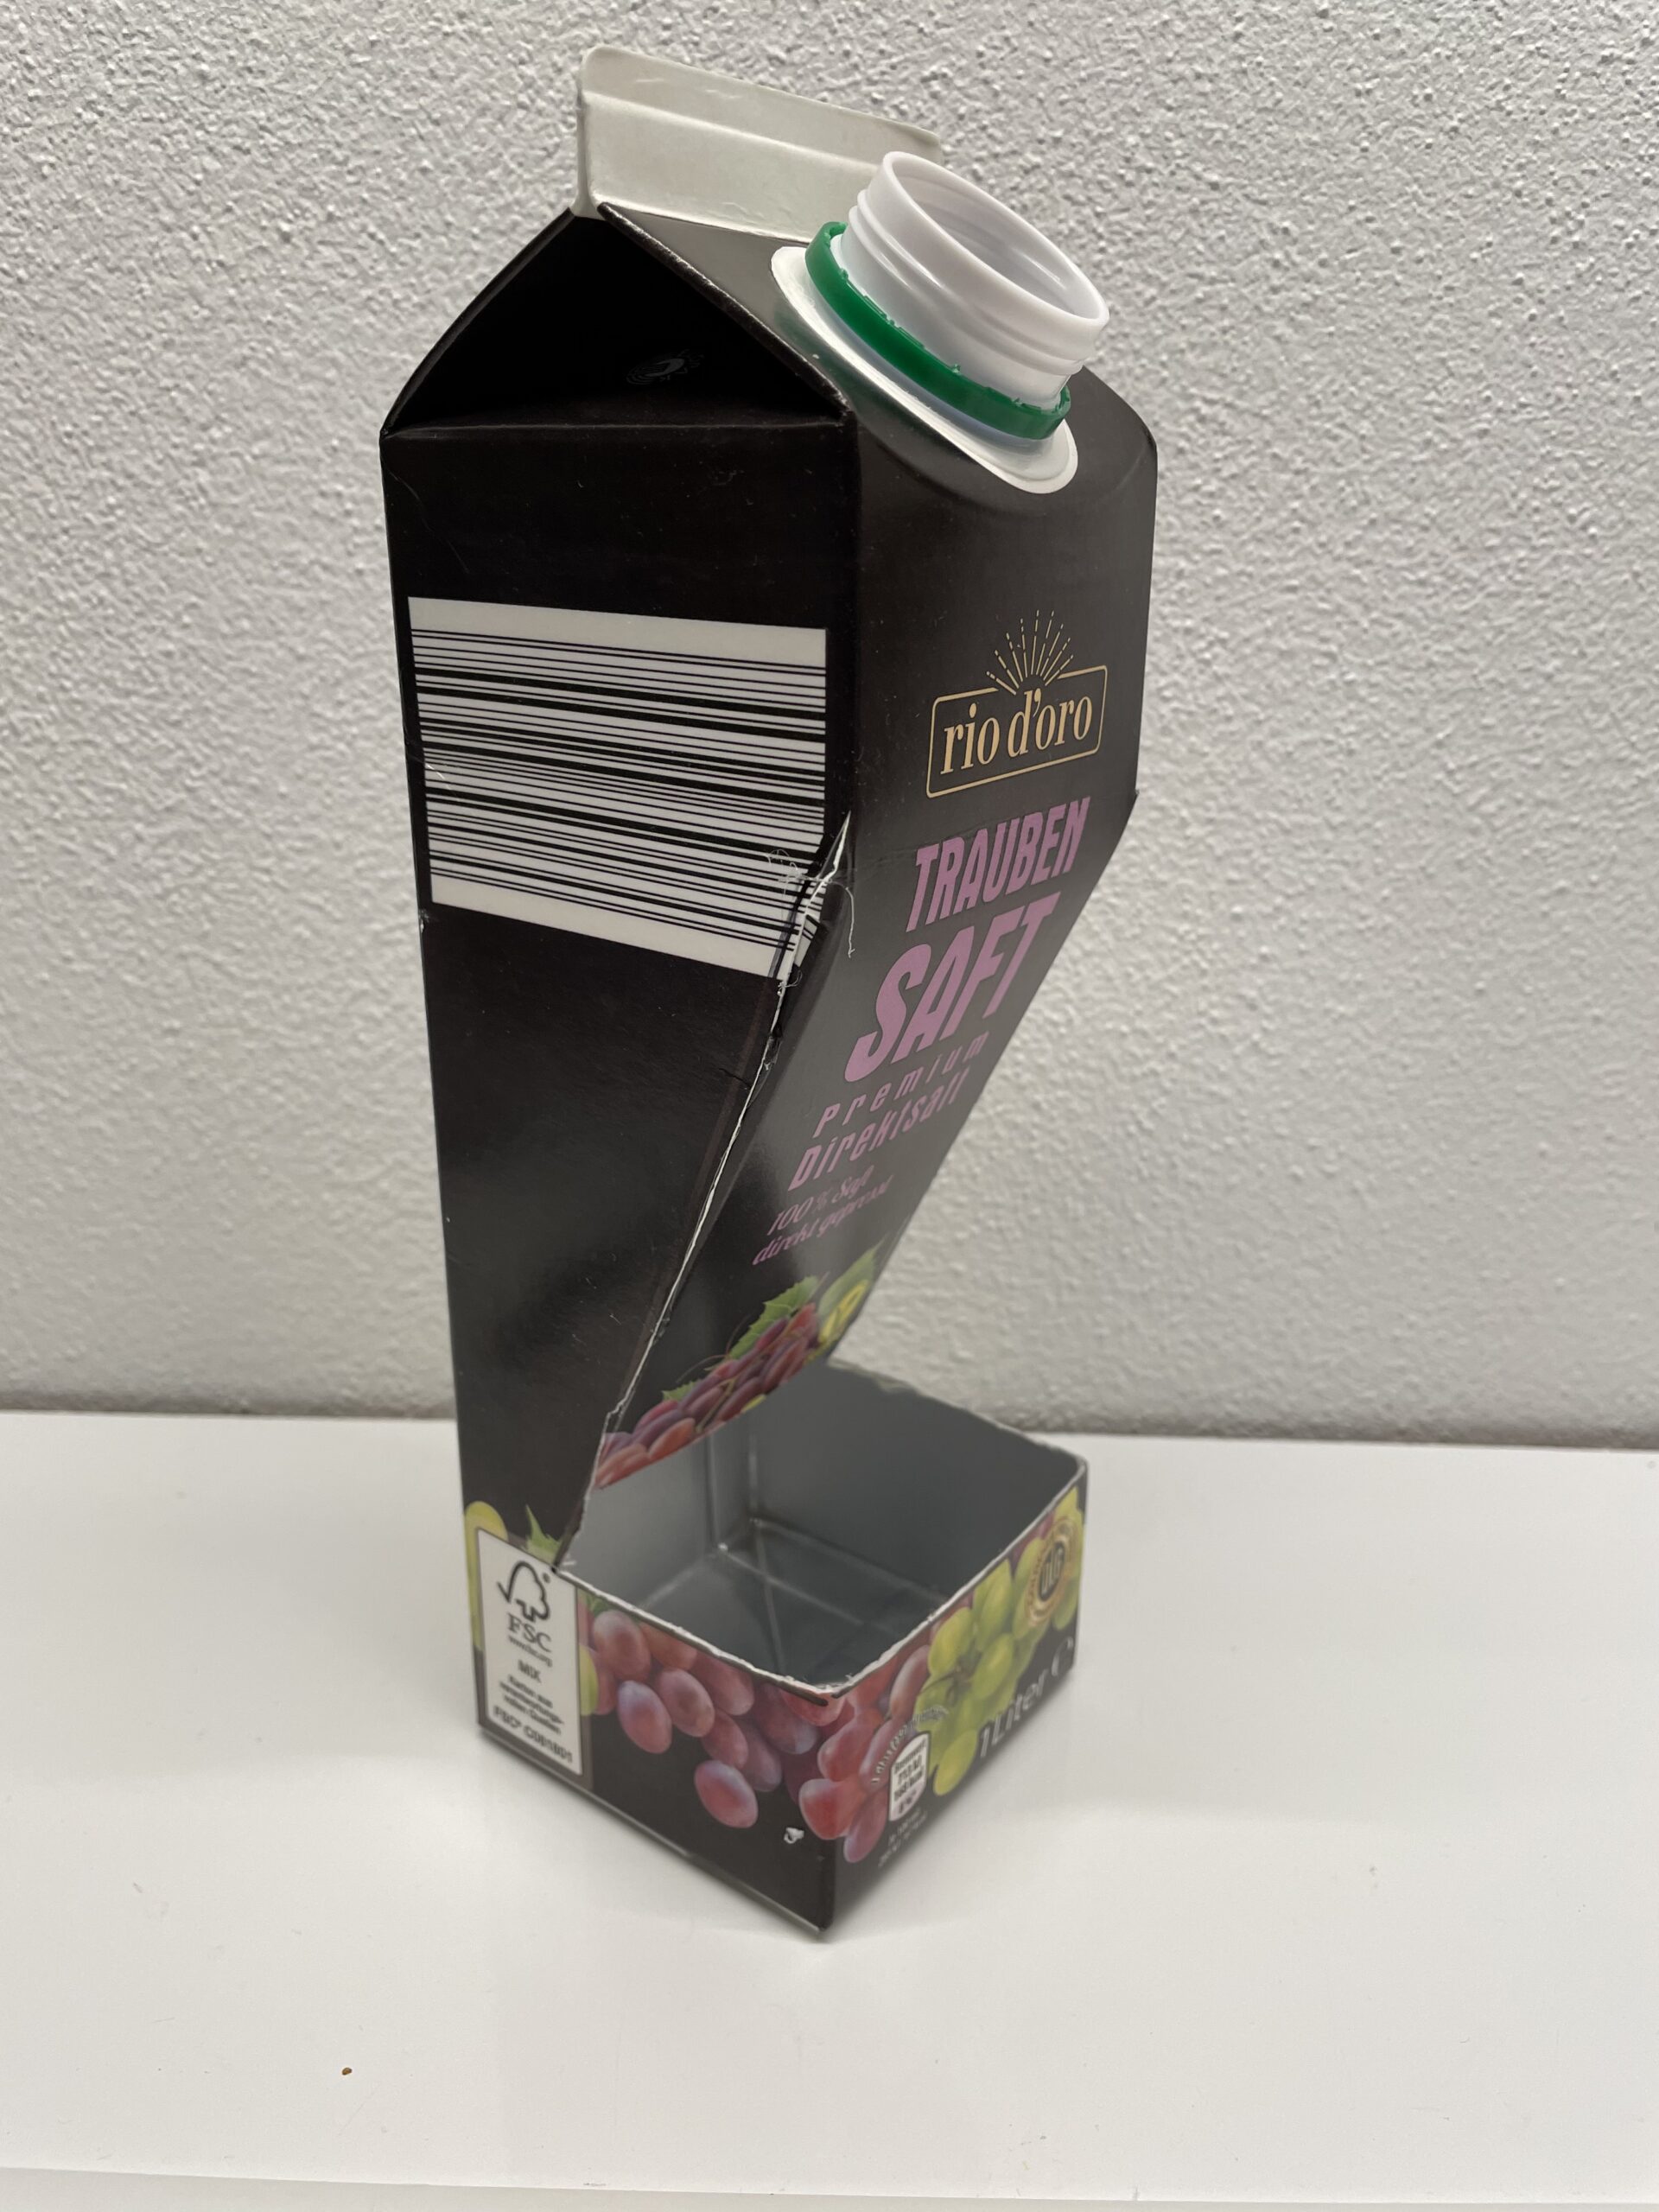
Bild zum Schritt 11 für das Bastel- und DIY-Abenteuer für Kinder: 'Der geklebte Rohling des Vogelfutter-Hauses ist fertig.'

12

Put on a Mahler coat.
Now you put an old newspaper under the blank and paint it with acrylic paint.

Tip: Drip a tink of paint on a screw glass lid. This makes working with paint easier.

Bild zum Schritt 12 für das Bastel- und DIY-Abenteuer für Kinder: 'Ziehe dir einen Mahlerkittel an.   Jetzt legt ihr...'

13

The paint may not cover enough on the first paint. Then let the paint dry and then paint another layer over it.
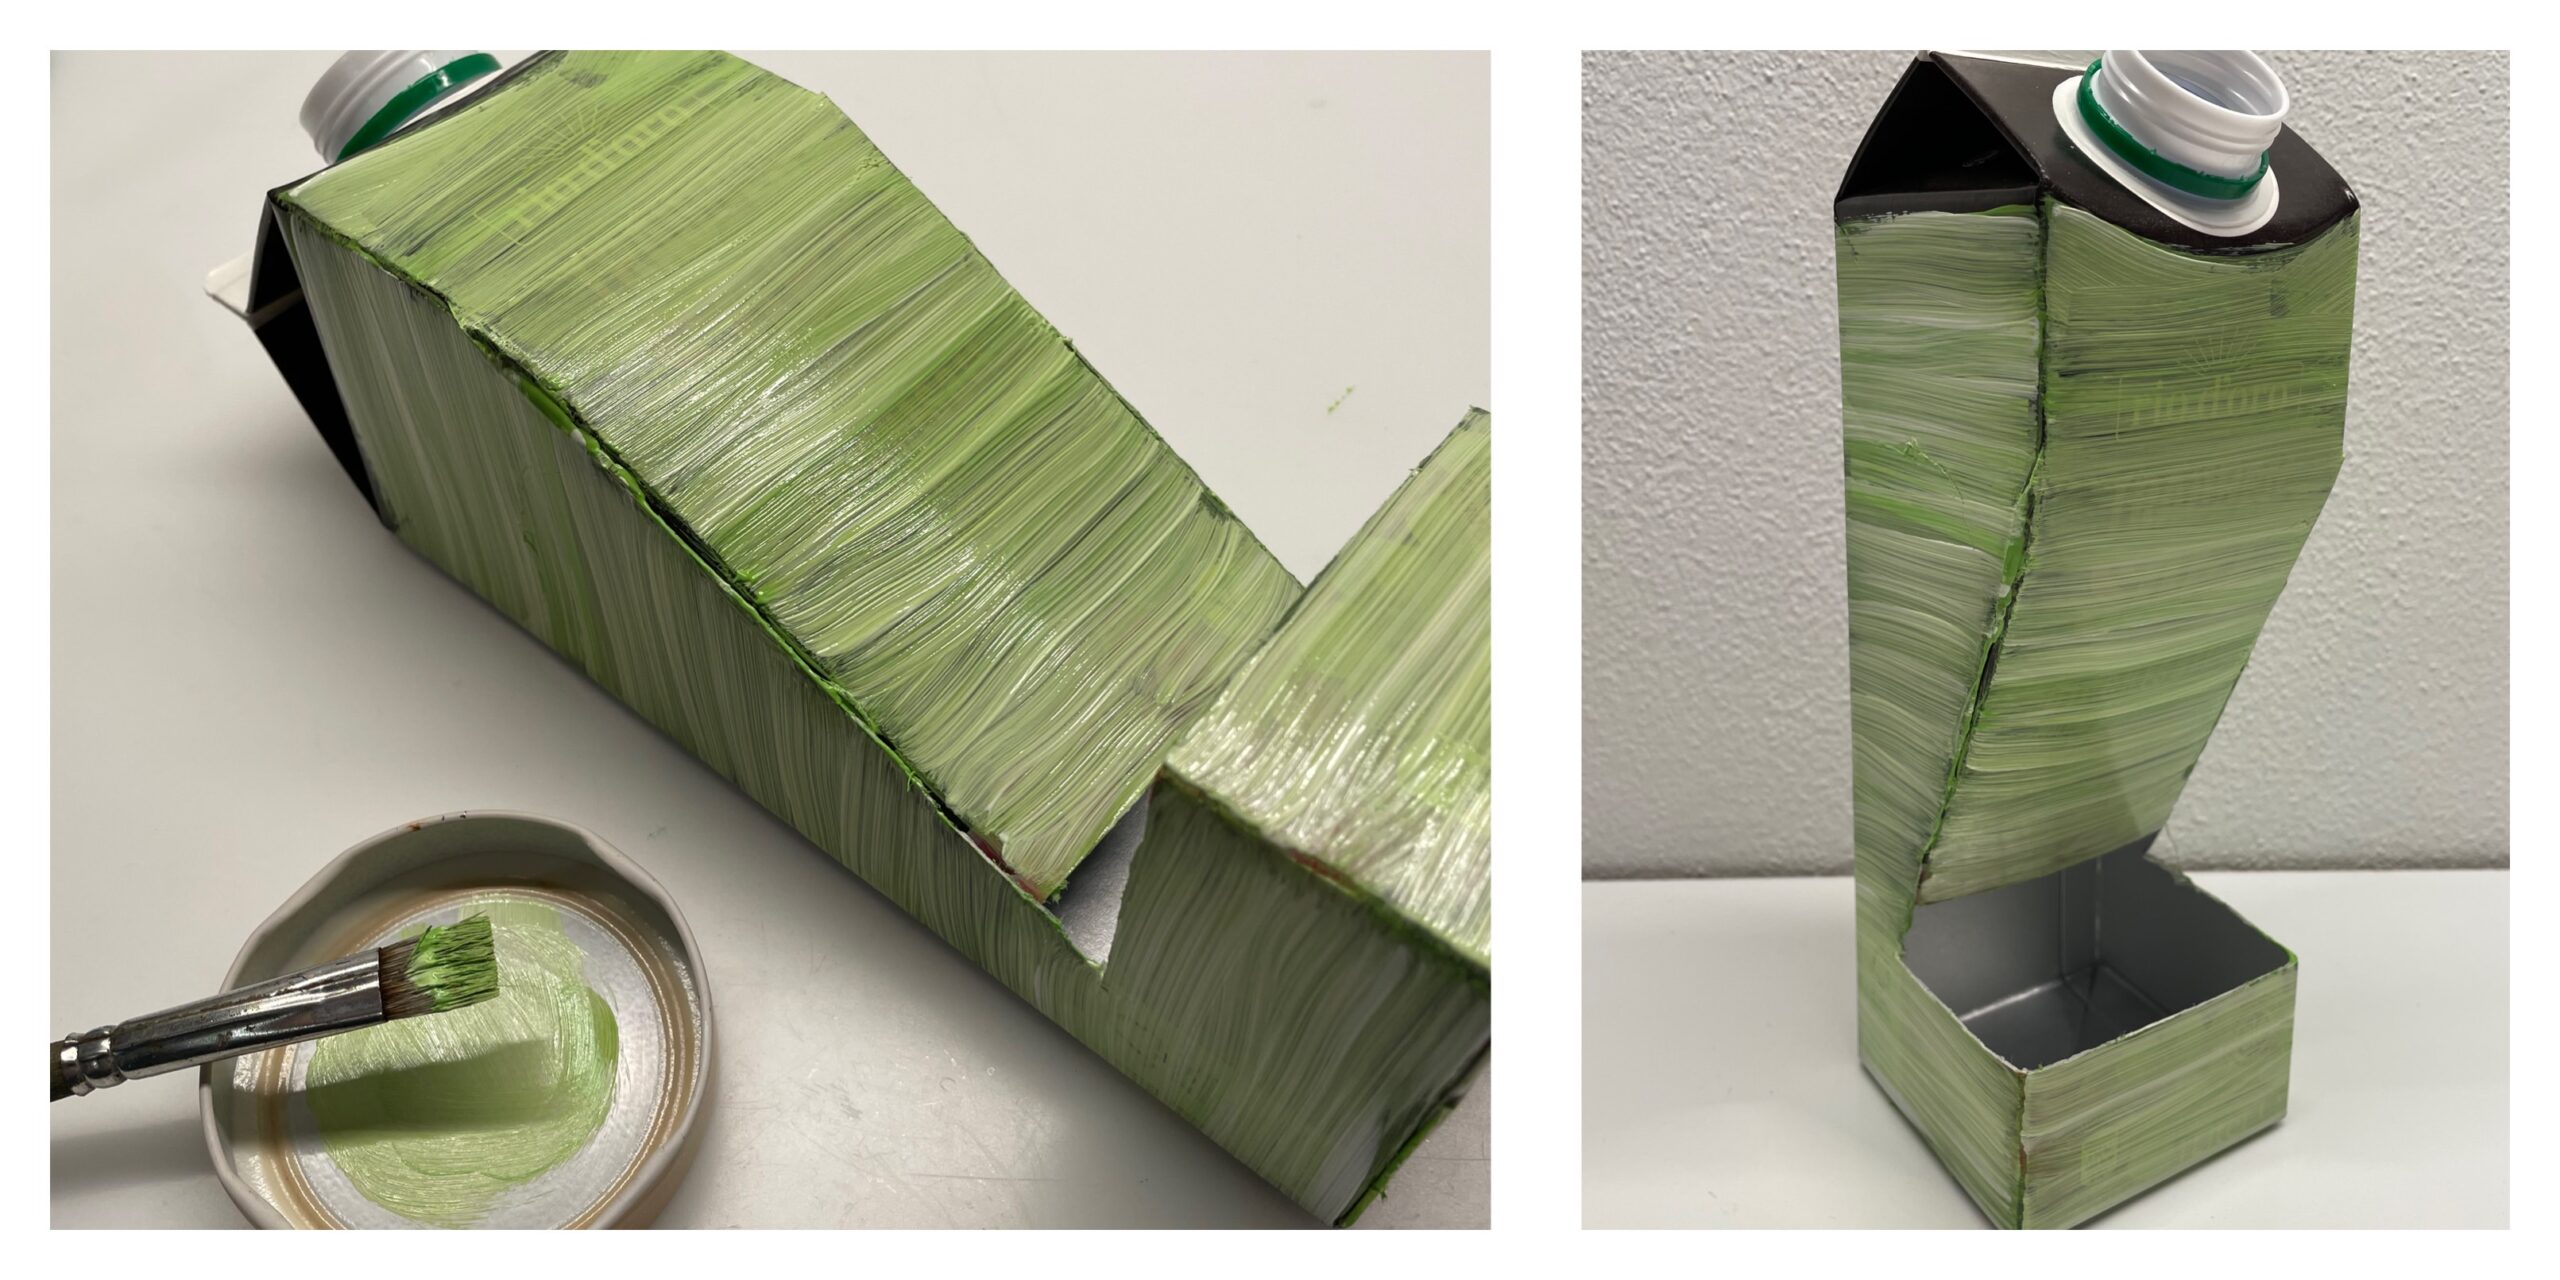
Bild zum Schritt 13 für das Bastel- und DIY-Abenteuer für Kinder: 'Die Farbe deckt beim ersten Anstrich eventuell nicht ausreichend. Dann...'

14

When the blank is dried, you push the scissors into the lower part of the carton and cut out a hole. For this, you cut out radially from the puncture point and press the incisions with a pen inwards.
At the same place on the back you repeat the process.
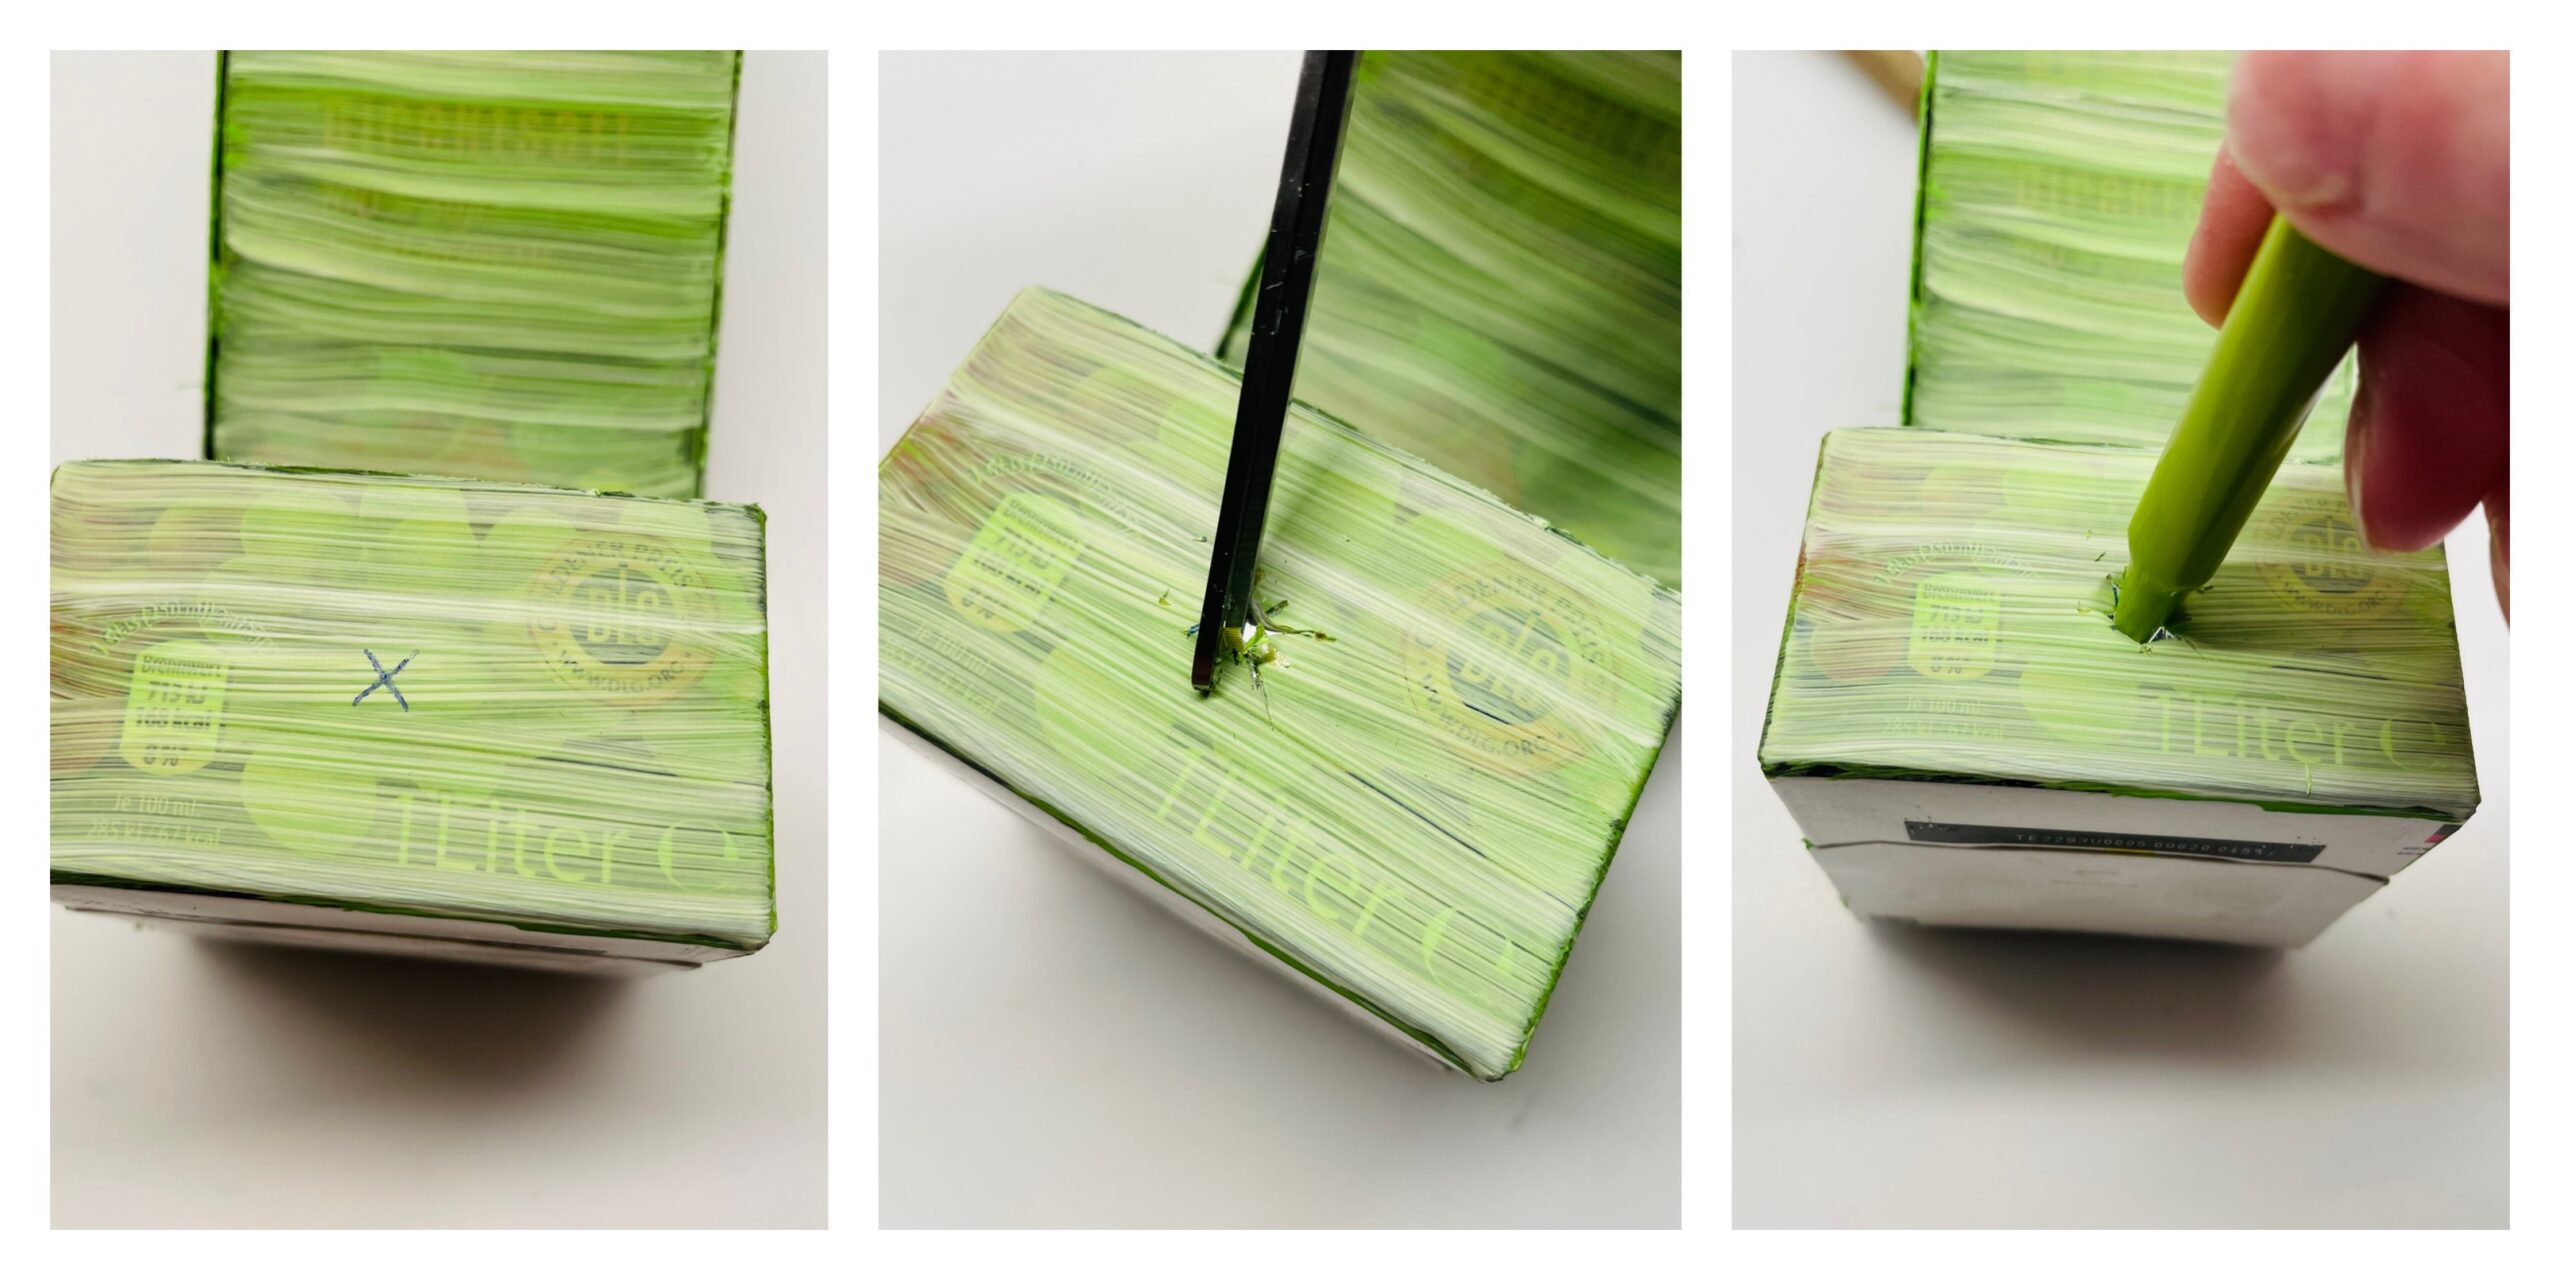
Bild zum Schritt 14 für das Bastel- und DIY-Abenteuer für Kinder: 'Ist der Rohling getrocknet, stecht ihr mit der Schere in...'

15

Then push the wooden stick through the box. The wooden stick looks out at the front and back and sits tight so that the birds can land on it.
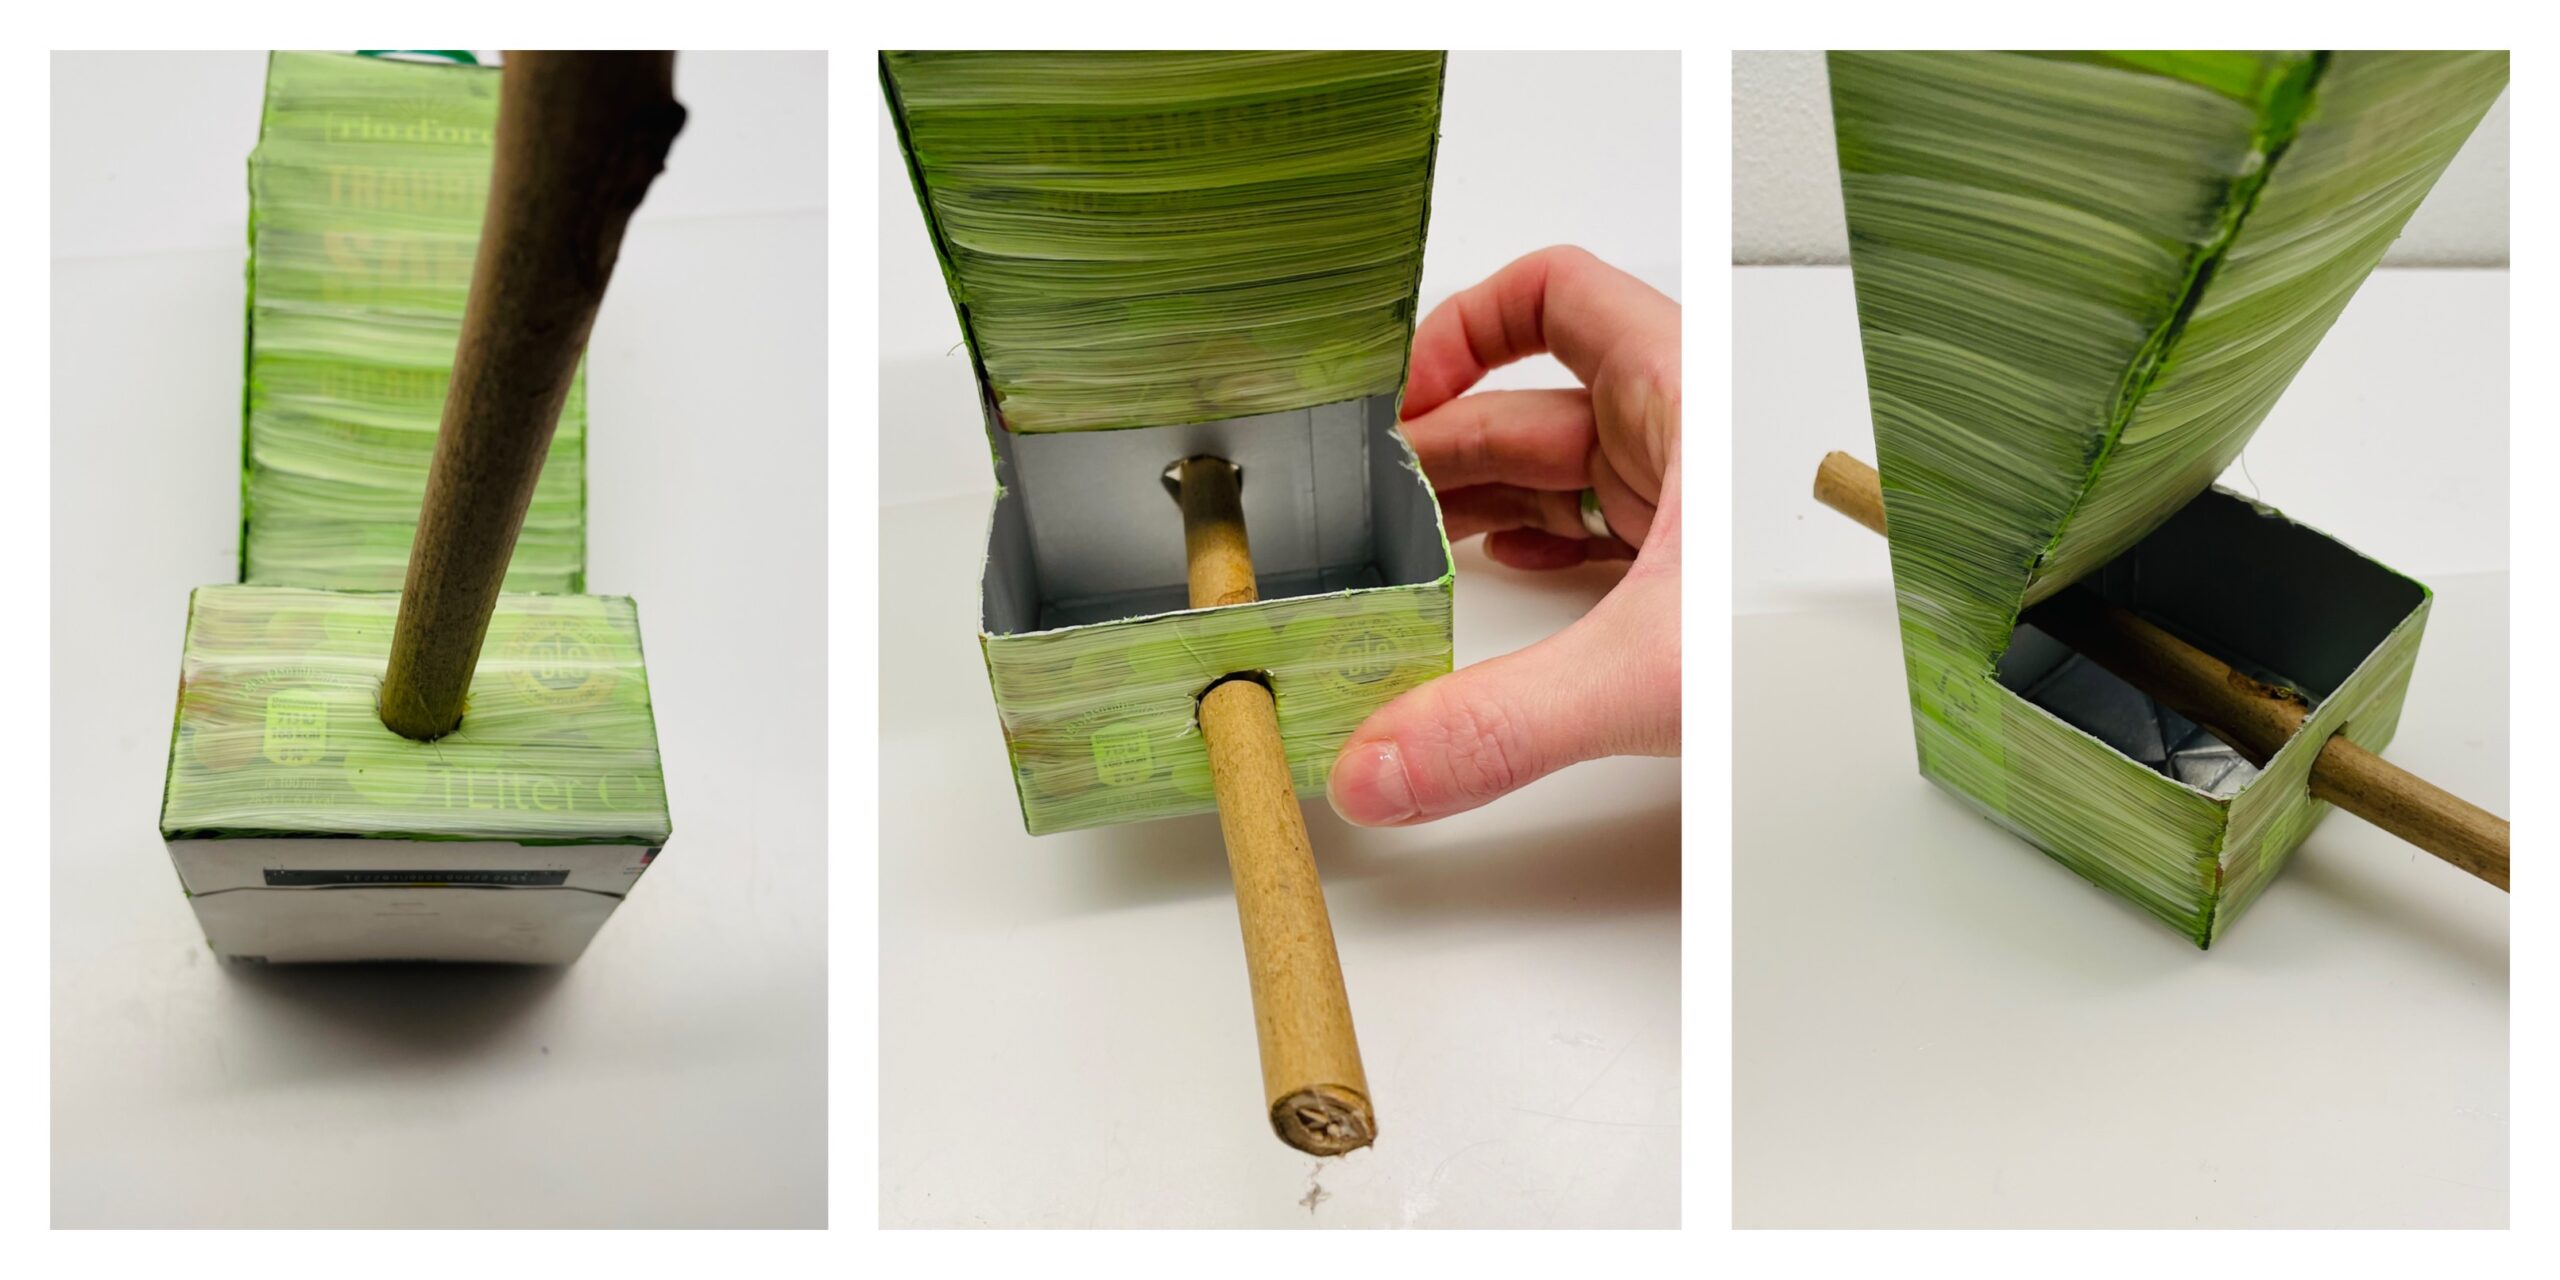
Bild zum Schritt 15 für das Bastel- und DIY-Abenteuer für Kinder: 'Danach schiebt ihr den Holzstab durch den Karton. Der Holzstab...'

16

Take the punch and punch two holes in the top fold of the box.

Alternative: In order to hang the feed house, you now drill a hole with the chestnut drill into the roof of the feed house.
Tip: If the chestnut drill is turned when pierced, it will work easier.
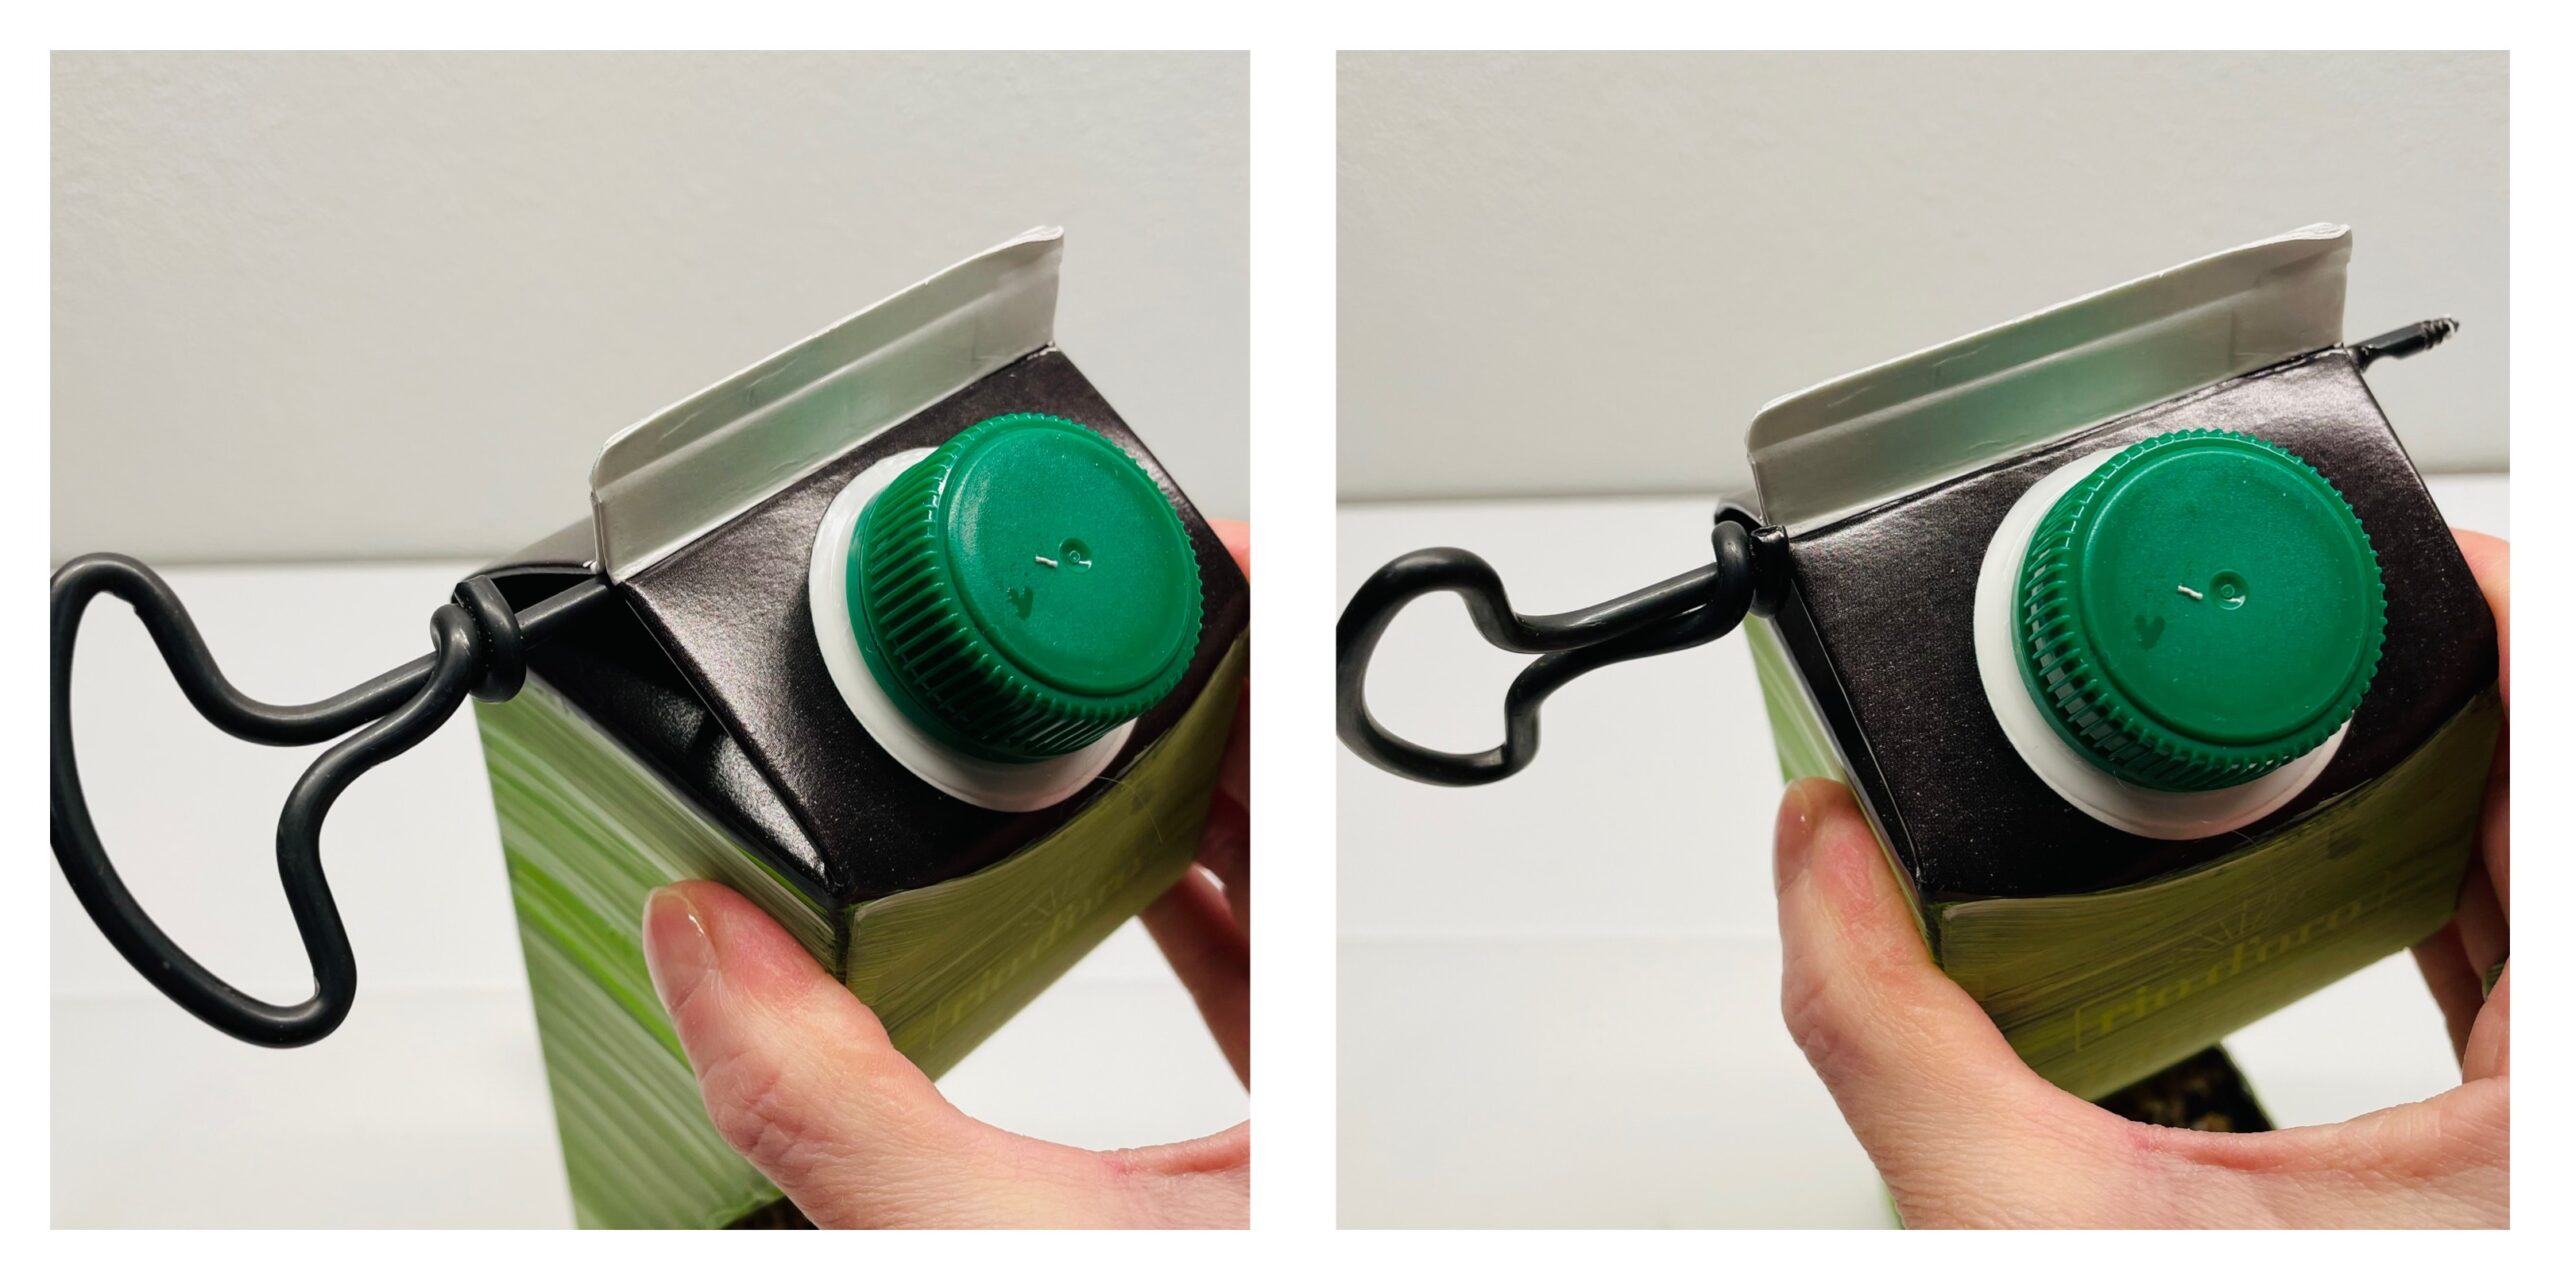
Bild zum Schritt 16 für das Bastel- und DIY-Abenteuer für Kinder: 'Nimm den Locher und stanze zwei Löcher in den oberen...'

17

Thread the package line through the two punched holes and knot them.

Alternative: Now cut off a package line with a length of 20cm and thread it into the ear of a large, thick needle. Then thread the cord through the drilled holes and knot the ends.
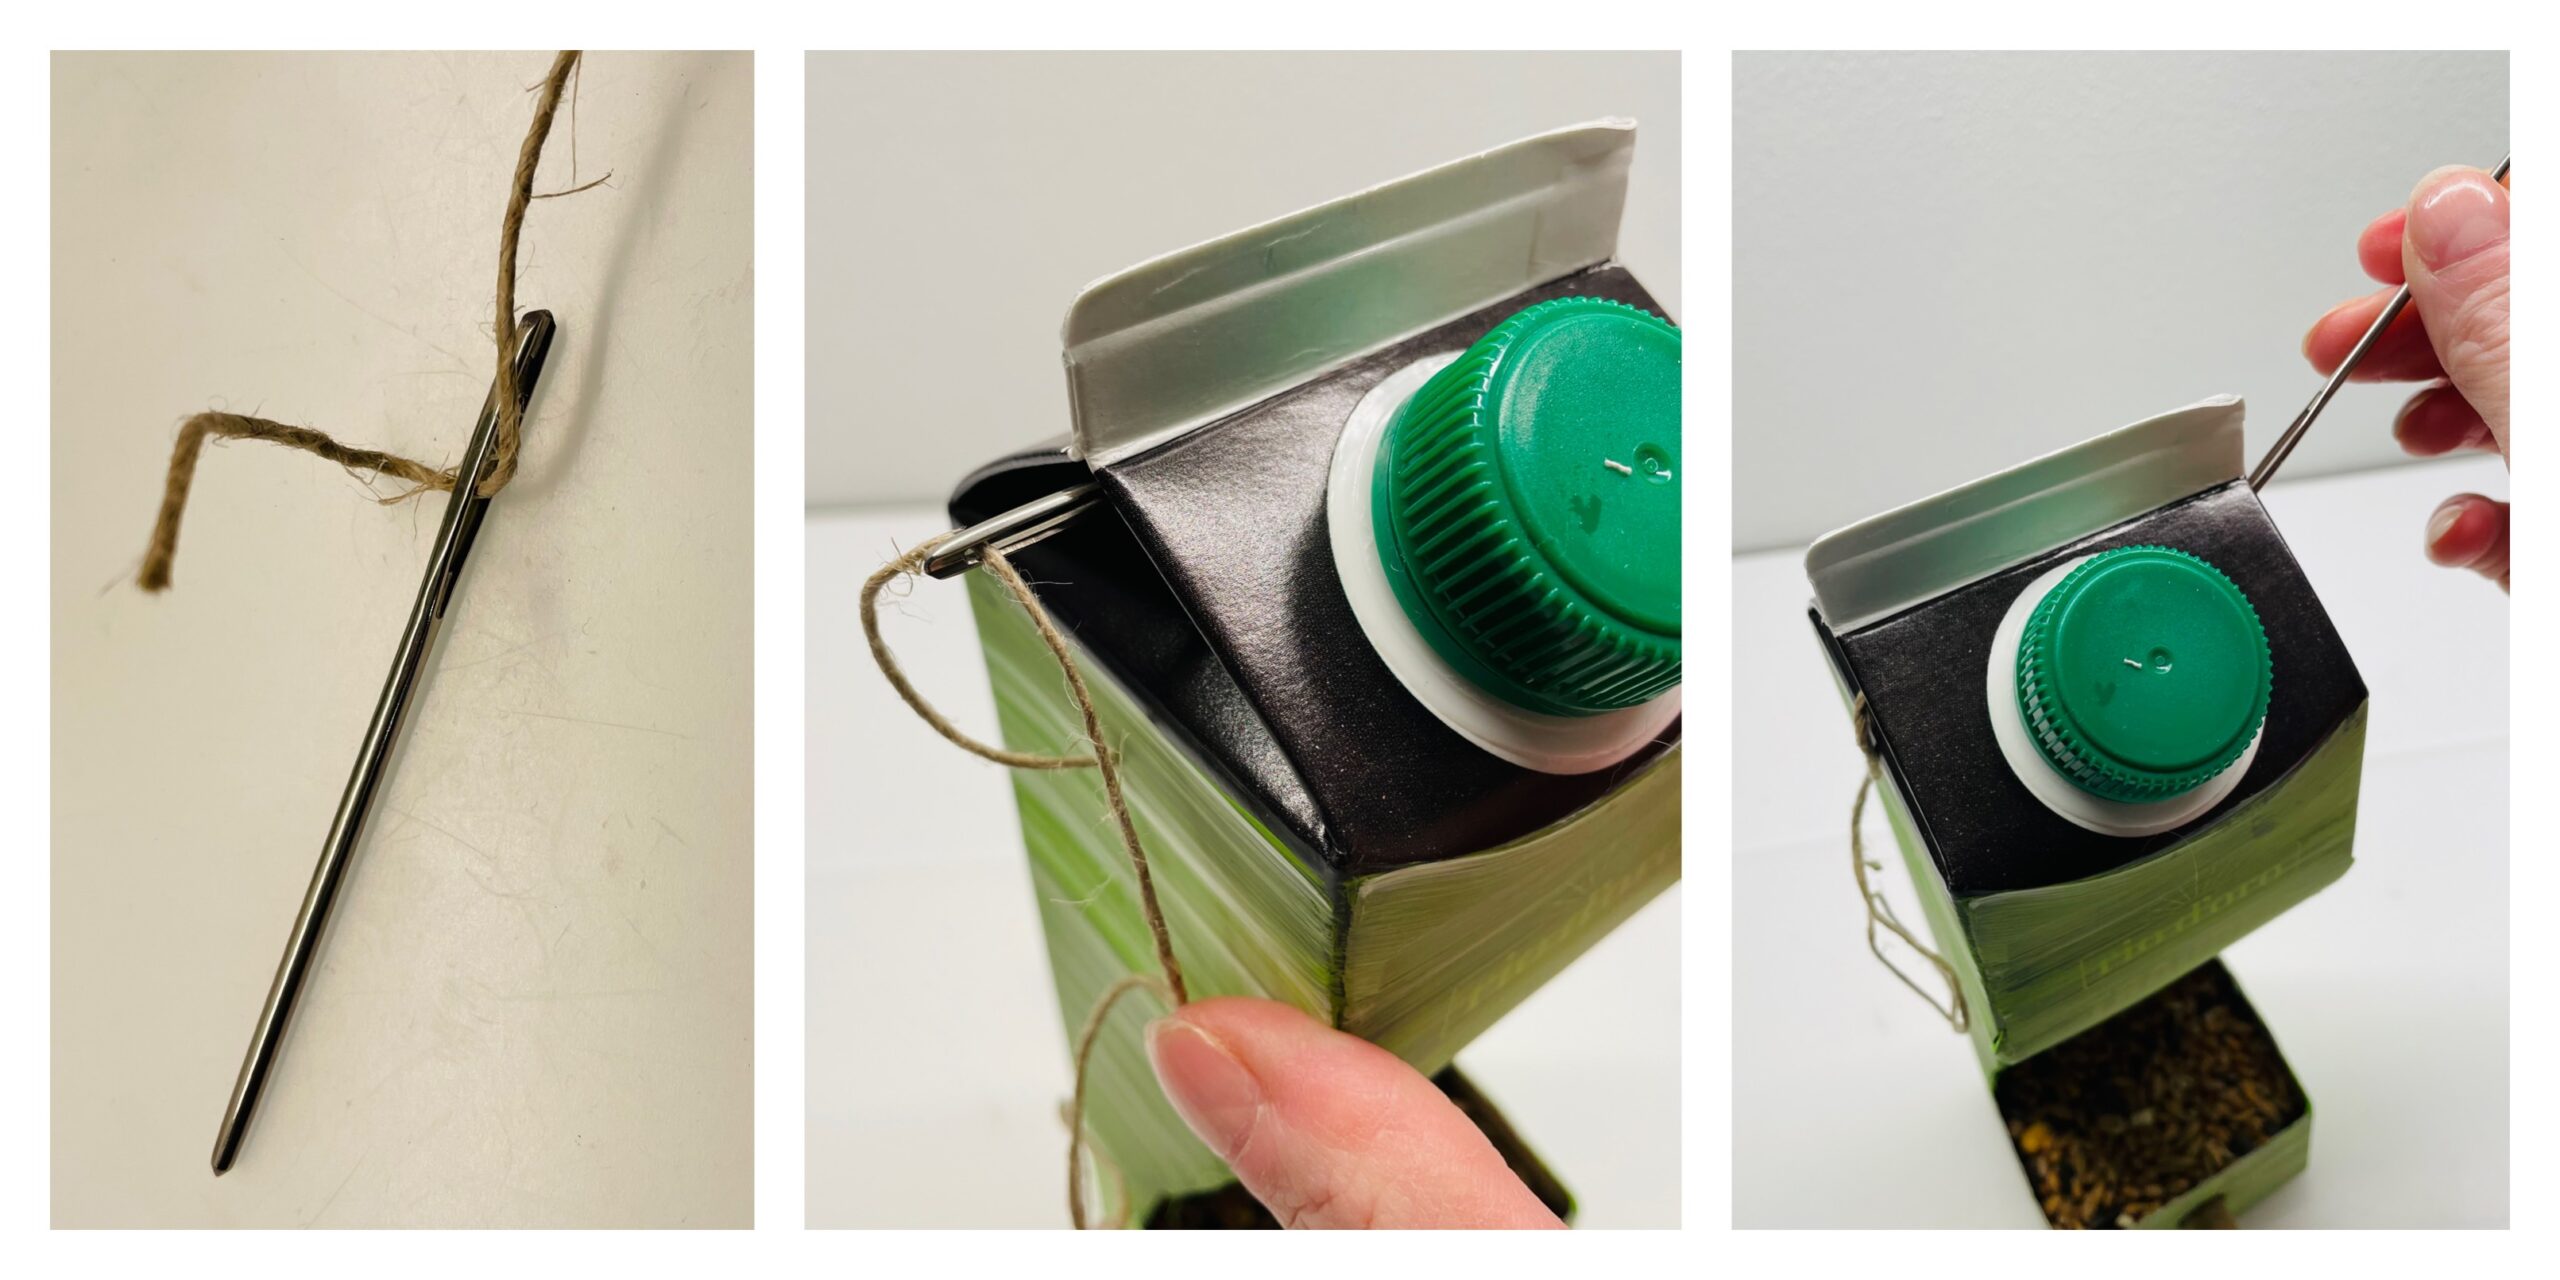
Bild zum Schritt 17 für das Bastel- und DIY-Abenteuer für Kinder: 'Fädle die Paketschnur durch die beiden gestanzten Löcher und verknote...'

18

The suspension for your bird feed house is ready.
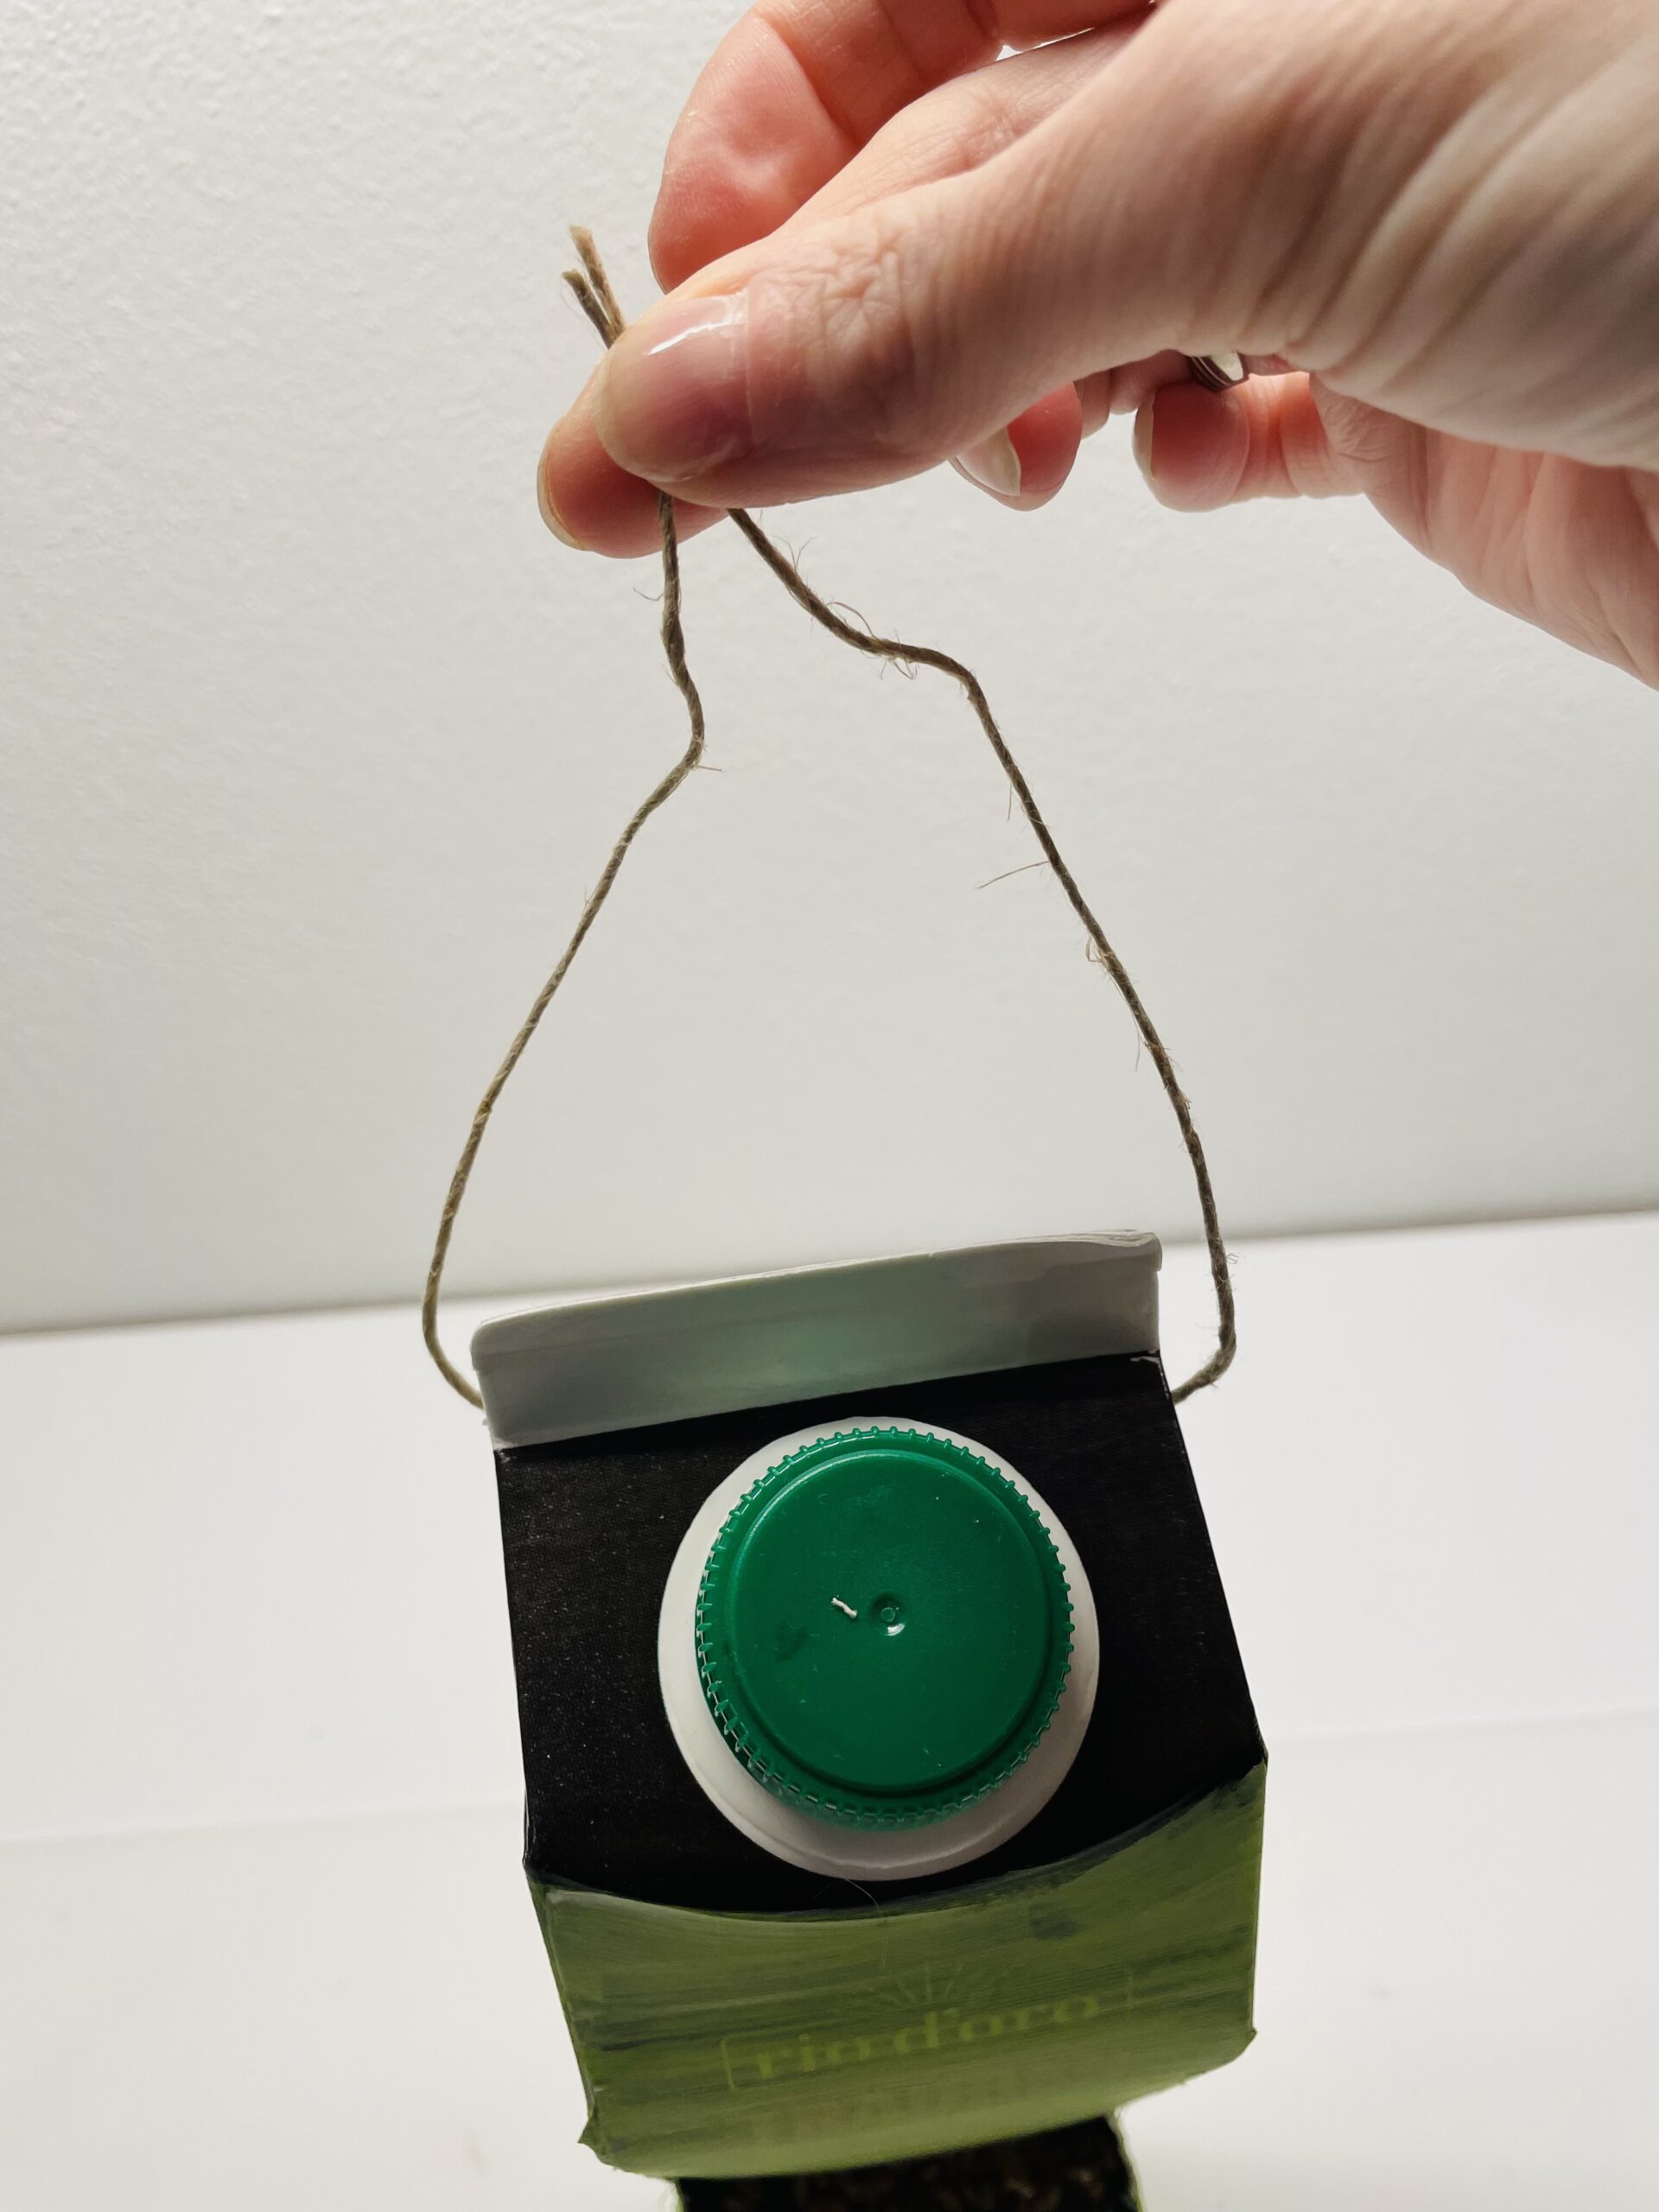
Bild zum Schritt 18 für das Bastel- und DIY-Abenteuer für Kinder: 'Fertig ist die Aufhängung für euer Vogelfutter-Haus.'

19

Now fill the bottom of the forage with loose bird food.
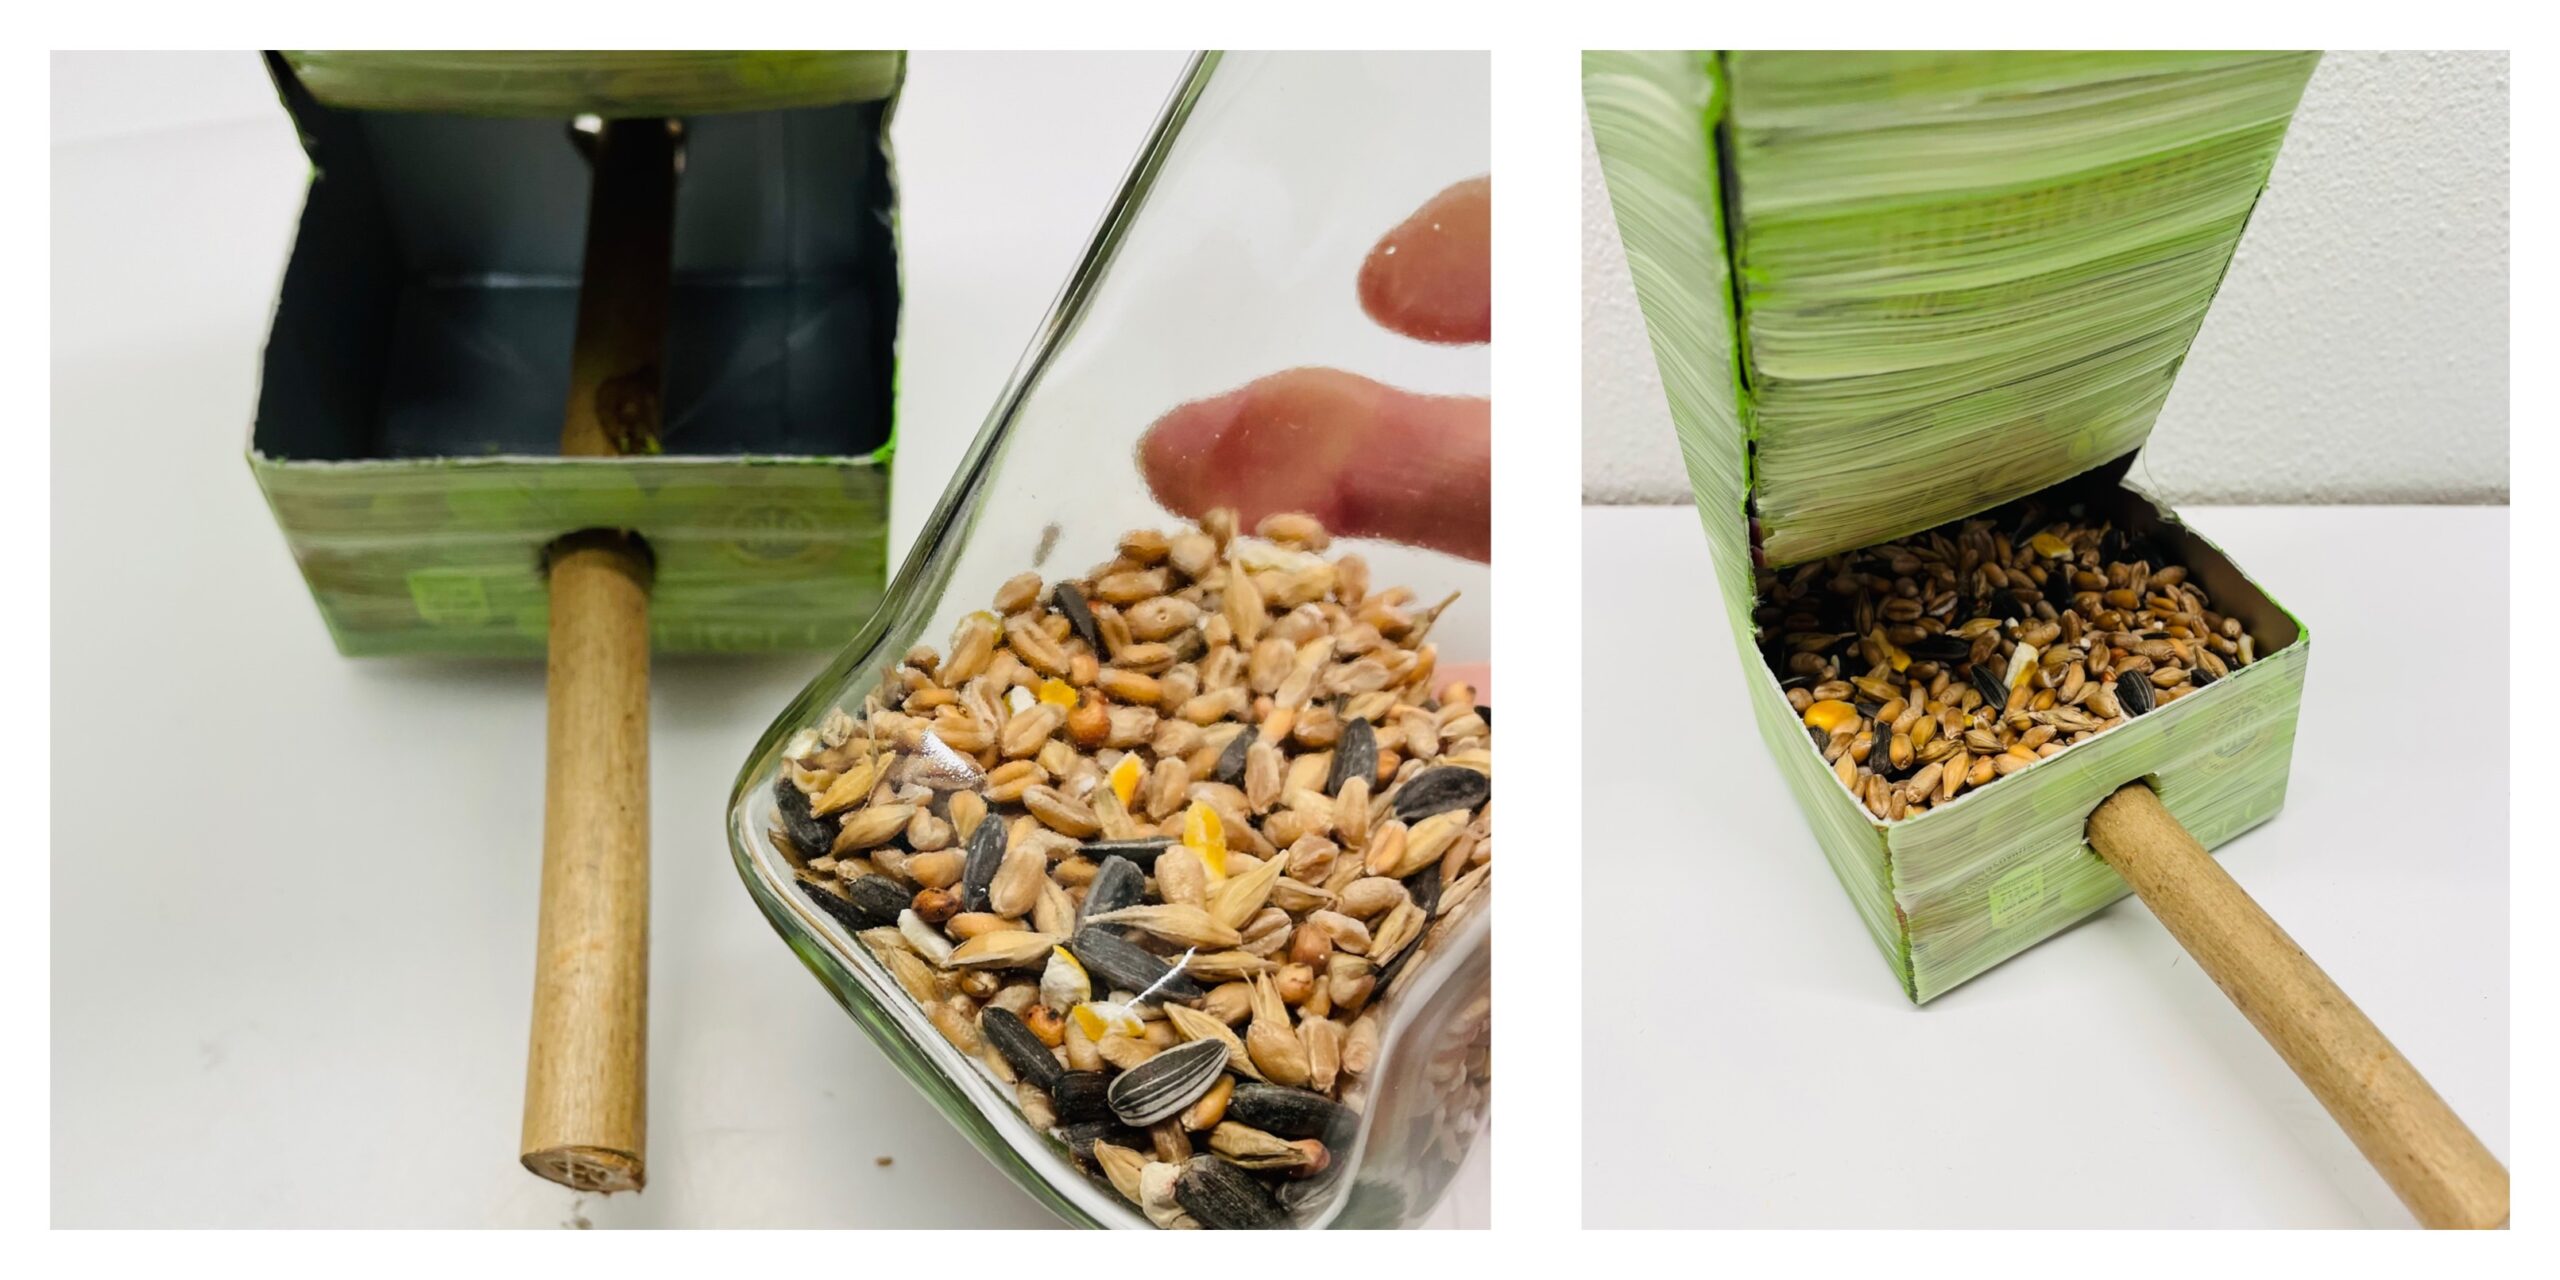
Bild zum Schritt 19 für das Bastel- und DIY-Abenteuer für Kinder: 'Befüllt jetzt das Unterteil des Futterhauses mit losem Vogelfutter.'

20

The birdhouse is ready.

Tip: Fill the bird food also with the screw cap. For this you use a funnel (alternatively fold one out of paper) because this way the food slips from above as required. The upper part of the carton is, so to speak, the storage container, which is protected from rain by the screw cap.
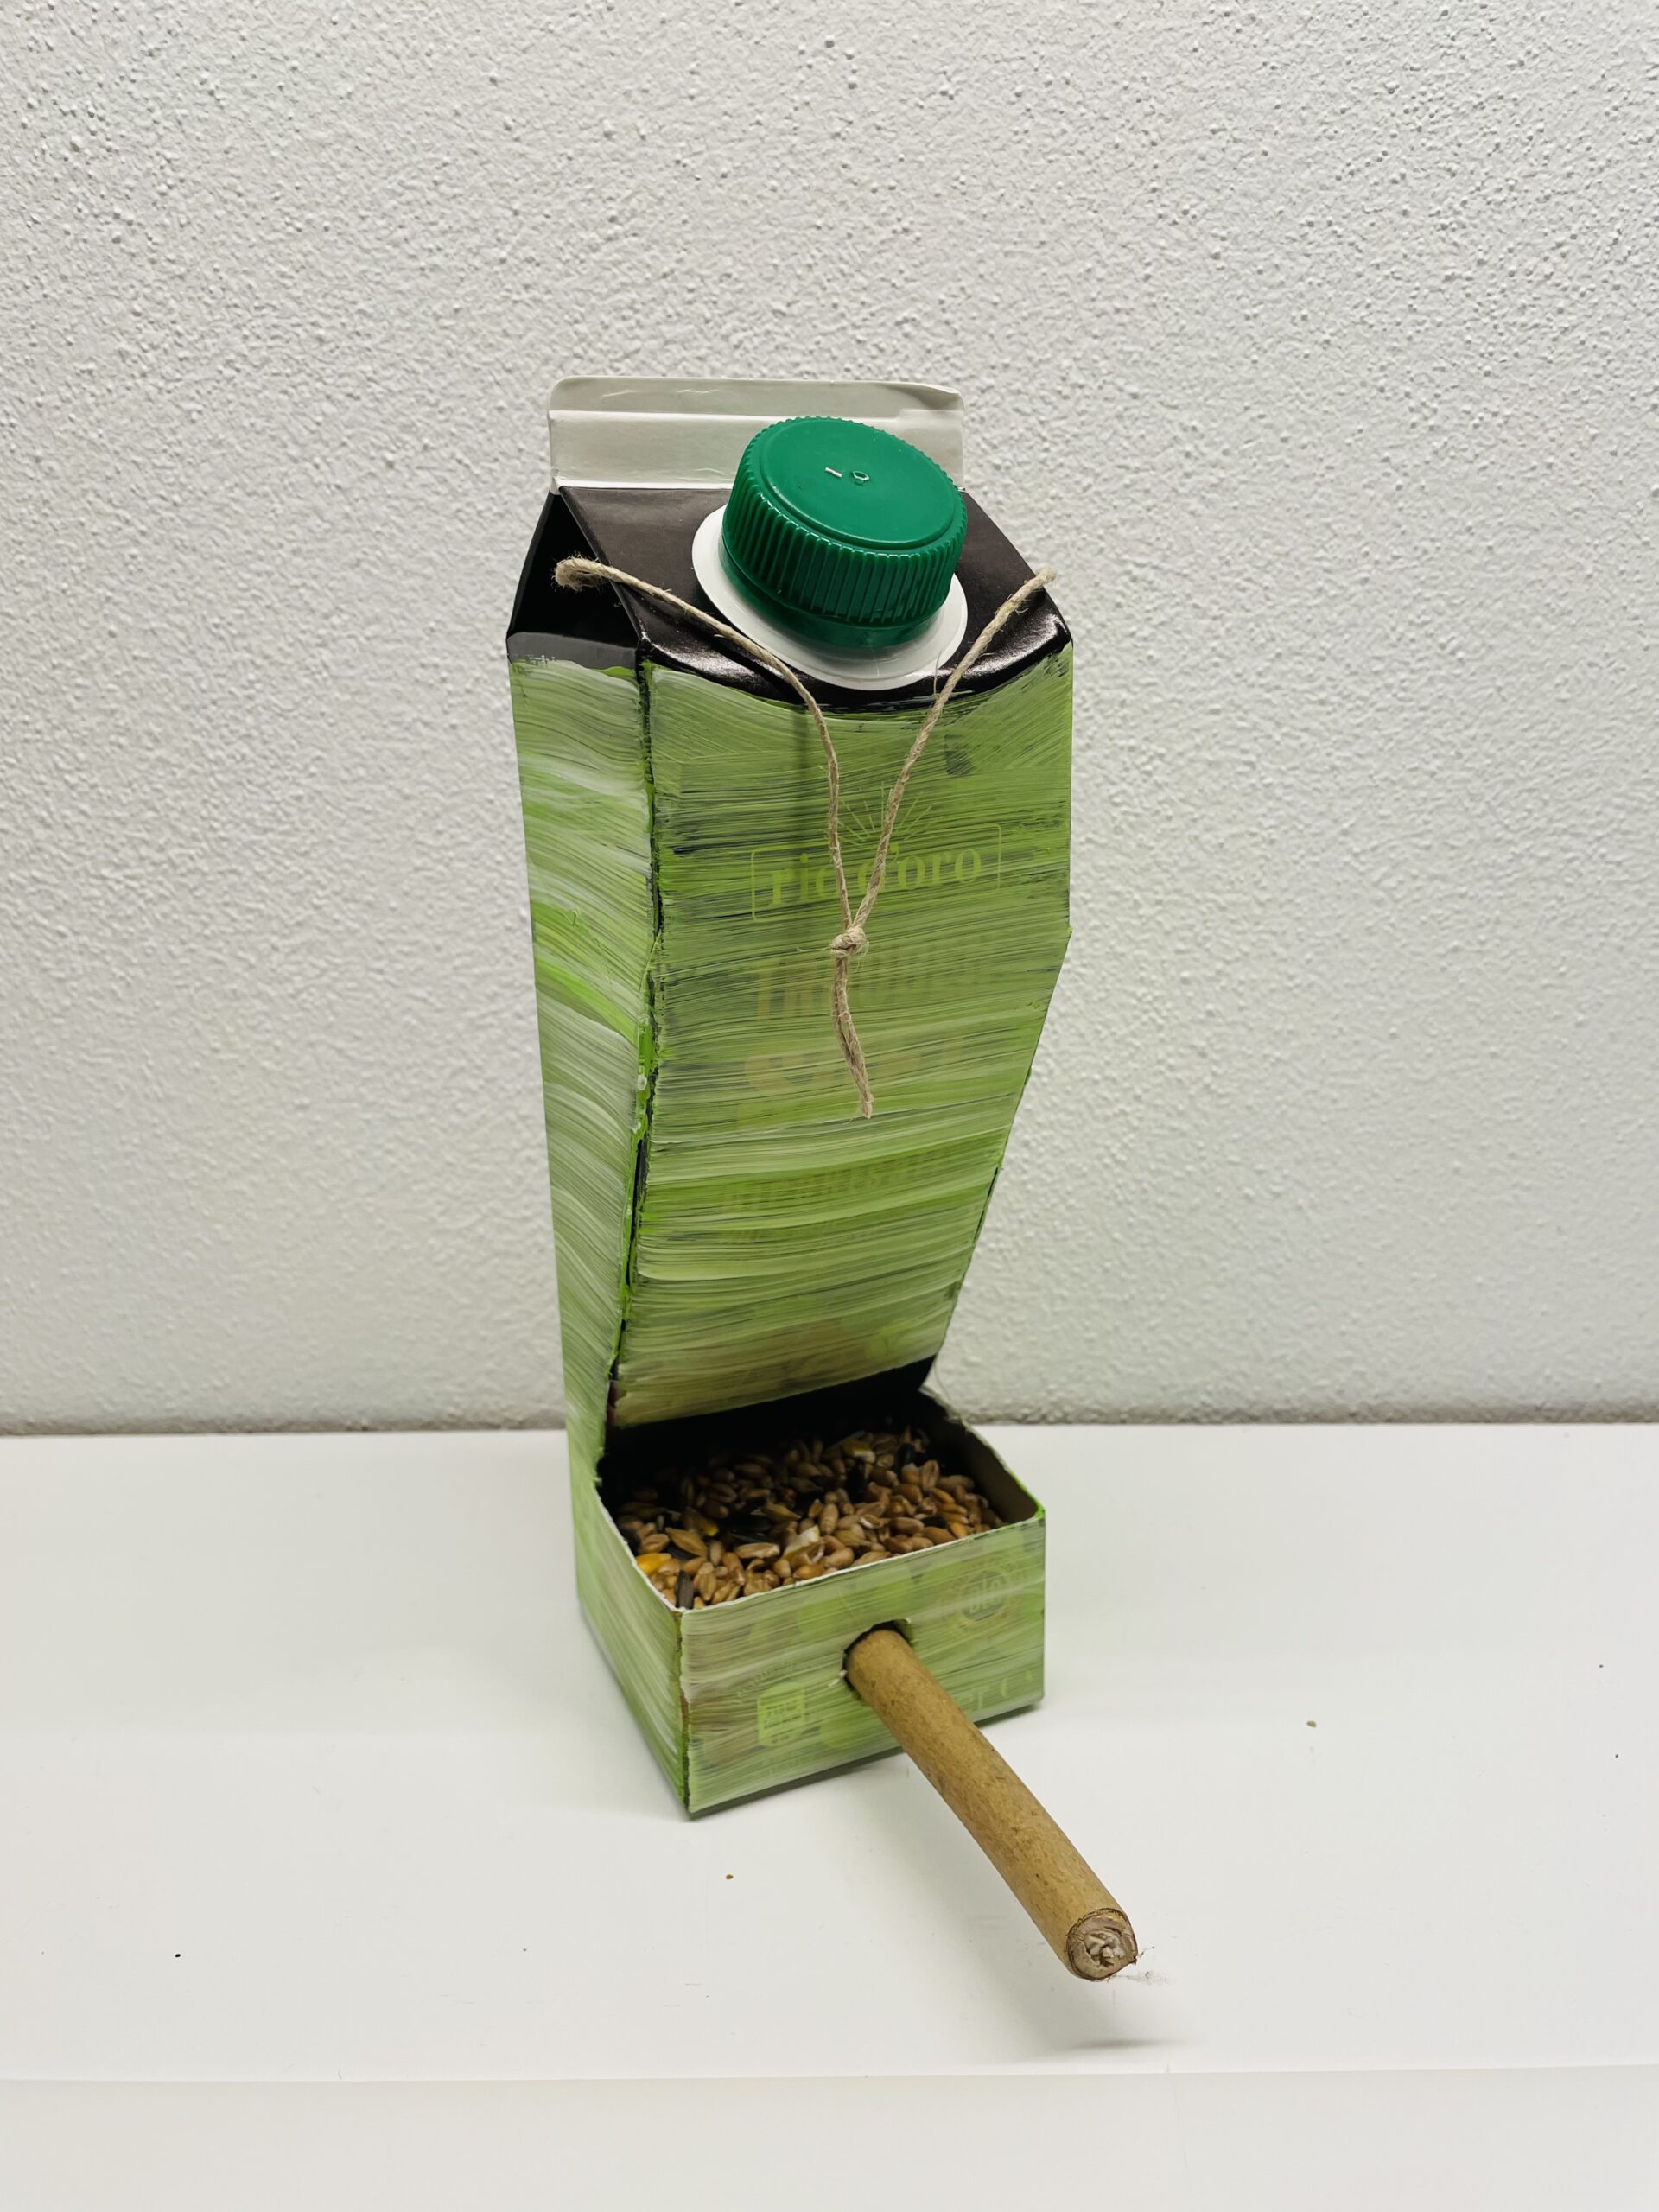
Bild zum Schritt 20 für das Bastel- und DIY-Abenteuer für Kinder: 'Fertig ist das Vogelhaus.     Tipp: Füllt...'

21

Finally, she hangs the forage house to a sheltered place in the garden.
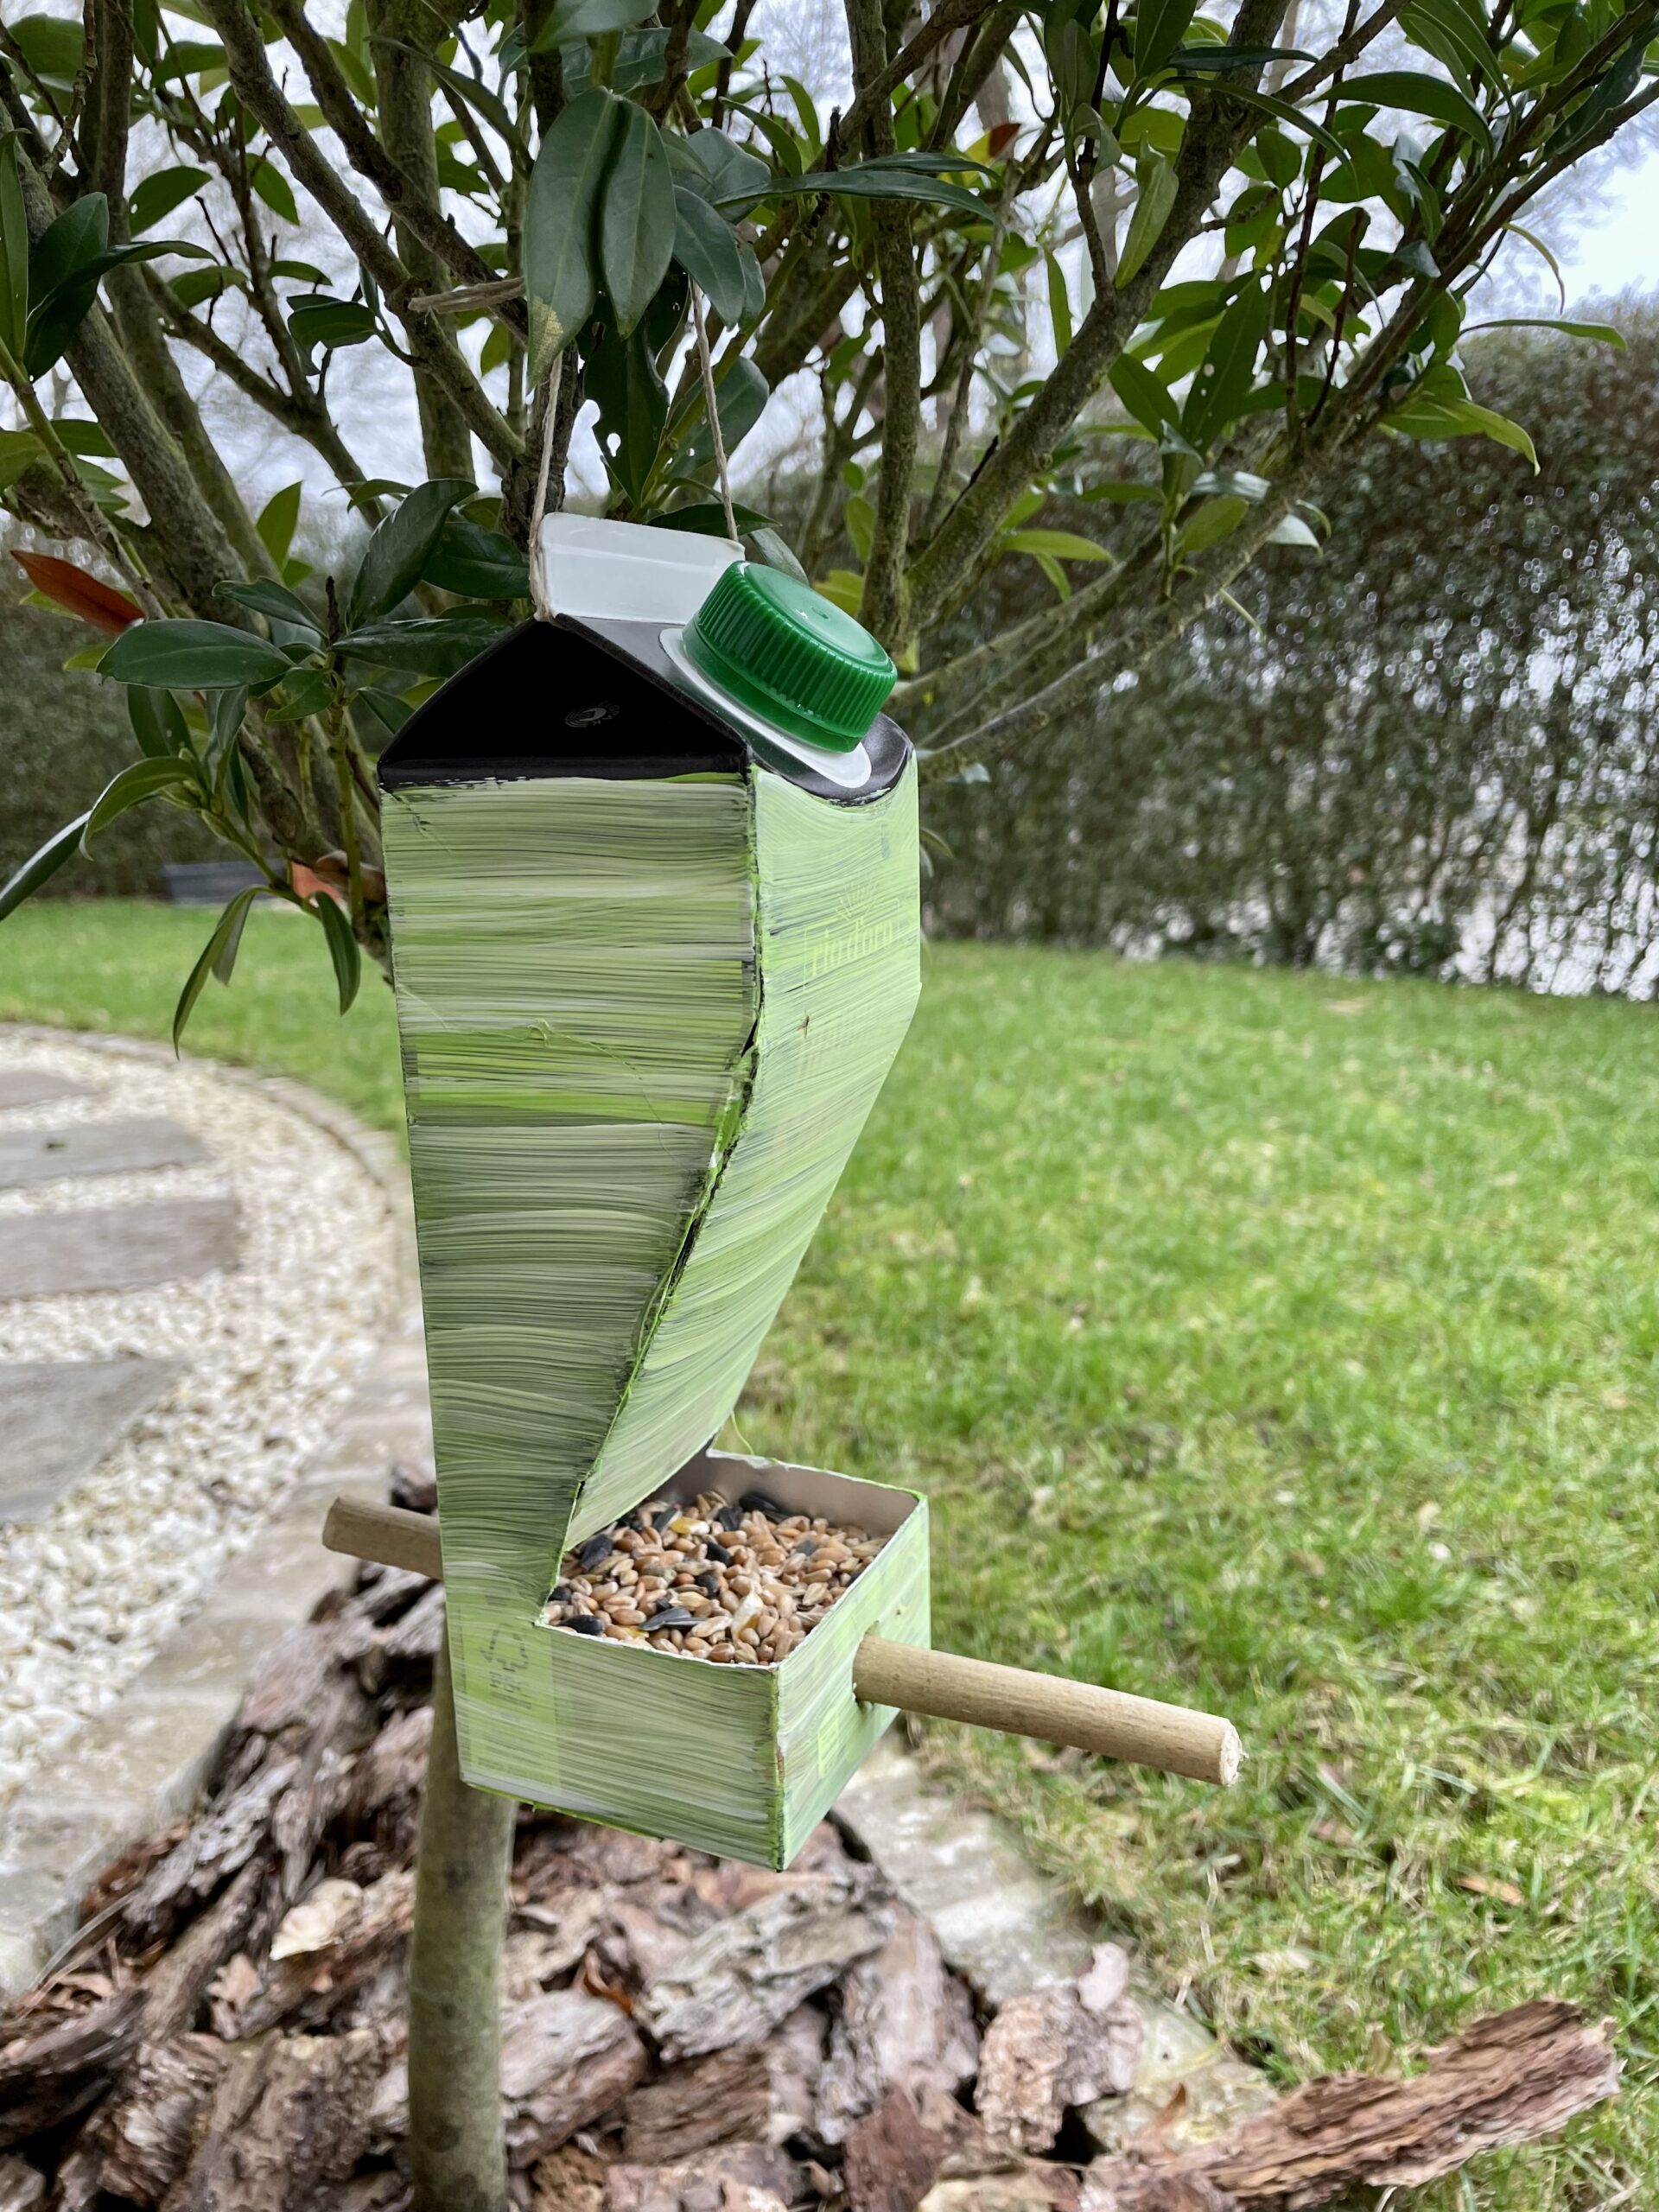
Bild zum Schritt 21 für das Bastel- und DIY-Abenteuer für Kinder: 'Abschließend hängt ihr das Futterhaus an einen geschützten Ort in...'

22

Have fun doing crafts and watching birds!

Bird food - Build a place

Follow us on Facebook , Instagram and Pinterest
Don't miss any more adventures: Our bottle mail

Leave a Reply

Your email address will not be published.

The maximum upload file size: 5 MB. You can upload: image, document. Drop file here