Fir tree making 3D

AdventurerKatzi
Rating0.01.5 thousand times & (0) DifficultyIntermediate

A fanned fir tree that looks very plastic. Whether used as a card or as an image, it is a challenging craft.
Try it out. Here you will find the instructions.

Media Education for Kindergarten and Hort

Kind bastelt eine Rassel mit dem Navi
The Adventure Navi, the app for DIY projects, enables media education for the youngest.

Relief in everyday life, targeted promotion of individual children, independent learning and - without any pre-knowledge already usable by the youngest!
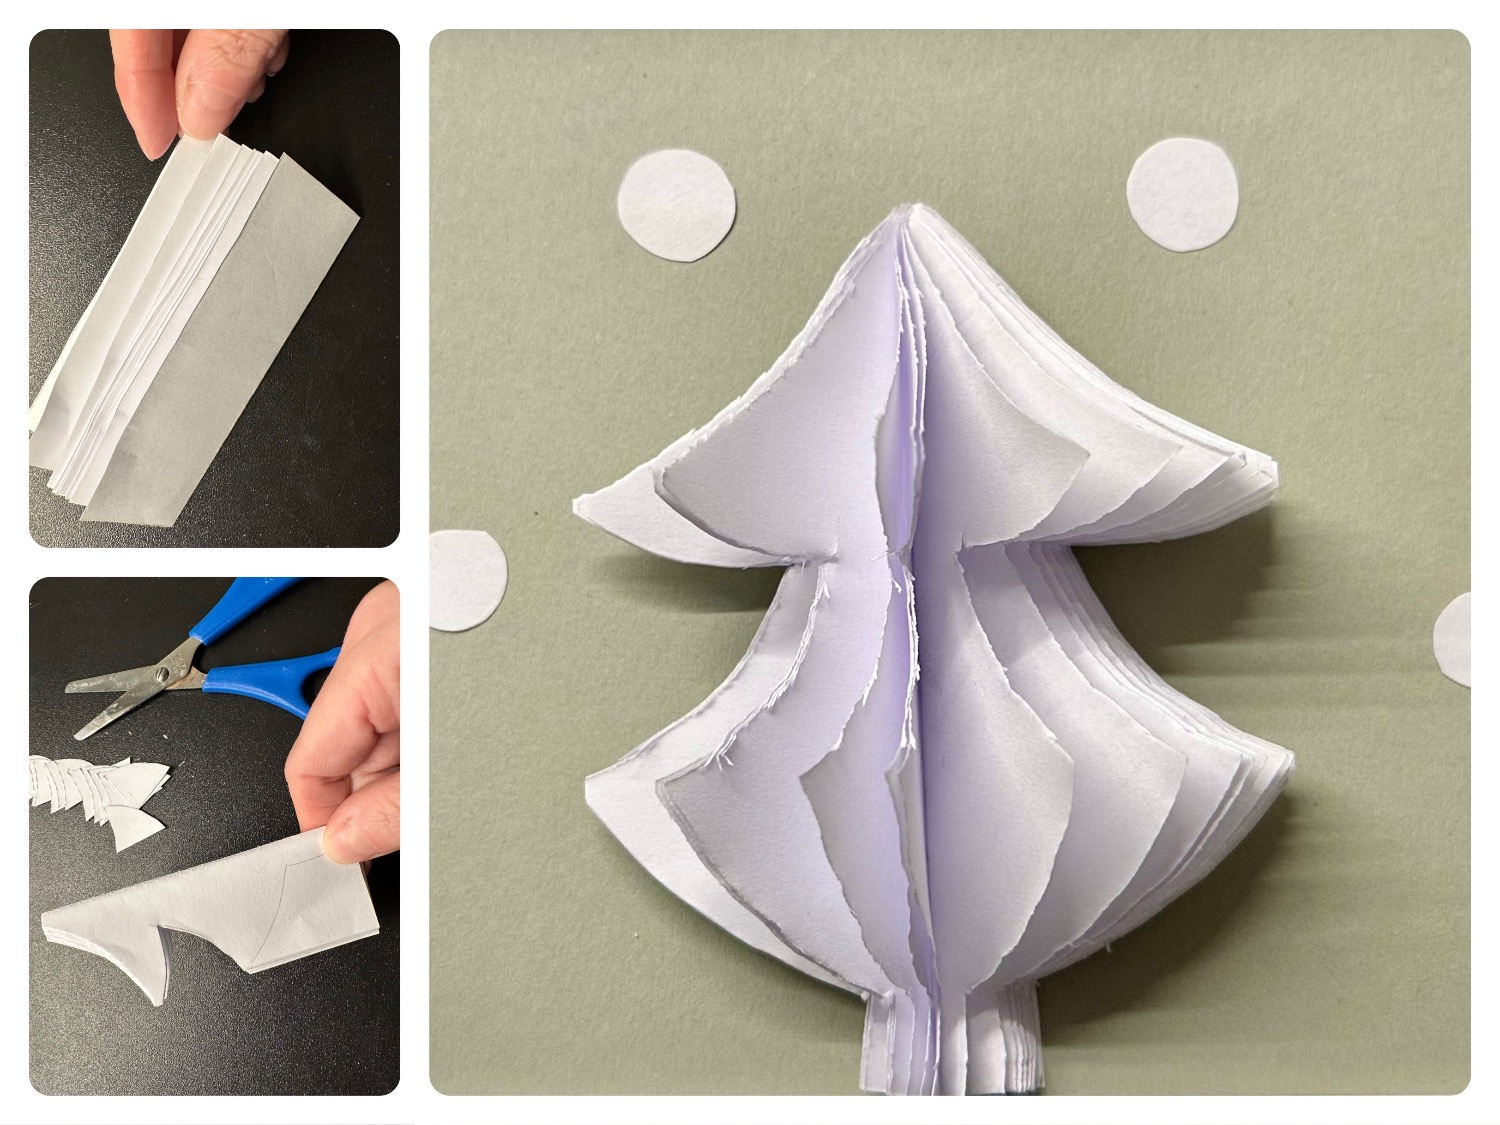


Titelbild zur Bastel- und DIY-Idee für Kinder '(252) Tannenbaum basteln 3D'
Material for1 Child
Prep Time5 min.Adv. Time25 min.Total Time30 min.
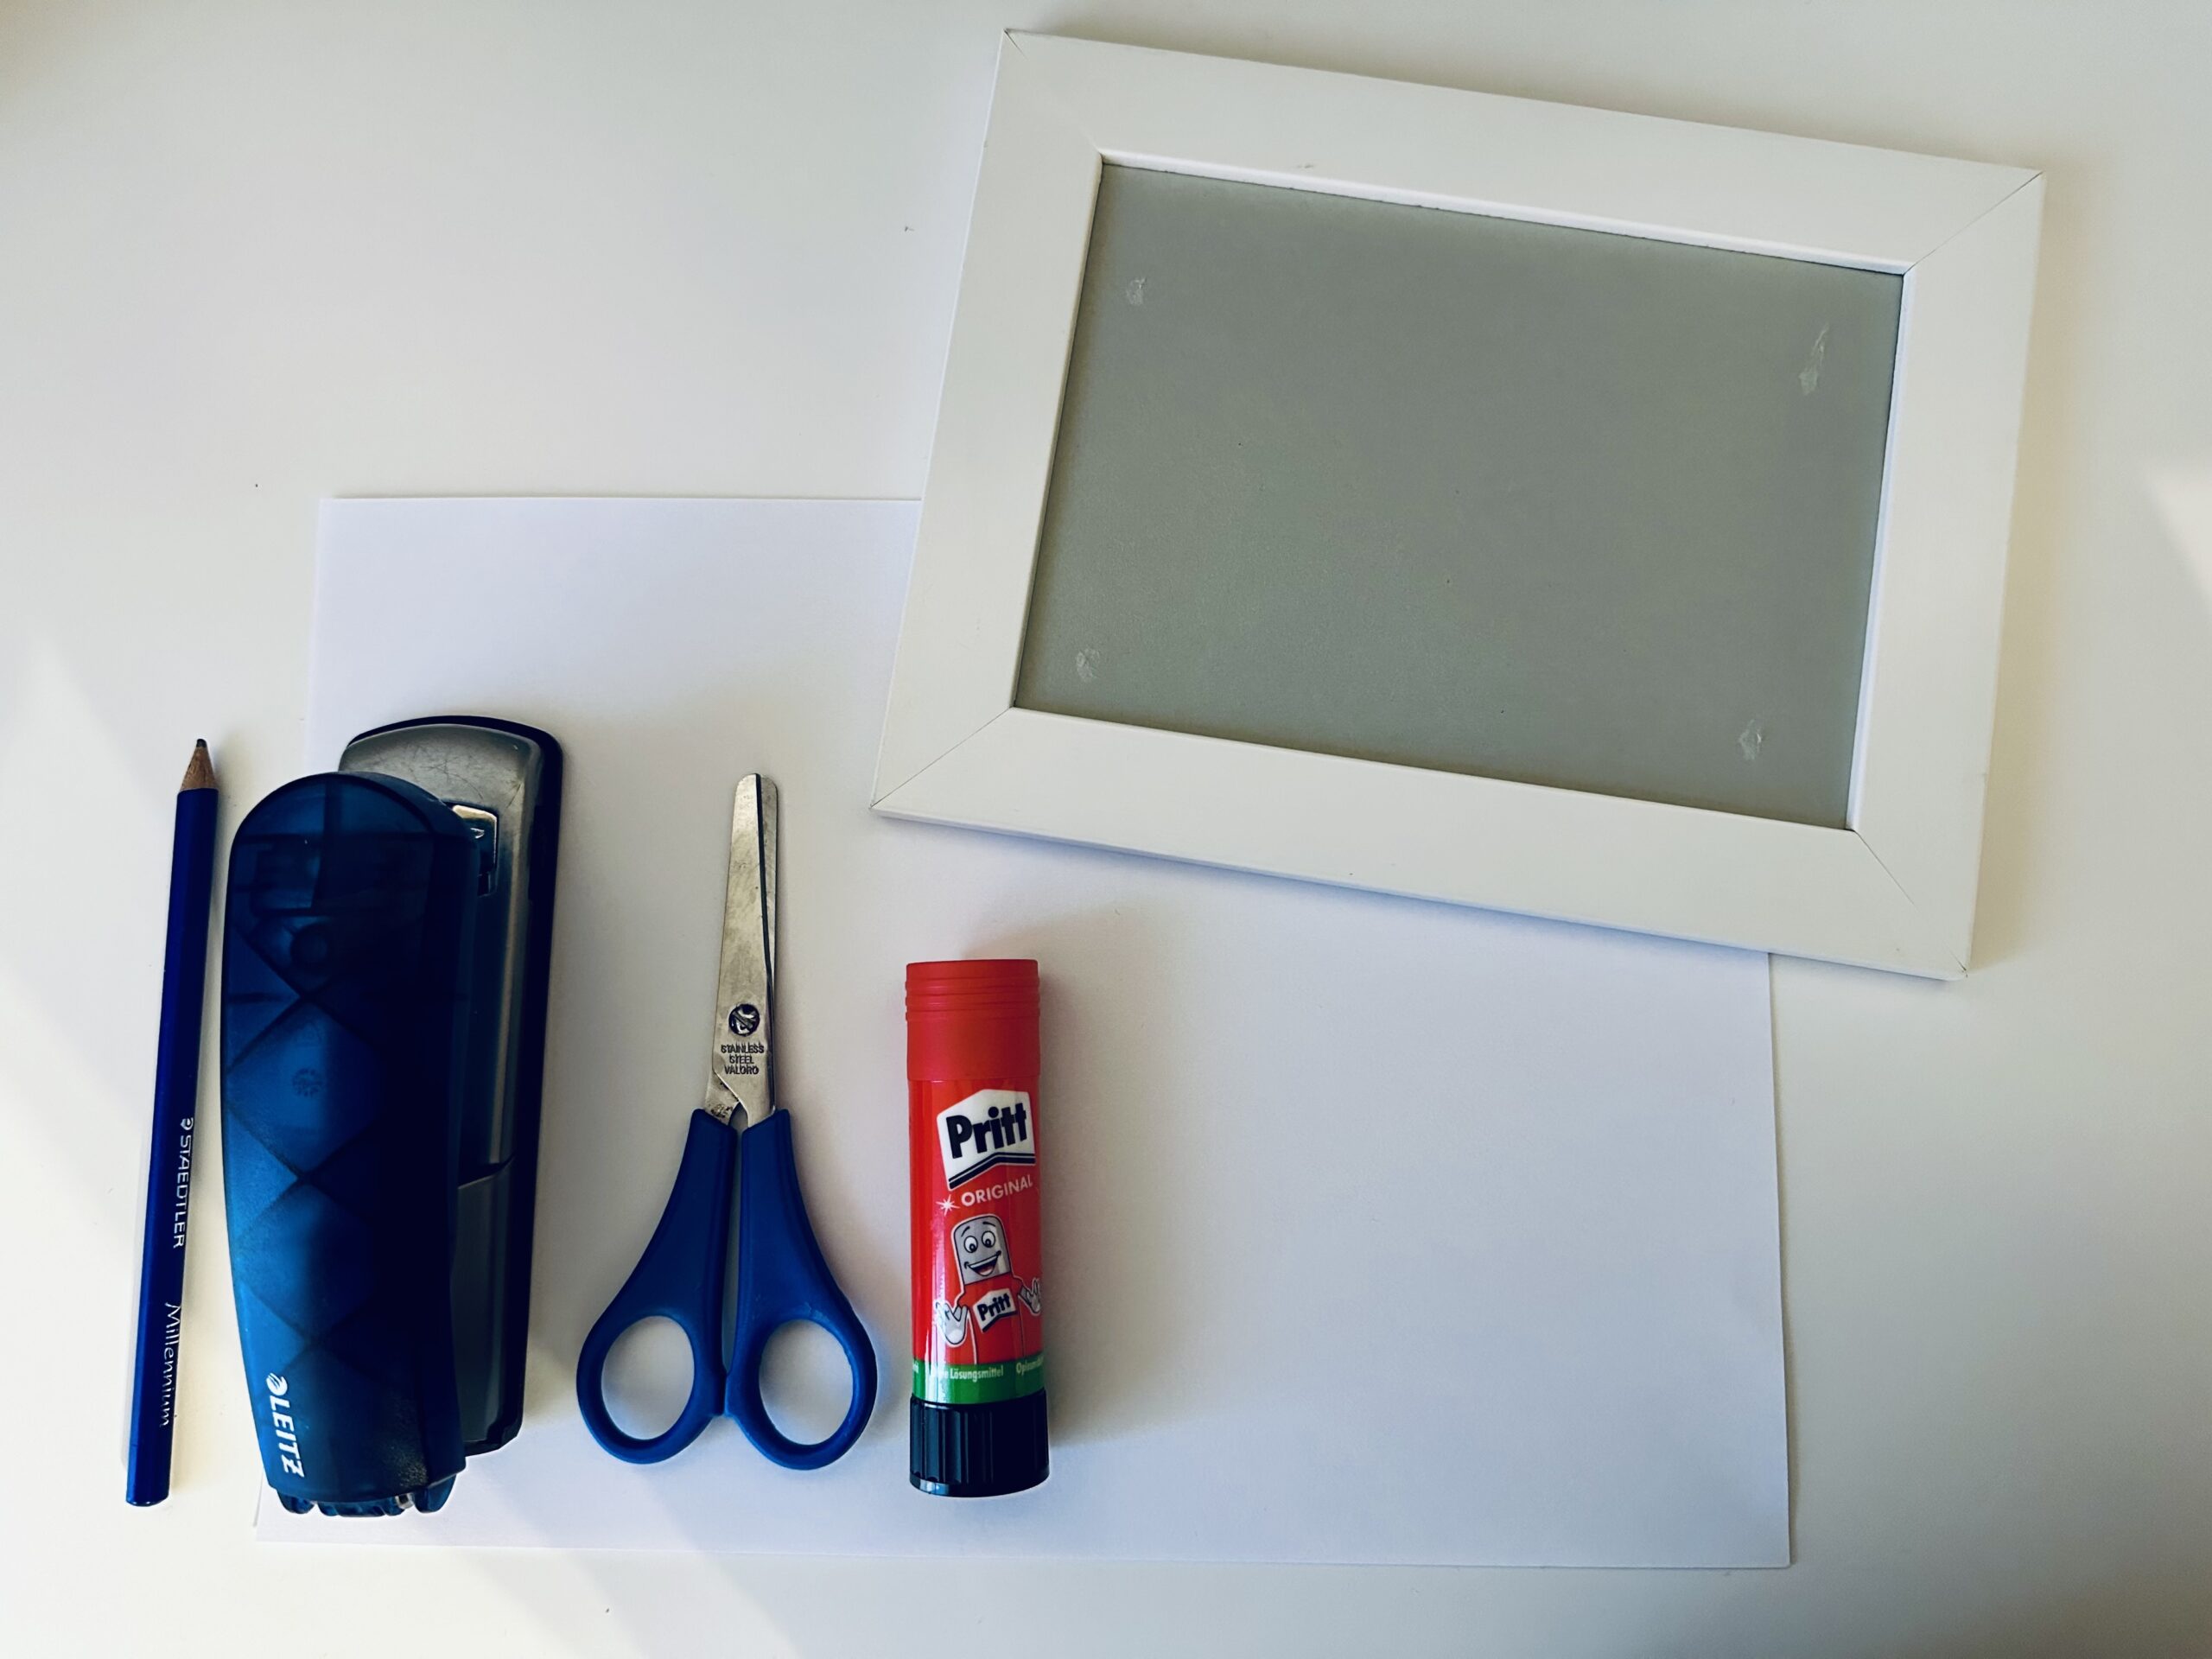
 1 Sheet paper DIN A4Green or white
 1 Pen
 1 Tacker
 1 DIN A5 mapor an empty picture frame
 1 Builder's pad
All links marked with a shopping cart lead to Amazon - here we have selected products that we would order ourselves and in part also ordered. In a qualified purchase via the advertising link, we as Amazon partner receive a commission, for you there are no costs. You thus support our cost- and advertising banner-free, educational offer.
1

Put everything in place.

Bild zum Schritt 1 für das Bastel- und DIY-Abenteuer für Kinder: 'Lege alles bereit.'

2

First, the leaf is folded.

Bild zum Schritt 2 für das Bastel- und DIY-Abenteuer für Kinder: 'Zuerst wird das Blatt gefaltet.'

3

Put the sheet across you. Fold the bottom long edge upwards onto the opposite side. Gently strike the fracture. Then fold the paper apart again. Cuts apart along the break along the paper.
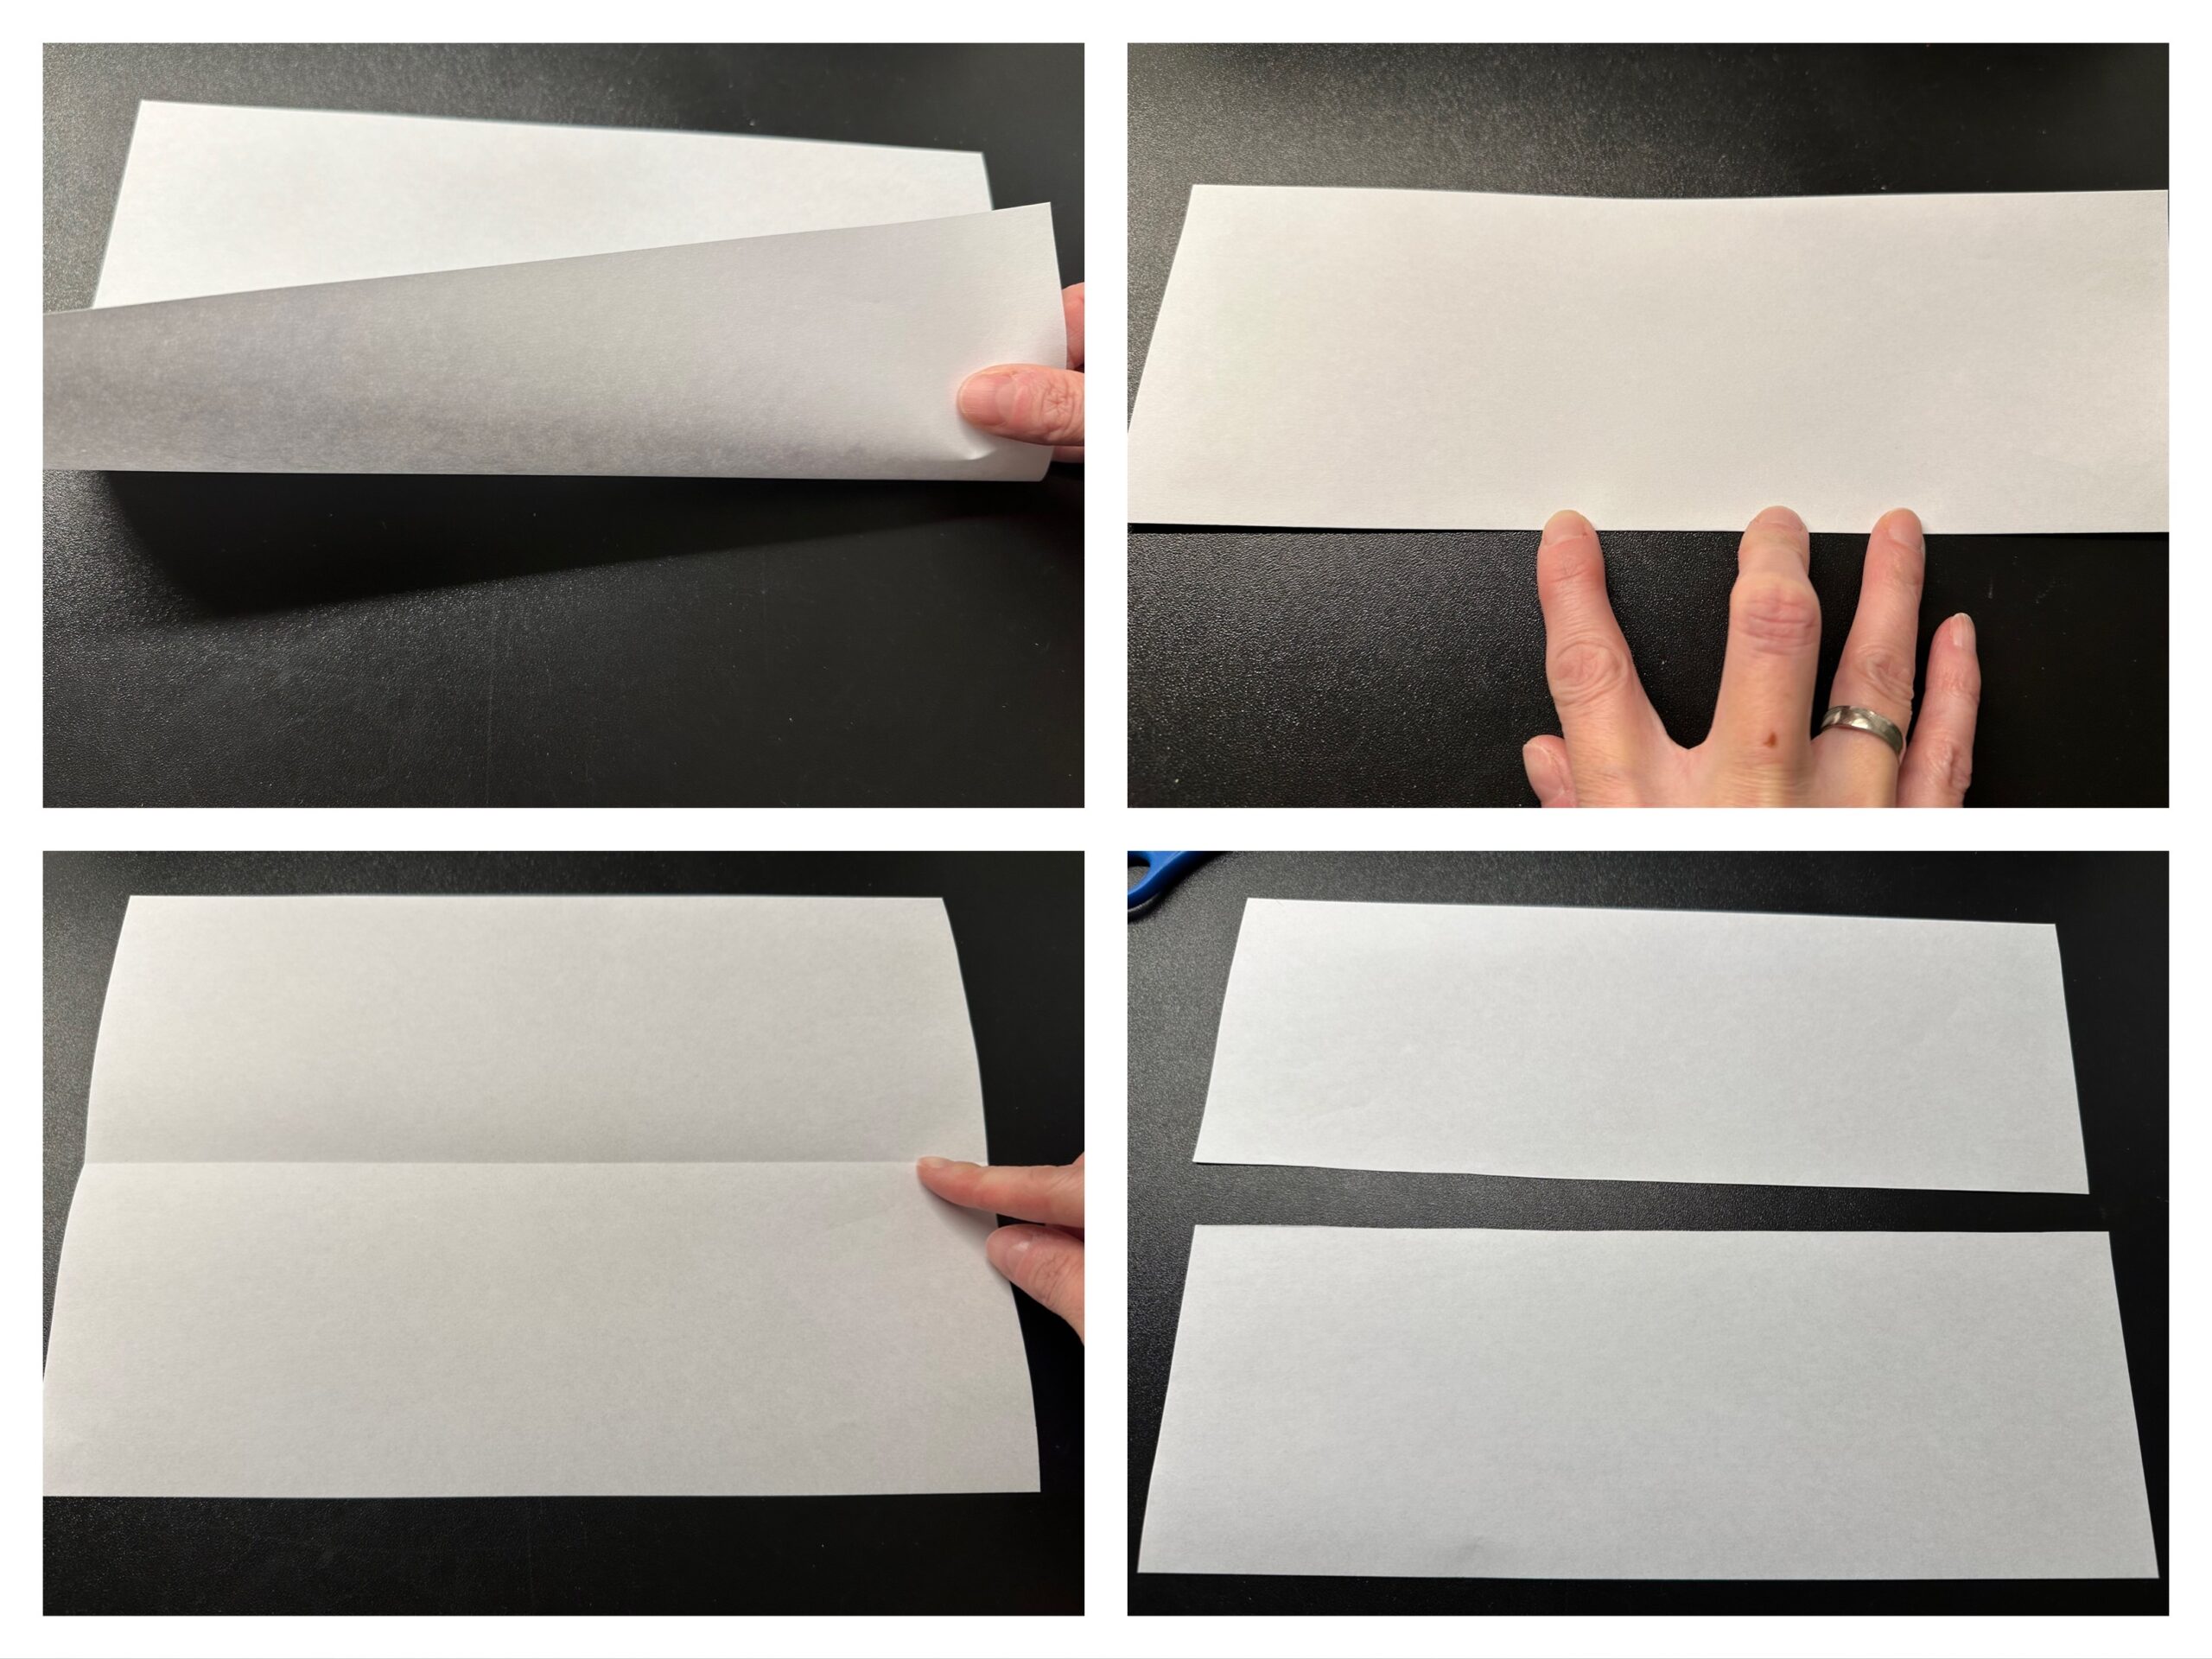
Bild zum Schritt 3 für das Bastel- und DIY-Abenteuer für Kinder: 'Legt das Blatt quer vor euch hin. Faltet die untere...'

4

Put a strip of paper up in front of you. Fold the lower edge of the paper upwards. Gently strike the break. Fold the sheet apart again. The break now shows you the middle. Now fold the short sides from both sides to the middle line and brush the breaks smoothly.

Bild zum Schritt 4 für das Bastel- und DIY-Abenteuer für Kinder: 'Legt einen Papierstreifen hochkant vor euch hin. Faltet die untere...'

5

Now fold all folds apart again. Now you can cut the clearly visible fracture lines apart with the scissors.
Do the same with the second strip of paper.

Bild zum Schritt 5 für das Bastel- und DIY-Abenteuer für Kinder: 'Klappt nun alle Faltungen wieder auseinander. Die gut sichtbaren Bruchlinien...'

6

Place a small leaf across you and fold the lower edge onto the upper edge. Repeat this on all leaves.

Bild zum Schritt 6 für das Bastel- und DIY-Abenteuer für Kinder: 'Legt ein kleines Blatt quer vor euch hin und faltet...'

7

Now put the folded leaves together. Make sure that they lie exactly in each other.

Bild zum Schritt 7 für das Bastel- und DIY-Abenteuer für Kinder: 'Steckt nun die gefalteten Blätter ineinander. Achtet darauf, dass sie...'

8

Hold the leaf bump firmly in your hand. The centre line is clearly visible (as a break). Here two clamps are put into it with the tacker. Set the tacker so that the clamps sit along the line.
Now the leaf bump is fixed and holds together.

Bild zum Schritt 8 für das Bastel- und DIY-Abenteuer für Kinder: 'Haltet den Blätterstoß fest in der Hand klappt ihn auf....'

9

Folds the paper bump again (like a book). Paints a fir tree shape on the open side.
Note: The closed side is the trunk of the tree, here still paper has to stand, otherwise everything will fall apart.
For example, you can paint curved or straight jigs. Cut out the jigs with the scissors.
At the bottom you can leave a small tree trunk.

Bild zum Schritt 9 für das Bastel- und DIY-Abenteuer für Kinder: 'Klappt den Papierstoß wieder zusammen (wie ein Buch). Malt an...'

10

Place the cut-out fir tree, e.g. on a picture frame or a DIN A5 large folding card. All individual leaves of the tree are bent a little apart.
This creates a plastic fir tree.

Bild zum Schritt 10 für das Bastel- und DIY-Abenteuer für Kinder: 'Legt den  ausgeschnittenen Tannenbaum z.B. auf einen Bilderrahmen oder...'

11

Cuts out small circles from white paper remnants. Sticks them up as snowflakes around the tree.
The winter fir tree is ready.

Bild zum Schritt 11 für das Bastel- und DIY-Abenteuer für Kinder: 'Schneidet aus weißen Papierresten kleine Kreise aus. Klebt diese als...'

12

Usable as greeting or invitation card or decorative image.

Bild zum Schritt 12 für das Bastel- und DIY-Abenteuer für Kinder: 'Verwendbar als Gruß- oder Einladungskarte oder dekoratives Bild.'

13

Stay creative.

Materials

 1 Sheet paper DIN A4Green or white
 1 Pen
 1 Tacker
 1 DIN A5 mapor an empty picture frame
 1 Builder's pad
All links marked with a shopping cart lead to Amazon - here we have selected products that we would order ourselves and in part also ordered. In a qualified purchase via the advertising link, we as Amazon partner receive a commission, for you there are no costs. You thus support our cost- and advertising banner-free, educational offer.

Directions

1

Put everything in place.

Bild zum Schritt 1 für das Bastel- und DIY-Abenteuer für Kinder: 'Lege alles bereit.'

2

First, the leaf is folded.

Bild zum Schritt 2 für das Bastel- und DIY-Abenteuer für Kinder: 'Zuerst wird das Blatt gefaltet.'

3

Put the sheet across you. Fold the bottom long edge upwards onto the opposite side. Gently strike the fracture. Then fold the paper apart again. Cuts apart along the break along the paper.

Bild zum Schritt 3 für das Bastel- und DIY-Abenteuer für Kinder: 'Legt das Blatt quer vor euch hin. Faltet die untere...'

4

Put a strip of paper up in front of you. Fold the lower edge of the paper upwards. Gently strike the break. Fold the sheet apart again. The break now shows you the middle. Now fold the short sides from both sides to the middle line and brush the breaks smoothly.
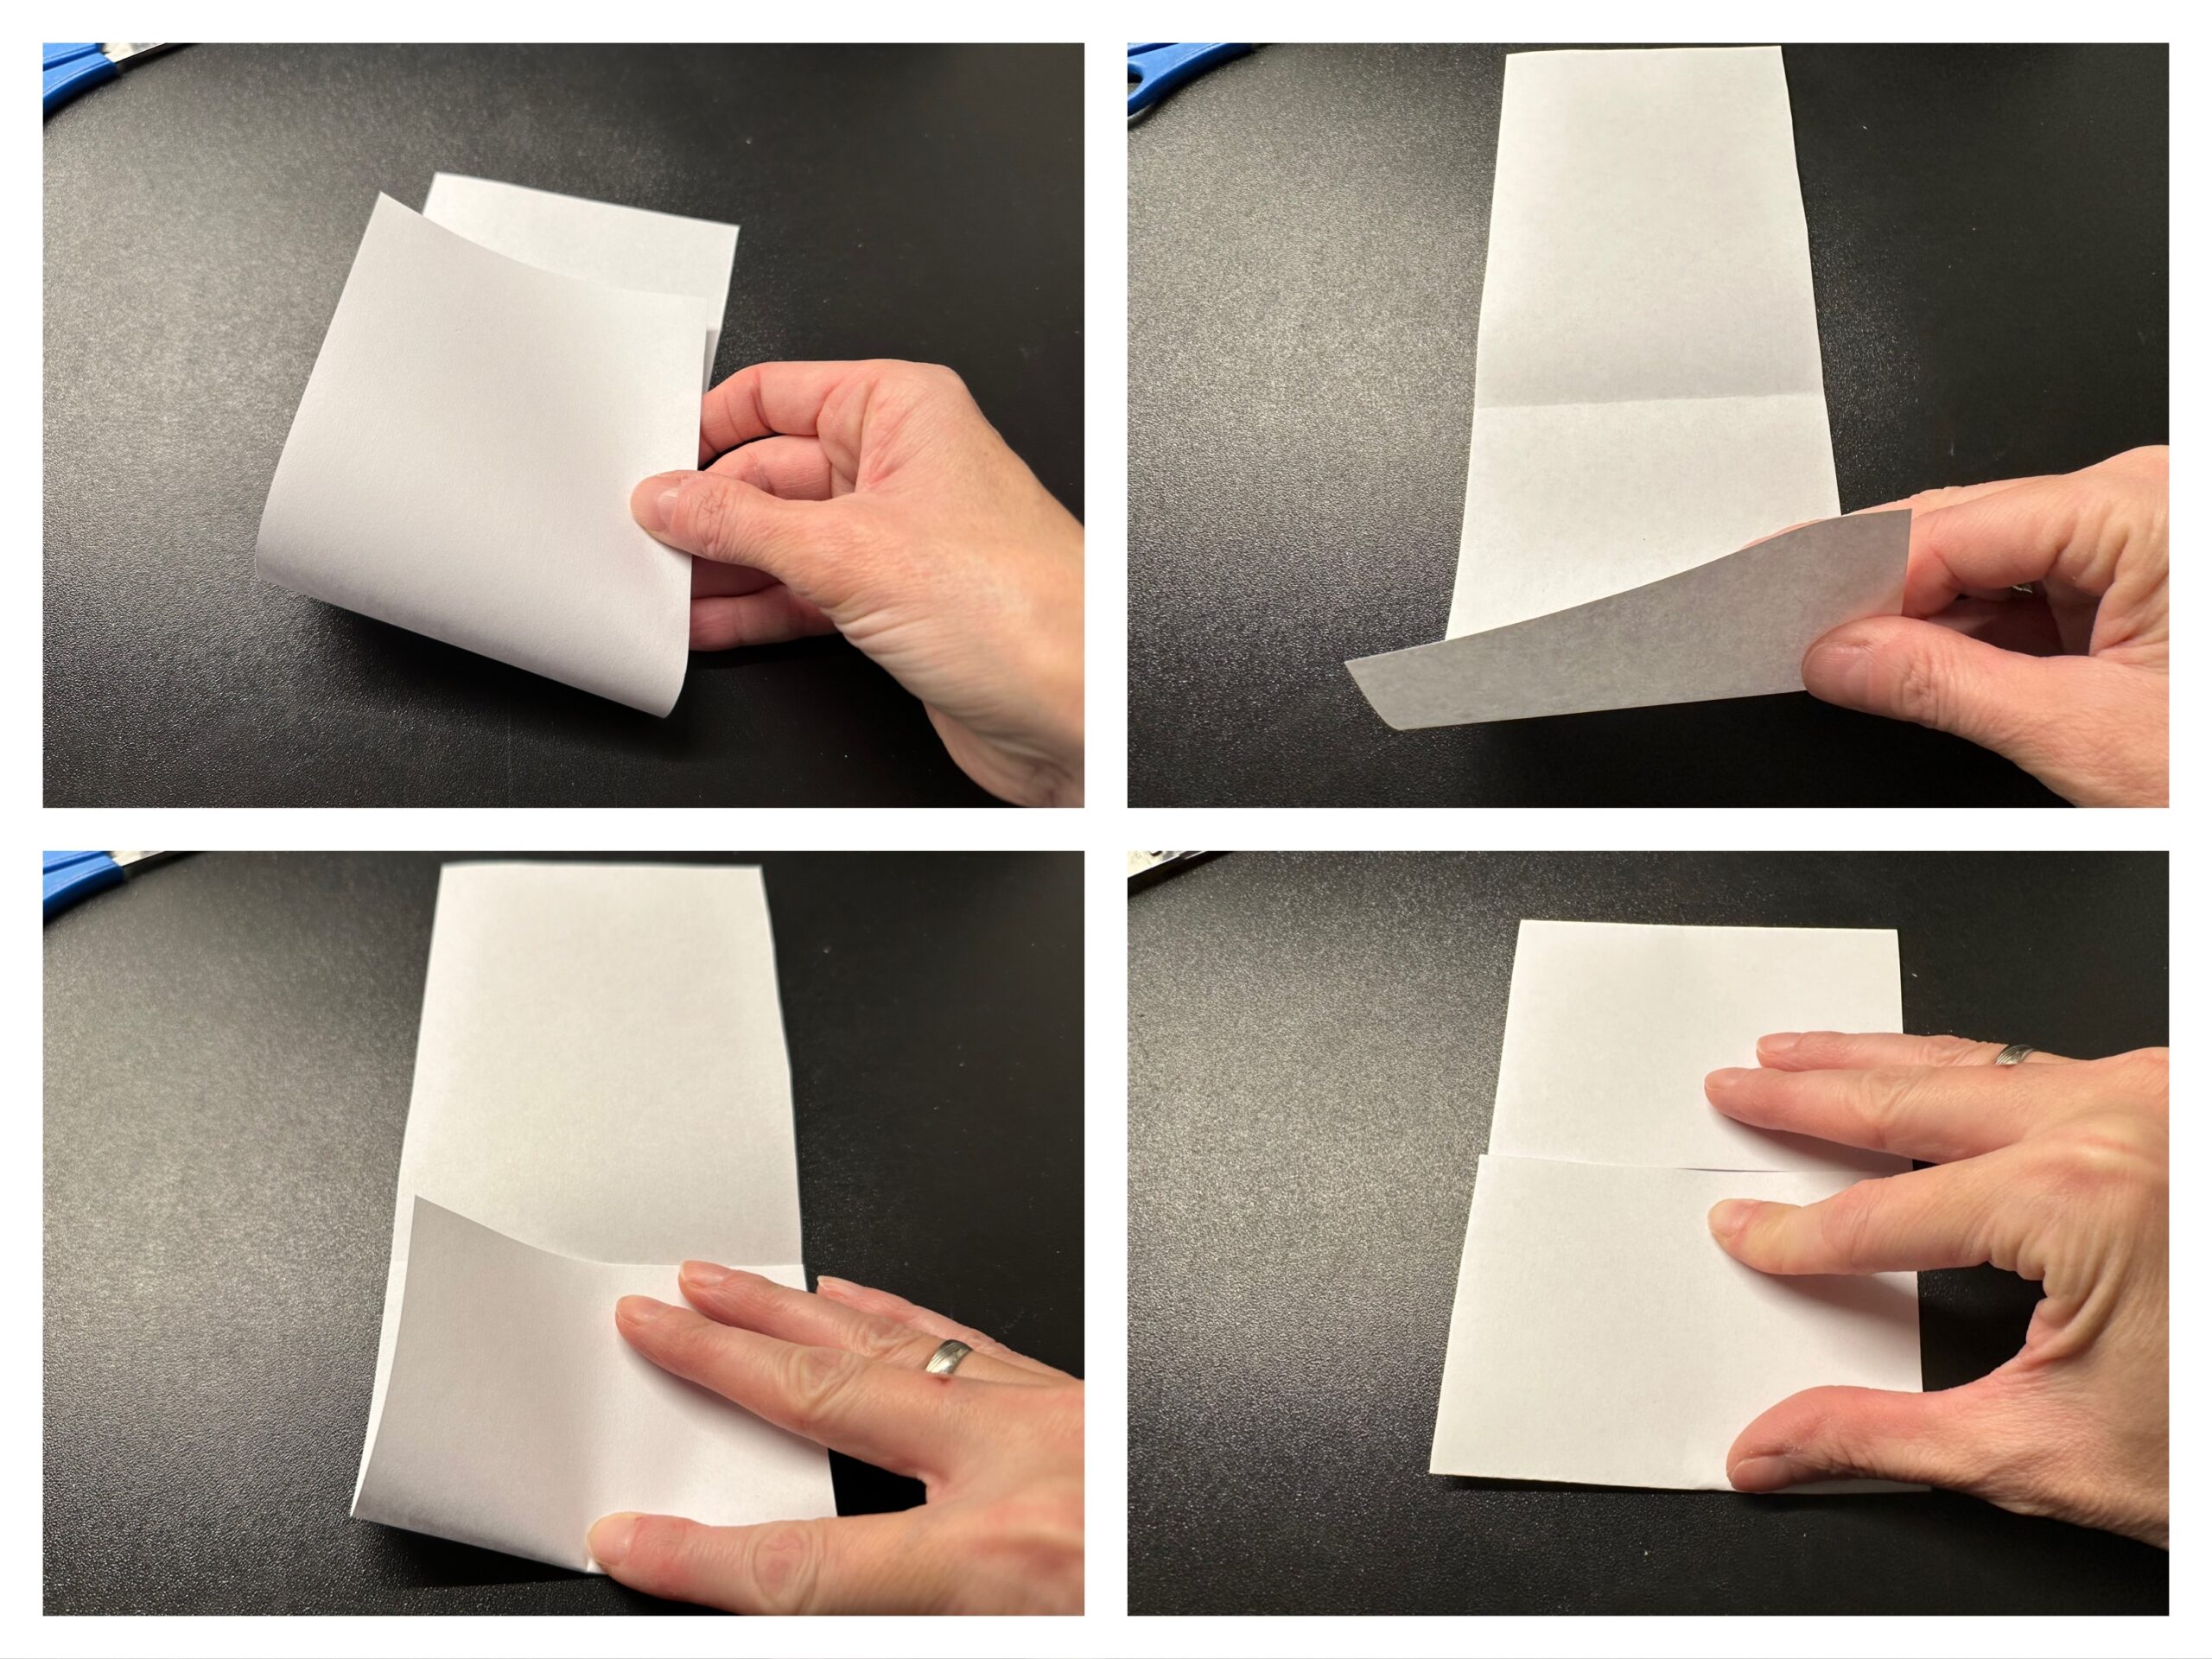
Bild zum Schritt 4 für das Bastel- und DIY-Abenteuer für Kinder: 'Legt einen Papierstreifen hochkant vor euch hin. Faltet die untere...'

5

Now fold all folds apart again. Now you can cut the clearly visible fracture lines apart with the scissors.
Do the same with the second strip of paper.
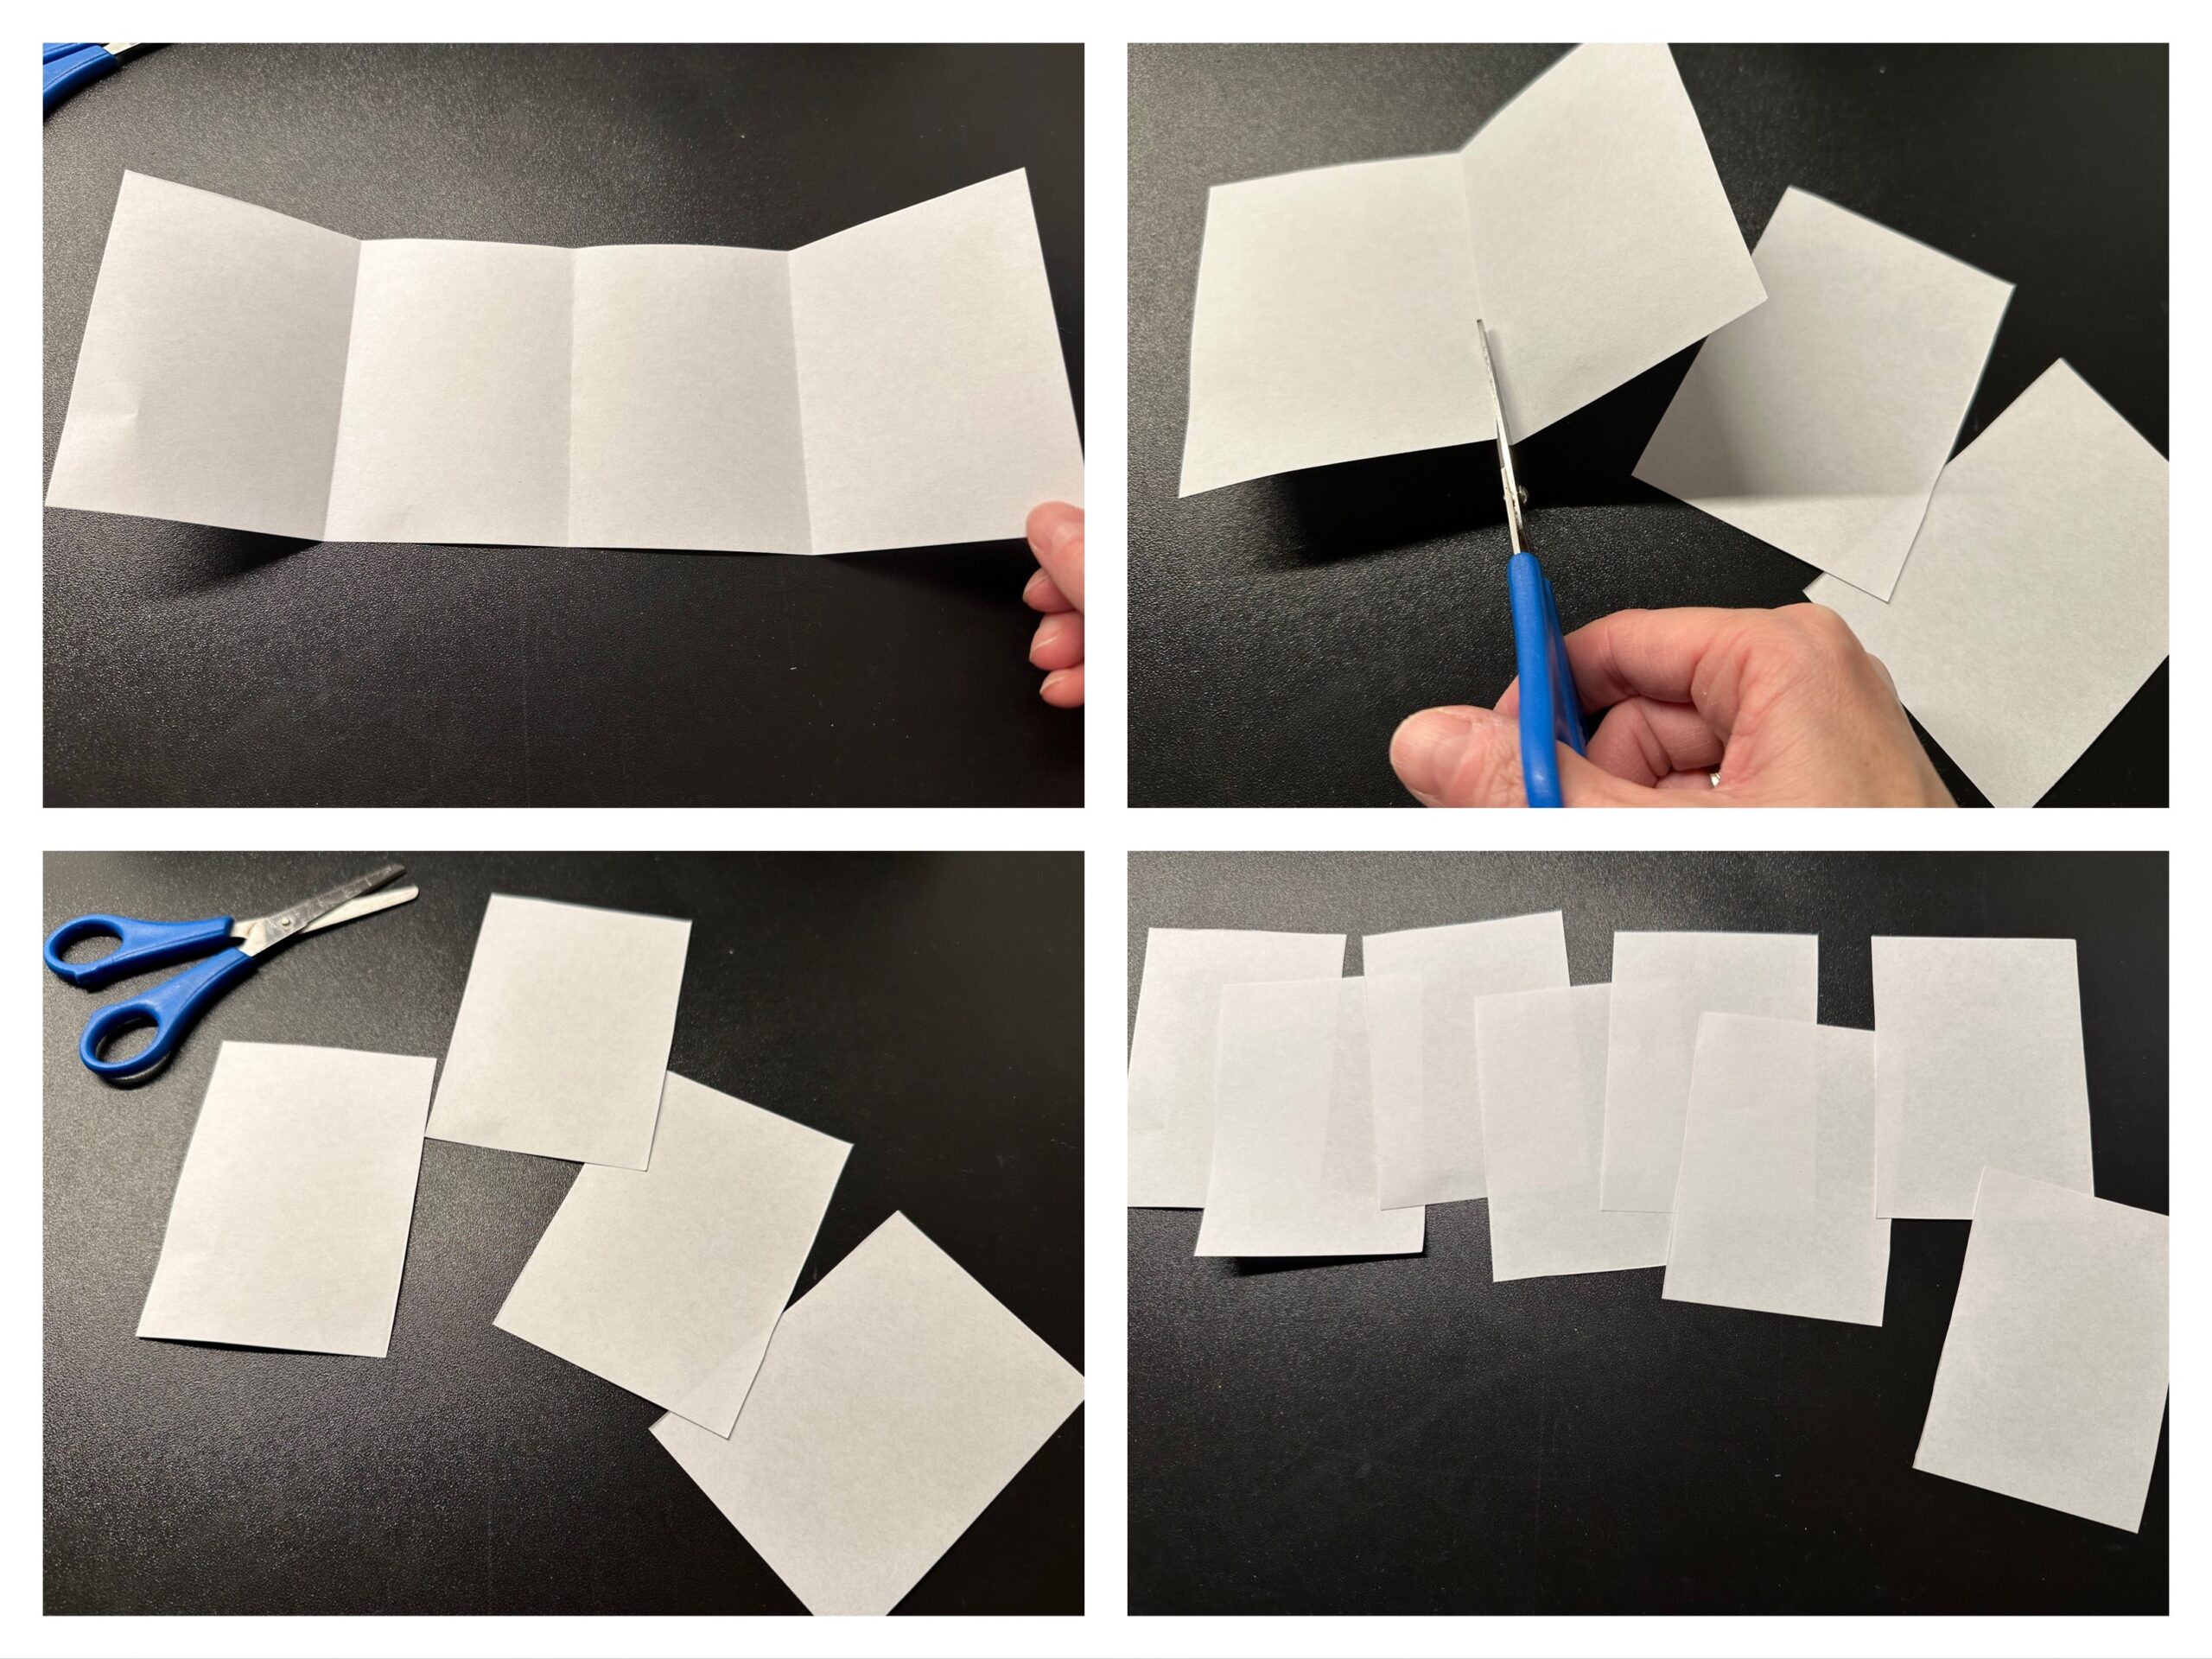
Bild zum Schritt 5 für das Bastel- und DIY-Abenteuer für Kinder: 'Klappt nun alle Faltungen wieder auseinander. Die gut sichtbaren Bruchlinien...'

6

Place a small leaf across you and fold the lower edge onto the upper edge. Repeat this on all leaves.
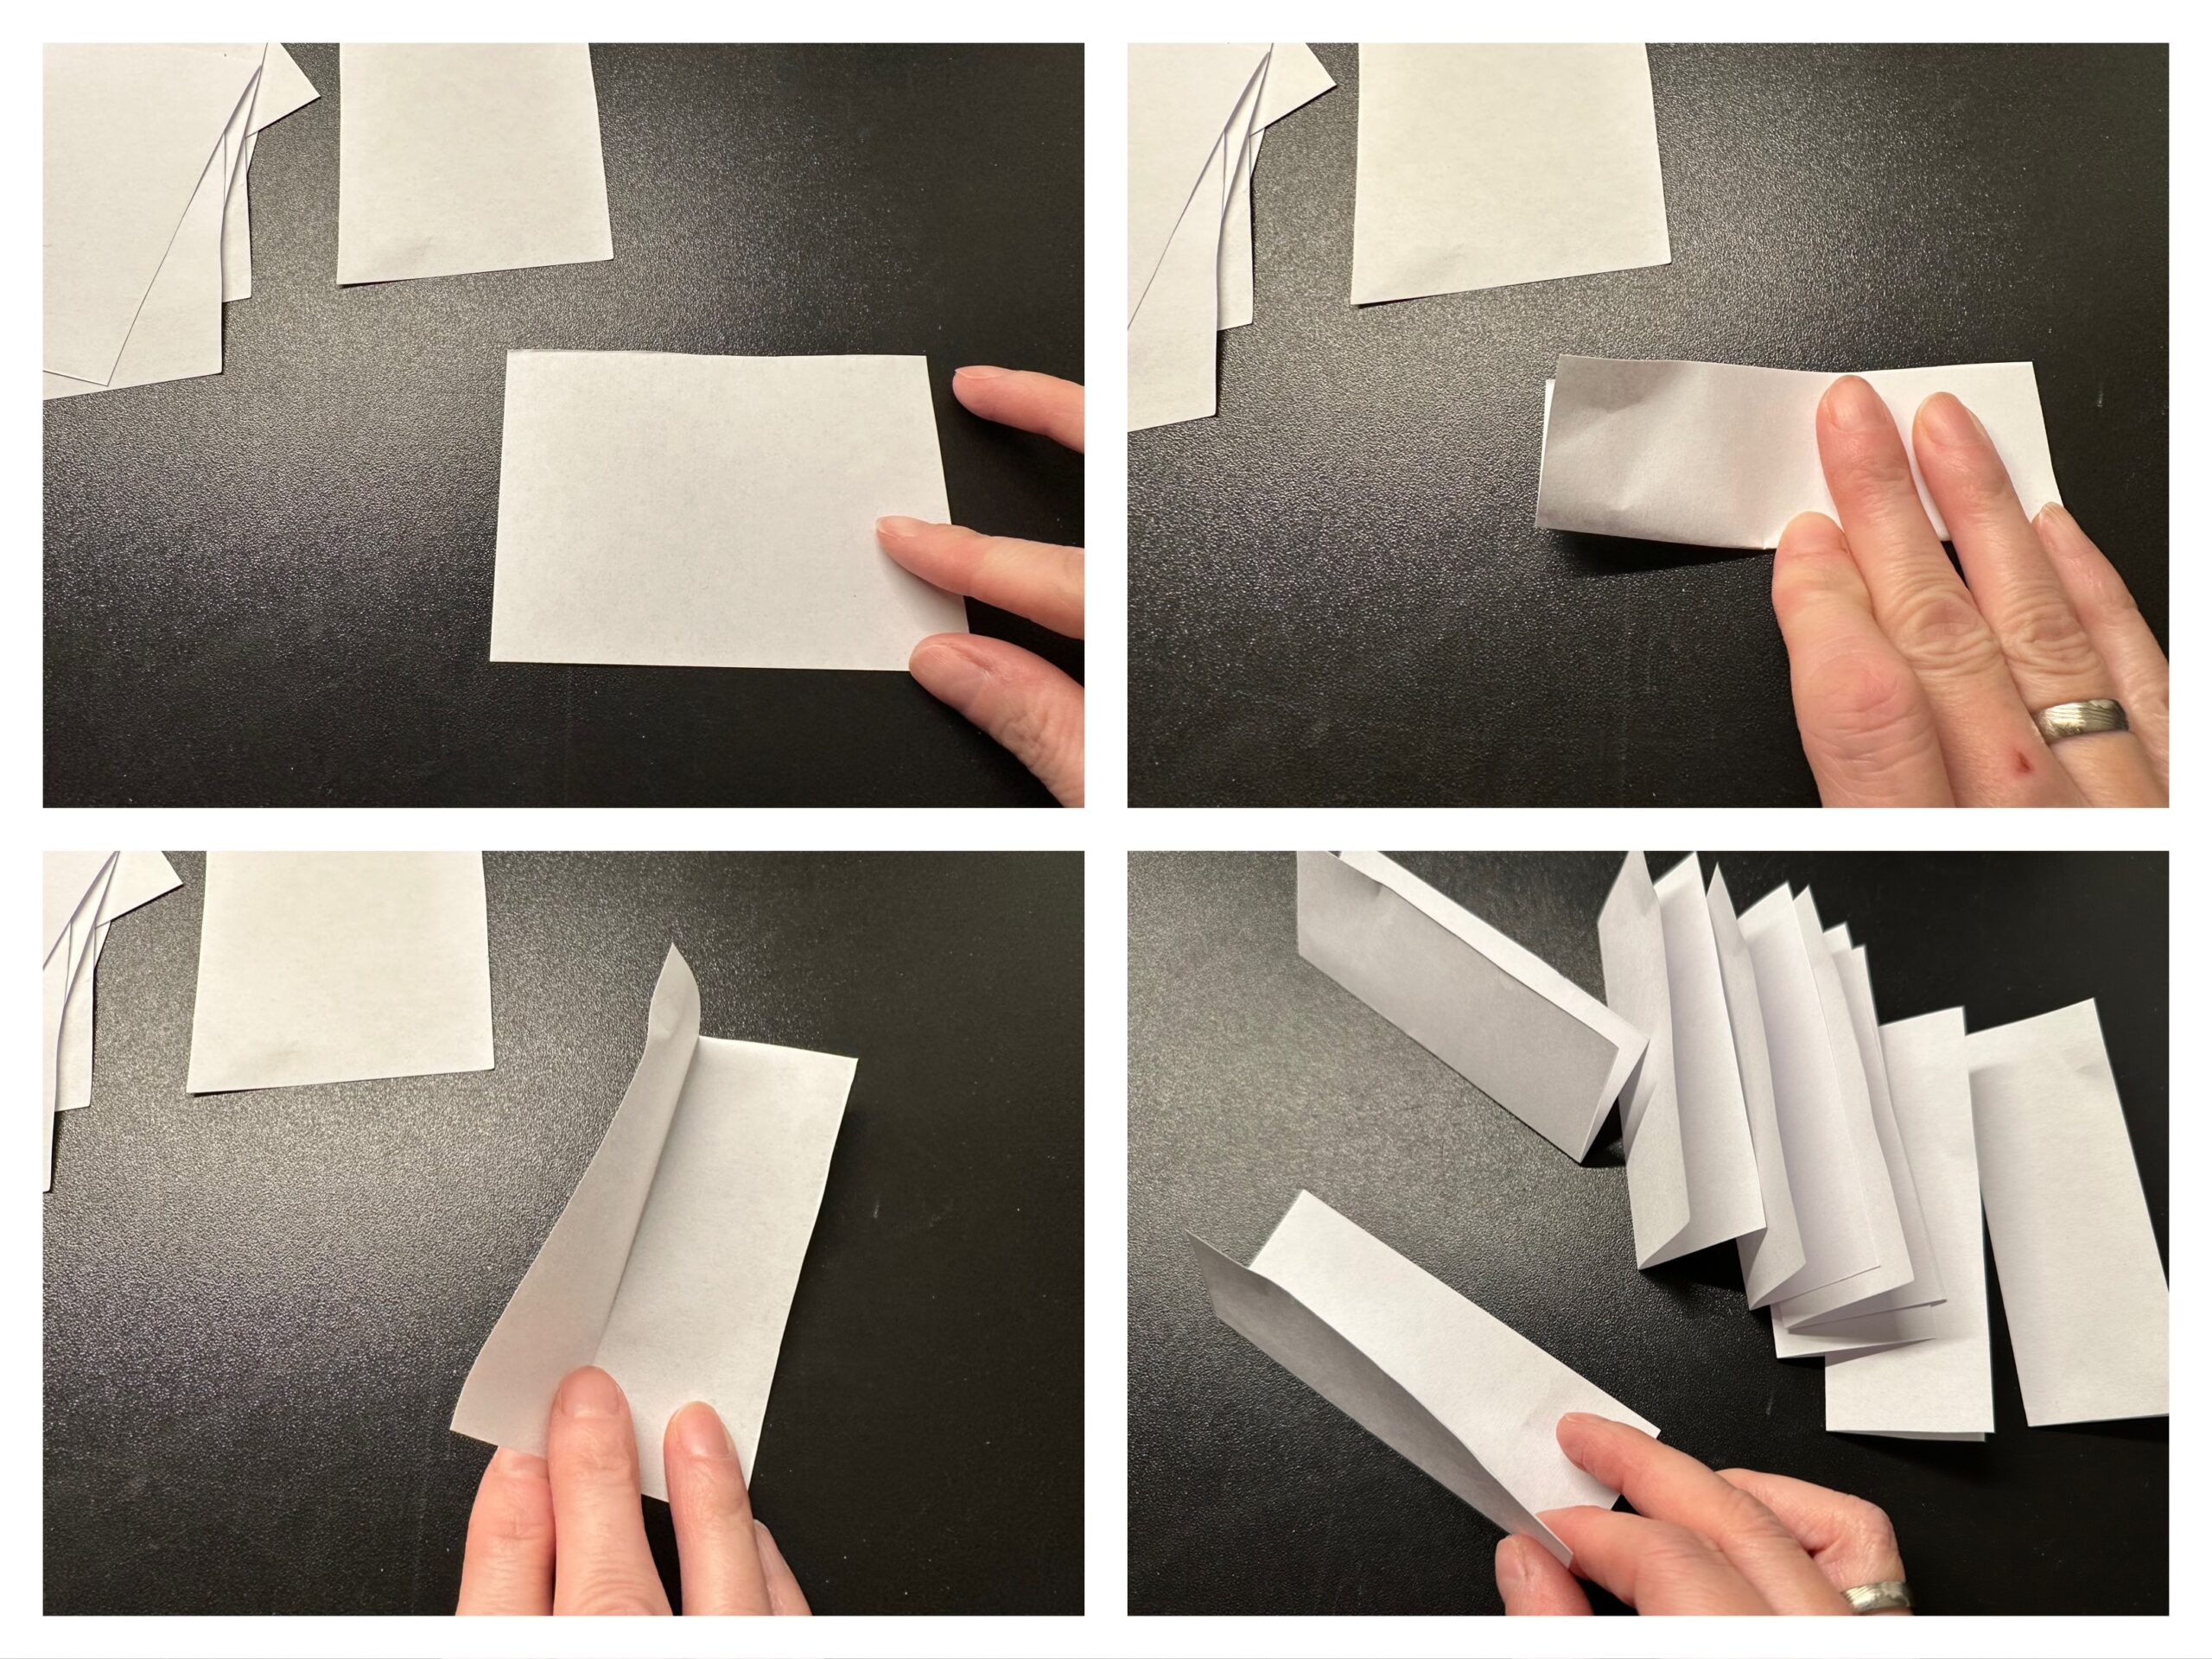
Bild zum Schritt 6 für das Bastel- und DIY-Abenteuer für Kinder: 'Legt ein kleines Blatt quer vor euch hin und faltet...'

7

Now put the folded leaves together. Make sure that they lie exactly in each other.

Bild zum Schritt 7 für das Bastel- und DIY-Abenteuer für Kinder: 'Steckt nun die gefalteten Blätter ineinander. Achtet darauf, dass sie...'

8

Hold the leaf bump firmly in your hand. The centre line is clearly visible (as a break). Here two clamps are put into it with the tacker. Set the tacker so that the clamps sit along the line.
Now the leaf bump is fixed and holds together.
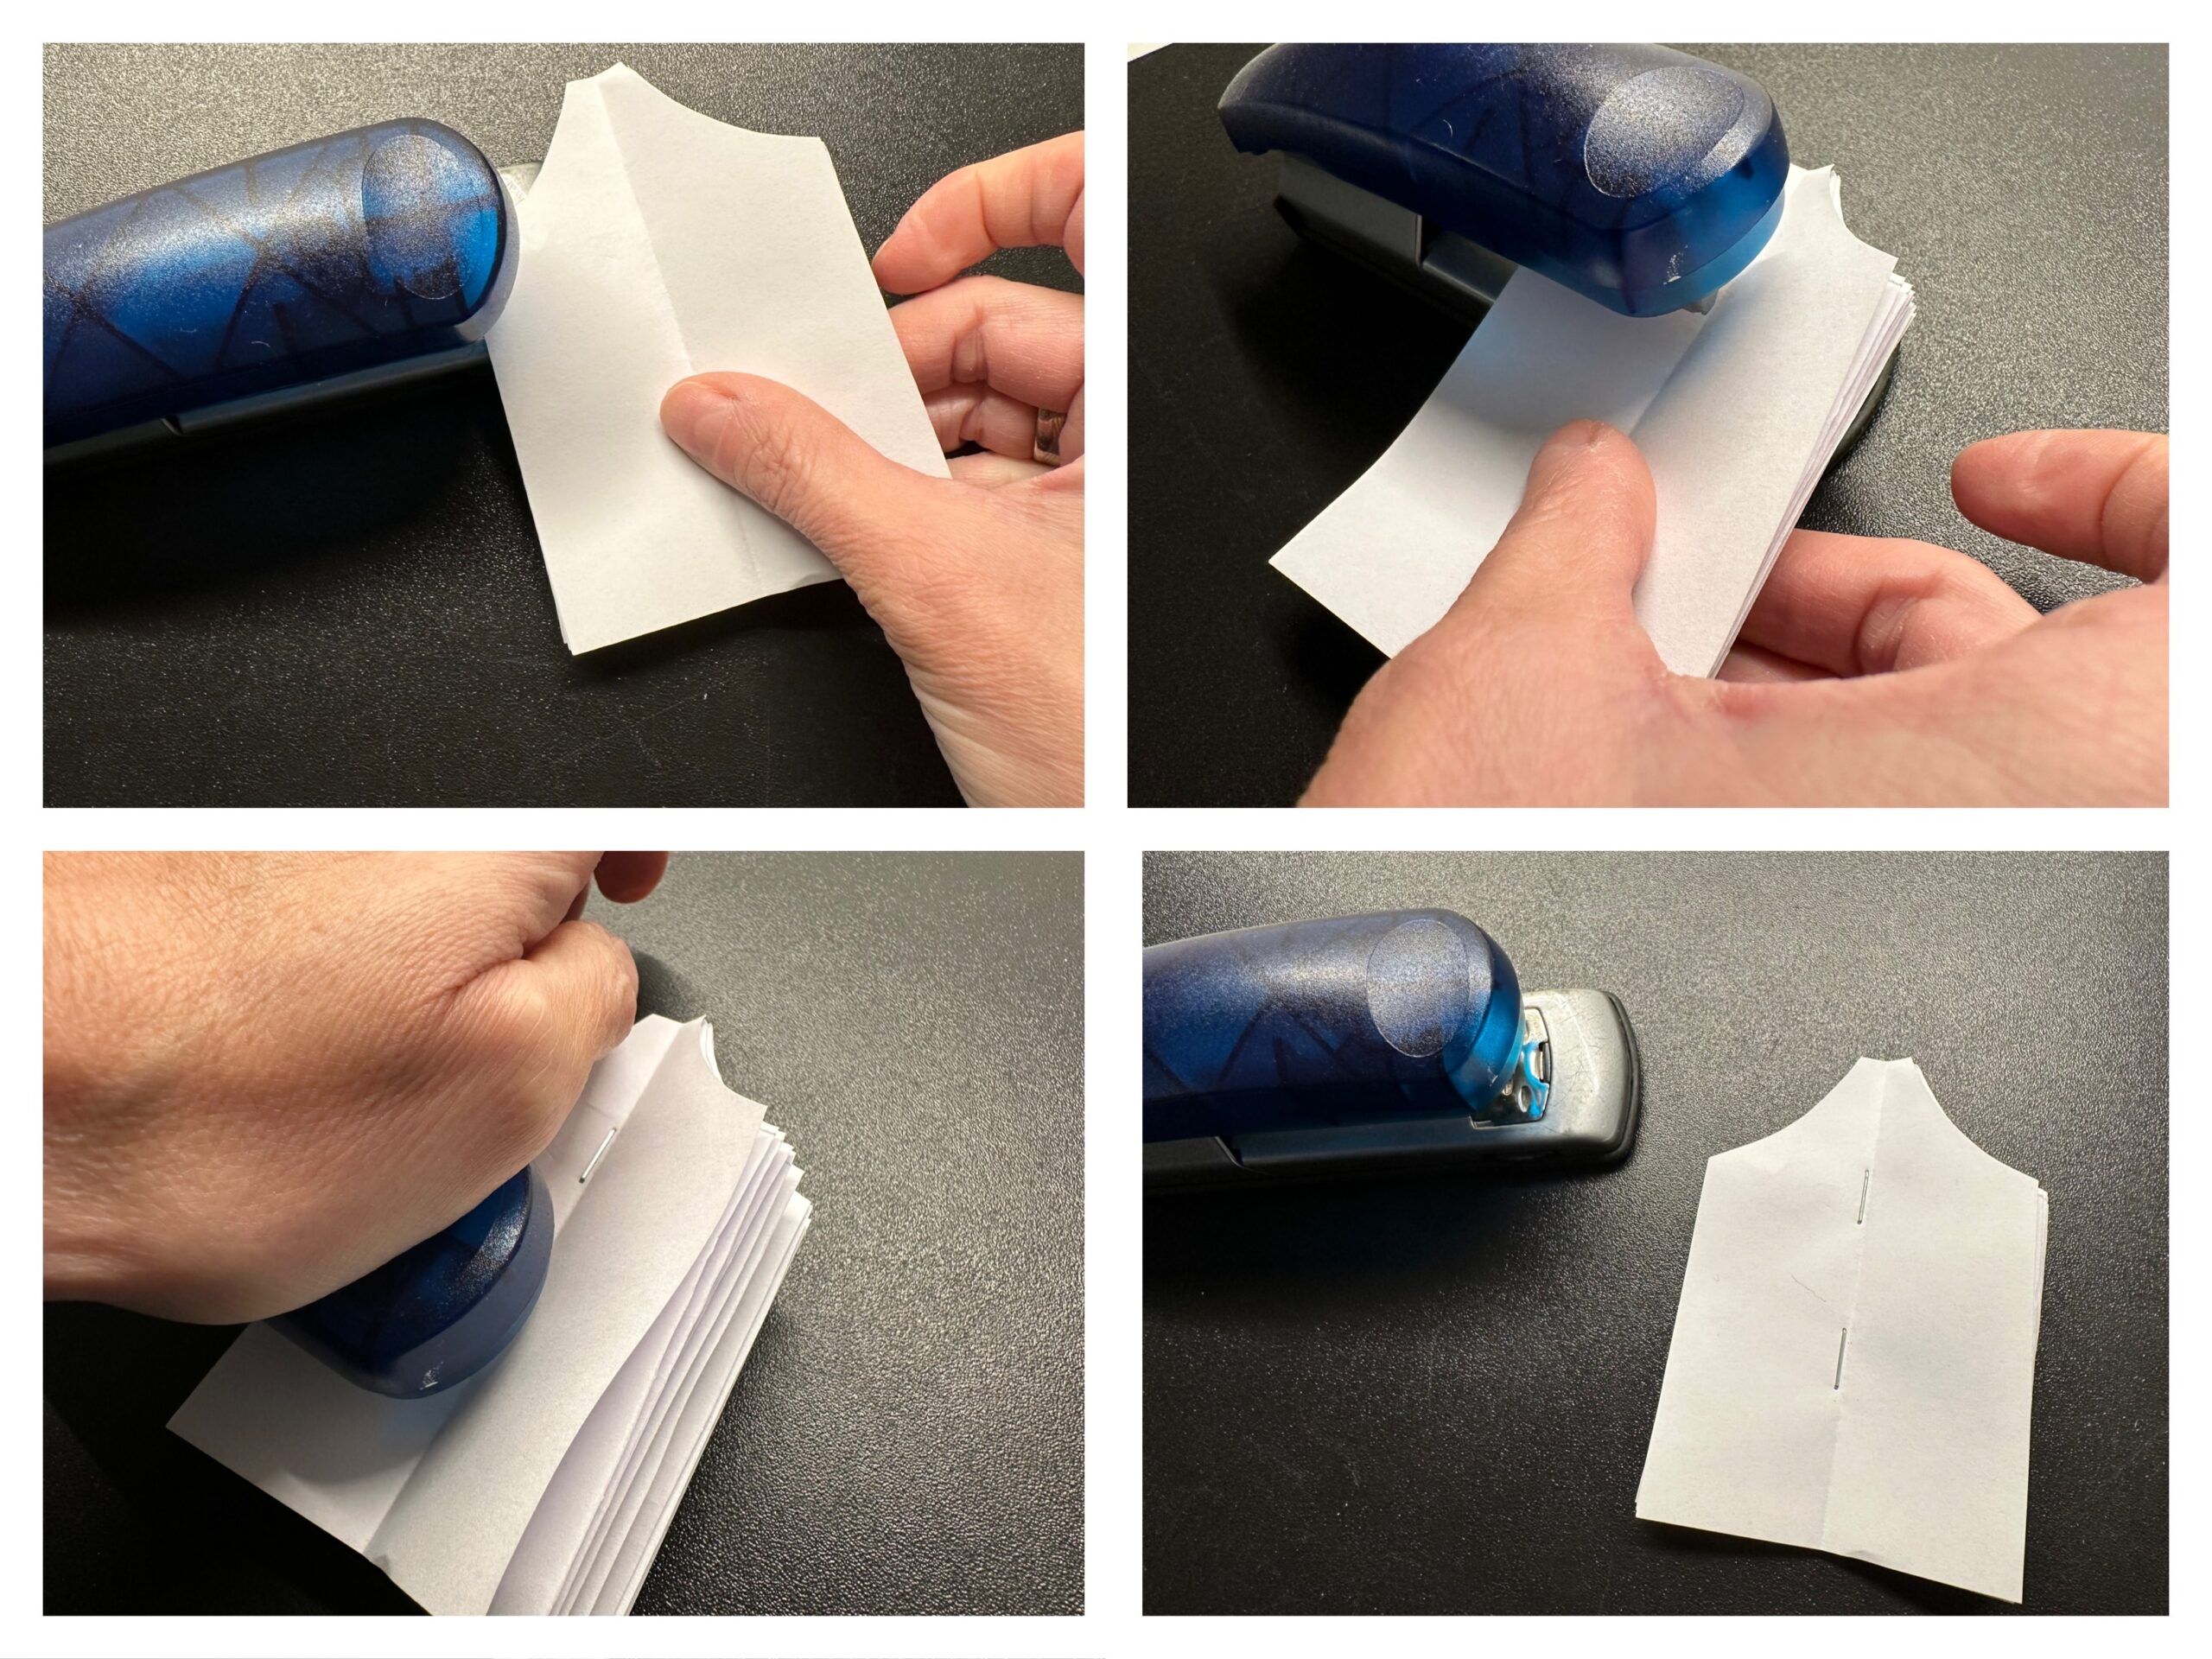
Bild zum Schritt 8 für das Bastel- und DIY-Abenteuer für Kinder: 'Haltet den Blätterstoß fest in der Hand klappt ihn auf....'

9

Folds the paper bump again (like a book). Paints a fir tree shape on the open side.
Note: The closed side is the trunk of the tree, here still paper has to stand, otherwise everything will fall apart.
For example, you can paint curved or straight jigs. Cut out the jigs with the scissors.
At the bottom you can leave a small tree trunk.

Bild zum Schritt 9 für das Bastel- und DIY-Abenteuer für Kinder: 'Klappt den Papierstoß wieder zusammen (wie ein Buch). Malt an...'

10

Place the cut-out fir tree, e.g. on a picture frame or a DIN A5 large folding card. All individual leaves of the tree are bent a little apart.
This creates a plastic fir tree.
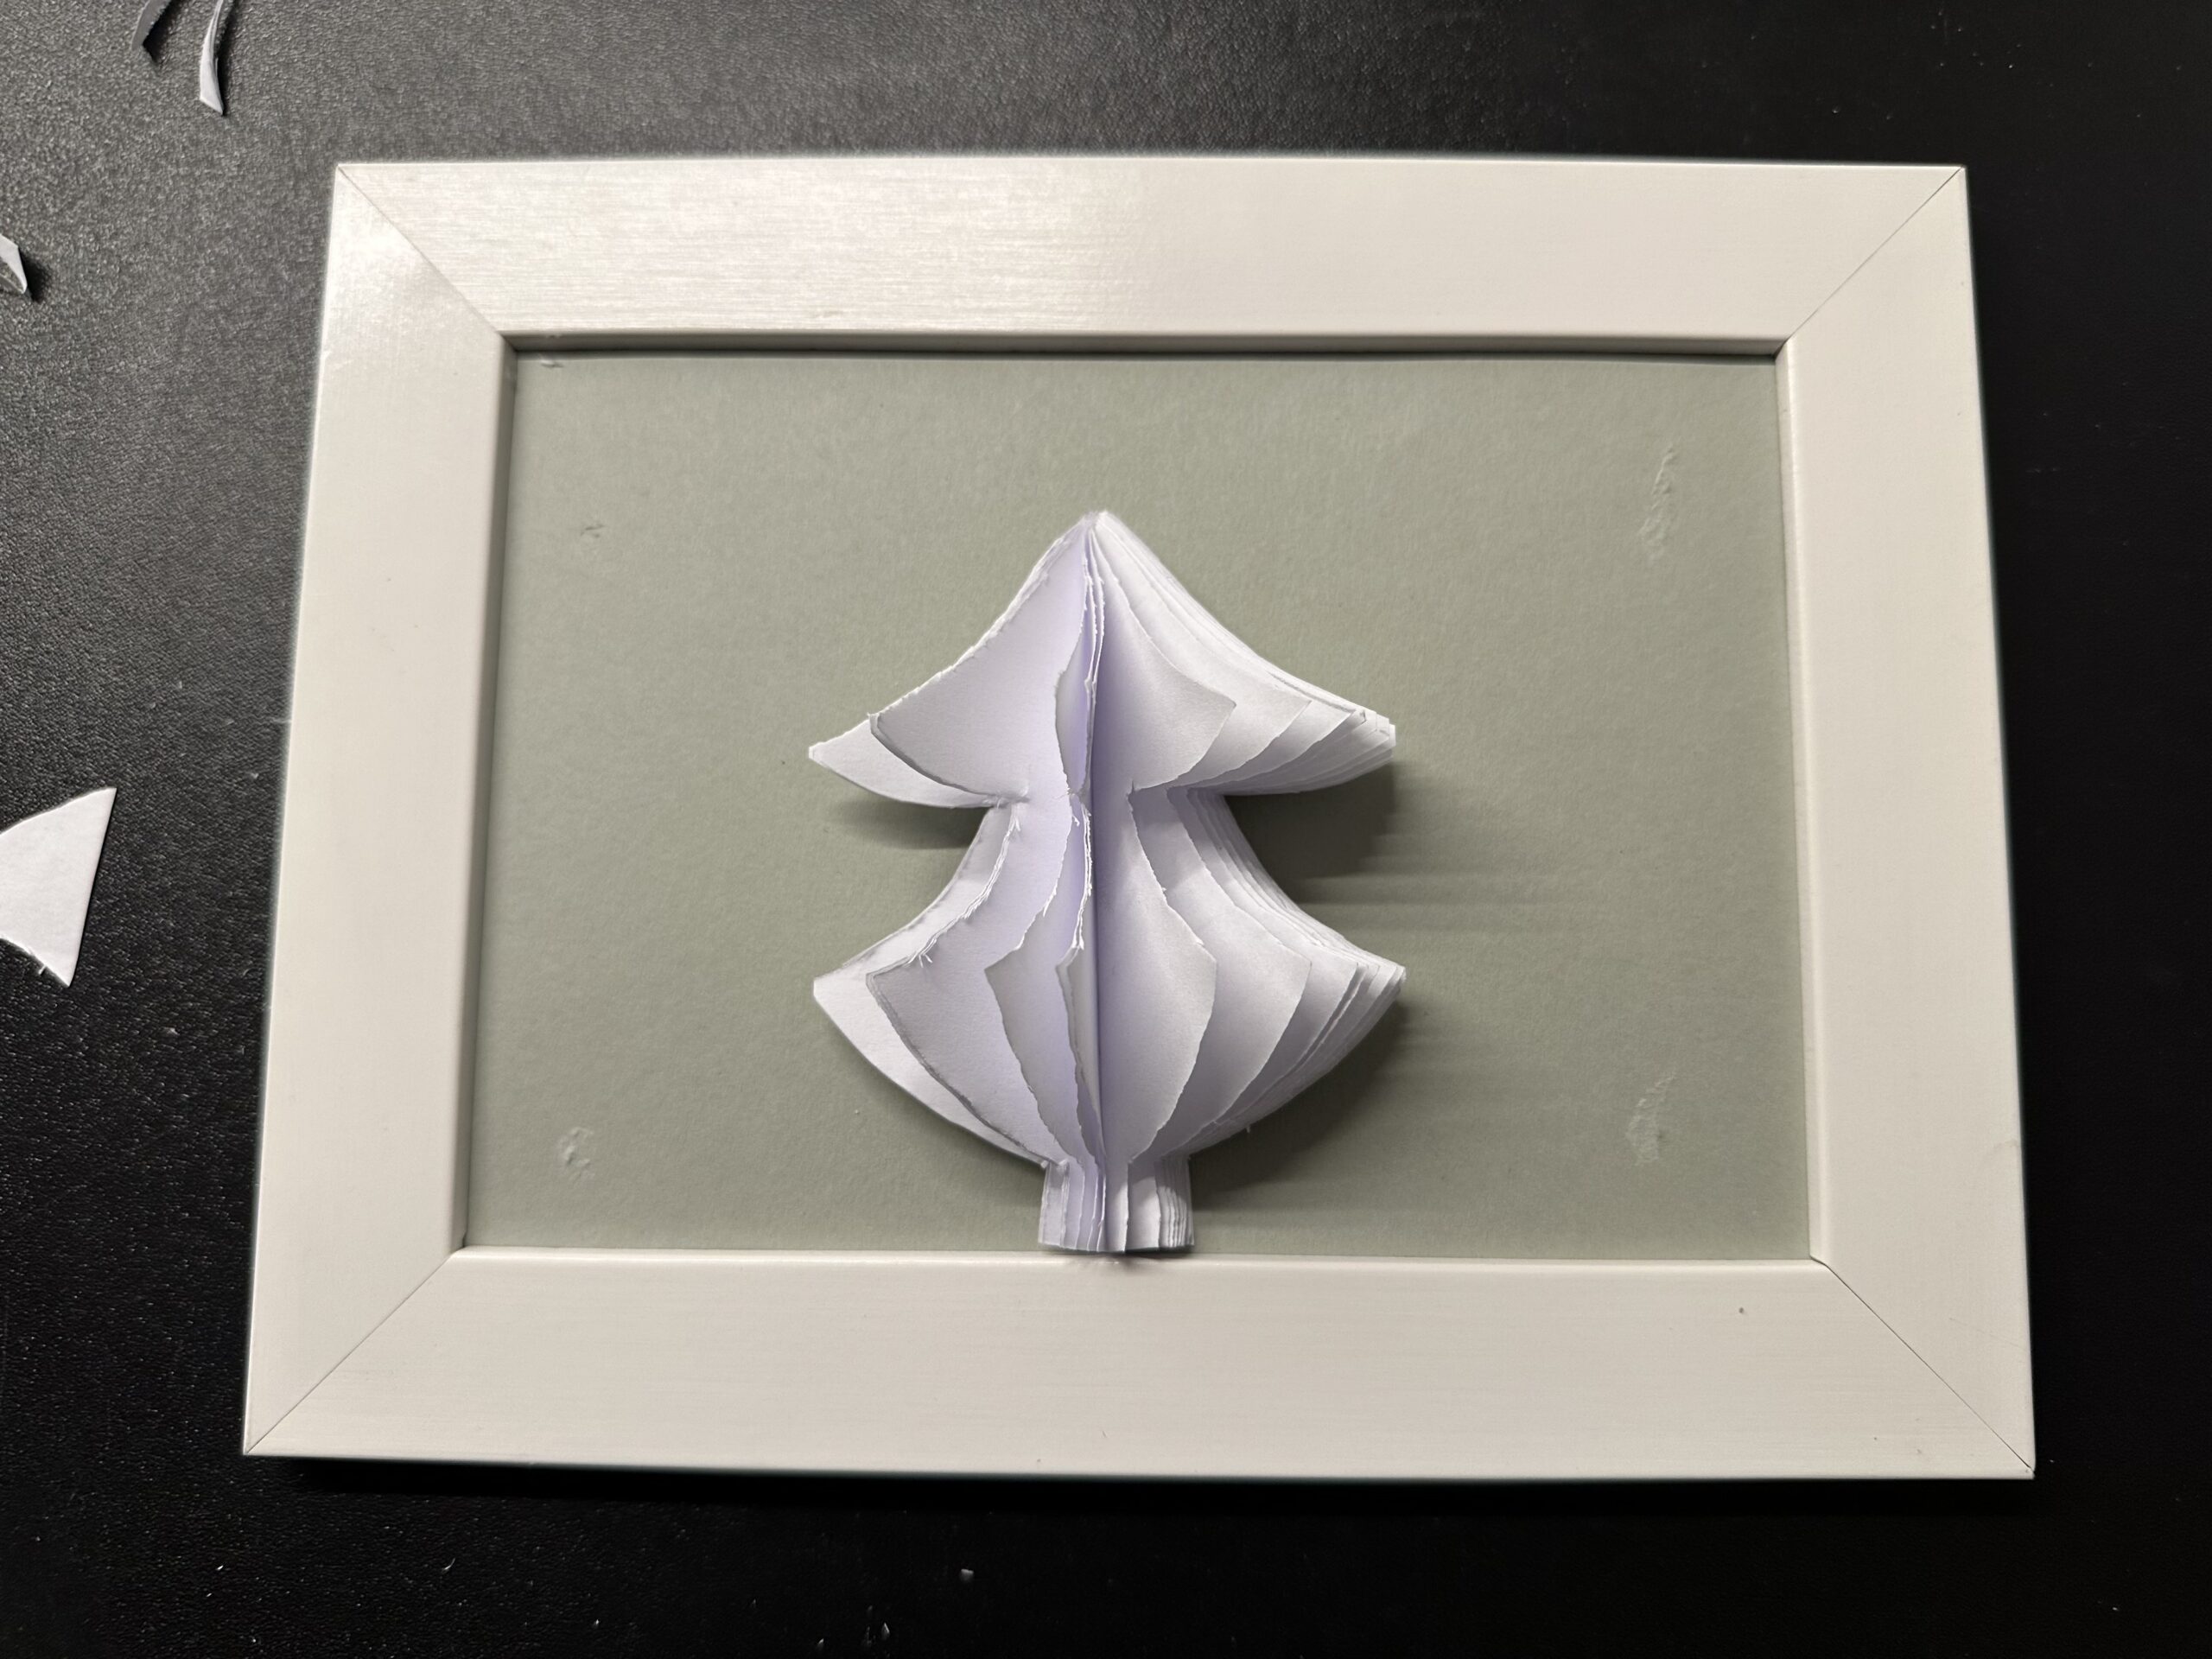
Bild zum Schritt 10 für das Bastel- und DIY-Abenteuer für Kinder: 'Legt den  ausgeschnittenen Tannenbaum z.B. auf einen Bilderrahmen oder...'

11

Cuts out small circles from white paper remnants. Sticks them up as snowflakes around the tree.
The winter fir tree is ready.
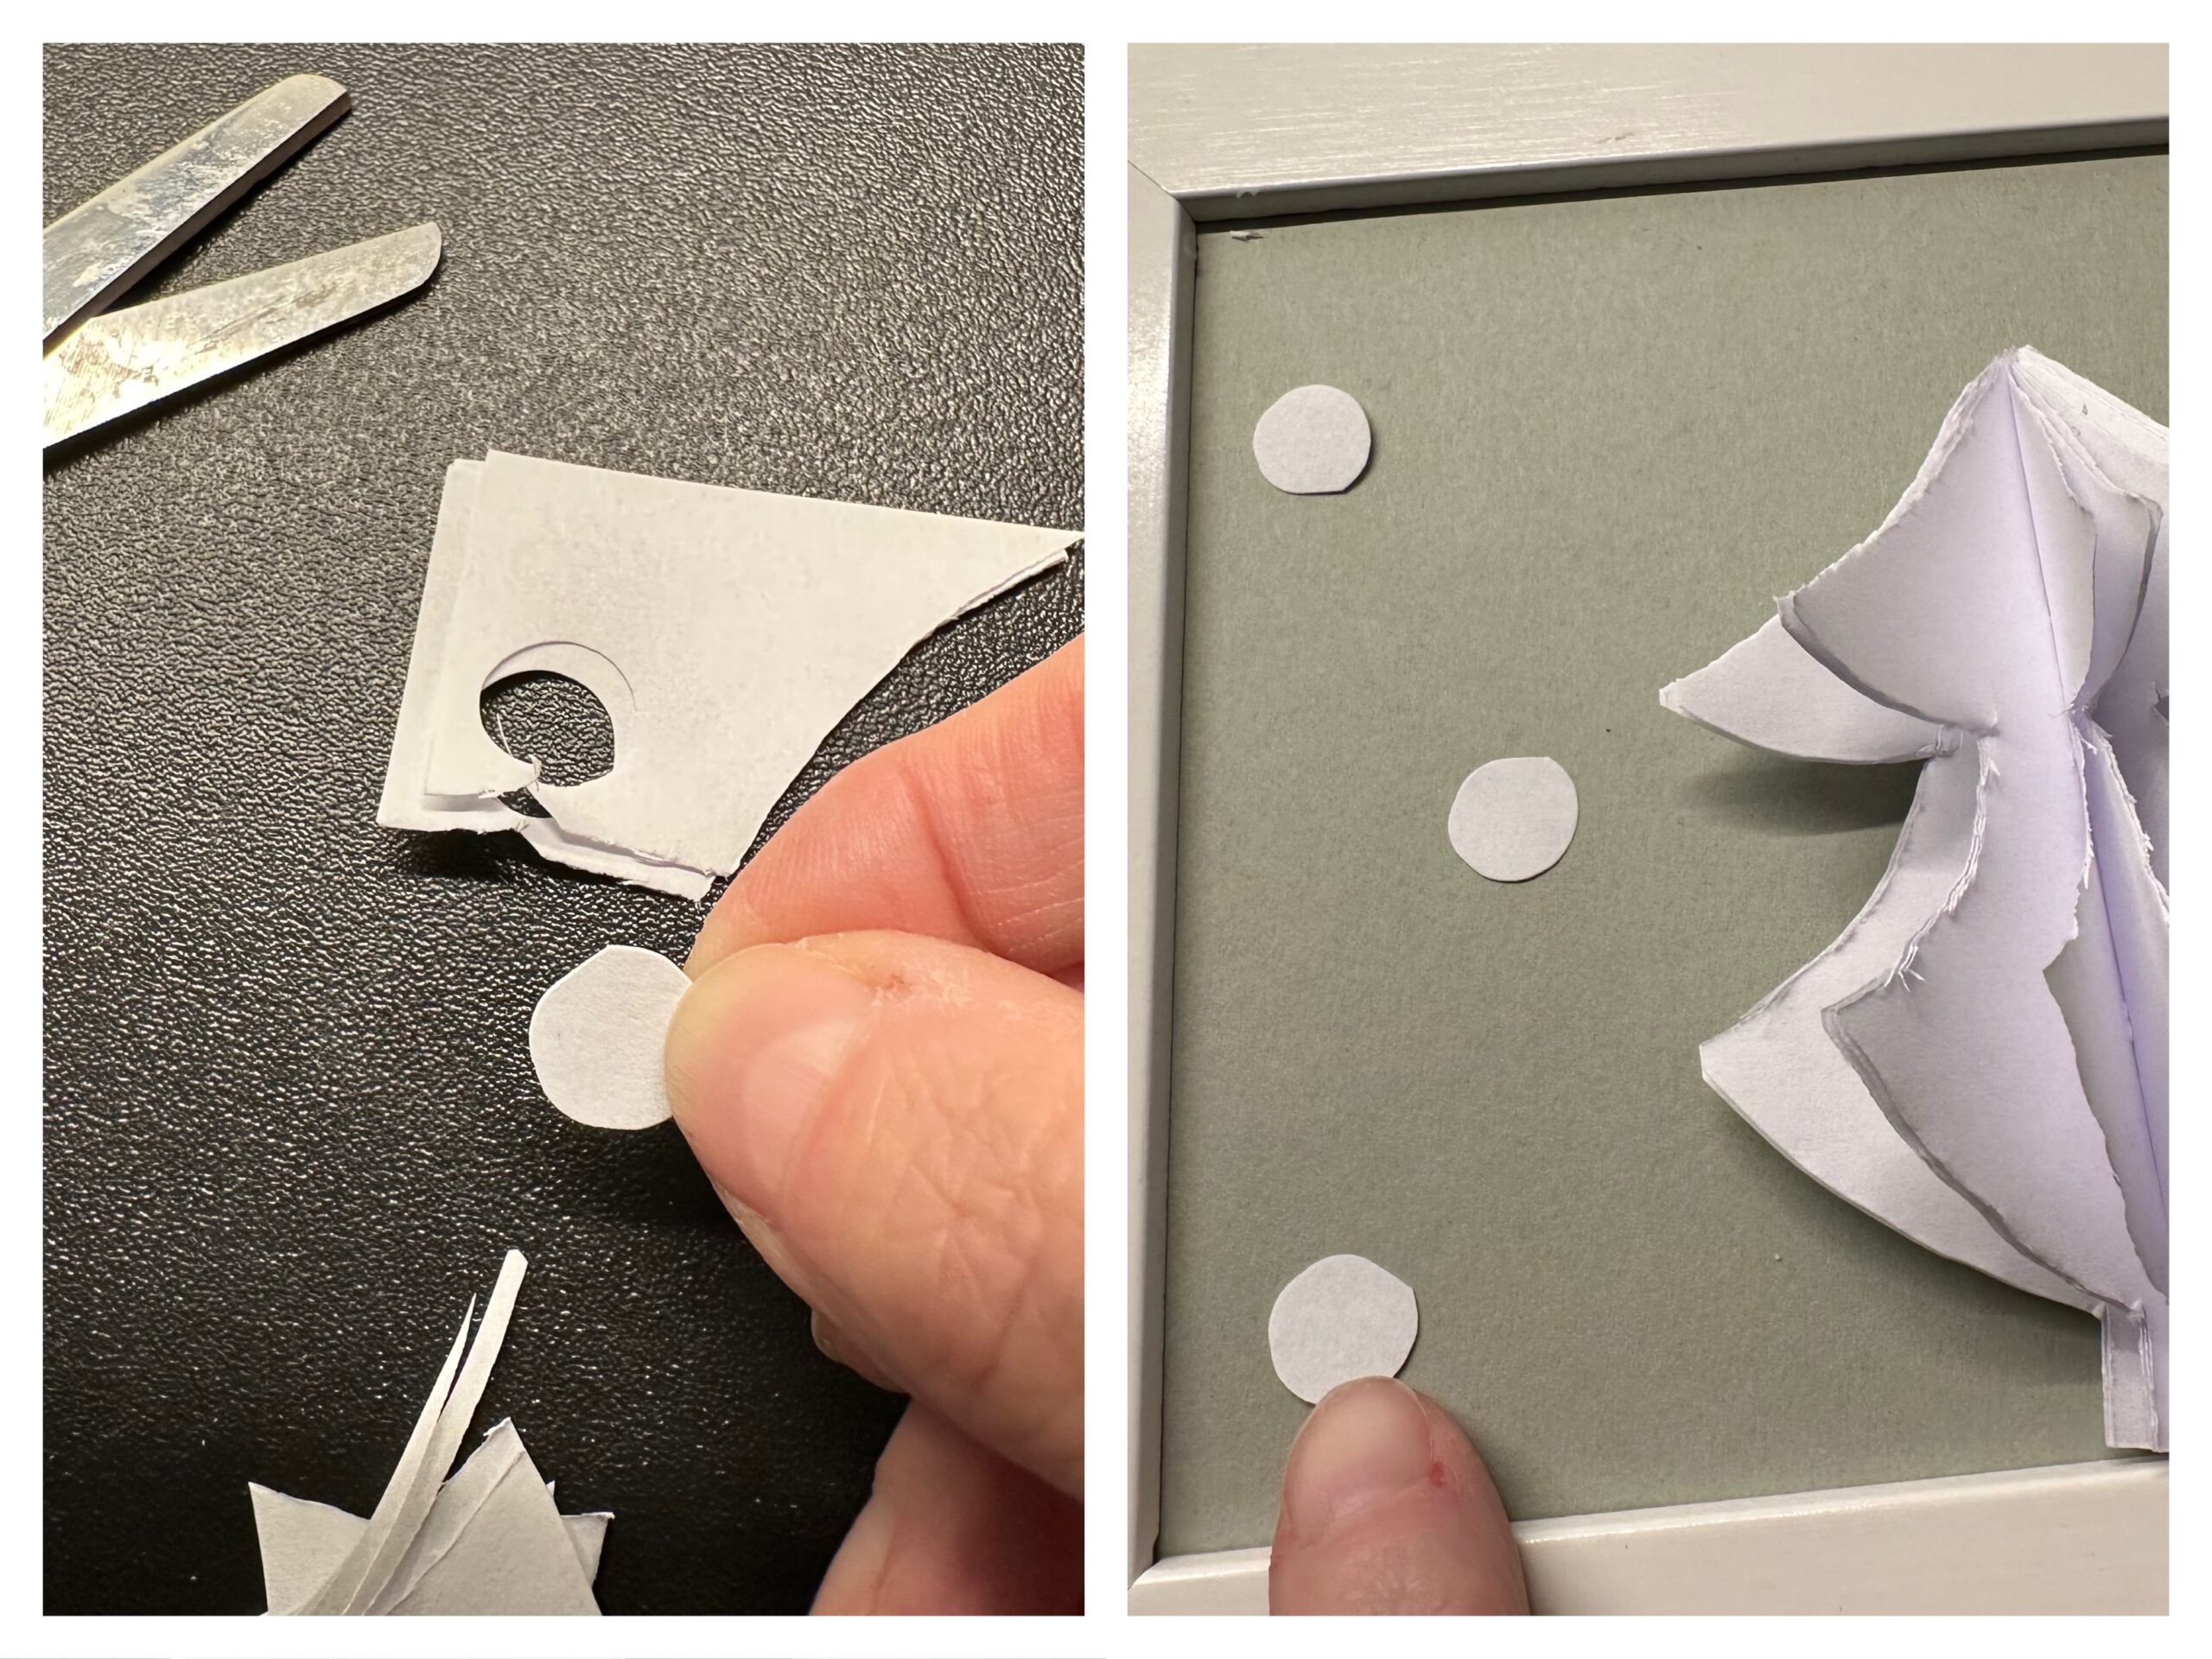
Bild zum Schritt 11 für das Bastel- und DIY-Abenteuer für Kinder: 'Schneidet aus weißen Papierresten kleine Kreise aus. Klebt diese als...'

12

Usable as greeting or invitation card or decorative image.
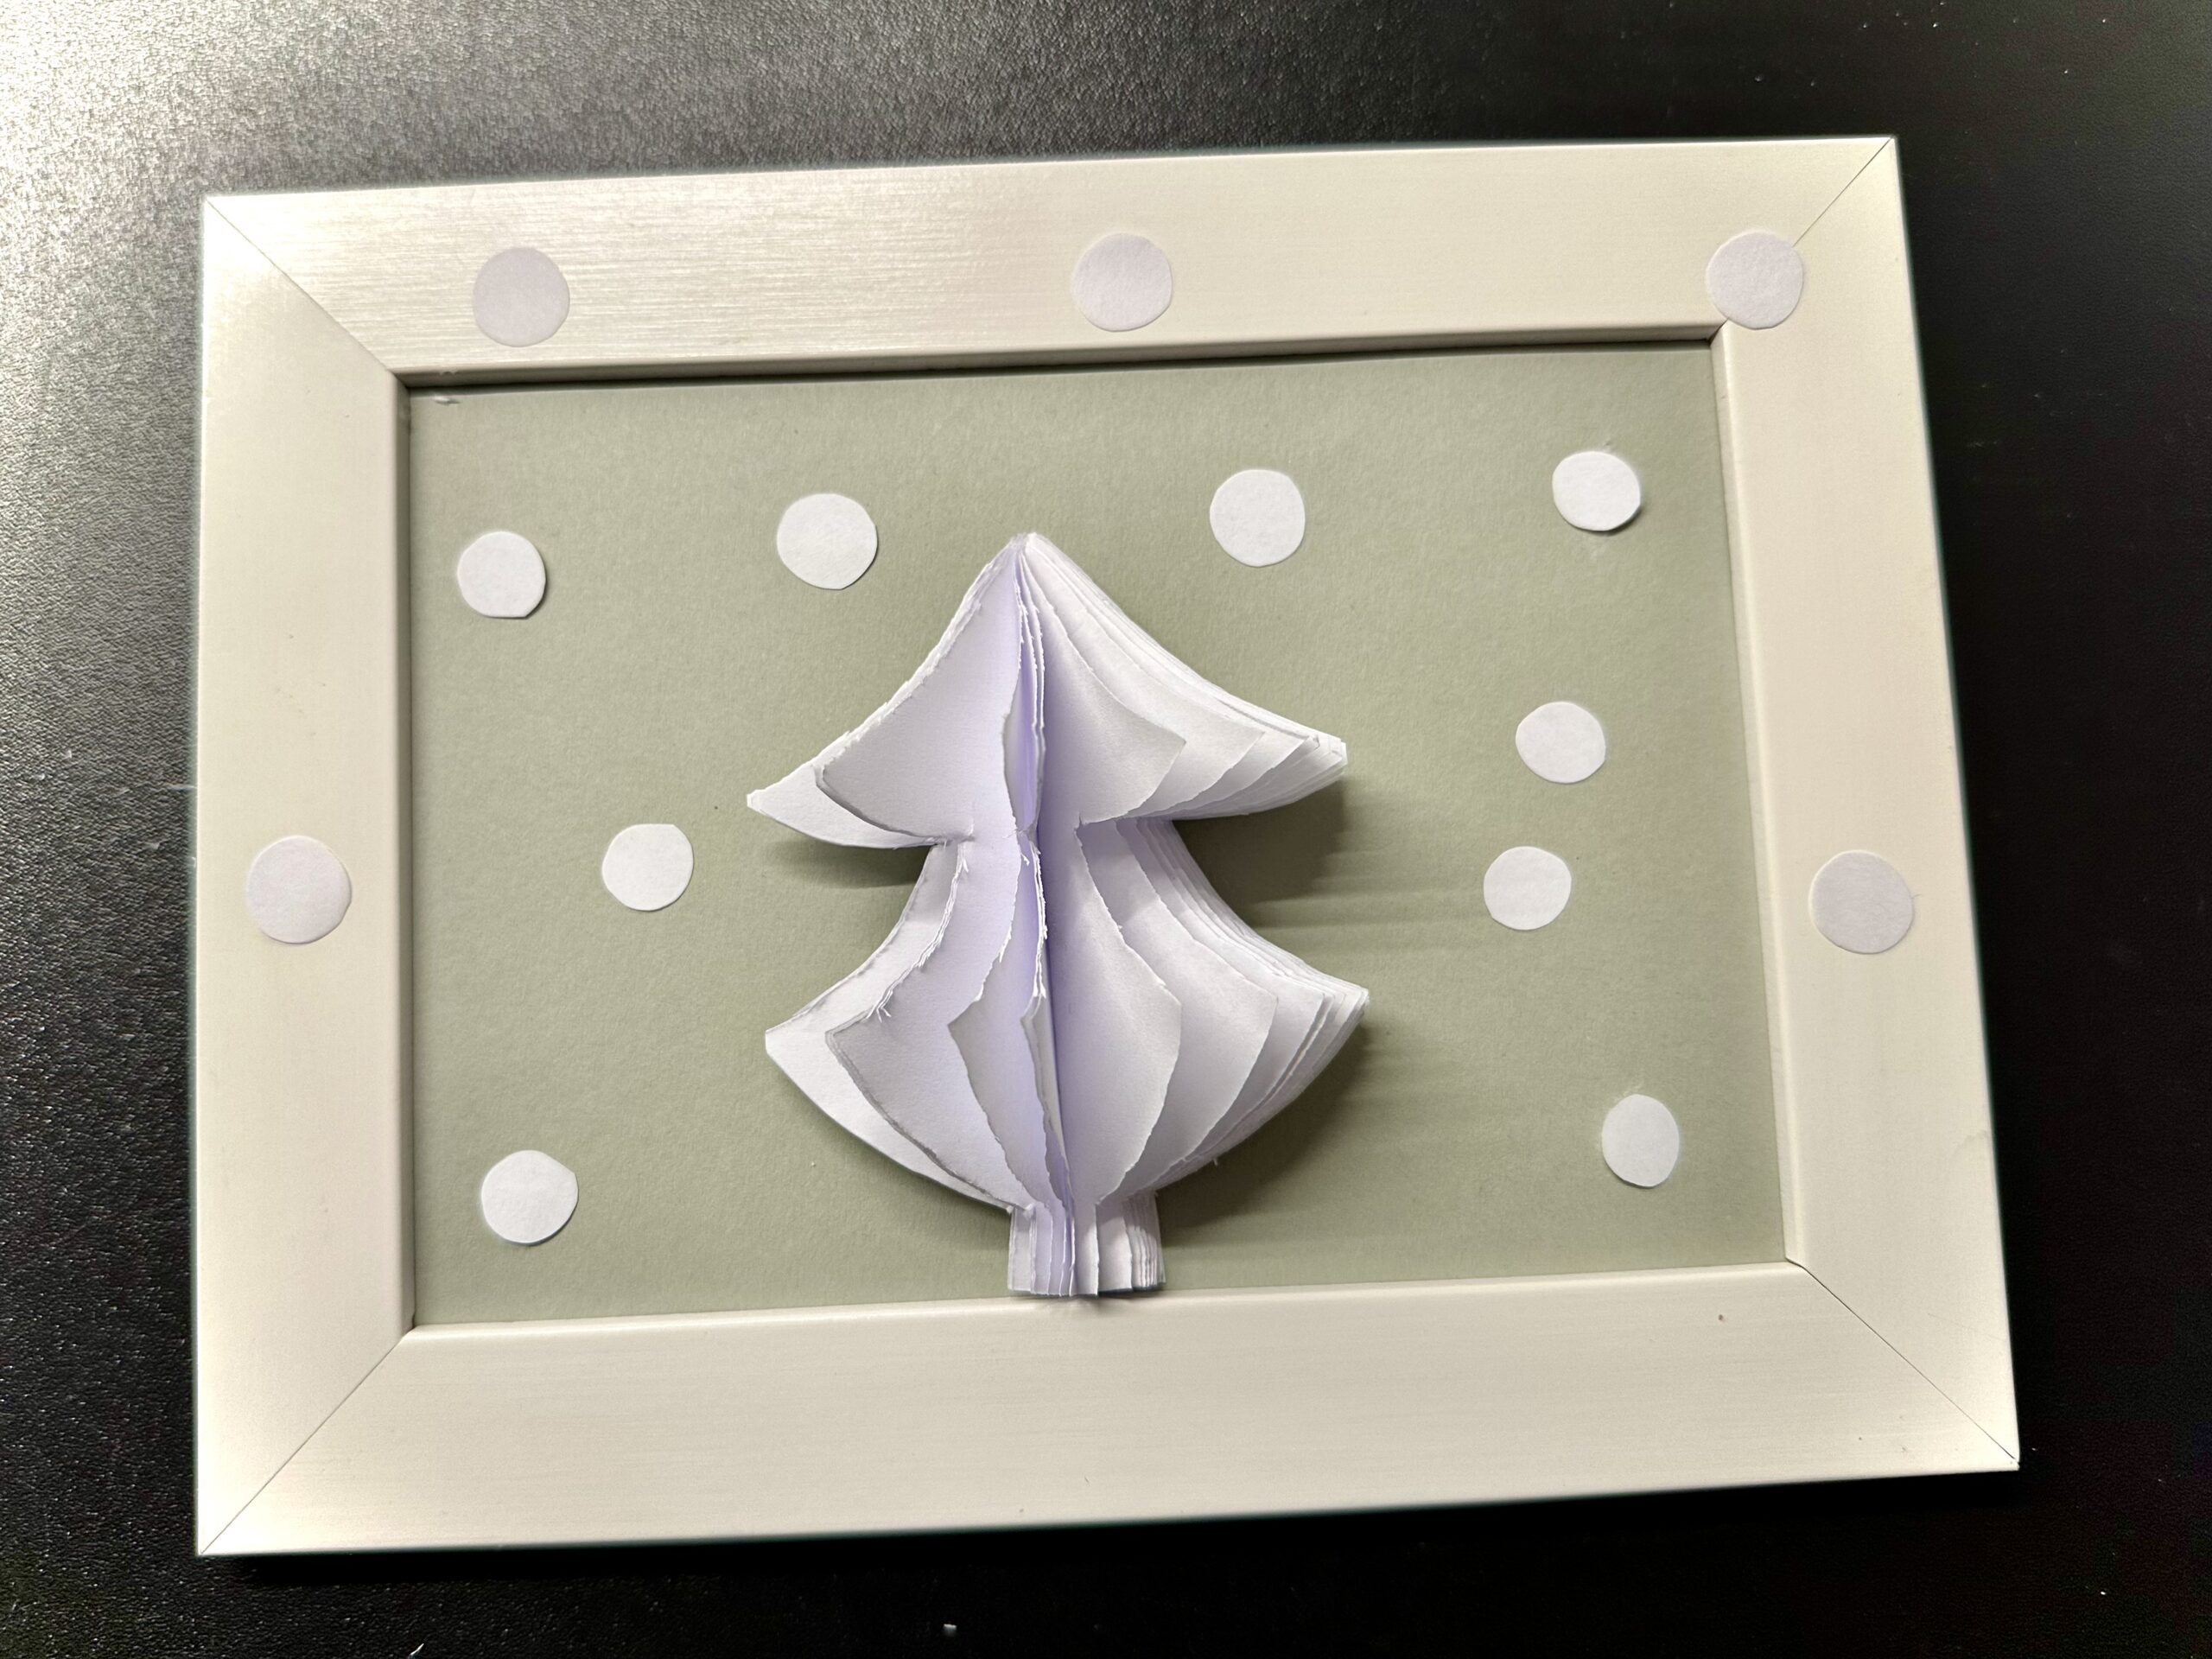
Bild zum Schritt 12 für das Bastel- und DIY-Abenteuer für Kinder: 'Verwendbar als Gruß- oder Einladungskarte oder dekoratives Bild.'

13

Stay creative.

Fir tree making 3D

Follow us on Facebook , Instagram and Pinterest
Don't miss any more adventures: Our bottle mail

Leave a Reply

Your email address will not be published.

The maximum upload file size: 5 MB. You can upload: image, document. Drop file here