Preparing mobile phone (iPhone) for children - Part 4

Note: We have provided you with an orientation guide for the use of children with digital devices, which you can find here: Guidance Digitalisation
AdventurerDivers
Rating5.05.5 Thousand times & (3) DifficultyIntermediate

For family sharing, you need an Apple ID for your child and you need to enter a payment method. Family sharing is free of charge and all apps we will use. However, this is a necessary requirement. Therefore, we explain how to create an Apple ID for your child, how to set up the payment method and give recommendations on how to set up family sharing.

This offer is possible from the iPhone 5s (more precisely from iOS 12). Please write to us if you would like an offer for an Android device. Then we would create one in time.

Media Education for Kindergarten and Hort

Kind bastelt eine Rassel mit dem Navi
The Adventure Navi, the app for DIY projects, enables media education for the youngest.

Relief in everyday life, targeted promotion of individual children, independent learning and - without any pre-knowledge already usable by the youngest!


Titelbild zur Bastel- und DIY-Idee für Kinder '(275) Handy (iPhone) für Kinder vorbereiten – Teil 4'
Material for1 Child
Adv. Time30 min.Total Time30 min.
 your iPhone with at least iOS 12
1

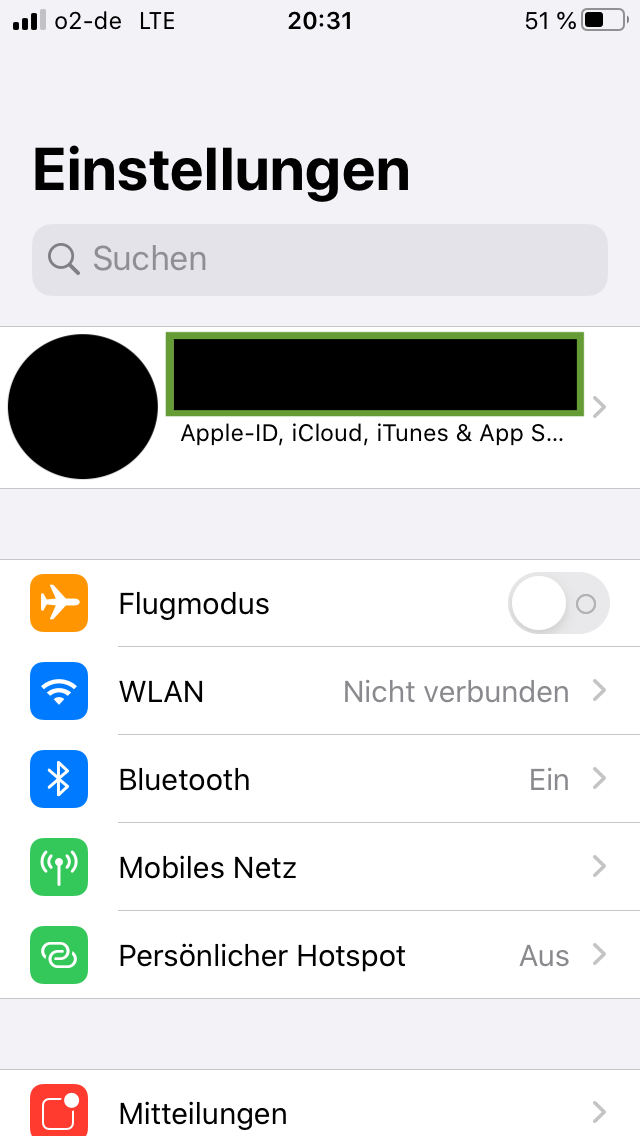
Go to Settings and then to your name.

Bild zum Schritt 1 für das Bastel- und DIY-Abenteuer für Kinder: 'Gehe auf Einstellungen und dann auf deinen Namen.'

Enter payment method
2

If there is no "None" for payment, you must first enter a payment method here. Otherwise, it is not possible to add an Apple ID for underage children.
If you have already set it up, continue in the next section Family Release.

Bild zum Schritt 3 für das Bastel- und DIY-Abenteuer für Kinder: 'Falls bei Zahlung & Versand „Keine“ steht, musst du hier...'

3

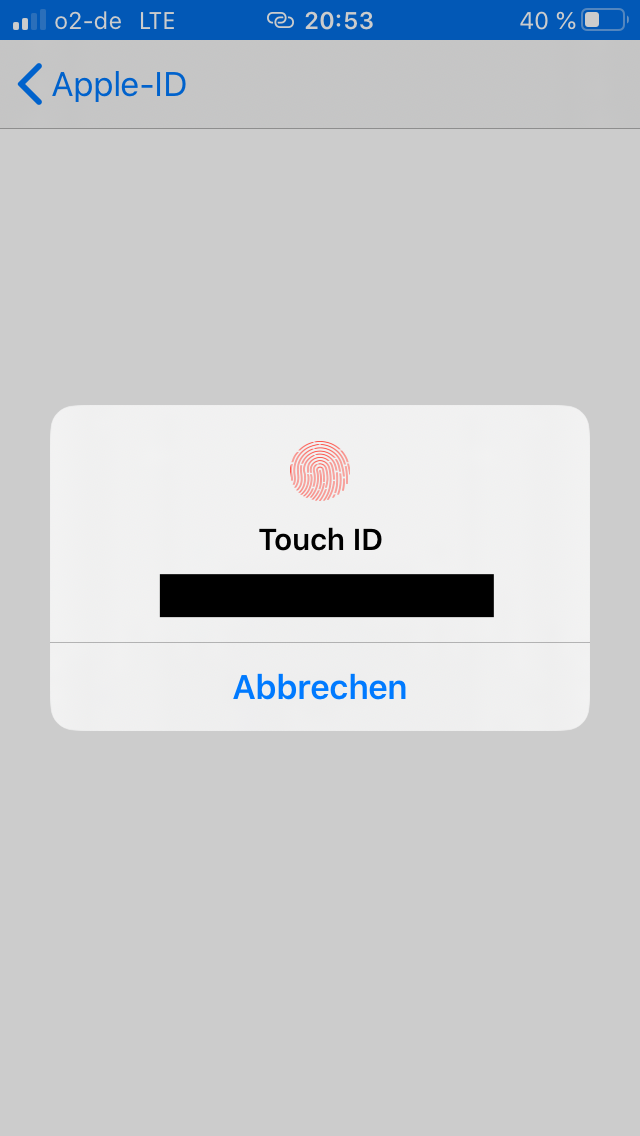
To set up the payment you have to enter your passcode (alternatively, the Touch ID can also be used).

Bild zum Schritt 4 für das Bastel- und DIY-Abenteuer für Kinder: 'Zum Einrichten der Zahlung musst du dein Passcode eingeben (alternativ...'

4

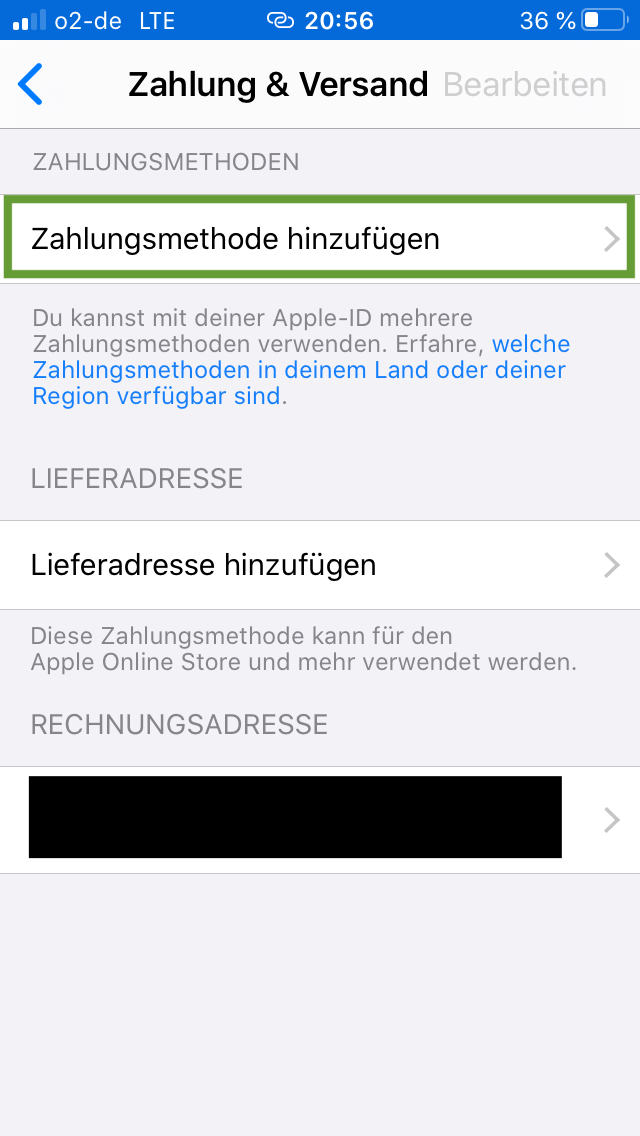
Now click "Add payment method".

Bild zum Schritt 5 für das Bastel- und DIY-Abenteuer für Kinder: 'Jetzt „Zahlungsmethode hinzufügen“ klicken.'

5

There you can choose between Apple pay, credit card, Paypal and the mobile phone bill. If you don't have Apple pay, credit card, Paypal, choose to pay by mobile phone bill.

Bild zum Schritt 6 für das Bastel- und DIY-Abenteuer für Kinder: 'Dort kannst du zwischen Apple-Pay, Kreditkarte, Paypal und der Handyrechnung...'

6

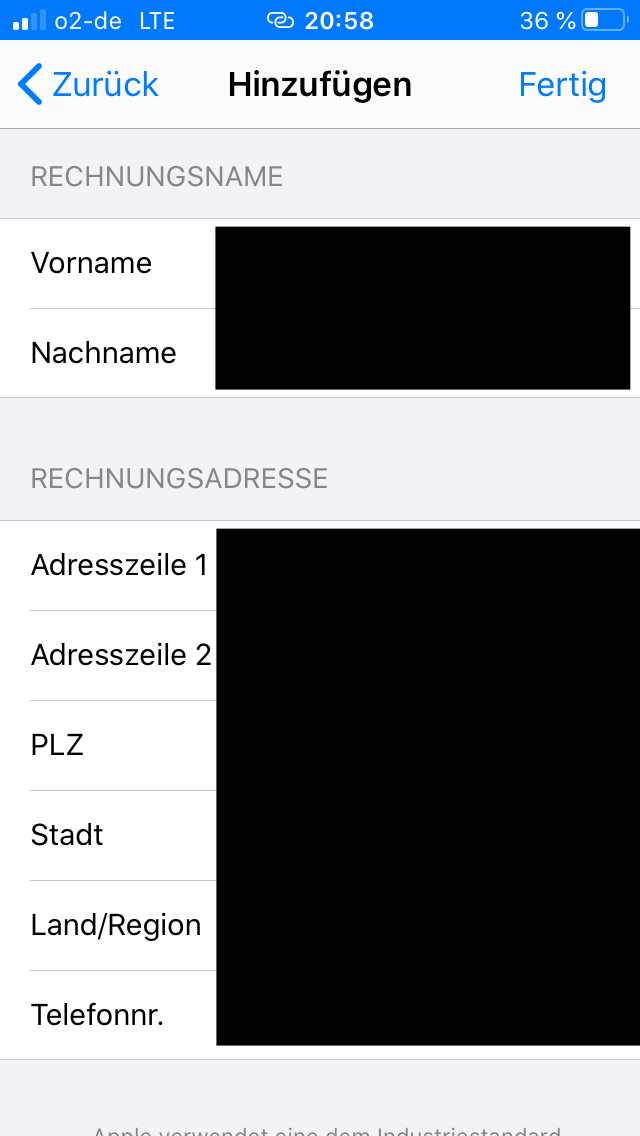
Enter your billing data and your billing address below. Then click "back" at the top right.

Bild zum Schritt 7 für das Bastel- und DIY-Abenteuer für Kinder: 'Gib unterhalb deine Daten zur Rechnungsstellung und deine Rechnungsadresse ein....'

7

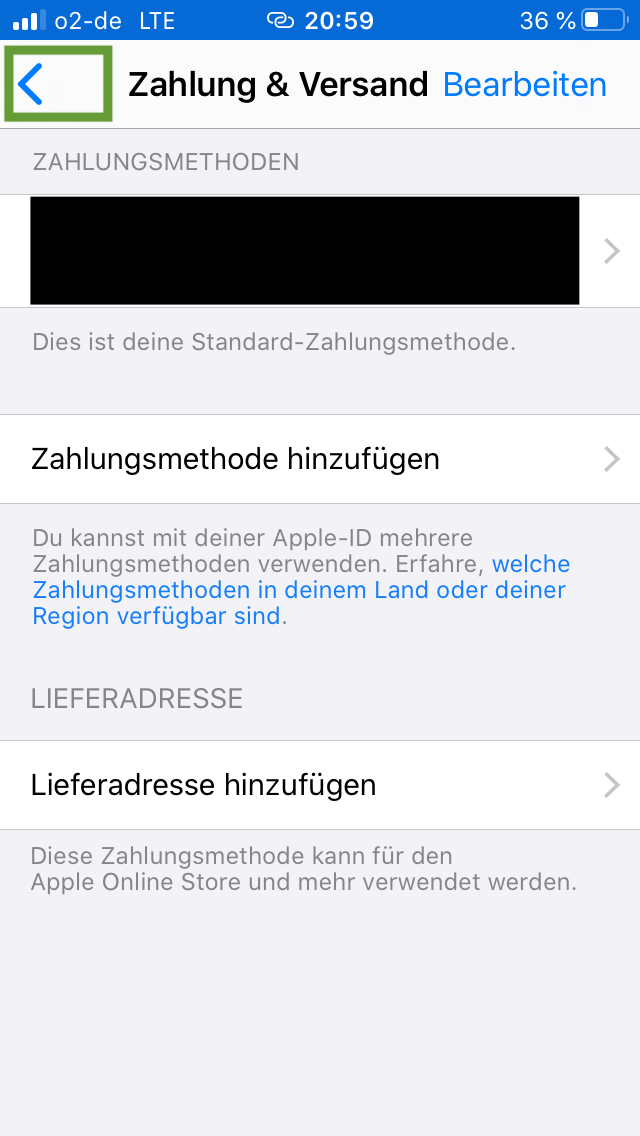
Then go back with the blue arrow at the top left.

Bild zum Schritt 8 für das Bastel- und DIY-Abenteuer für Kinder: 'Dann mit dem blauen Pfeil links oben einmal zurück gehen.'

Configure Family Sharing
8

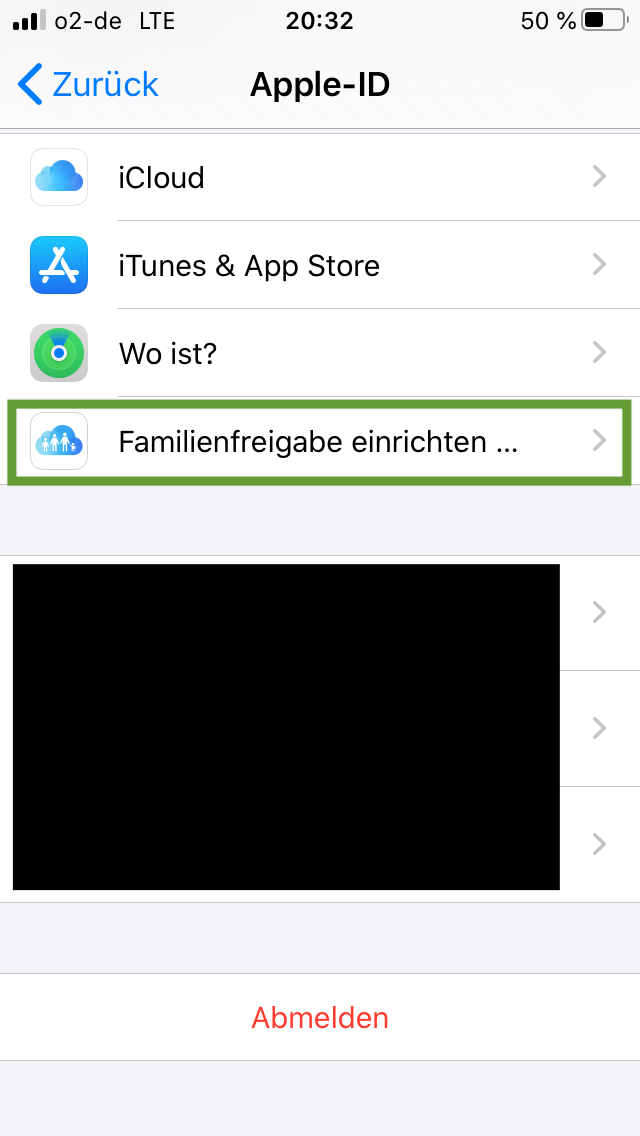
Scroll down and click "Set up Family Sharing".

Bild zum Schritt 10 für das Bastel- und DIY-Abenteuer für Kinder: 'Scrolle nach unten und klicke „Familienfreigabe einrichten“.'

9

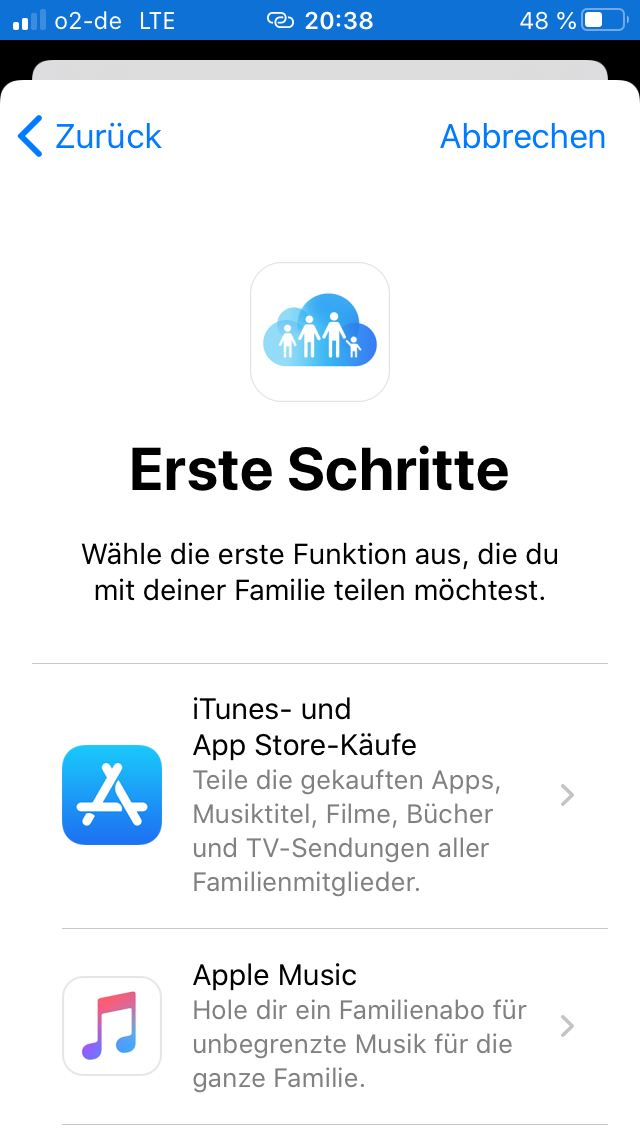
"First steps" appears on the screen.

Bild zum Schritt 11 für das Bastel- und DIY-Abenteuer für Kinder: 'Auf dem Bildschirm erscheint „Erste Schritte“.'

10

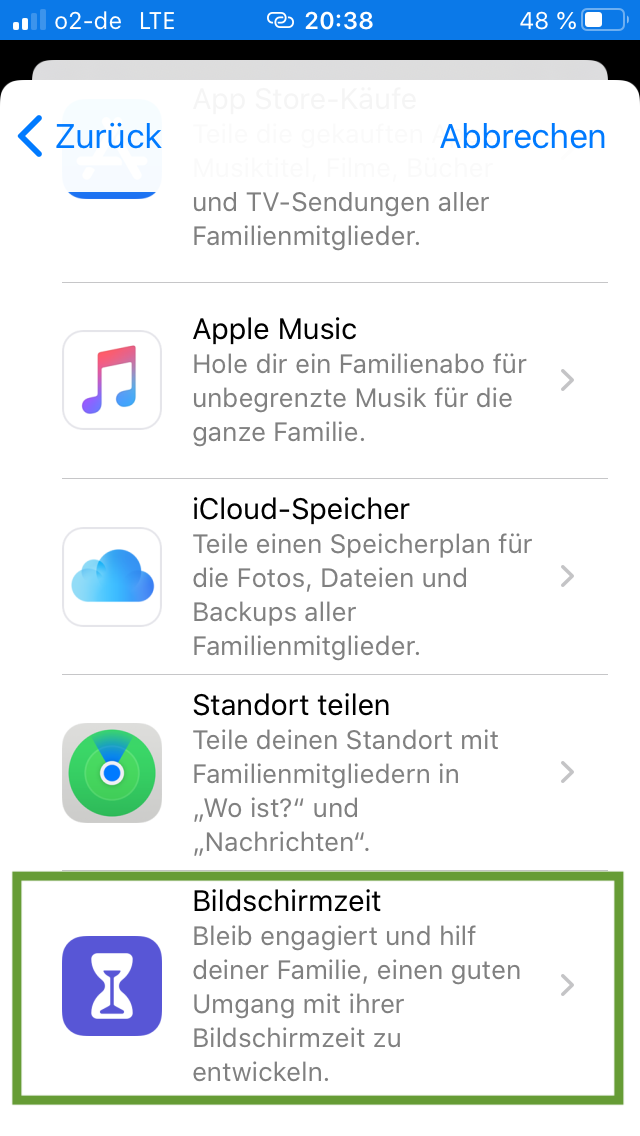
Scroll down and select "screen time".

Bild zum Schritt 12 für das Bastel- und DIY-Abenteuer für Kinder: 'Scrolle nach unten und wähle „Bildschirmzeit“ aus.'

11

Now the next step is to explain if you have an Apple ID for your child. The next step is if you don't have an Apple ID for your child.

12

If you have an Apple ID for your child, please press "Add Child". Then enter the Apple ID and password for your child.

Bild zum Schritt 14 für das Bastel- und DIY-Abenteuer für Kinder: 'Falls du eine Apple-ID für dein Kind hast drücke bitte...'

13

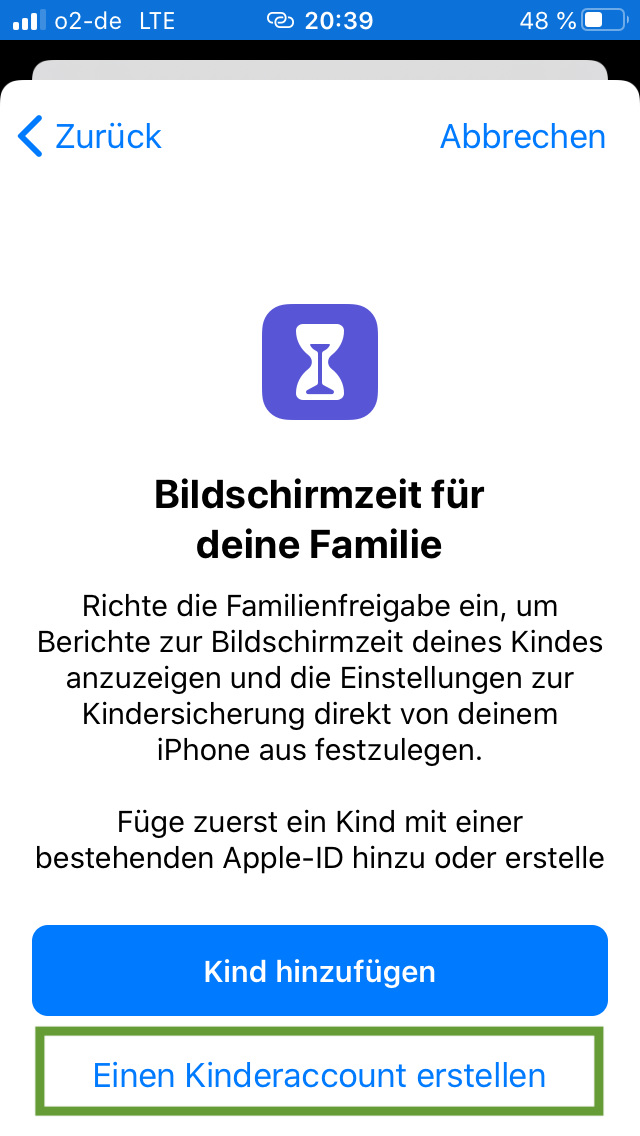
If you don't have an Apple ID for your child, please press "Create a child account".

Bild zum Schritt 15 für das Bastel- und DIY-Abenteuer für Kinder: 'Wenn ihr noch keine Apple-ID für euer Kind habt drückt...'

Create Apple ID for your child, i.e. create a child account
14

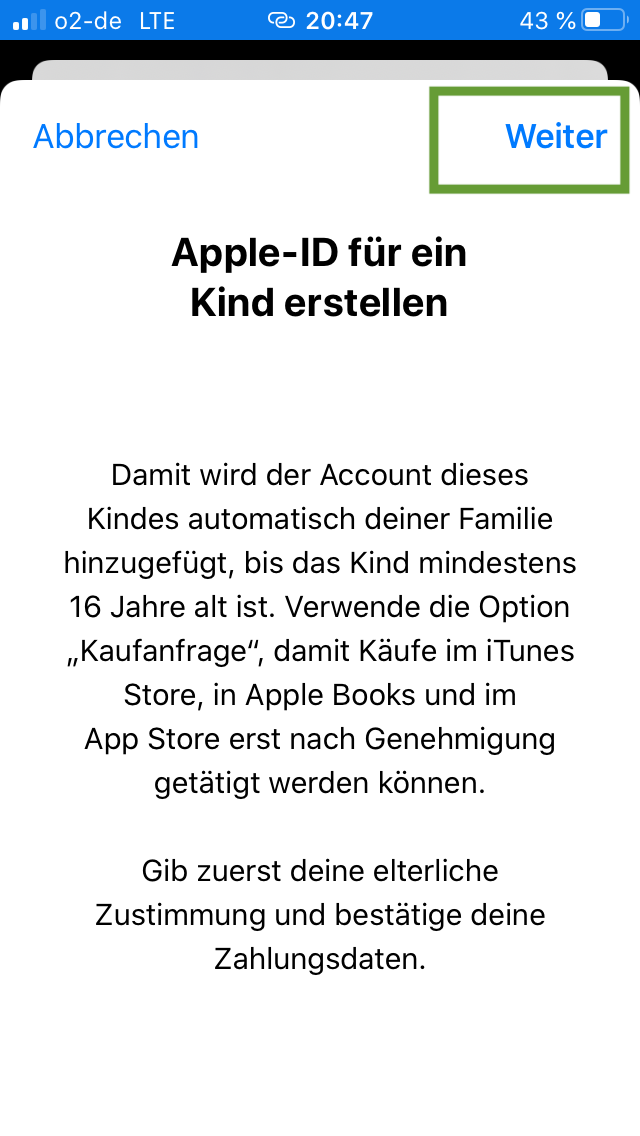
Then click on "Next" at the top right.

Bild zum Schritt 17 für das Bastel- und DIY-Abenteuer für Kinder: 'Dann rechts oben auf „Weiter" klicken.'

15

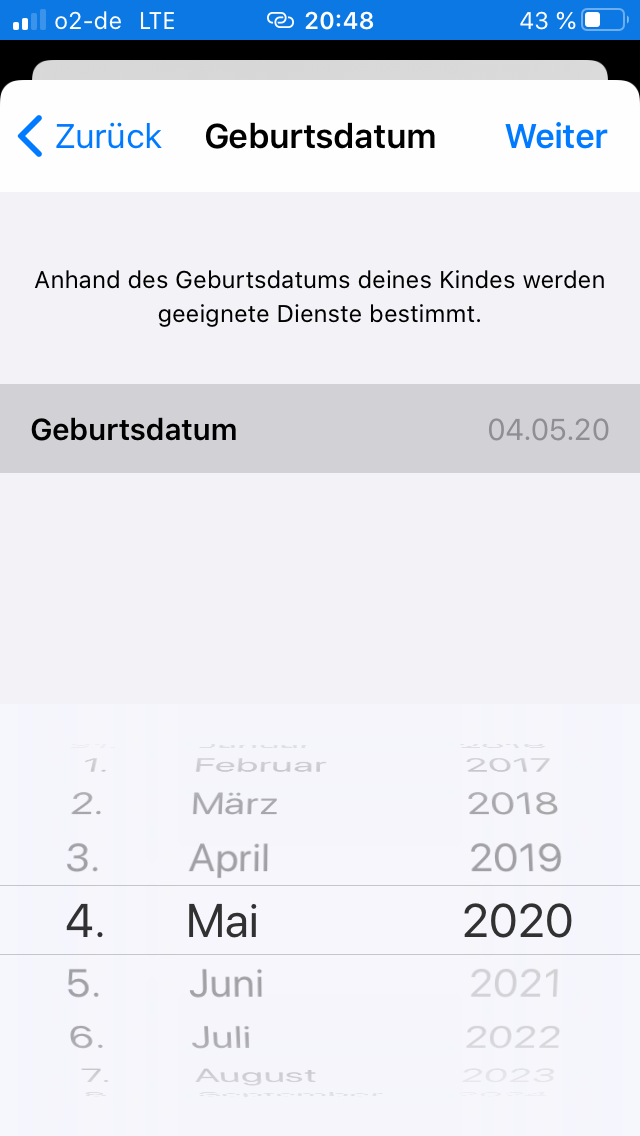
Enter your child's date of birth, then click "continue" at the top right.

Bild zum Schritt 18 für das Bastel- und DIY-Abenteuer für Kinder: 'Gebe das Geburtsdatum deines Kindes ein. Dann klicke rechts oben...'

16

"Accept" the parental consent below right.

Bild zum Schritt 19 für das Bastel- und DIY-Abenteuer für Kinder: '"Akzeptiere" die elterlichen Zustimmung rechts unten.'

17

Then you get a confirmation code by SMS. Enter this code and click on "Next" at the top right.

Bild zum Schritt 20 für das Bastel- und DIY-Abenteuer für Kinder: 'Dann erhälst du einen Bestätigungscode per SMS. Diesen Code gebe...'

18

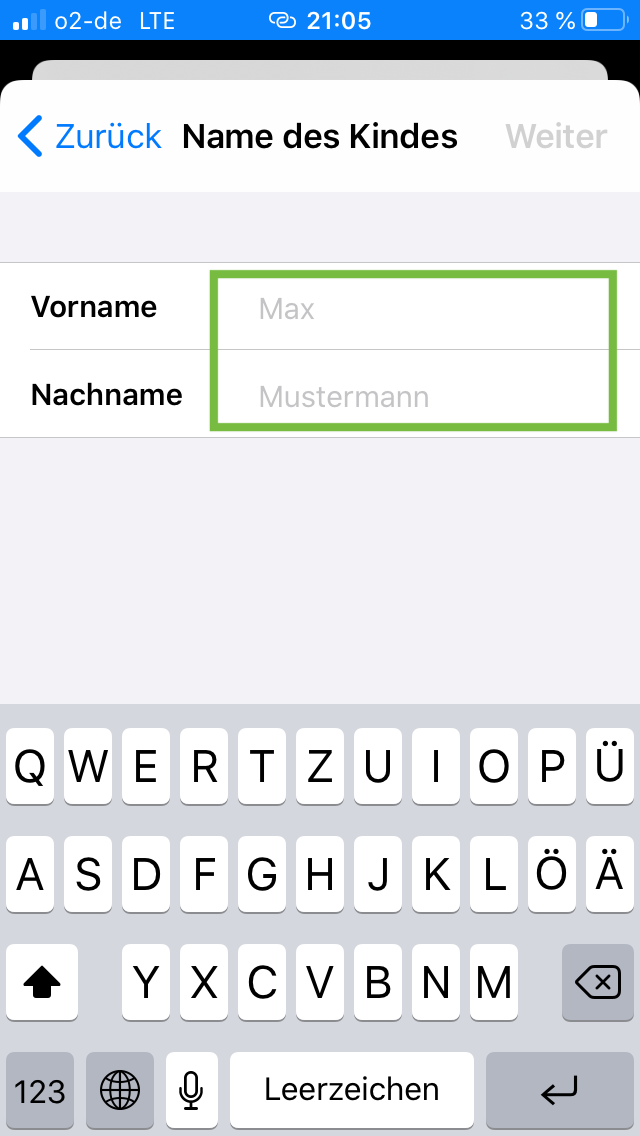
Then enter your child's first and last name and go to "Continue" on the top right.

Bild zum Schritt 21 für das Bastel- und DIY-Abenteuer für Kinder: 'Dann gebe den Vor- und Nachnamen deines Kindes ein und...'

19

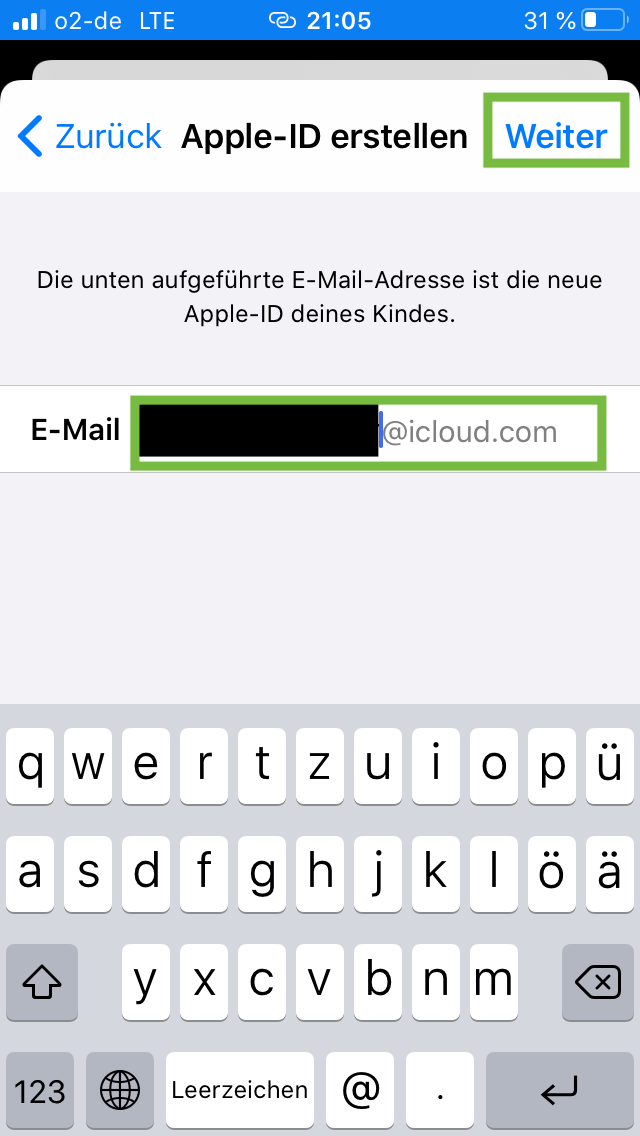
Then enter an e-mail address for your child. We recommend the first and last name of your child. This e-mail address may not yet exist. Automatically is at the end of the e-mail address "@icloud.com". Then click on "Next" again on the top right.

Bild zum Schritt 22 für das Bastel- und DIY-Abenteuer für Kinder: 'Dann gib eine E-Mail-Adresse für dein Kind ein. Wir empfehlen...'

20

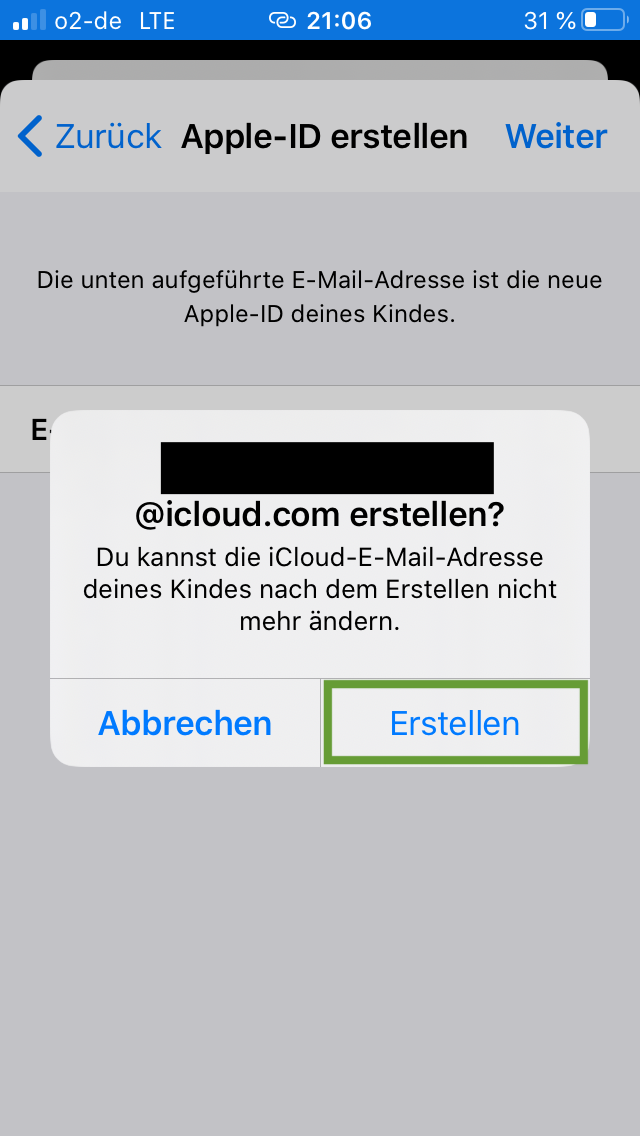
Then click on "Create" again.

Bild zum Schritt 23 für das Bastel- und DIY-Abenteuer für Kinder: 'Dann klicke noch einmal auf „Erstellen“.'

21

Now you have to assign a password and click on "Next" at the top right. This must then be confirmed.

Bild zum Schritt 24 für das Bastel- und DIY-Abenteuer für Kinder: 'Jetzt musst du ein Passwort vergeben und rechts oben auf...'

22

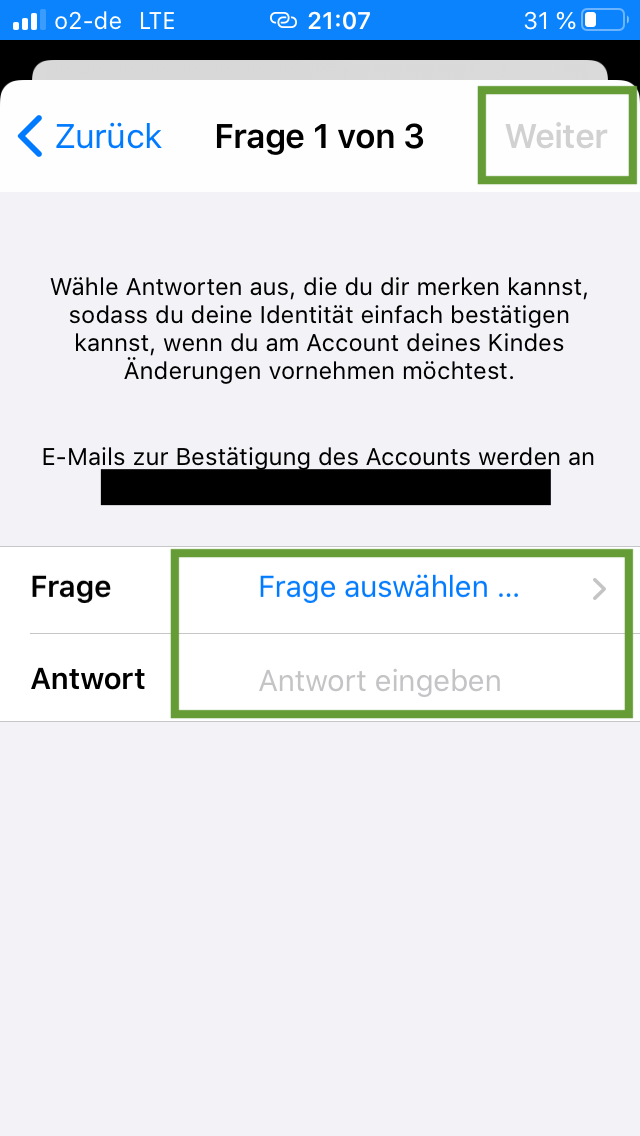
For safety, choose a question three times from different questions and enter the appropriate answer.

Bild zum Schritt 25 für das Bastel- und DIY-Abenteuer für Kinder: 'Wähle zur Sicherheit dreimal aus verschiedenen Fragen eine Frage aus...'

23

Then you will be asked if every purchase request of your child should be confirmed by you. We would recommend that. The slider must be green. Then click on "Next" at the top right.

Bild zum Schritt 26 für das Bastel- und DIY-Abenteuer für Kinder: 'Dann wird gefragt, ob jede Kaufanfrage deines Kindes von dir...'

24

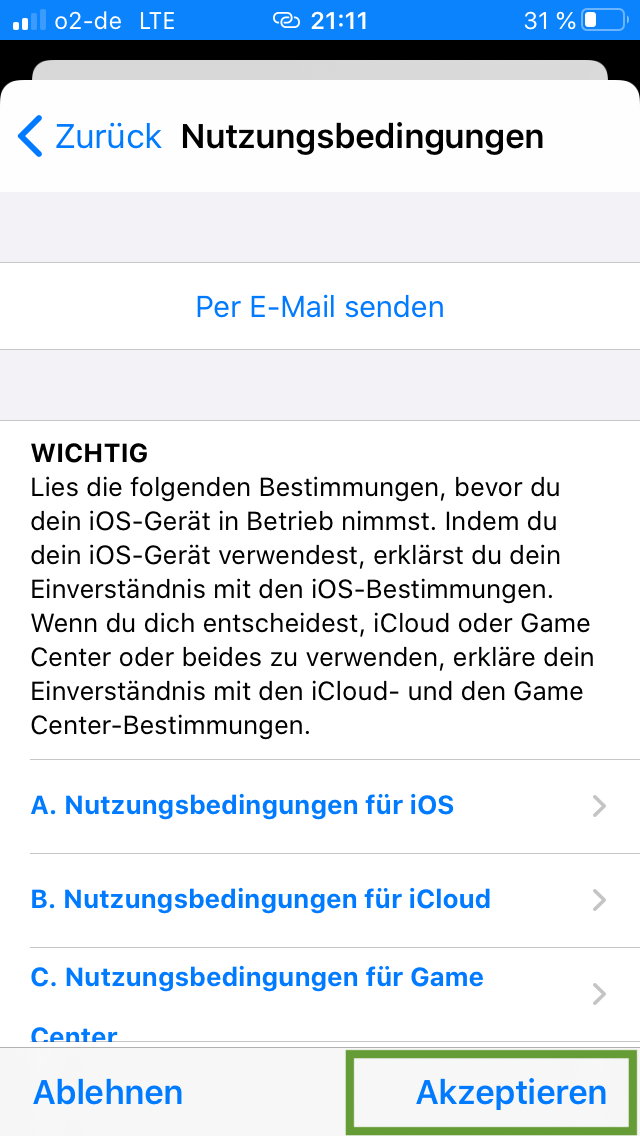
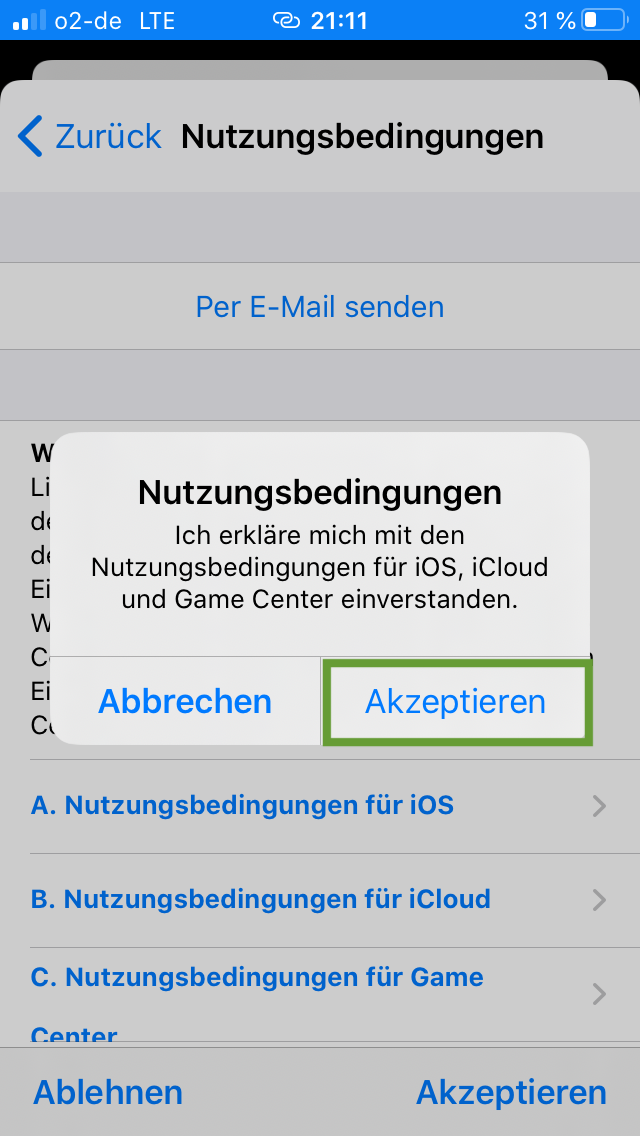
Then you see the terms of use that you "accept" at the bottom right

Bild zum Schritt 27 für das Bastel- und DIY-Abenteuer für Kinder: 'Dann siehst du die Nutzungsbedingungen, die du rechts unten „Akzeptierst“'

25

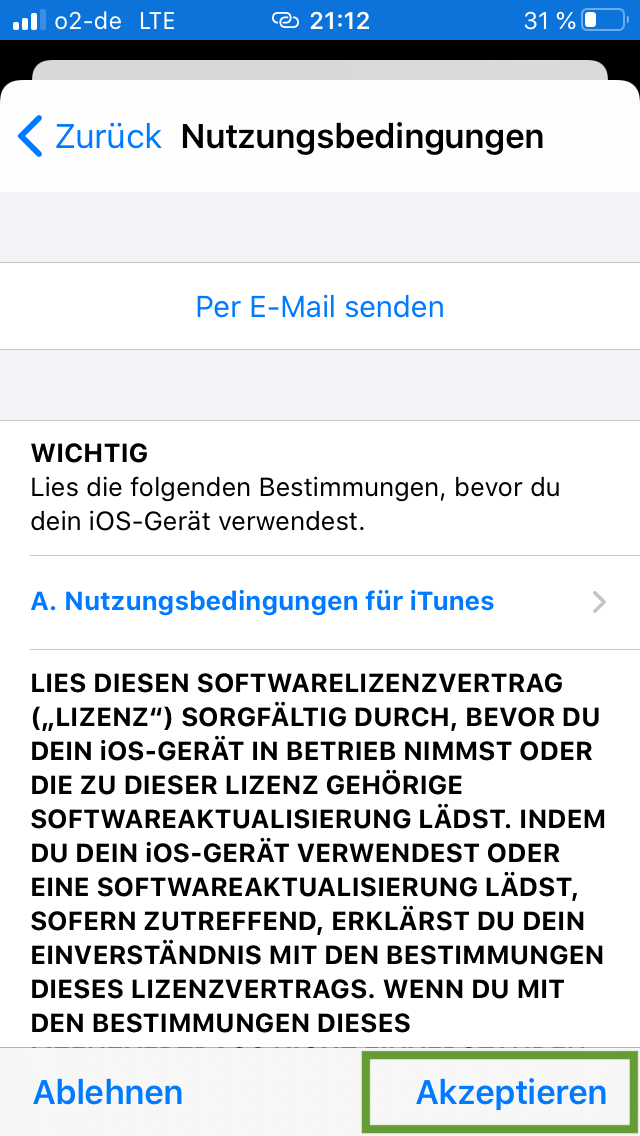
You'll have to "accept" this one again.

Bild zum Schritt 28 für das Bastel- und DIY-Abenteuer für Kinder: 'Diese musst du dann noch einmal „Akzeptieren“'

26

Then once again there will be terms of use for iTunes, which you then "accept" at the bottom right. And finally again.

Bild zum Schritt 29 für das Bastel- und DIY-Abenteuer für Kinder: 'Dann erscheinen noch einmal Nutzungsbedingungen für iTunes, die du dann...'

27

Now you can set up the screen time afterwards. How this works we show you in Part 5.

Materials

 your iPhone with at least iOS 12

Directions

1

Go to Settings and then to your name.

Bild zum Schritt 1 für das Bastel- und DIY-Abenteuer für Kinder: 'Gehe auf Einstellungen und dann auf deinen Namen.'

Enter payment method
2

If there is no "None" for payment, you must first enter a payment method here. Otherwise, it is not possible to add an Apple ID for underage children.
If you have already set it up, continue in the next section Family Release.

Bild zum Schritt 3 für das Bastel- und DIY-Abenteuer für Kinder: 'Falls bei Zahlung & Versand „Keine“ steht, musst du hier...'

3

To set up the payment you have to enter your passcode (alternatively, the Touch ID can also be used).

Bild zum Schritt 4 für das Bastel- und DIY-Abenteuer für Kinder: 'Zum Einrichten der Zahlung musst du dein Passcode eingeben (alternativ...'

4

Now click "Add payment method".

Bild zum Schritt 5 für das Bastel- und DIY-Abenteuer für Kinder: 'Jetzt „Zahlungsmethode hinzufügen“ klicken.'

5

There you can choose between Apple pay, credit card, Paypal and the mobile phone bill. If you don't have Apple pay, credit card, Paypal, choose to pay by mobile phone bill.

Bild zum Schritt 6 für das Bastel- und DIY-Abenteuer für Kinder: 'Dort kannst du zwischen Apple-Pay, Kreditkarte, Paypal und der Handyrechnung...'

6

Enter your billing data and your billing address below. Then click "back" at the top right.

Bild zum Schritt 7 für das Bastel- und DIY-Abenteuer für Kinder: 'Gib unterhalb deine Daten zur Rechnungsstellung und deine Rechnungsadresse ein....'

7

Then go back with the blue arrow at the top left.

Bild zum Schritt 8 für das Bastel- und DIY-Abenteuer für Kinder: 'Dann mit dem blauen Pfeil links oben einmal zurück gehen.'

Configure Family Sharing
8

Scroll down and click "Set up Family Sharing".

Bild zum Schritt 10 für das Bastel- und DIY-Abenteuer für Kinder: 'Scrolle nach unten und klicke „Familienfreigabe einrichten“.'

9

"First steps" appears on the screen.

Bild zum Schritt 11 für das Bastel- und DIY-Abenteuer für Kinder: 'Auf dem Bildschirm erscheint „Erste Schritte“.'

10

Scroll down and select "screen time".

Bild zum Schritt 12 für das Bastel- und DIY-Abenteuer für Kinder: 'Scrolle nach unten und wähle „Bildschirmzeit“ aus.'

11

Now the next step is to explain if you have an Apple ID for your child. The next step is if you don't have an Apple ID for your child.

12

If you have an Apple ID for your child, please press "Add Child". Then enter the Apple ID and password for your child.

Bild zum Schritt 14 für das Bastel- und DIY-Abenteuer für Kinder: 'Falls du eine Apple-ID für dein Kind hast drücke bitte...'

13

If you don't have an Apple ID for your child, please press "Create a child account".

Bild zum Schritt 15 für das Bastel- und DIY-Abenteuer für Kinder: 'Wenn ihr noch keine Apple-ID für euer Kind habt drückt...'

Create Apple ID for your child, i.e. create a child account
14

Then click on "Next" at the top right.

Bild zum Schritt 17 für das Bastel- und DIY-Abenteuer für Kinder: 'Dann rechts oben auf „Weiter" klicken.'

15

Enter your child's date of birth, then click "continue" at the top right.

Bild zum Schritt 18 für das Bastel- und DIY-Abenteuer für Kinder: 'Gebe das Geburtsdatum deines Kindes ein. Dann klicke rechts oben...'

16

"Accept" the parental consent below right.

Bild zum Schritt 19 für das Bastel- und DIY-Abenteuer für Kinder: '"Akzeptiere" die elterlichen Zustimmung rechts unten.'

17

Then you get a confirmation code by SMS. Enter this code and click on "Next" at the top right.

Bild zum Schritt 20 für das Bastel- und DIY-Abenteuer für Kinder: 'Dann erhälst du einen Bestätigungscode per SMS. Diesen Code gebe...'

18

Then enter your child's first and last name and go to "Continue" on the top right.

Bild zum Schritt 21 für das Bastel- und DIY-Abenteuer für Kinder: 'Dann gebe den Vor- und Nachnamen deines Kindes ein und...'

19

Then enter an e-mail address for your child. We recommend the first and last name of your child. This e-mail address may not yet exist. Automatically is at the end of the e-mail address "@icloud.com". Then click on "Next" again on the top right.

Bild zum Schritt 22 für das Bastel- und DIY-Abenteuer für Kinder: 'Dann gib eine E-Mail-Adresse für dein Kind ein. Wir empfehlen...'

20

Then click on "Create" again.

Bild zum Schritt 23 für das Bastel- und DIY-Abenteuer für Kinder: 'Dann klicke noch einmal auf „Erstellen“.'

21

Now you have to assign a password and click on "Next" at the top right. This must then be confirmed.

Bild zum Schritt 24 für das Bastel- und DIY-Abenteuer für Kinder: 'Jetzt musst du ein Passwort vergeben und rechts oben auf...'

22

For safety, choose a question three times from different questions and enter the appropriate answer.

Bild zum Schritt 25 für das Bastel- und DIY-Abenteuer für Kinder: 'Wähle zur Sicherheit dreimal aus verschiedenen Fragen eine Frage aus...'

23

Then you will be asked if every purchase request of your child should be confirmed by you. We would recommend that. The slider must be green. Then click on "Next" at the top right.

Bild zum Schritt 26 für das Bastel- und DIY-Abenteuer für Kinder: 'Dann wird gefragt, ob jede Kaufanfrage deines Kindes von dir...'

24

Then you see the terms of use that you "accept" at the bottom right

Bild zum Schritt 27 für das Bastel- und DIY-Abenteuer für Kinder: 'Dann siehst du die Nutzungsbedingungen, die du rechts unten „Akzeptierst“'

25

You'll have to "accept" this one again.

Bild zum Schritt 28 für das Bastel- und DIY-Abenteuer für Kinder: 'Diese musst du dann noch einmal „Akzeptieren“'

26

Then once again there will be terms of use for iTunes, which you then "accept" at the bottom right. And finally again.

Bild zum Schritt 29 für das Bastel- und DIY-Abenteuer für Kinder: 'Dann erscheinen noch einmal Nutzungsbedingungen für iTunes, die du dann...'

27

Now you can set up the screen time afterwards. How this works we show you in Part 5.

Preparing mobile phone (iPhone) for children - Part 4

Follow us on Facebook , Instagram and Pinterest
Don't miss any more adventures: Our bottle mail

Leave a Reply

Your email address will not be published.

The maximum upload file size: 5 MB. You can upload: image, document. Drop file here