Preparing mobile phone (iPhone) for children - Part 2

Note: We have provided you with an orientation guide for the use of children with digital devices, which you can find here: Guidance Digitalisation
AdventurerDivers
Rating5.06.2 Thousand times & (2) DifficultyIntermediate

How to show you step by step how to restore the basic settings after reset to the factory settings. Since we were not able to take screenshots at the time, the image quality is worse than with the other offers.

This offer is possible from the iPhone 5s (more precisely from iOS 12). Please write to us if you would like an offer for an Android device. Then we would create one in time.

Media Education for Kindergarten and Hort

Kind bastelt eine Rassel mit dem Navi
The Adventure Navi, the app for DIY projects, enables media education for the youngest.

Relief in everyday life, targeted promotion of individual children, independent learning and - without any pre-knowledge already usable by the youngest!


Titelbild zur Bastel- und DIY-Idee für Kinder '(271) Handy (iPhone) für Kinder vorbereiten – Teil 2'
Material for1 Child
Adv. Time20 min.Total Time20 min.
 old smartphone for the child: iPhone or iPad with at least iOS12e.g. from iPhone 5s
 SIM card including pin (can be an old SIM card or your current one)only for setting up the smartphone.
 SIM card needle from iPhone (in the box)or paper clip to remove the SIM card
 possibly Apple ID of your childif you don't have it yet, you can create it or create it at a later date (part 4)
1

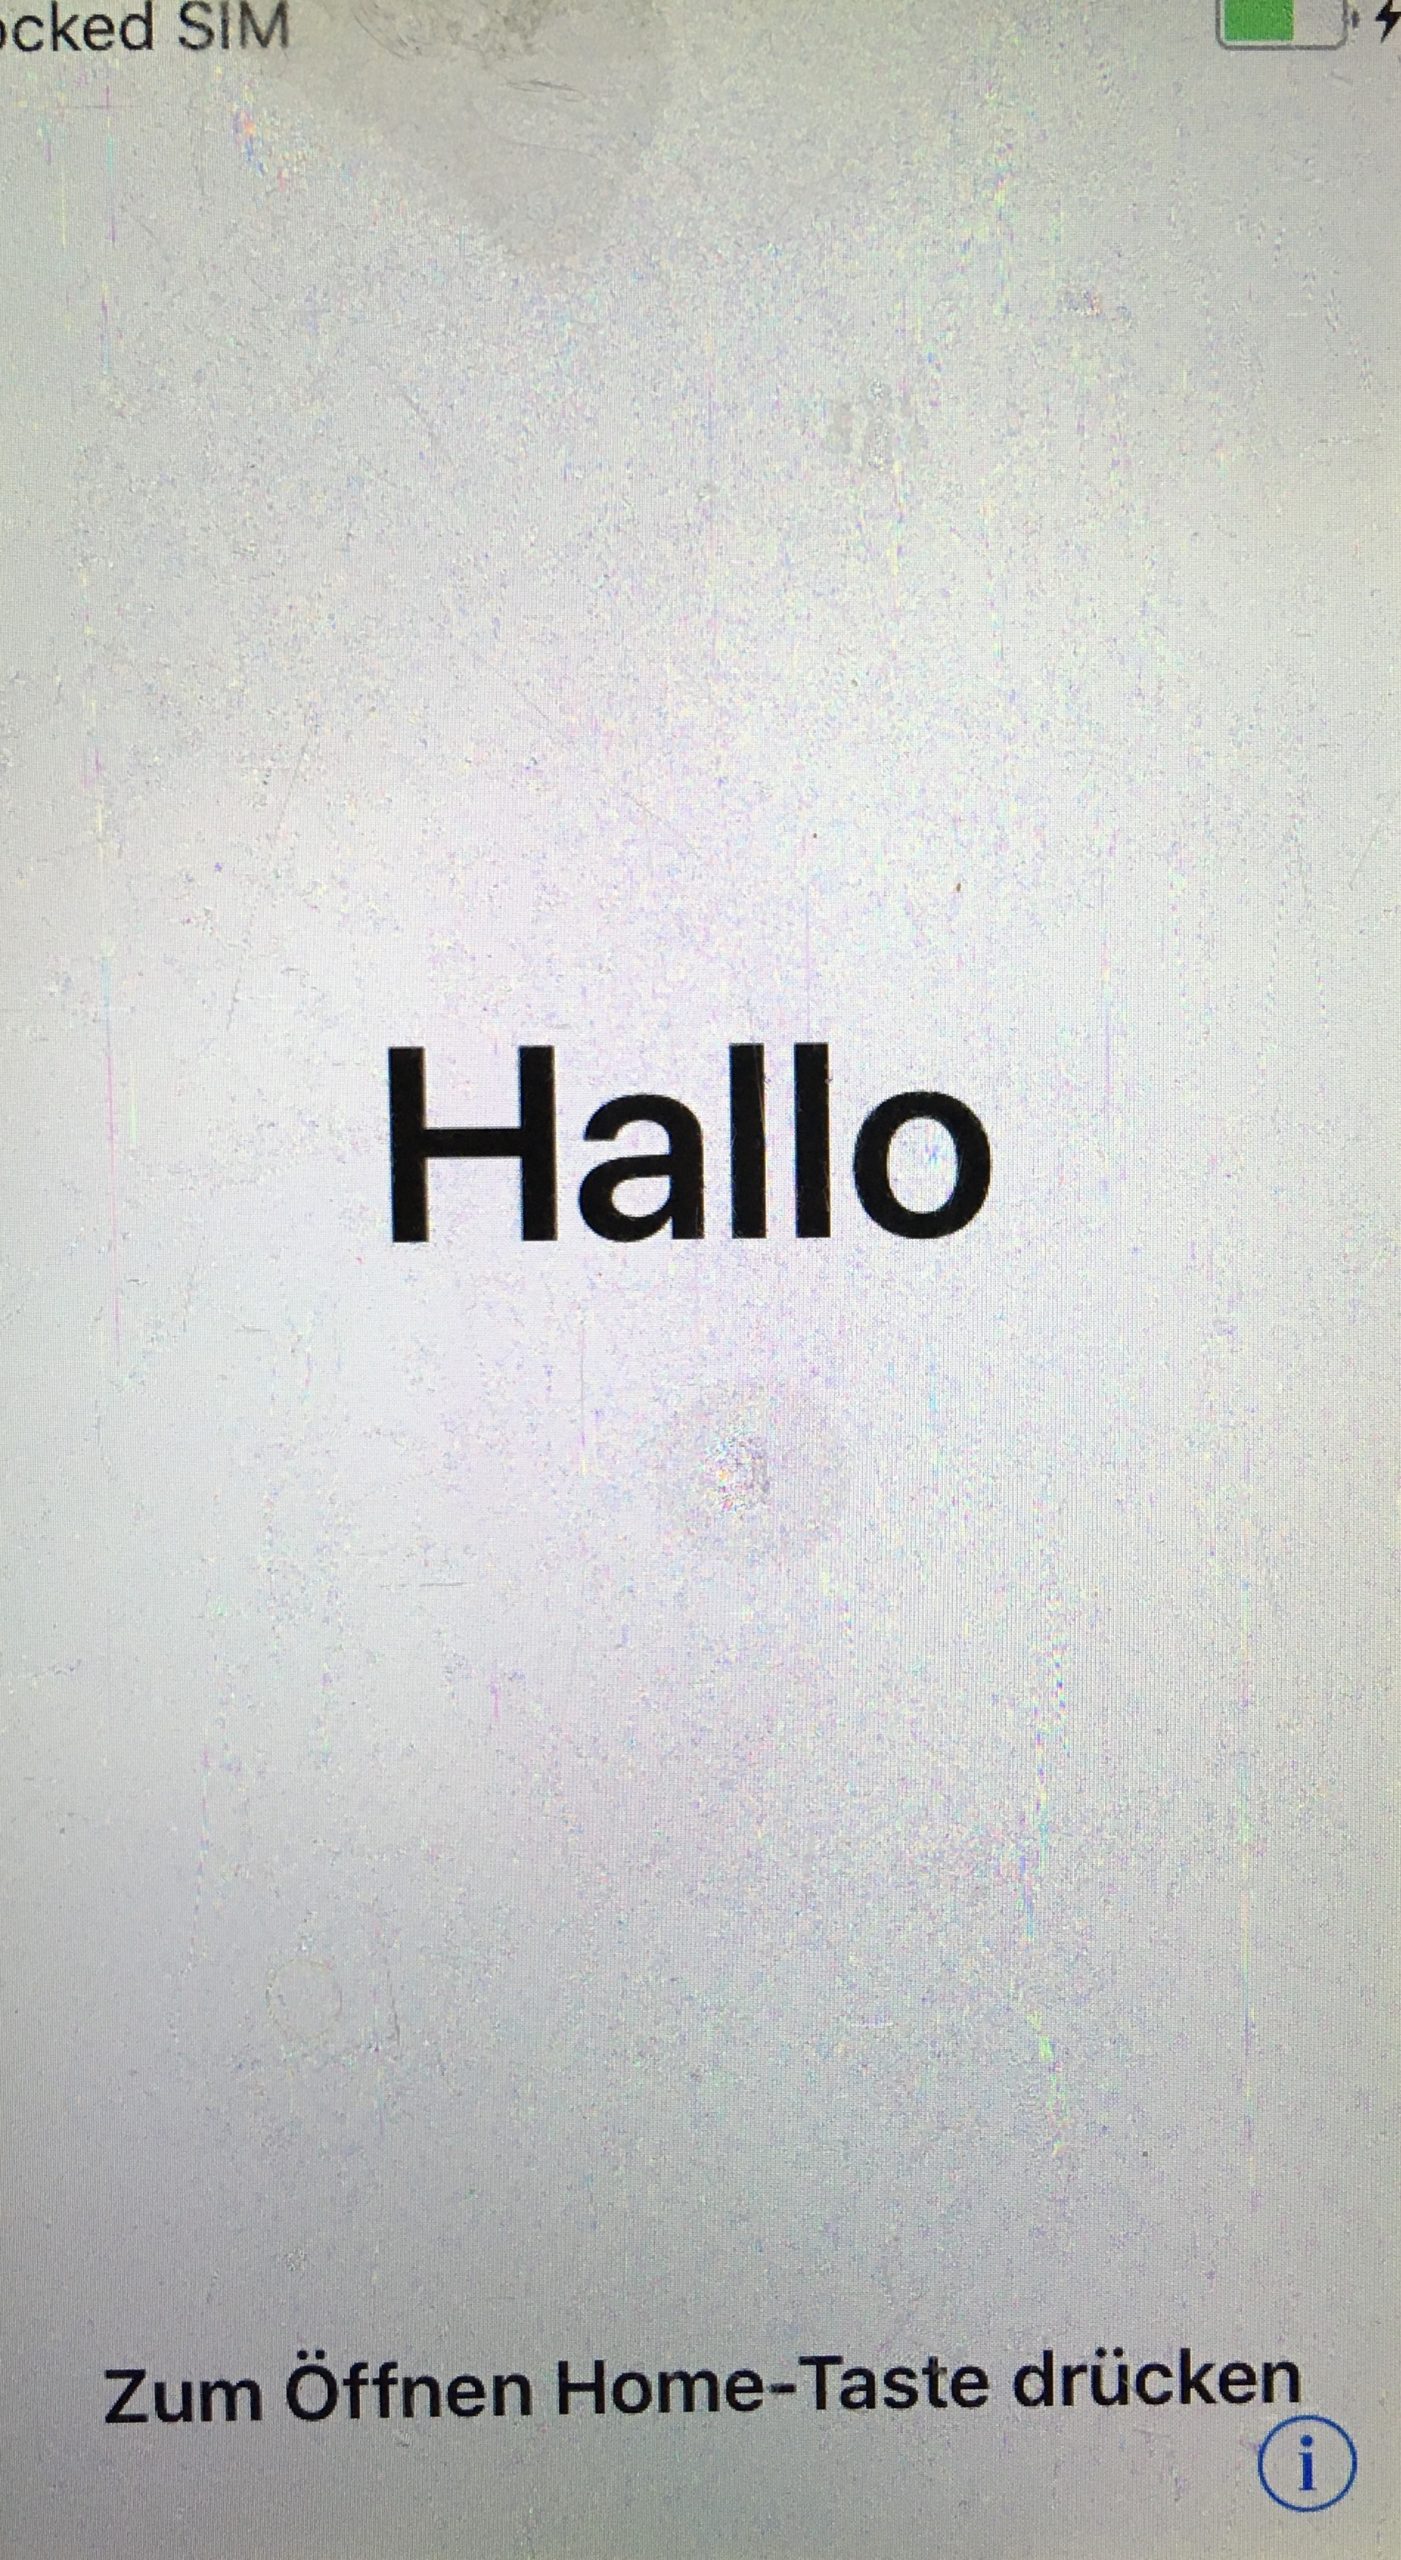
First, press the Home button.

Bild zum Schritt 1 für das Bastel- und DIY-Abenteuer für Kinder: 'Zuerst die Home-Taste drücken.'

2

Unlock the SIM card. You only need the SIM card to set it up. Then you can take it out again.
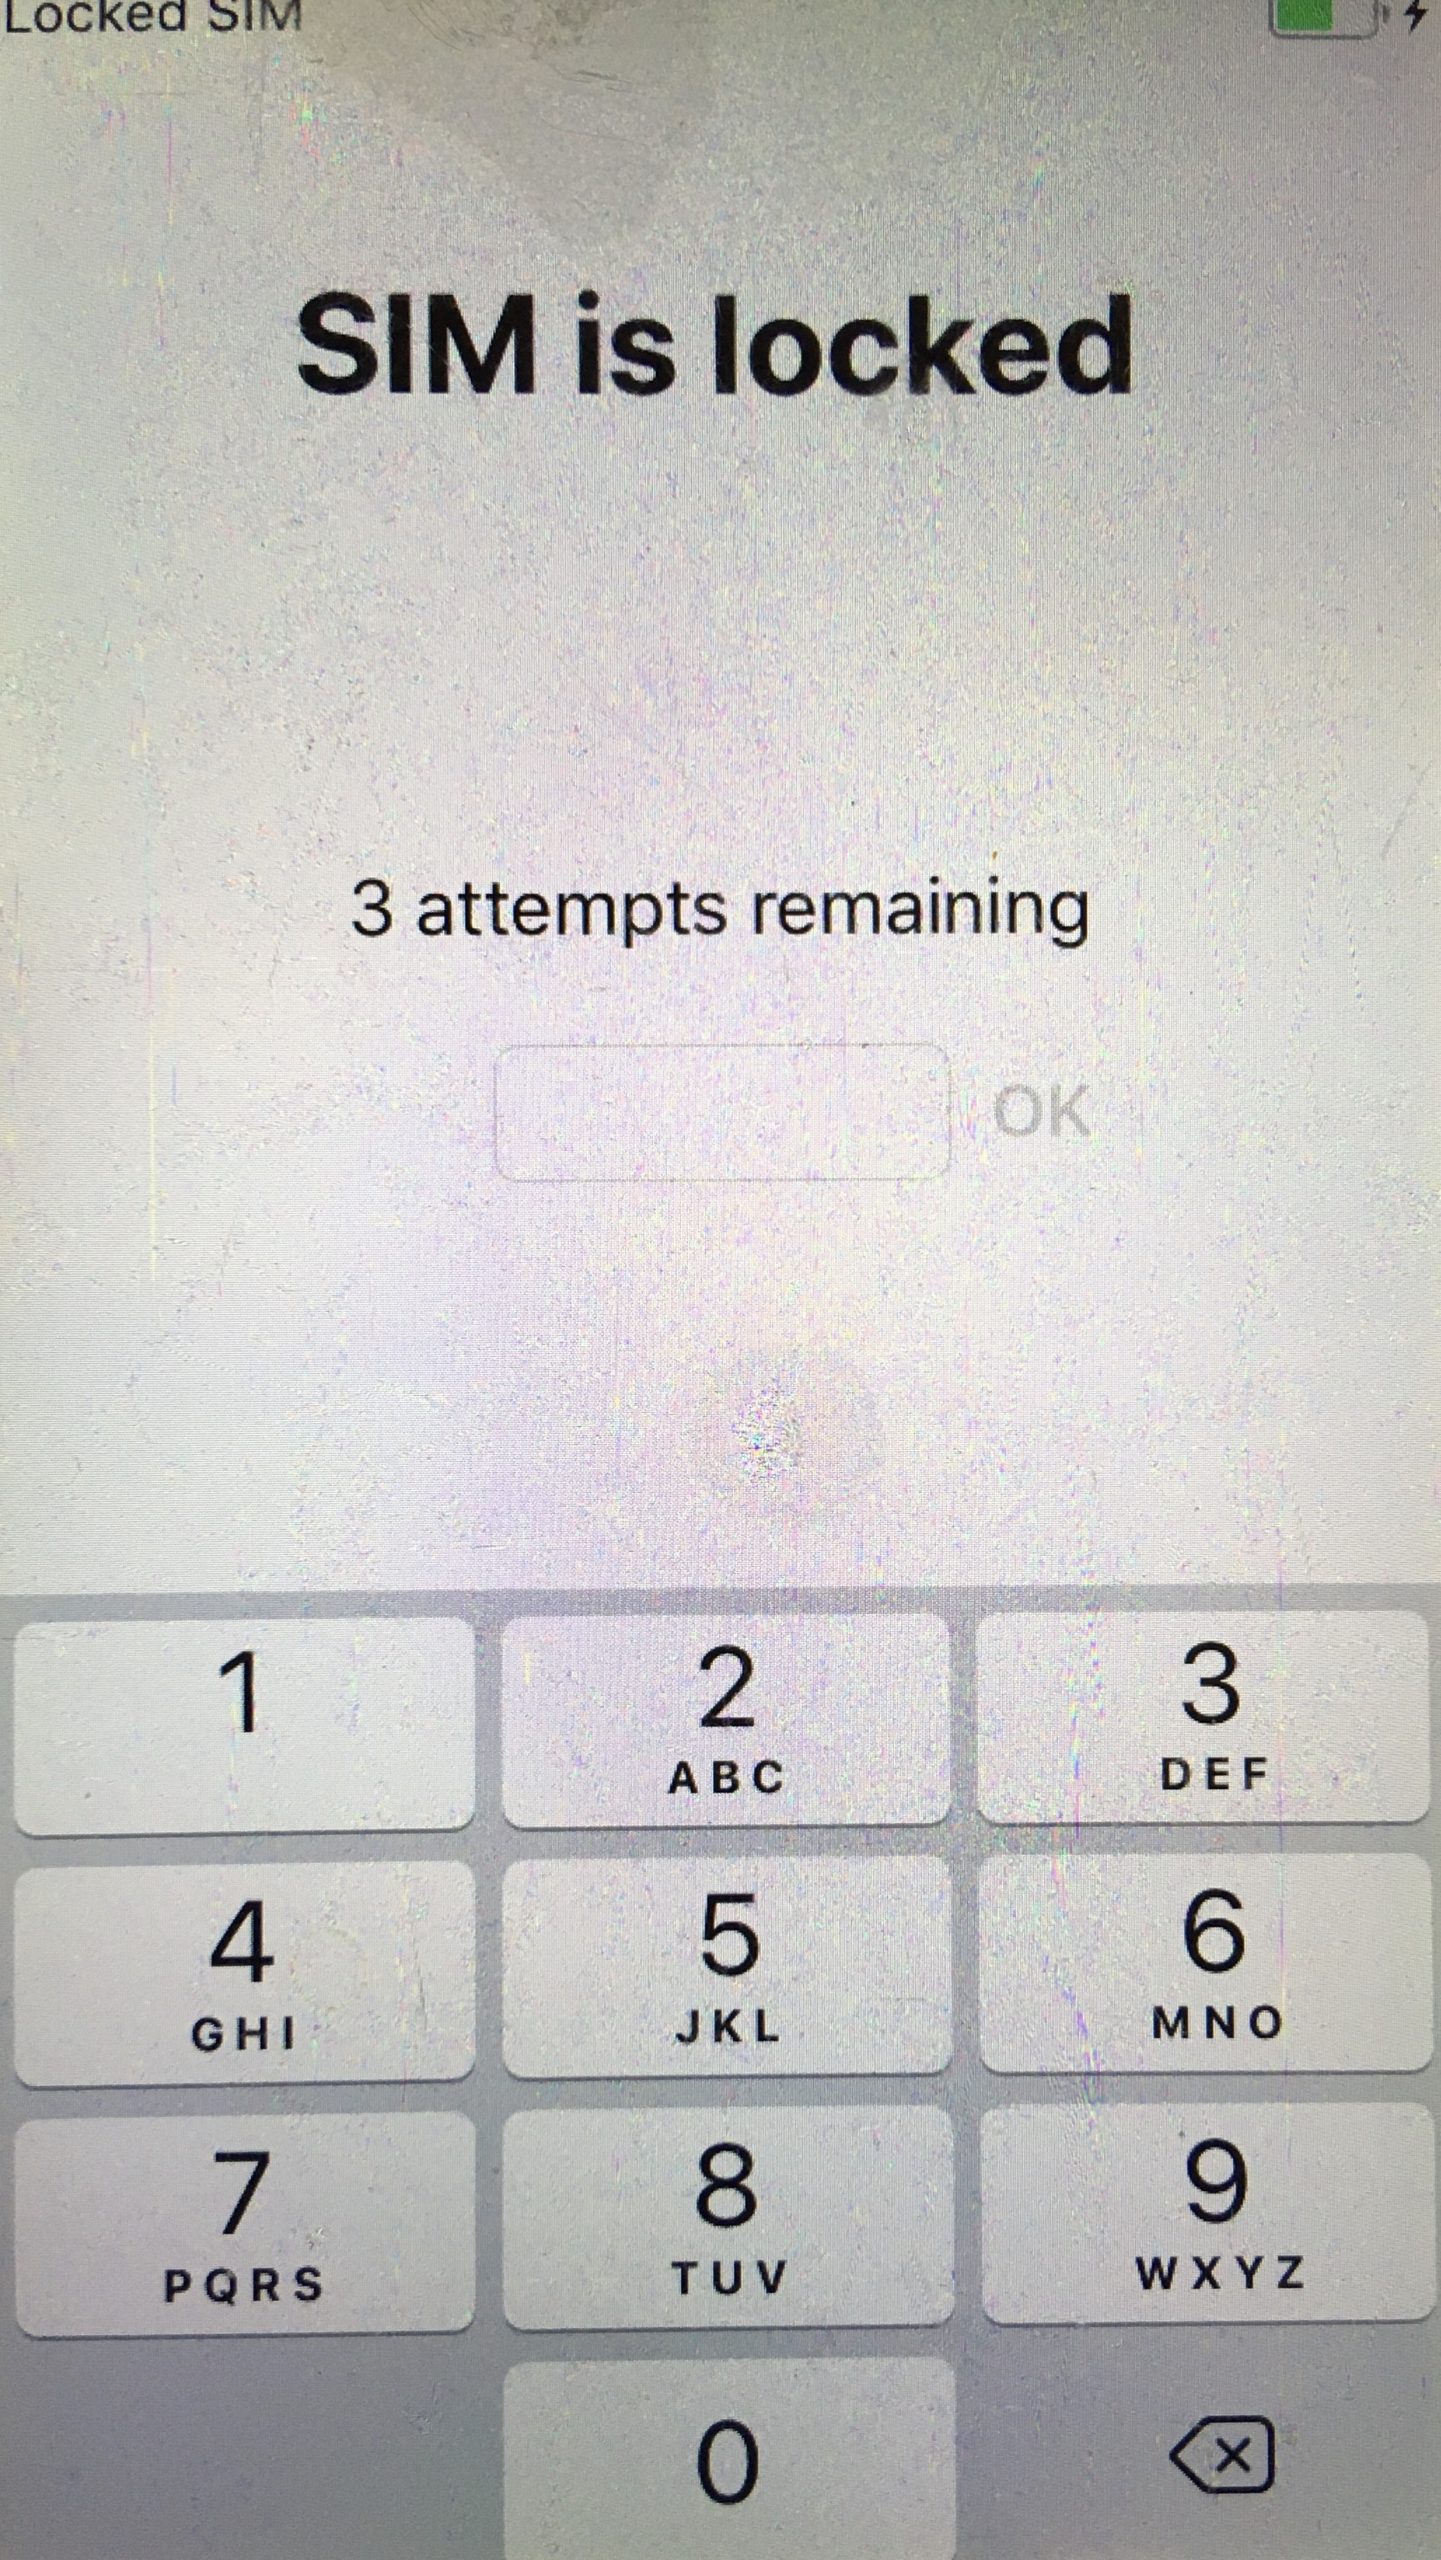
Bild zum Schritt 2 für das Bastel- und DIY-Abenteuer für Kinder: 'SIM-Karte entsperren. Du brauchst die SIM-Karte nur zum Einrichten. Danach...'

3

Then you adjust the language and choose the country and region.

Bild zum Schritt 3 für das Bastel- und DIY-Abenteuer für Kinder: 'Dann stellst du die Sprache ein und wählst das Land...'

4

Then skip the quick start and press "Manually Configure".

Bild zum Schritt 4 für das Bastel- und DIY-Abenteuer für Kinder: 'Dann überspringst du den Schnellstart und drückst auf "Manuell konfigurieren".'

5

Then connect to your Wi-Fi and enter the Wi-Fi password. This is important because communication with your child's mobile phone works best over the same Wi-Fi.

6

Then follow the data protection information. Click on "Next".

Bild zum Schritt 6 für das Bastel- und DIY-Abenteuer für Kinder: 'Dann folgen die Informationen zum Datenschutz. Da auf "Weiter" klicken.'

7

Enable the touch ID. We recommend that you also have access to the child's smartphone regardless of your child's passcode.

Bild zum Schritt 7 für das Bastel- und DIY-Abenteuer für Kinder: 'Die Touch-ID aktivieren. Das empfehlen wir, damit du unabhängig vom...'

8

To do this, put your fingers on repeatedly until the process is complete.

Bild zum Schritt 8 für das Bastel- und DIY-Abenteuer für Kinder: 'Dazu Finger wiederholt auflegen, bis der Vorgang abgeschlossen ist.'

9

Now set a passcode for your child. You can change it with your child. We recommend that you.

Bild zum Schritt 9 für das Bastel- und DIY-Abenteuer für Kinder: 'Nun einen Passcode für dein Kind einstellen. Diesen kannst du...'

10

Then the "Apps & Data" window opens. If you have not yet set up a smartphone for your child, press "no apps and data" to transfer. Otherwise, you can restore an existing backup of your child.

Bild zum Schritt 10 für das Bastel- und DIY-Abenteuer für Kinder: 'Dann öffnet sich das Fenster "Apps & Daten". Sofern du...'

11

Next you enter your child's Apple ID or you create a new Apple ID. You can also create it at a later date (see Part 4.)

Bild zum Schritt 11 für das Bastel- und DIY-Abenteuer für Kinder: 'Als nächstes gibst du die Apple-ID deines Kindes ein oder...'

12

Then accept the terms of use.

13

Then follow the express settings. Press "Adjust Settings".

Bild zum Schritt 13 für das Bastel- und DIY-Abenteuer für Kinder: 'Dann folgen die Expresseinstellungen. Dabei auf "Einstellungen anpassen" drücken.'

14

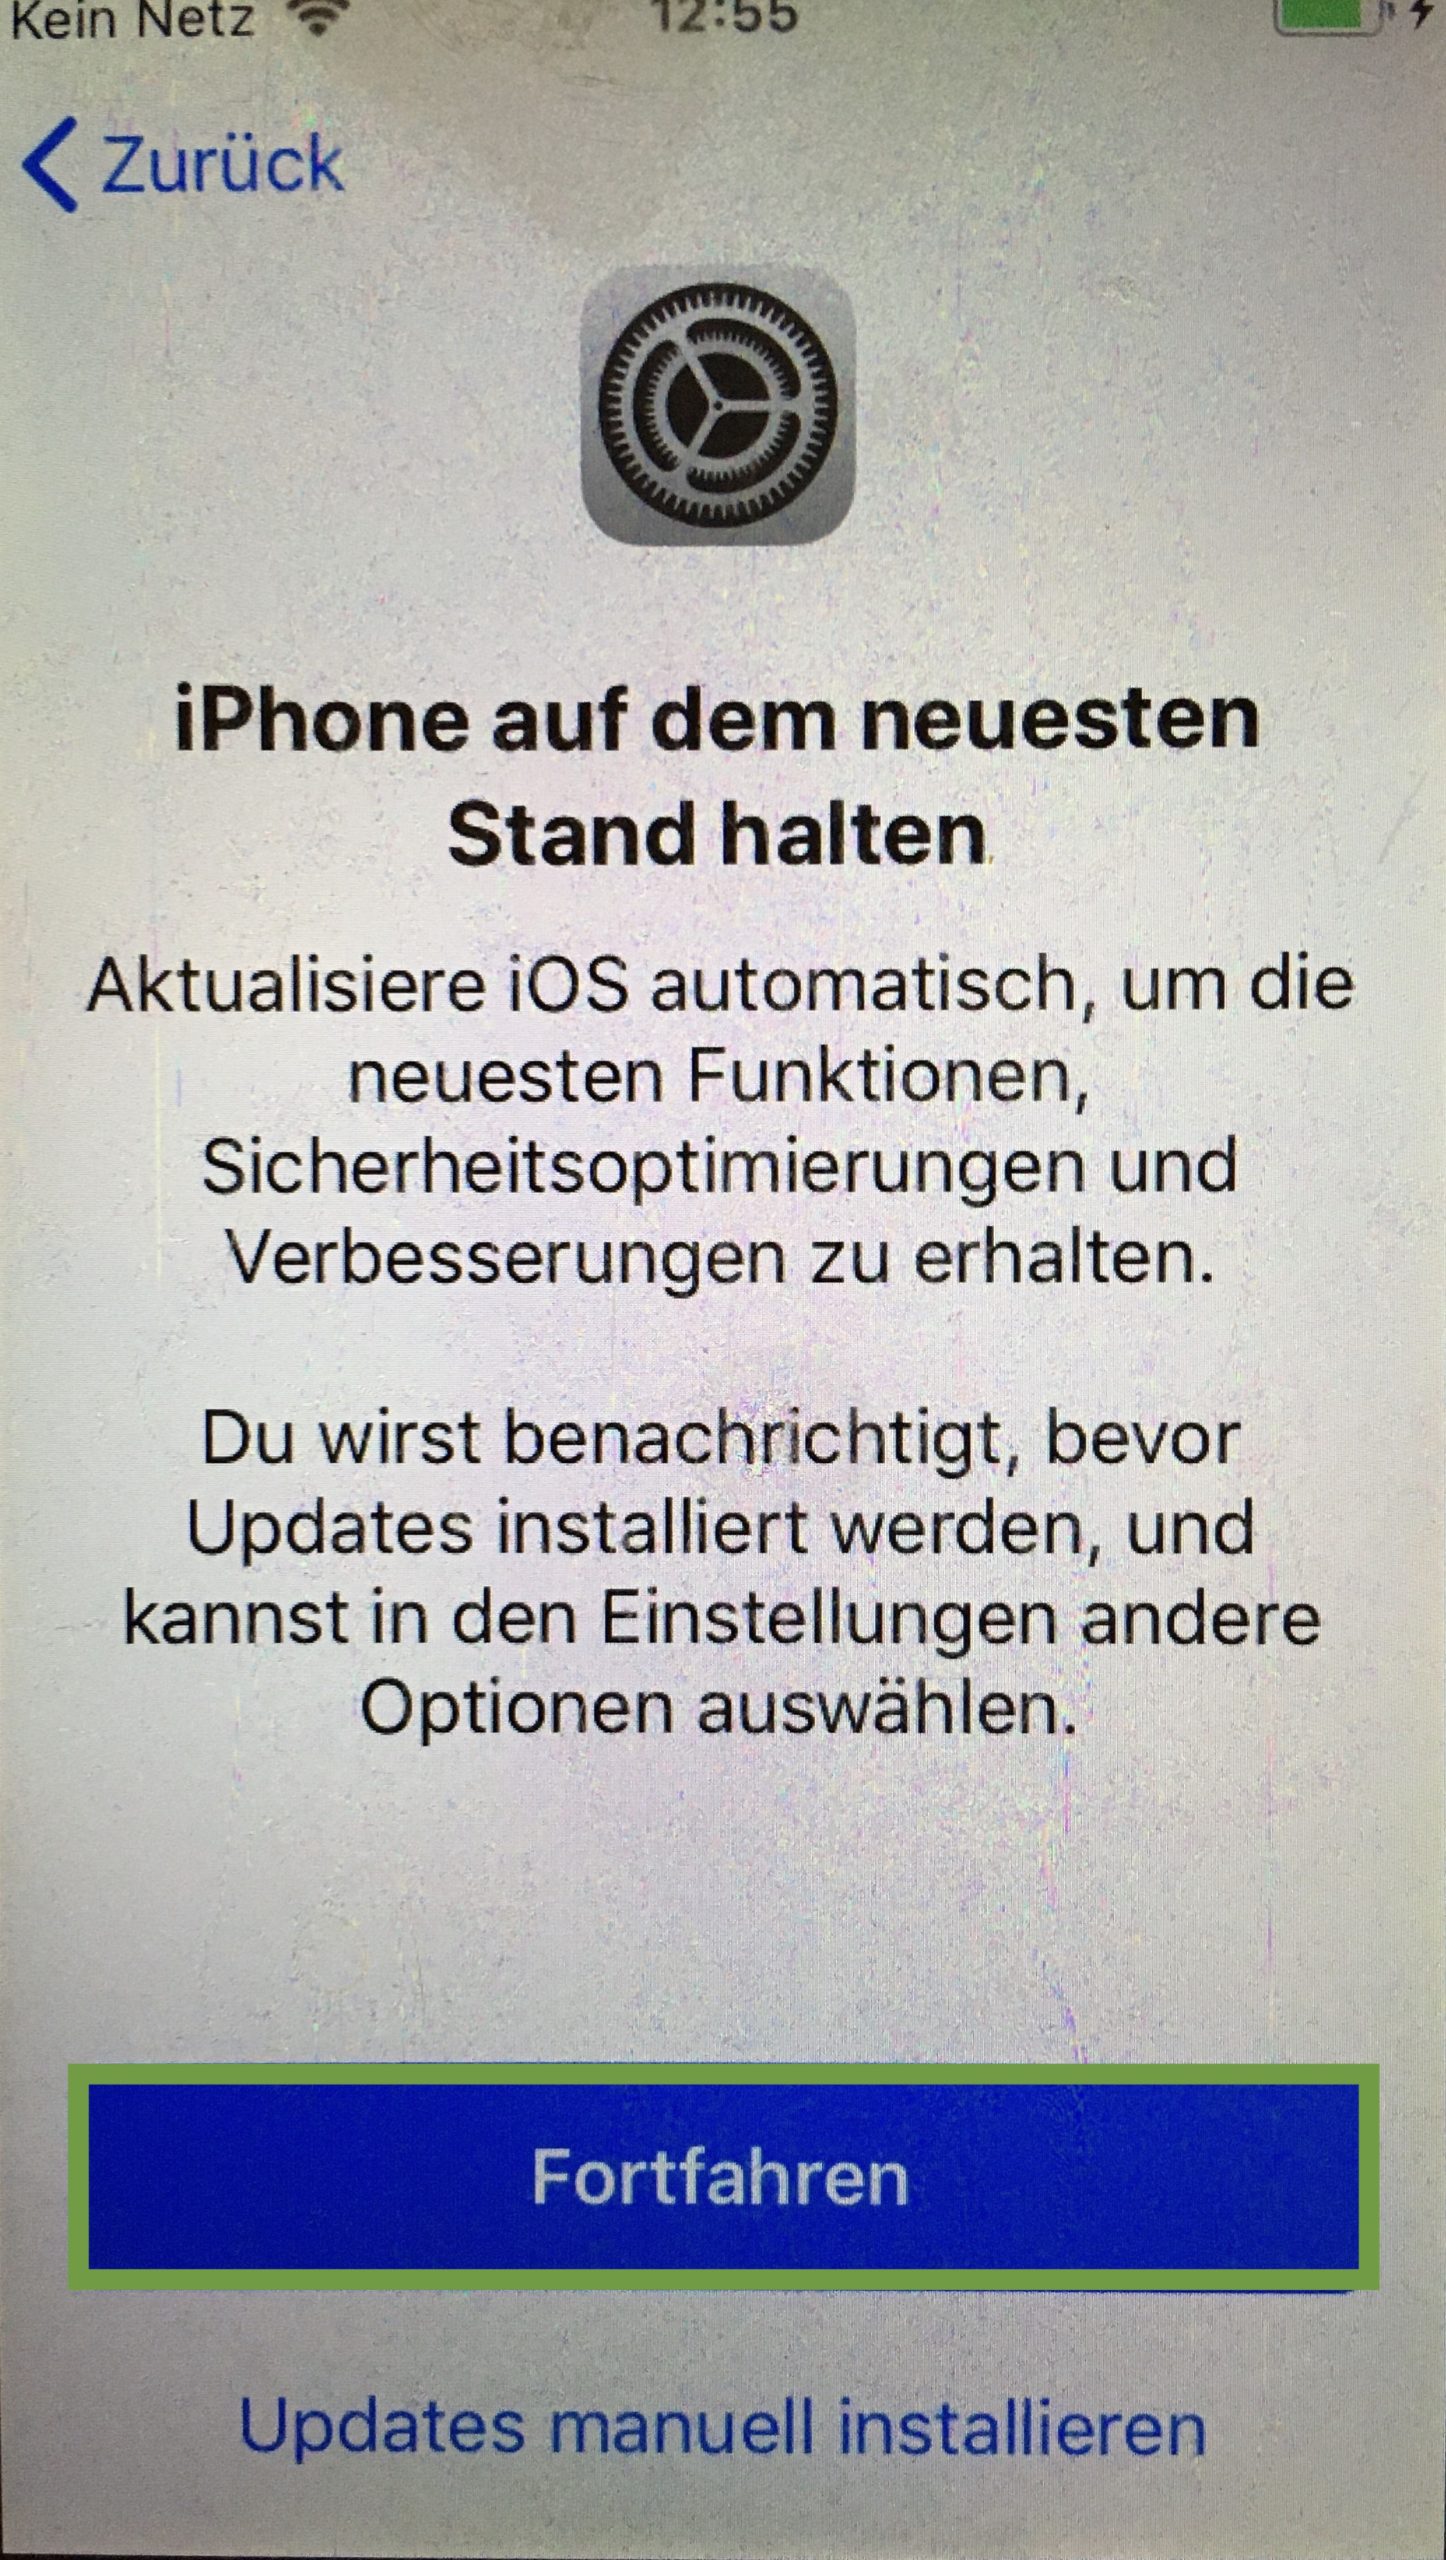
"Keeping Settings Up-to-date"

Bild zum Schritt 14 für das Bastel- und DIY-Abenteuer für Kinder: '"Einstellungen auf den neusten Stand halten"'

15

For iMessages and Facetime click on "later".

Bild zum Schritt 15 für das Bastel- und DIY-Abenteuer für Kinder: 'Bei iMessages und Facetime auf "später klicken".'

16

Order Services. This is a point to discuss. Because on the one hand Apple has the data about your child's whereabouts. On the other hand, you also have the information where your child's mobile phone is located or where your child is. We recommend activating the order services, but you can understand if you don't want to.

Bild zum Schritt 16 für das Bastel- und DIY-Abenteuer für Kinder: 'Ordnungsdienste. Das ist ein zu diskutierender Punkt. Denn einerseits hat...'

17

Press "configurate later" for Siri.

Bild zum Schritt 17 für das Bastel- und DIY-Abenteuer für Kinder: 'Bei Siri auf "später konfigurieren" drücken.'

18

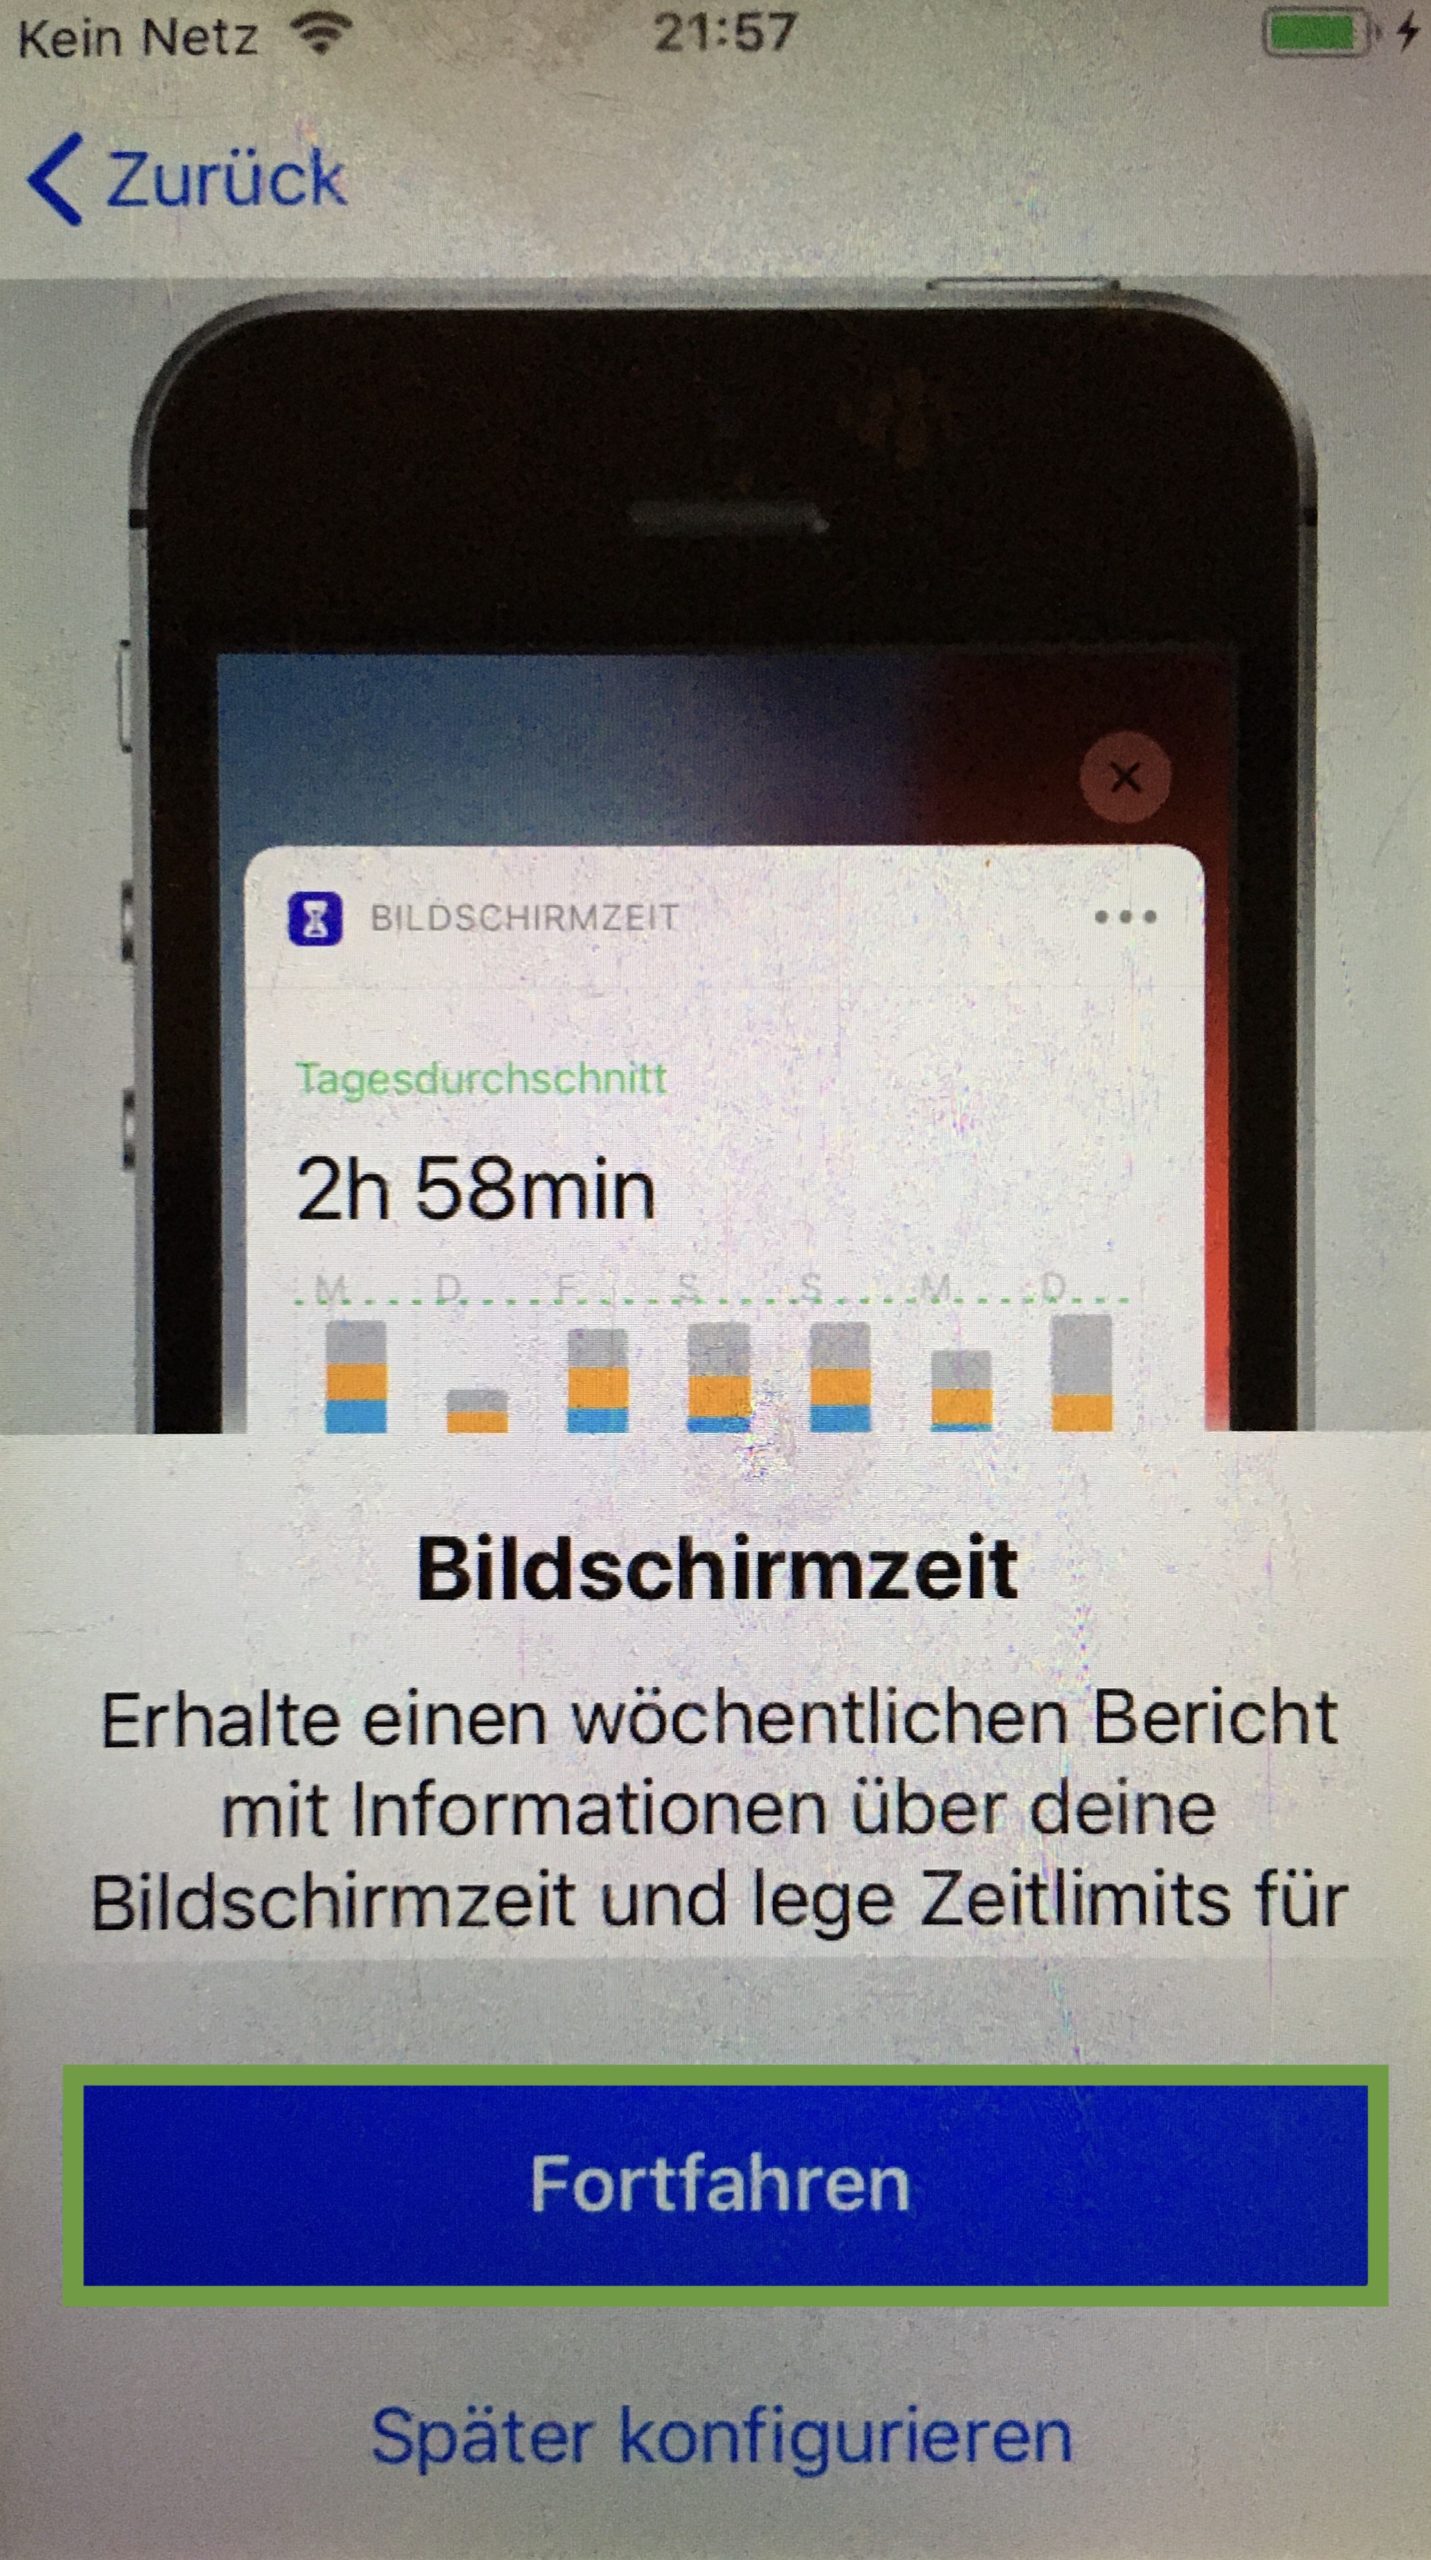
Press "Continue" at screen time.

Bild zum Schritt 18 für das Bastel- und DIY-Abenteuer für Kinder: 'Bei Bildschirmzeit auf "fortfahren" drücken.'

19

Press "do not share" for iPhone analysis.

Bild zum Schritt 19 für das Bastel- und DIY-Abenteuer für Kinder: 'Bei iPhone-Analyse auf "nicht teilen" drücken.'

20

Then you've already done it. Now you can remove the SIM card again.

21

Materials

 old smartphone for the child: iPhone or iPad with at least iOS12e.g. from iPhone 5s
 SIM card including pin (can be an old SIM card or your current one)only for setting up the smartphone.
 SIM card needle from iPhone (in the box)or paper clip to remove the SIM card
 possibly Apple ID of your childif you don't have it yet, you can create it or create it at a later date (part 4)

Directions

1

First, press the Home button.

Bild zum Schritt 1 für das Bastel- und DIY-Abenteuer für Kinder: 'Zuerst die Home-Taste drücken.'

2

Unlock the SIM card. You only need the SIM card to set it up. Then you can take it out again.

Bild zum Schritt 2 für das Bastel- und DIY-Abenteuer für Kinder: 'SIM-Karte entsperren. Du brauchst die SIM-Karte nur zum Einrichten. Danach...'

3

Then you adjust the language and choose the country and region.

Bild zum Schritt 3 für das Bastel- und DIY-Abenteuer für Kinder: 'Dann stellst du die Sprache ein und wählst das Land...'

4

Then skip the quick start and press "Manually Configure".
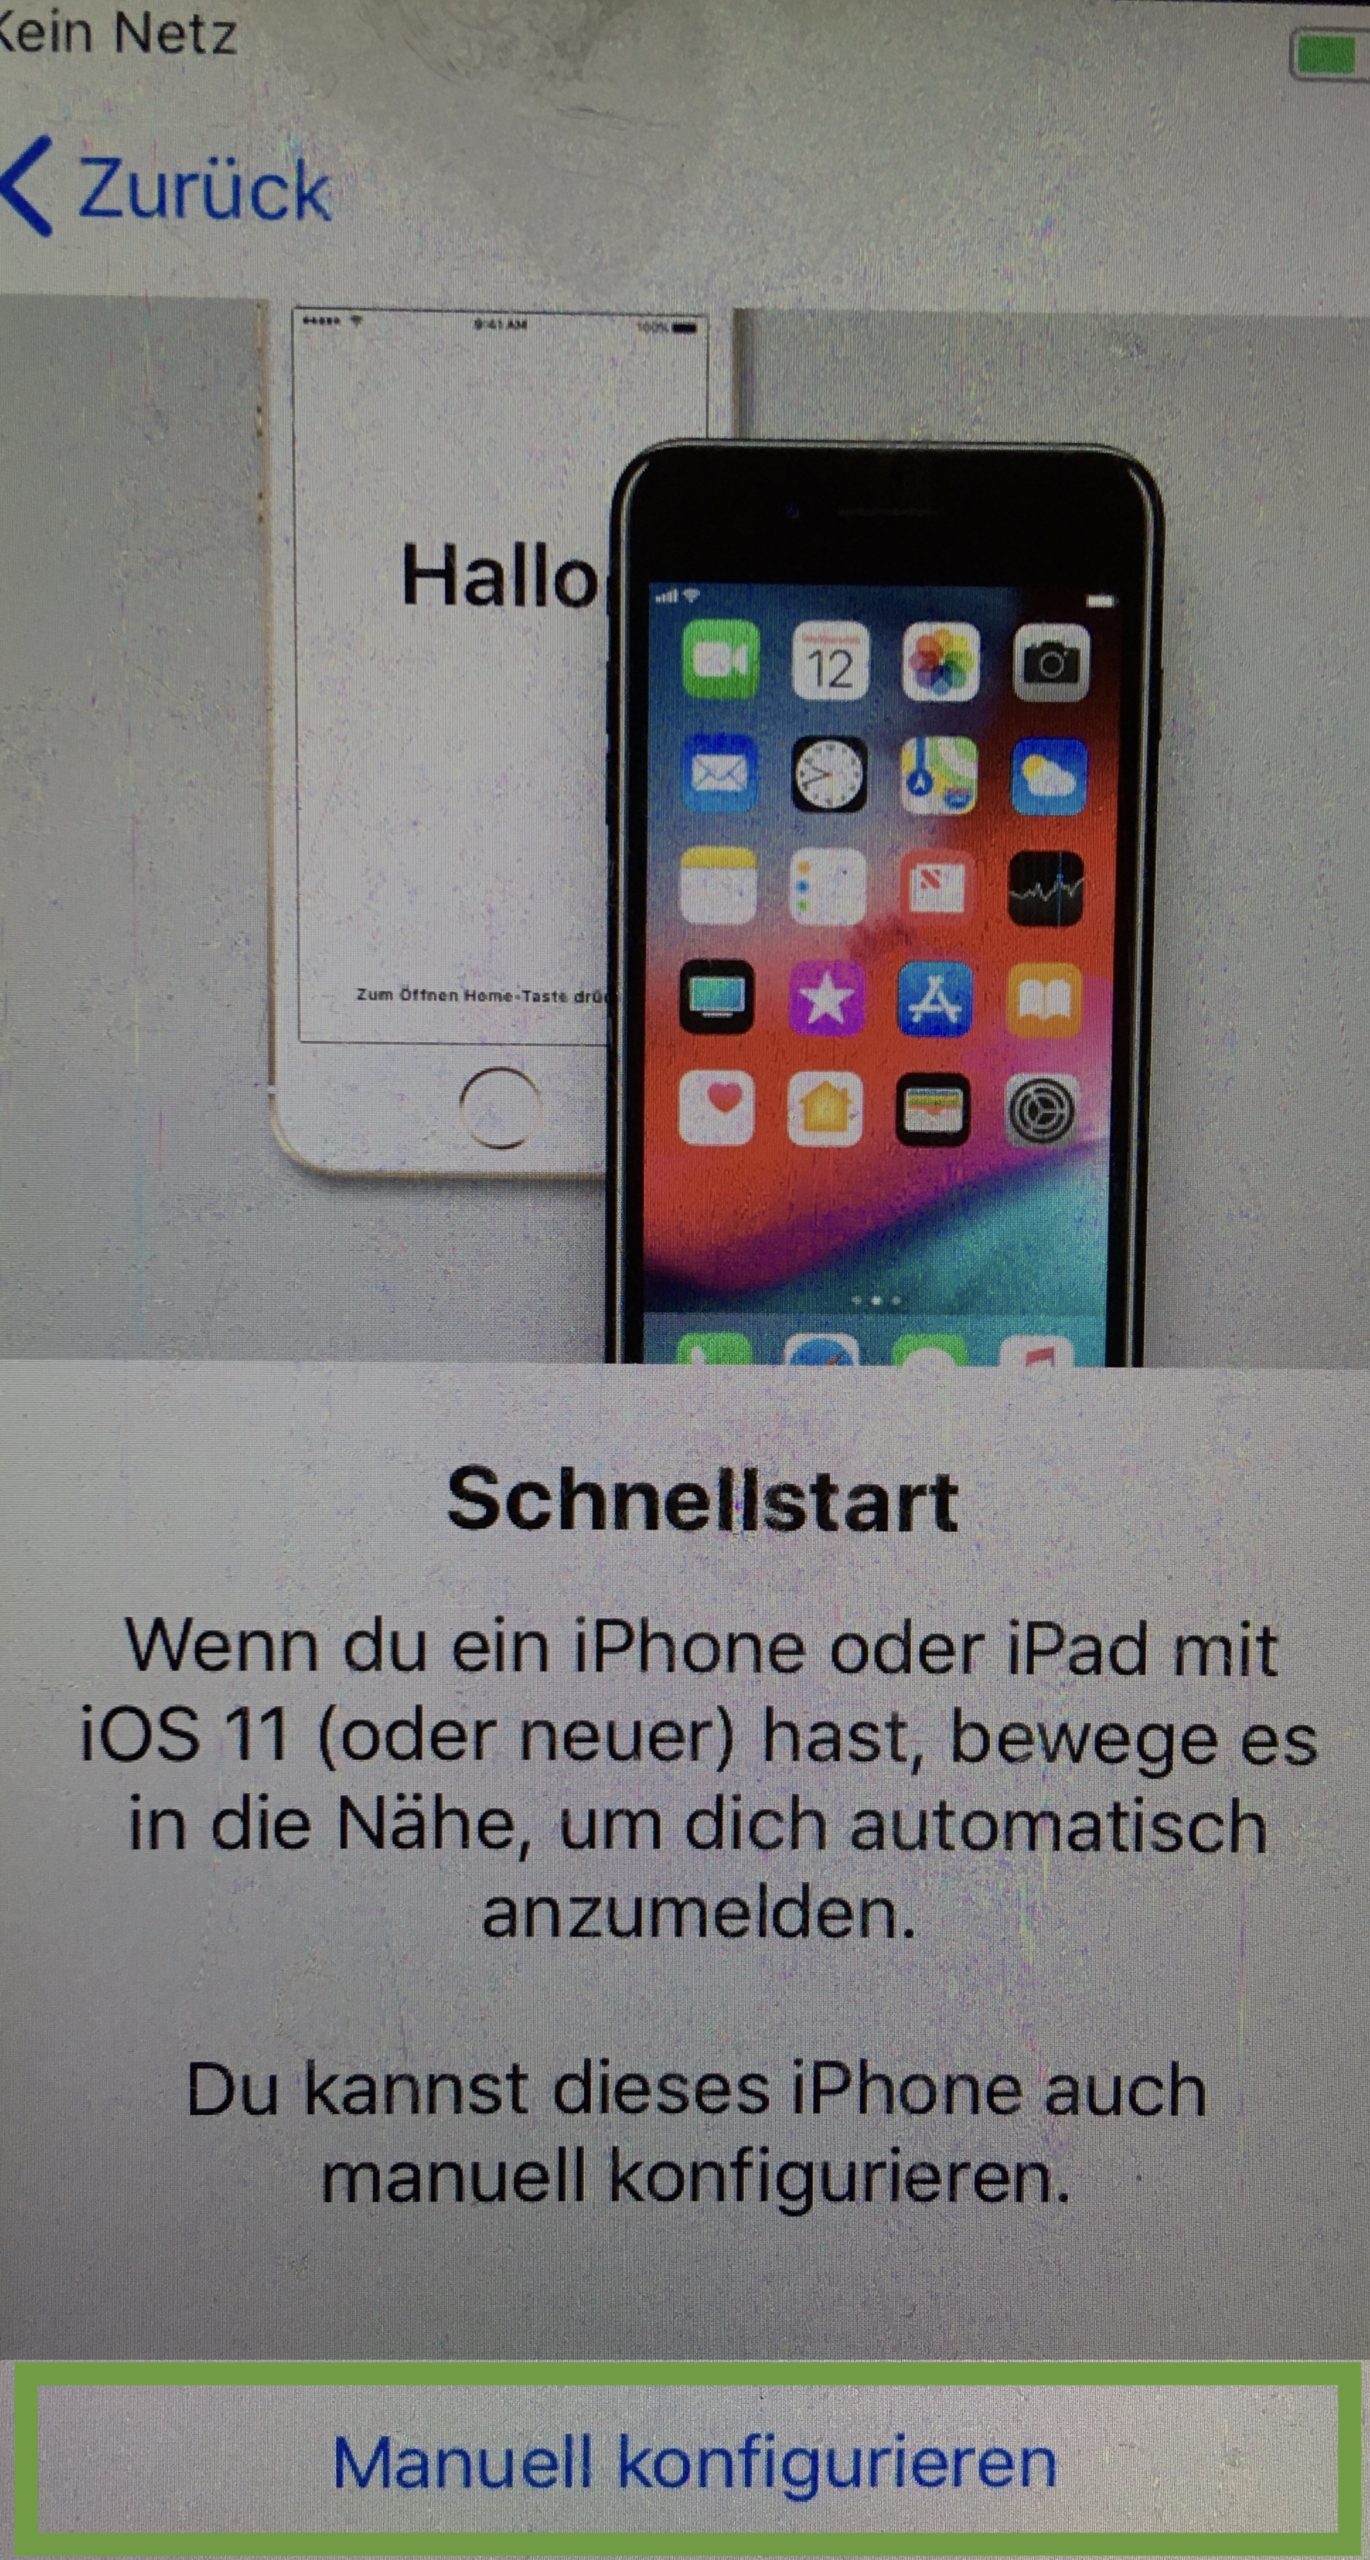
Bild zum Schritt 4 für das Bastel- und DIY-Abenteuer für Kinder: 'Dann überspringst du den Schnellstart und drückst auf "Manuell konfigurieren".'

5

Then connect to your Wi-Fi and enter the Wi-Fi password. This is important because communication with your child's mobile phone works best over the same Wi-Fi.

6

Then follow the data protection information. Click on "Next".

Bild zum Schritt 6 für das Bastel- und DIY-Abenteuer für Kinder: 'Dann folgen die Informationen zum Datenschutz. Da auf "Weiter" klicken.'

7

Enable the touch ID. We recommend that you also have access to the child's smartphone regardless of your child's passcode.
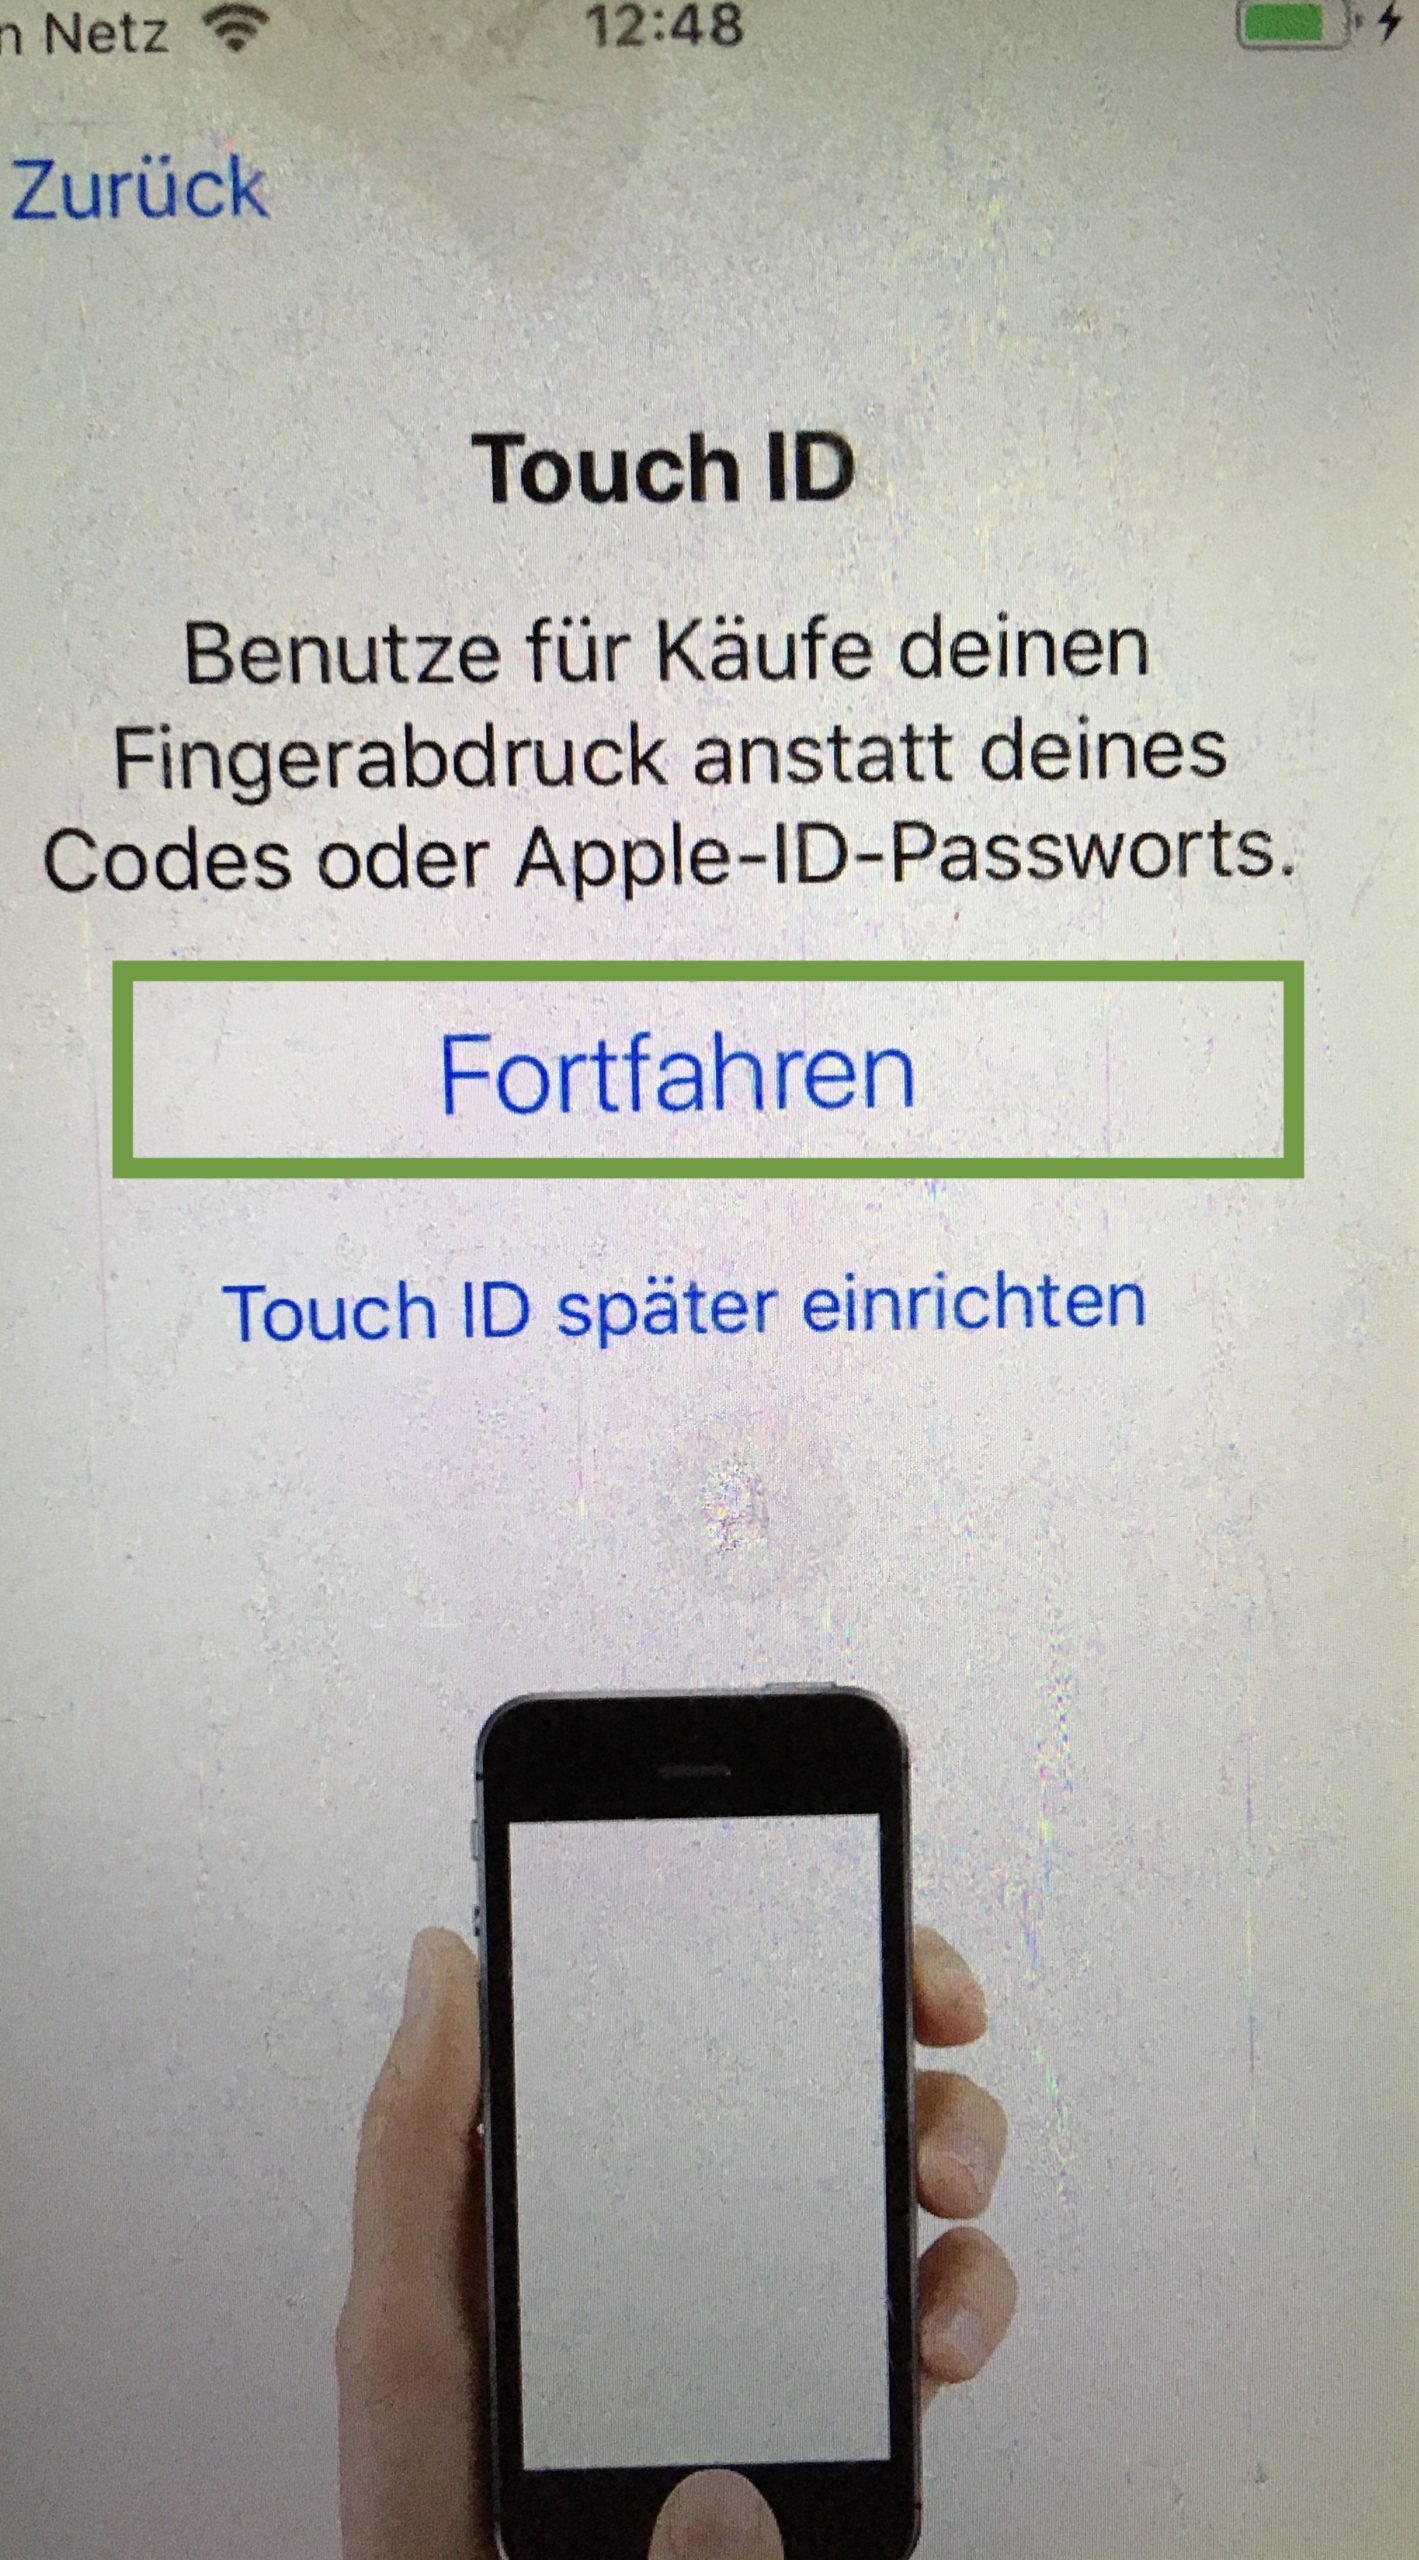
Bild zum Schritt 7 für das Bastel- und DIY-Abenteuer für Kinder: 'Die Touch-ID aktivieren. Das empfehlen wir, damit du unabhängig vom...'

8

To do this, put your fingers on repeatedly until the process is complete.

Bild zum Schritt 8 für das Bastel- und DIY-Abenteuer für Kinder: 'Dazu Finger wiederholt auflegen, bis der Vorgang abgeschlossen ist.'

9

Now set a passcode for your child. You can change it with your child. We recommend that you.
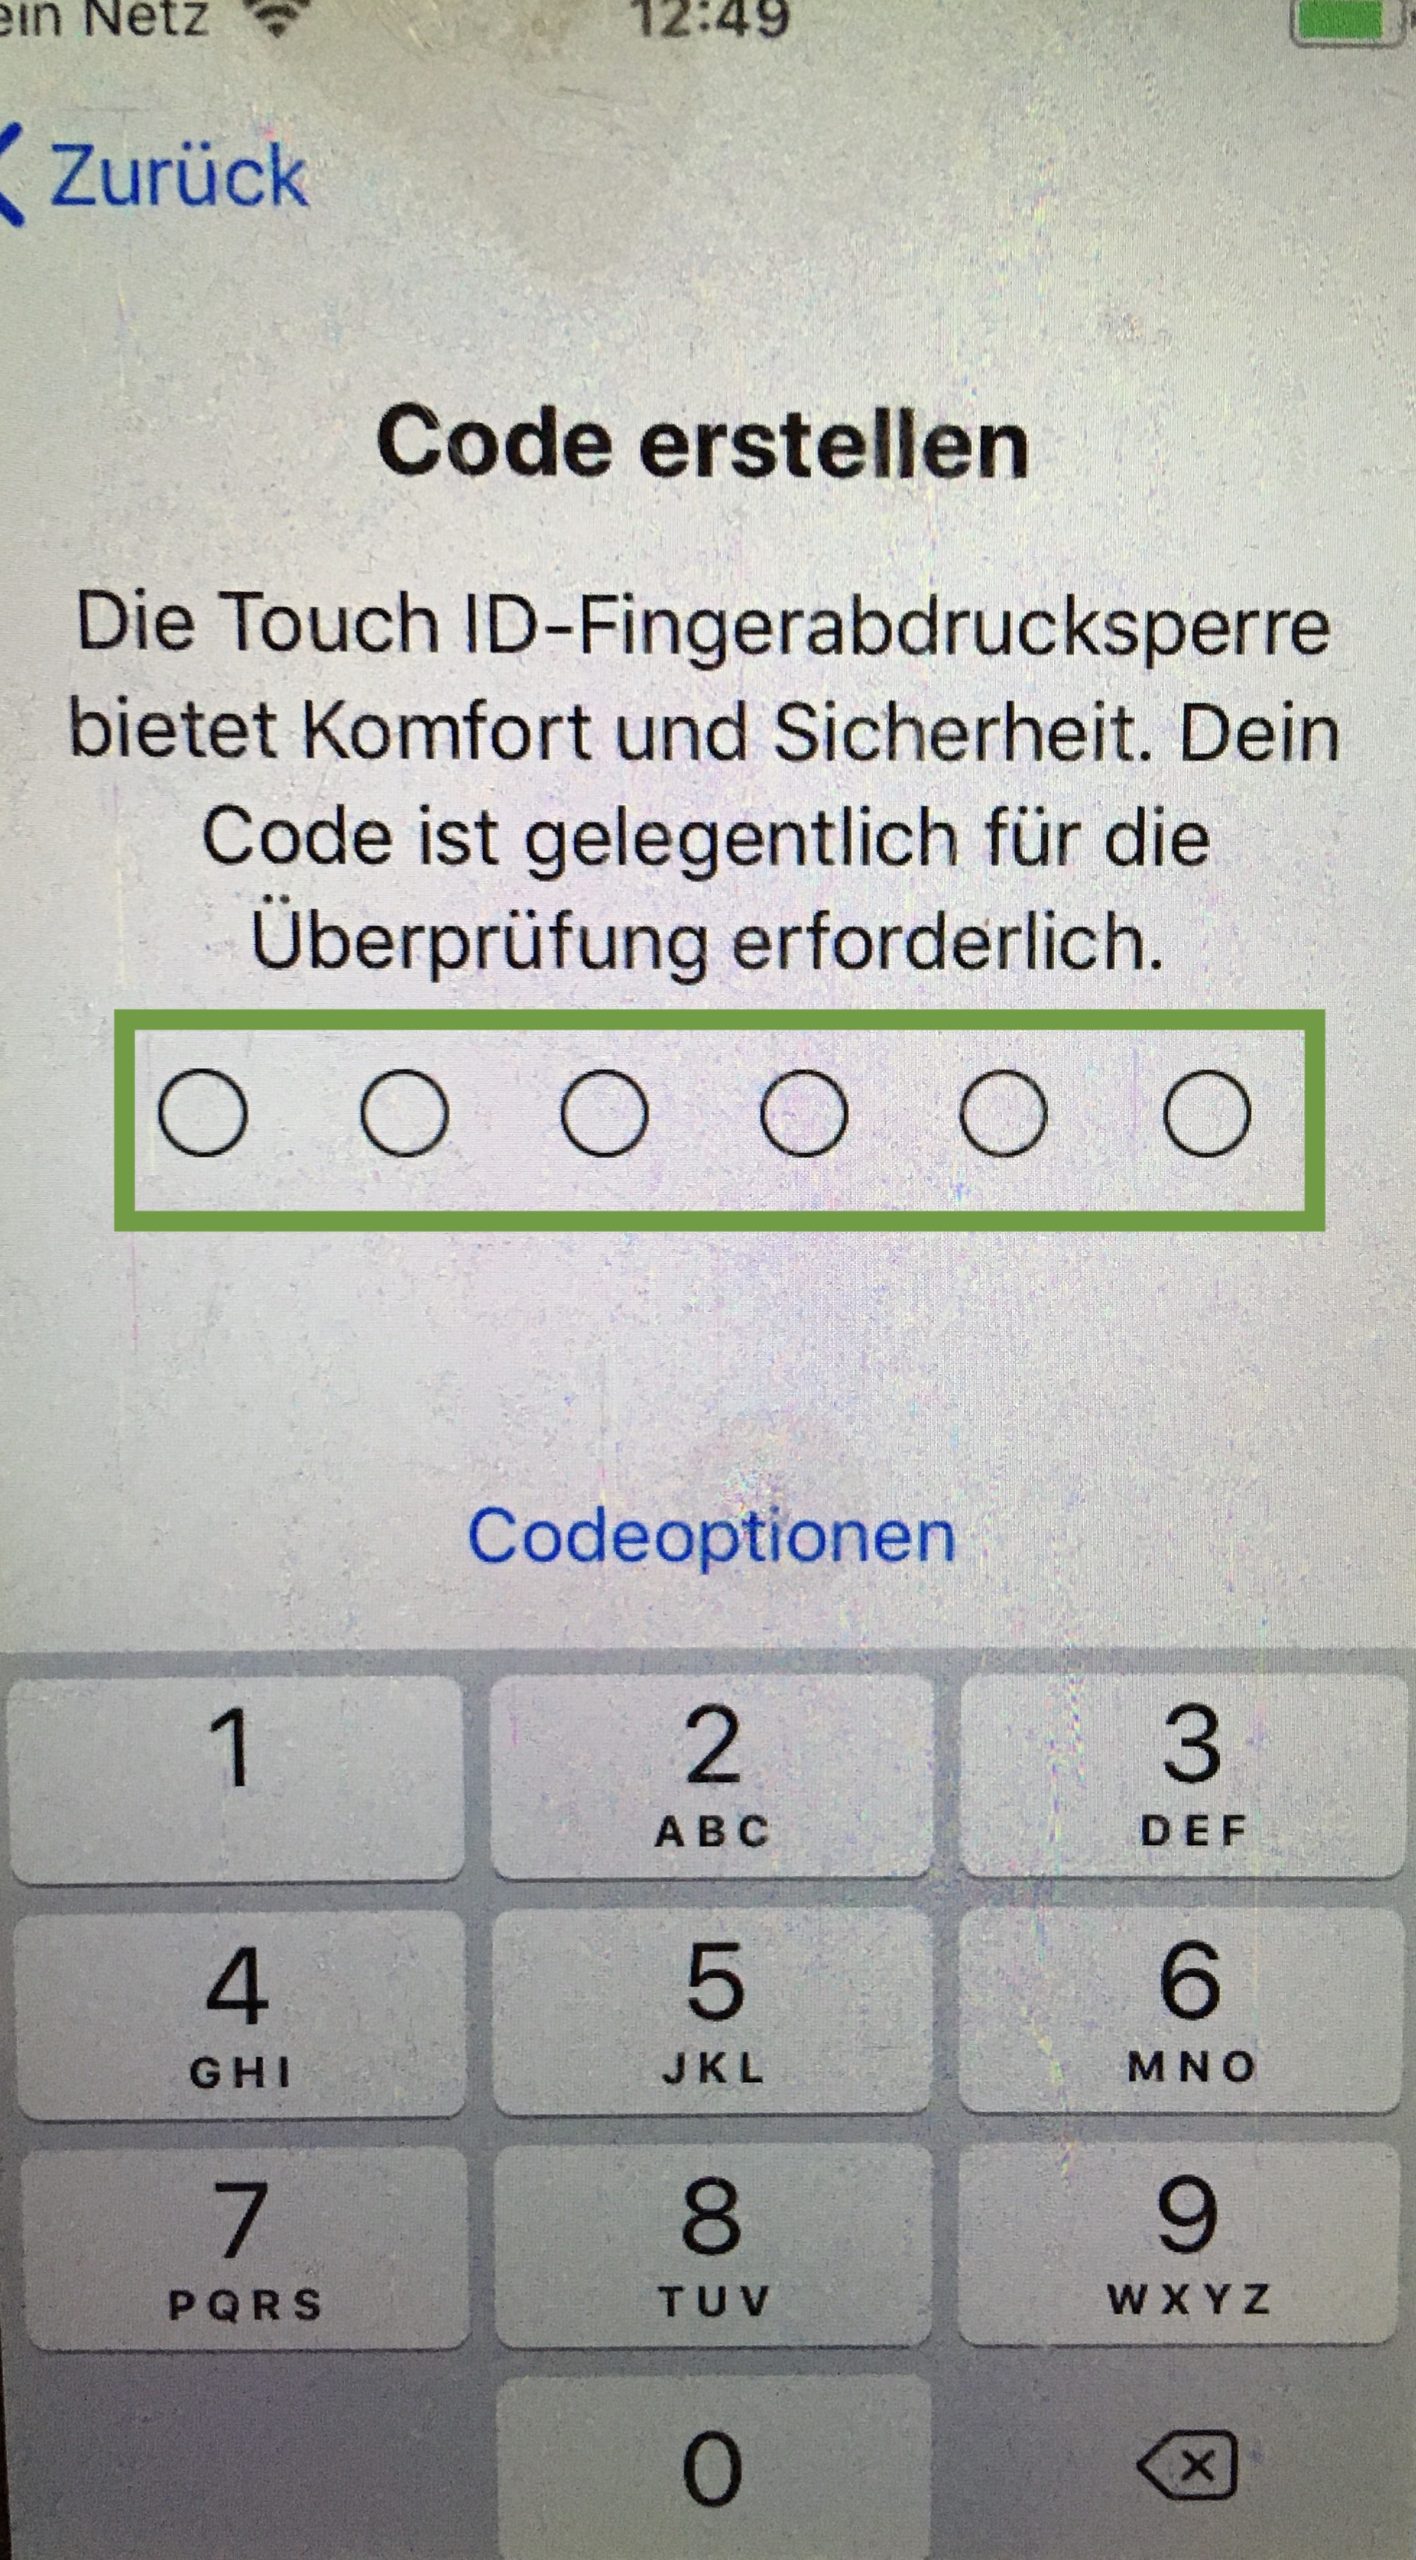
Bild zum Schritt 9 für das Bastel- und DIY-Abenteuer für Kinder: 'Nun einen Passcode für dein Kind einstellen. Diesen kannst du...'

10

Then the "Apps & Data" window opens. If you have not yet set up a smartphone for your child, press "no apps and data" to transfer. Otherwise, you can restore an existing backup of your child.
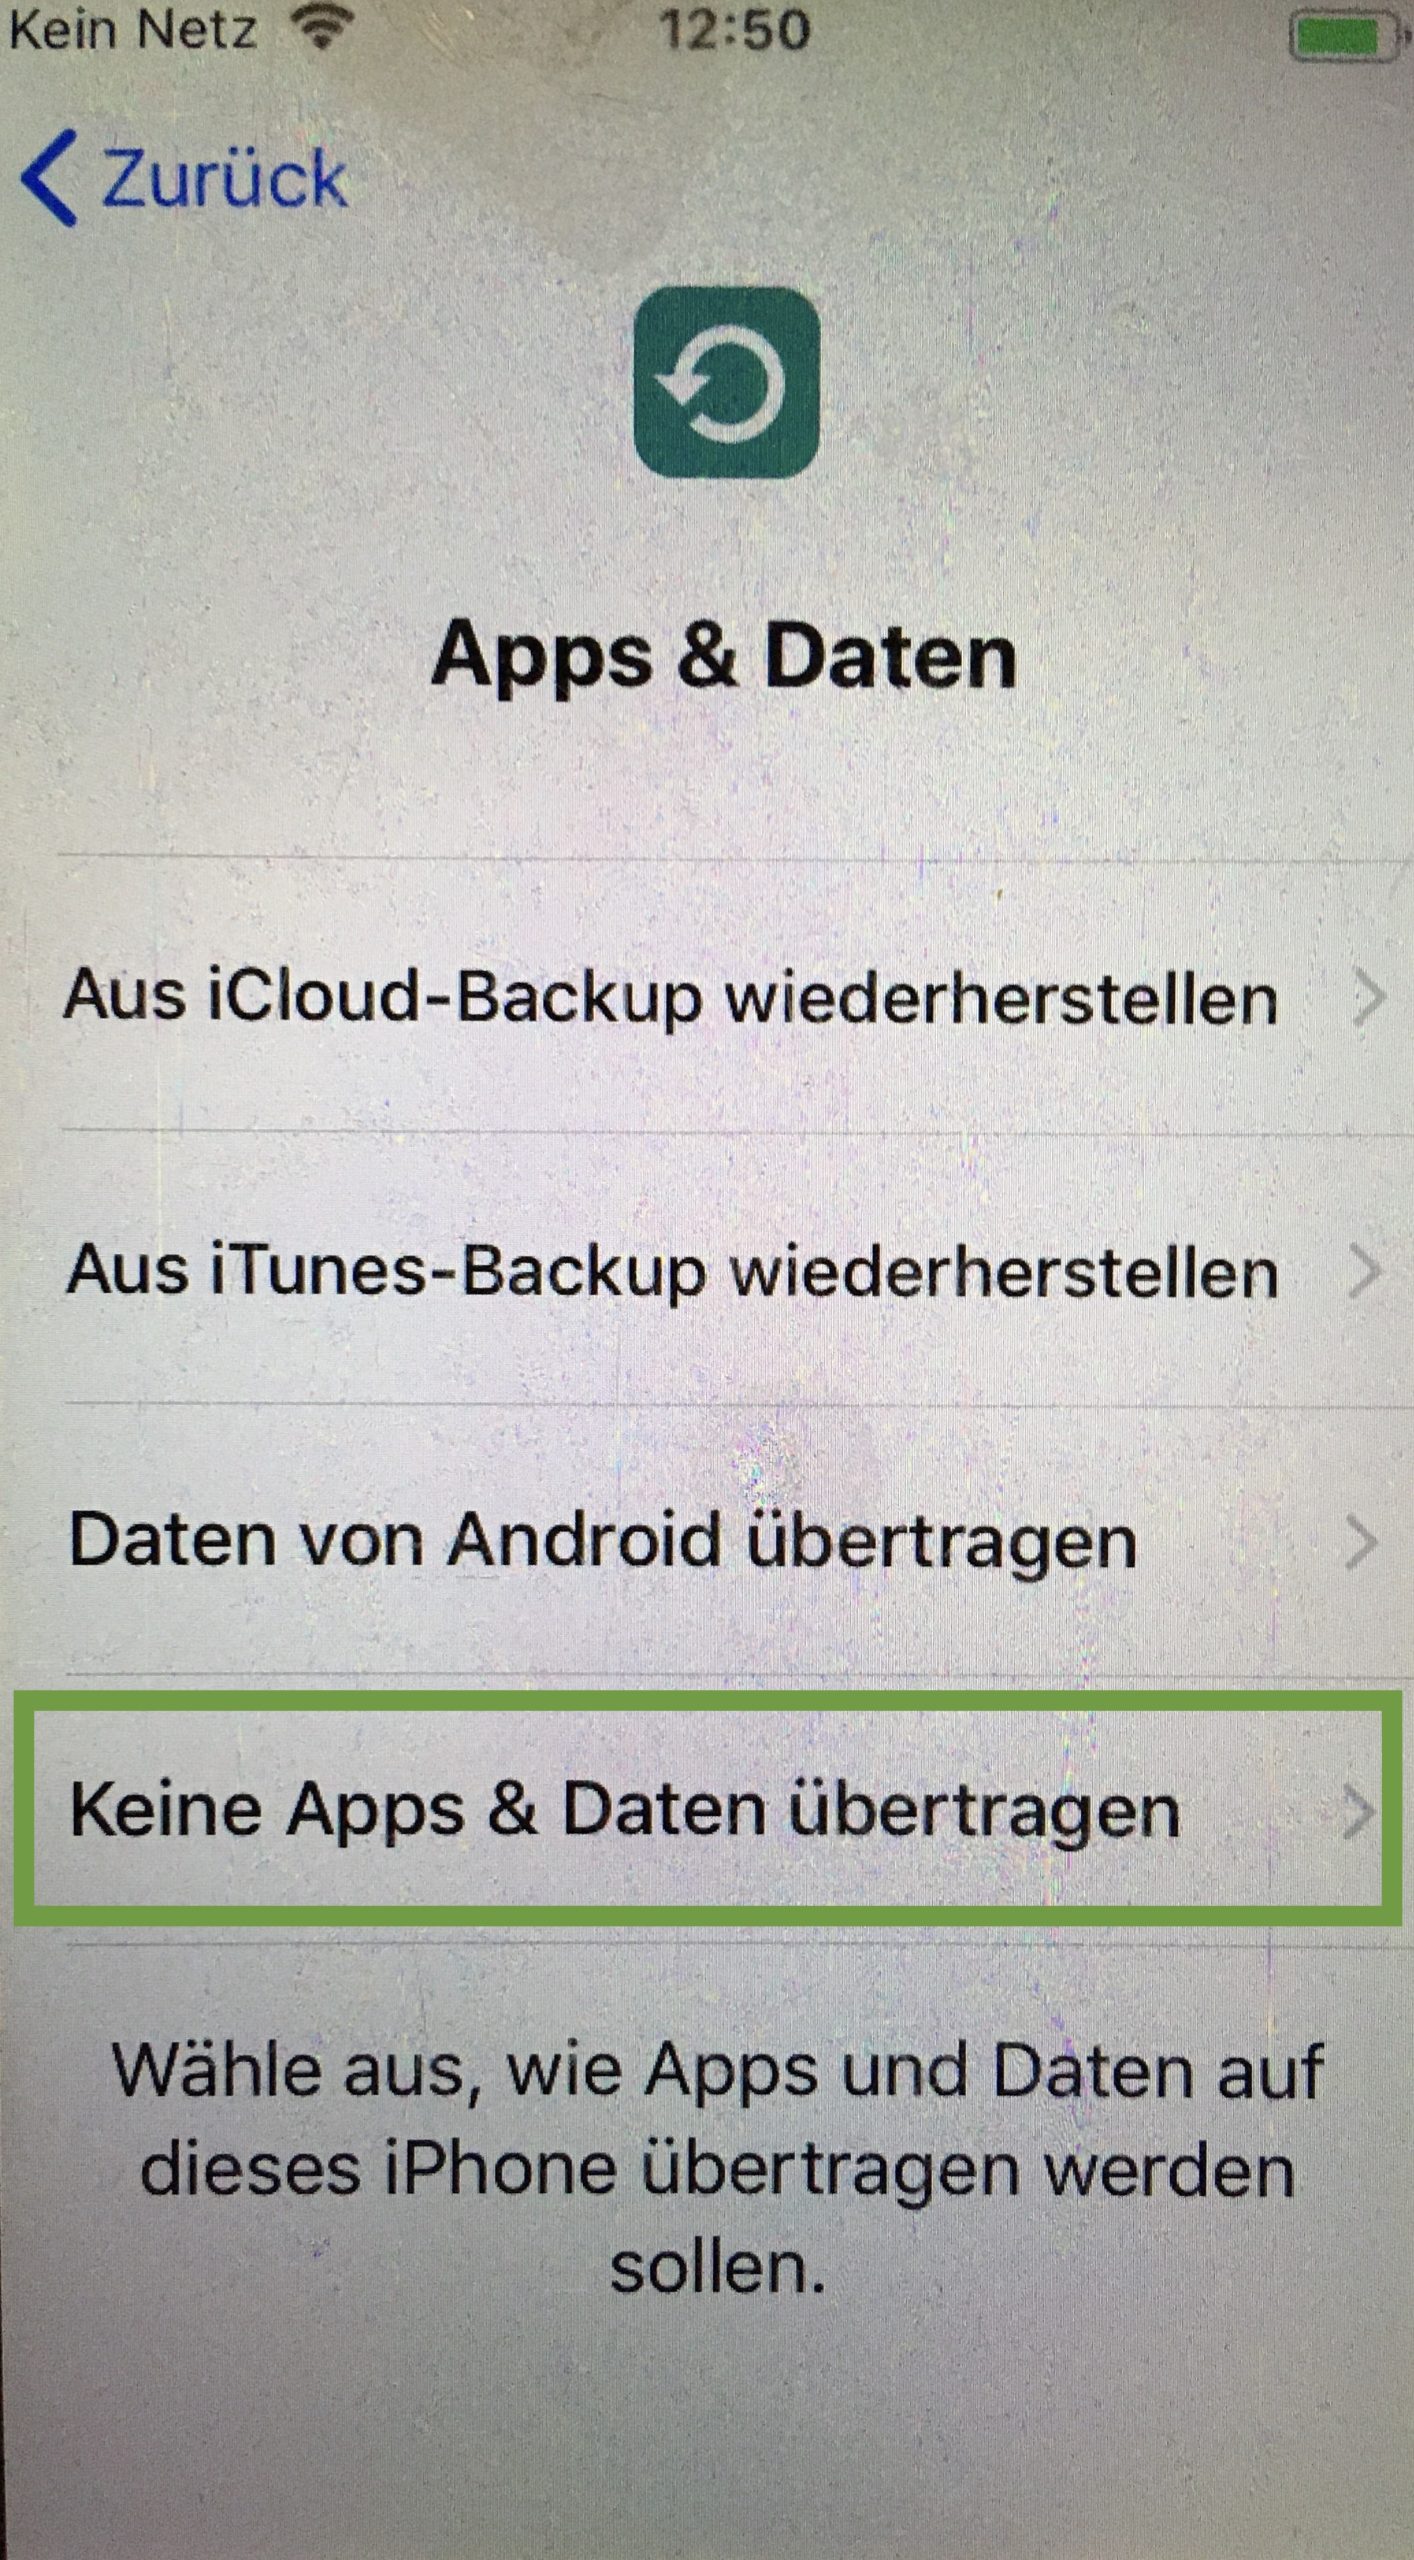
Bild zum Schritt 10 für das Bastel- und DIY-Abenteuer für Kinder: 'Dann öffnet sich das Fenster "Apps & Daten". Sofern du...'

11

Next you enter your child's Apple ID or you create a new Apple ID. You can also create it at a later date (see Part 4.)
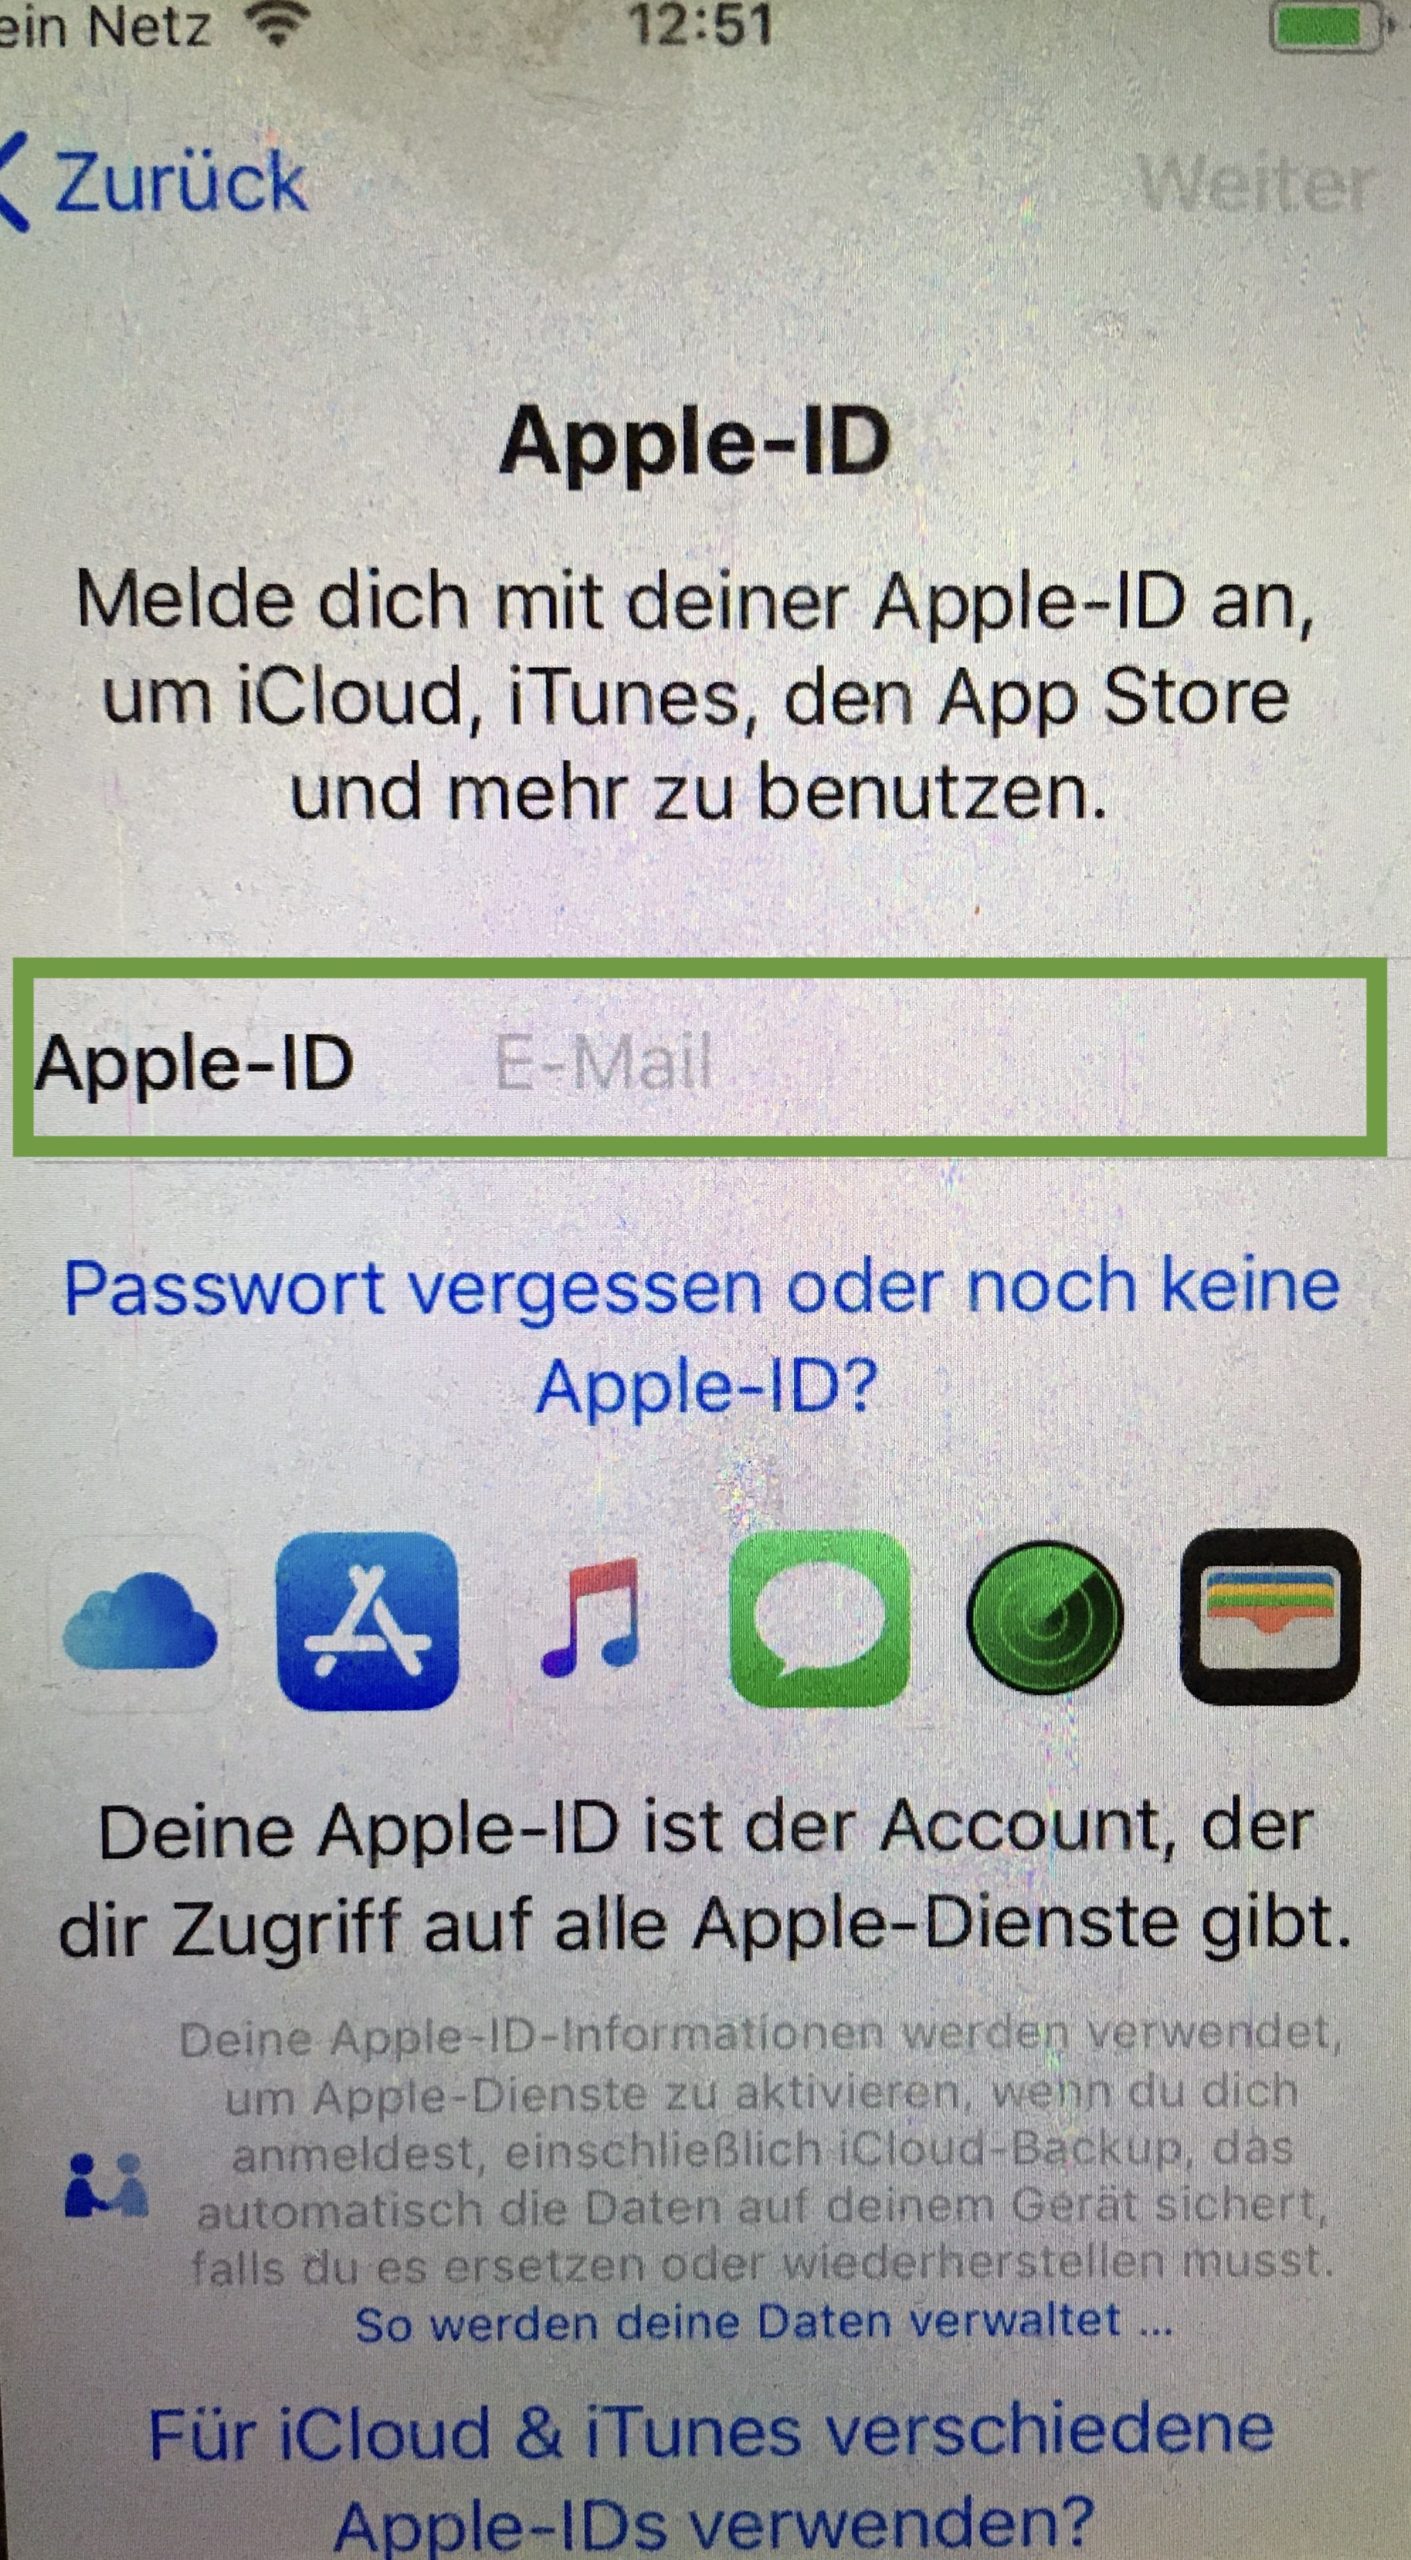
Bild zum Schritt 11 für das Bastel- und DIY-Abenteuer für Kinder: 'Als nächstes gibst du die Apple-ID deines Kindes ein oder...'

12

Then accept the terms of use.

13

Then follow the express settings. Press "Adjust Settings".
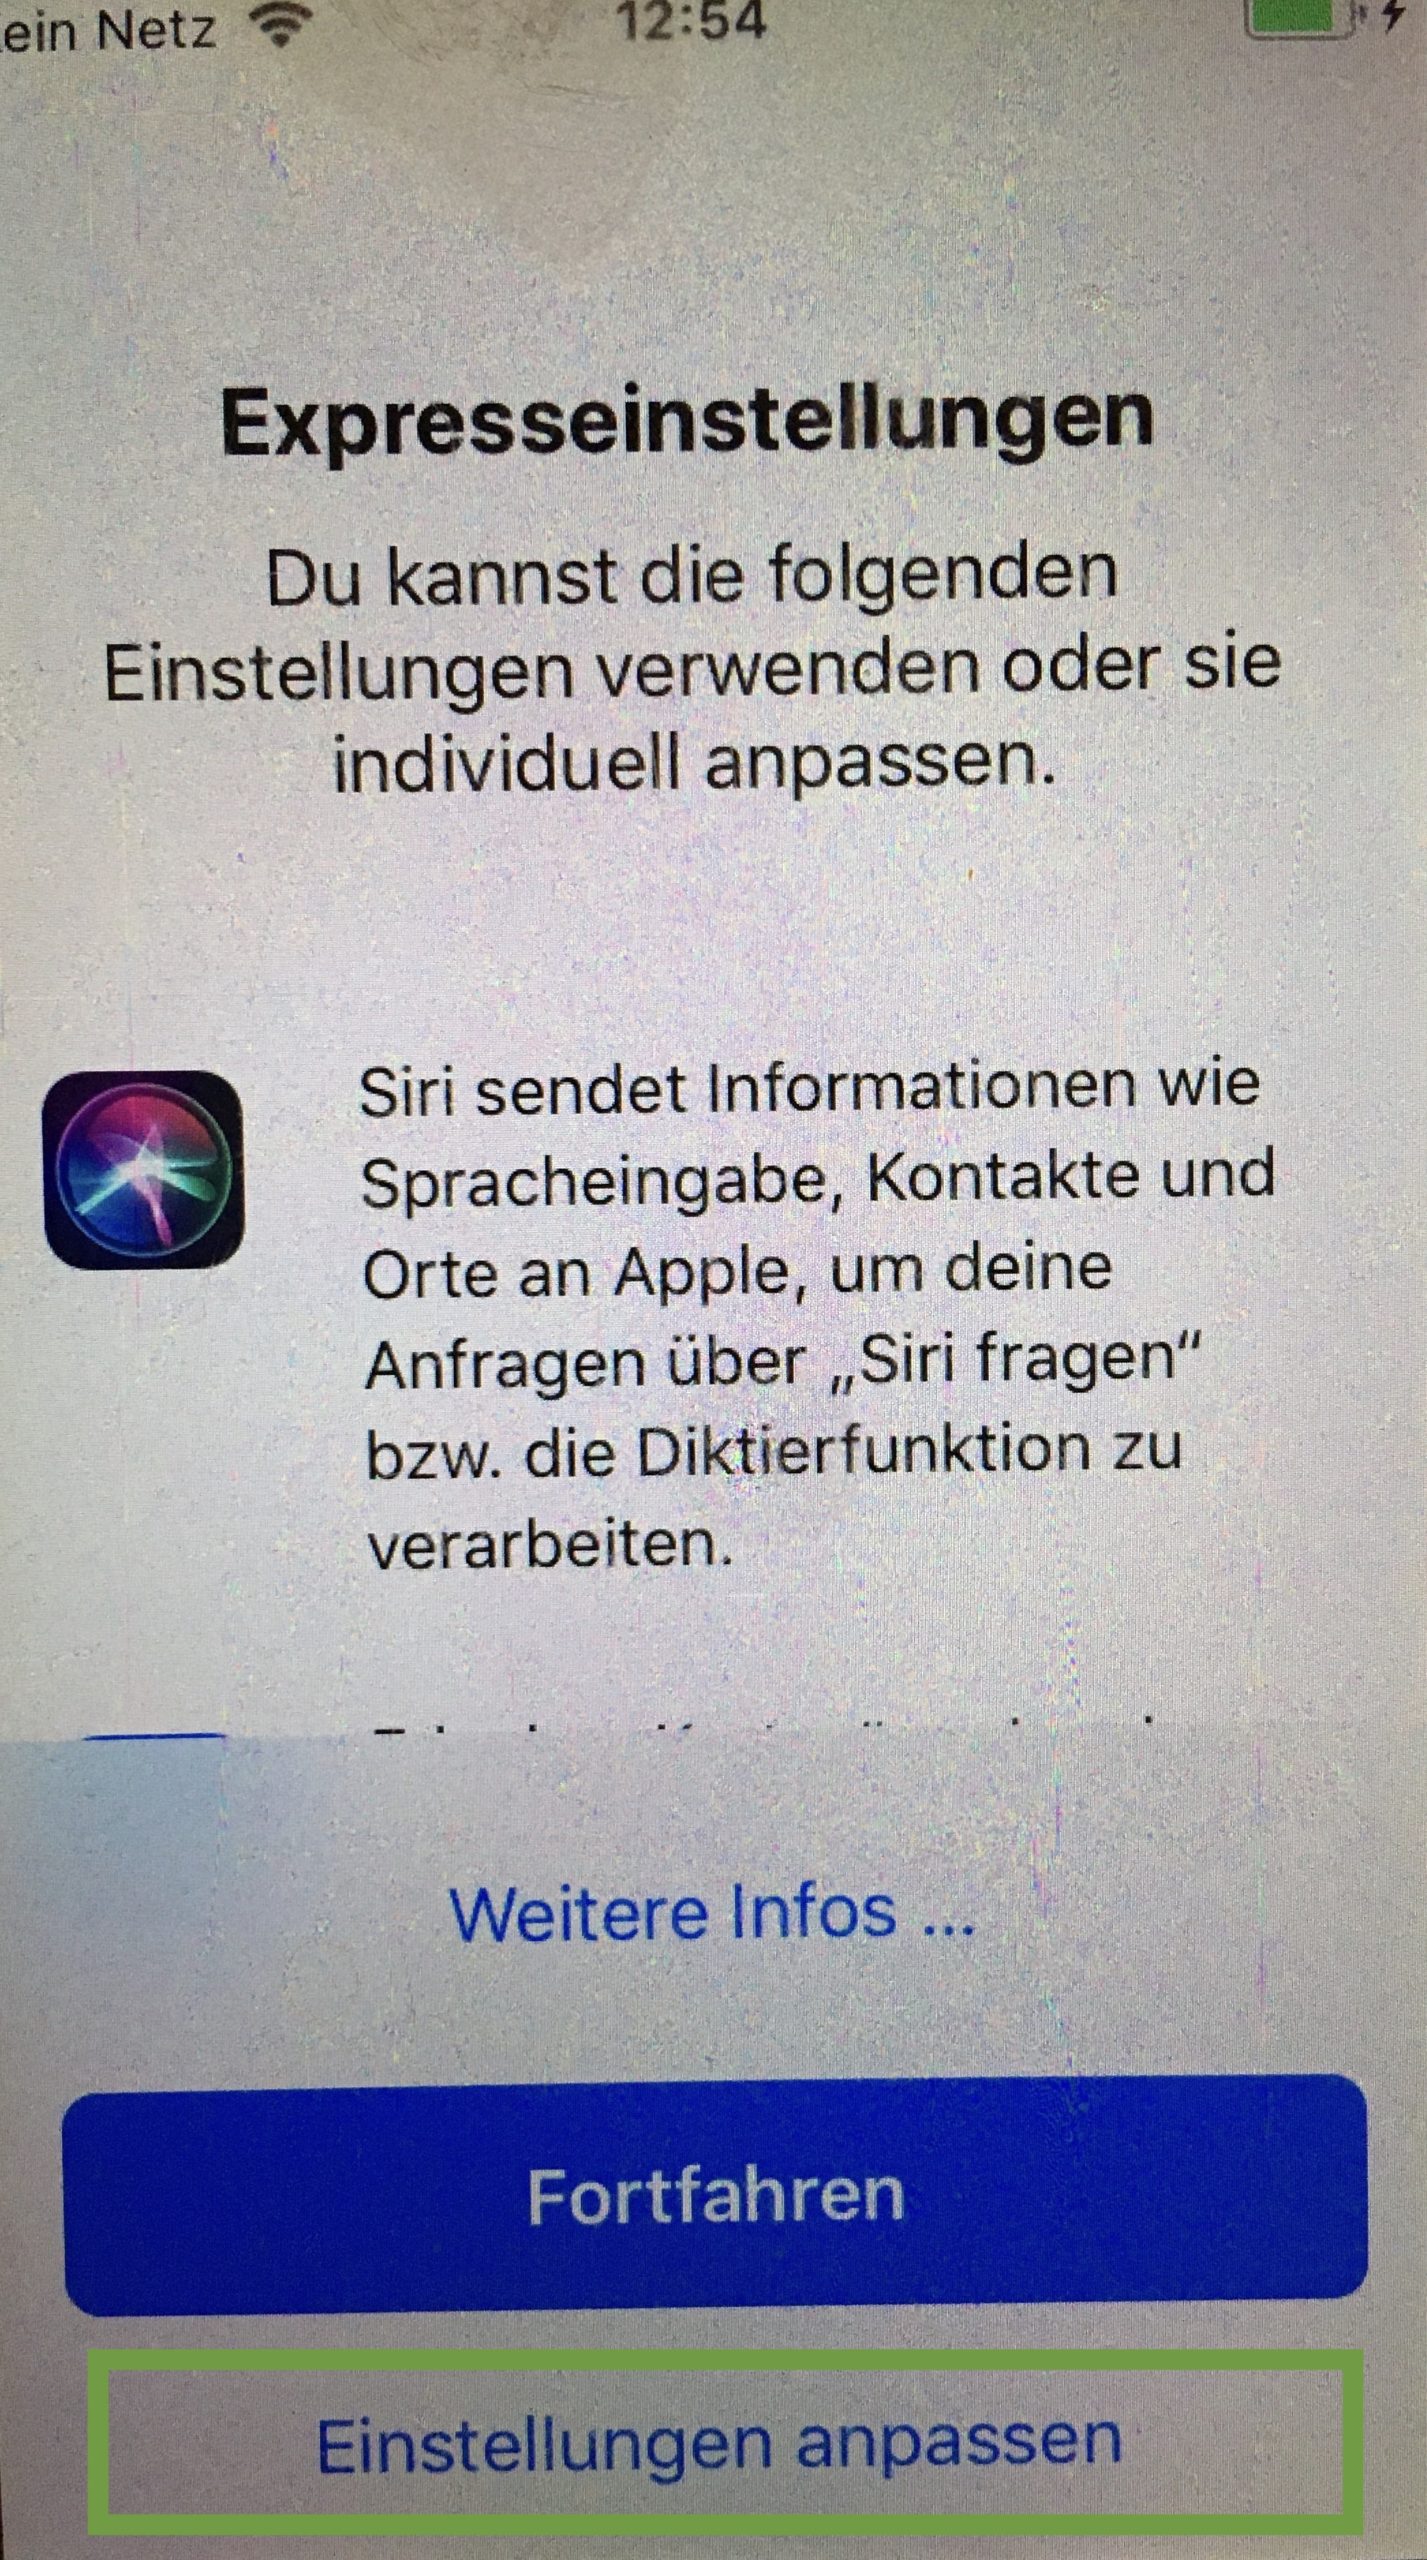
Bild zum Schritt 13 für das Bastel- und DIY-Abenteuer für Kinder: 'Dann folgen die Expresseinstellungen. Dabei auf "Einstellungen anpassen" drücken.'

14

"Keeping Settings Up-to-date"

Bild zum Schritt 14 für das Bastel- und DIY-Abenteuer für Kinder: '"Einstellungen auf den neusten Stand halten"'

15

For iMessages and Facetime click on "later".
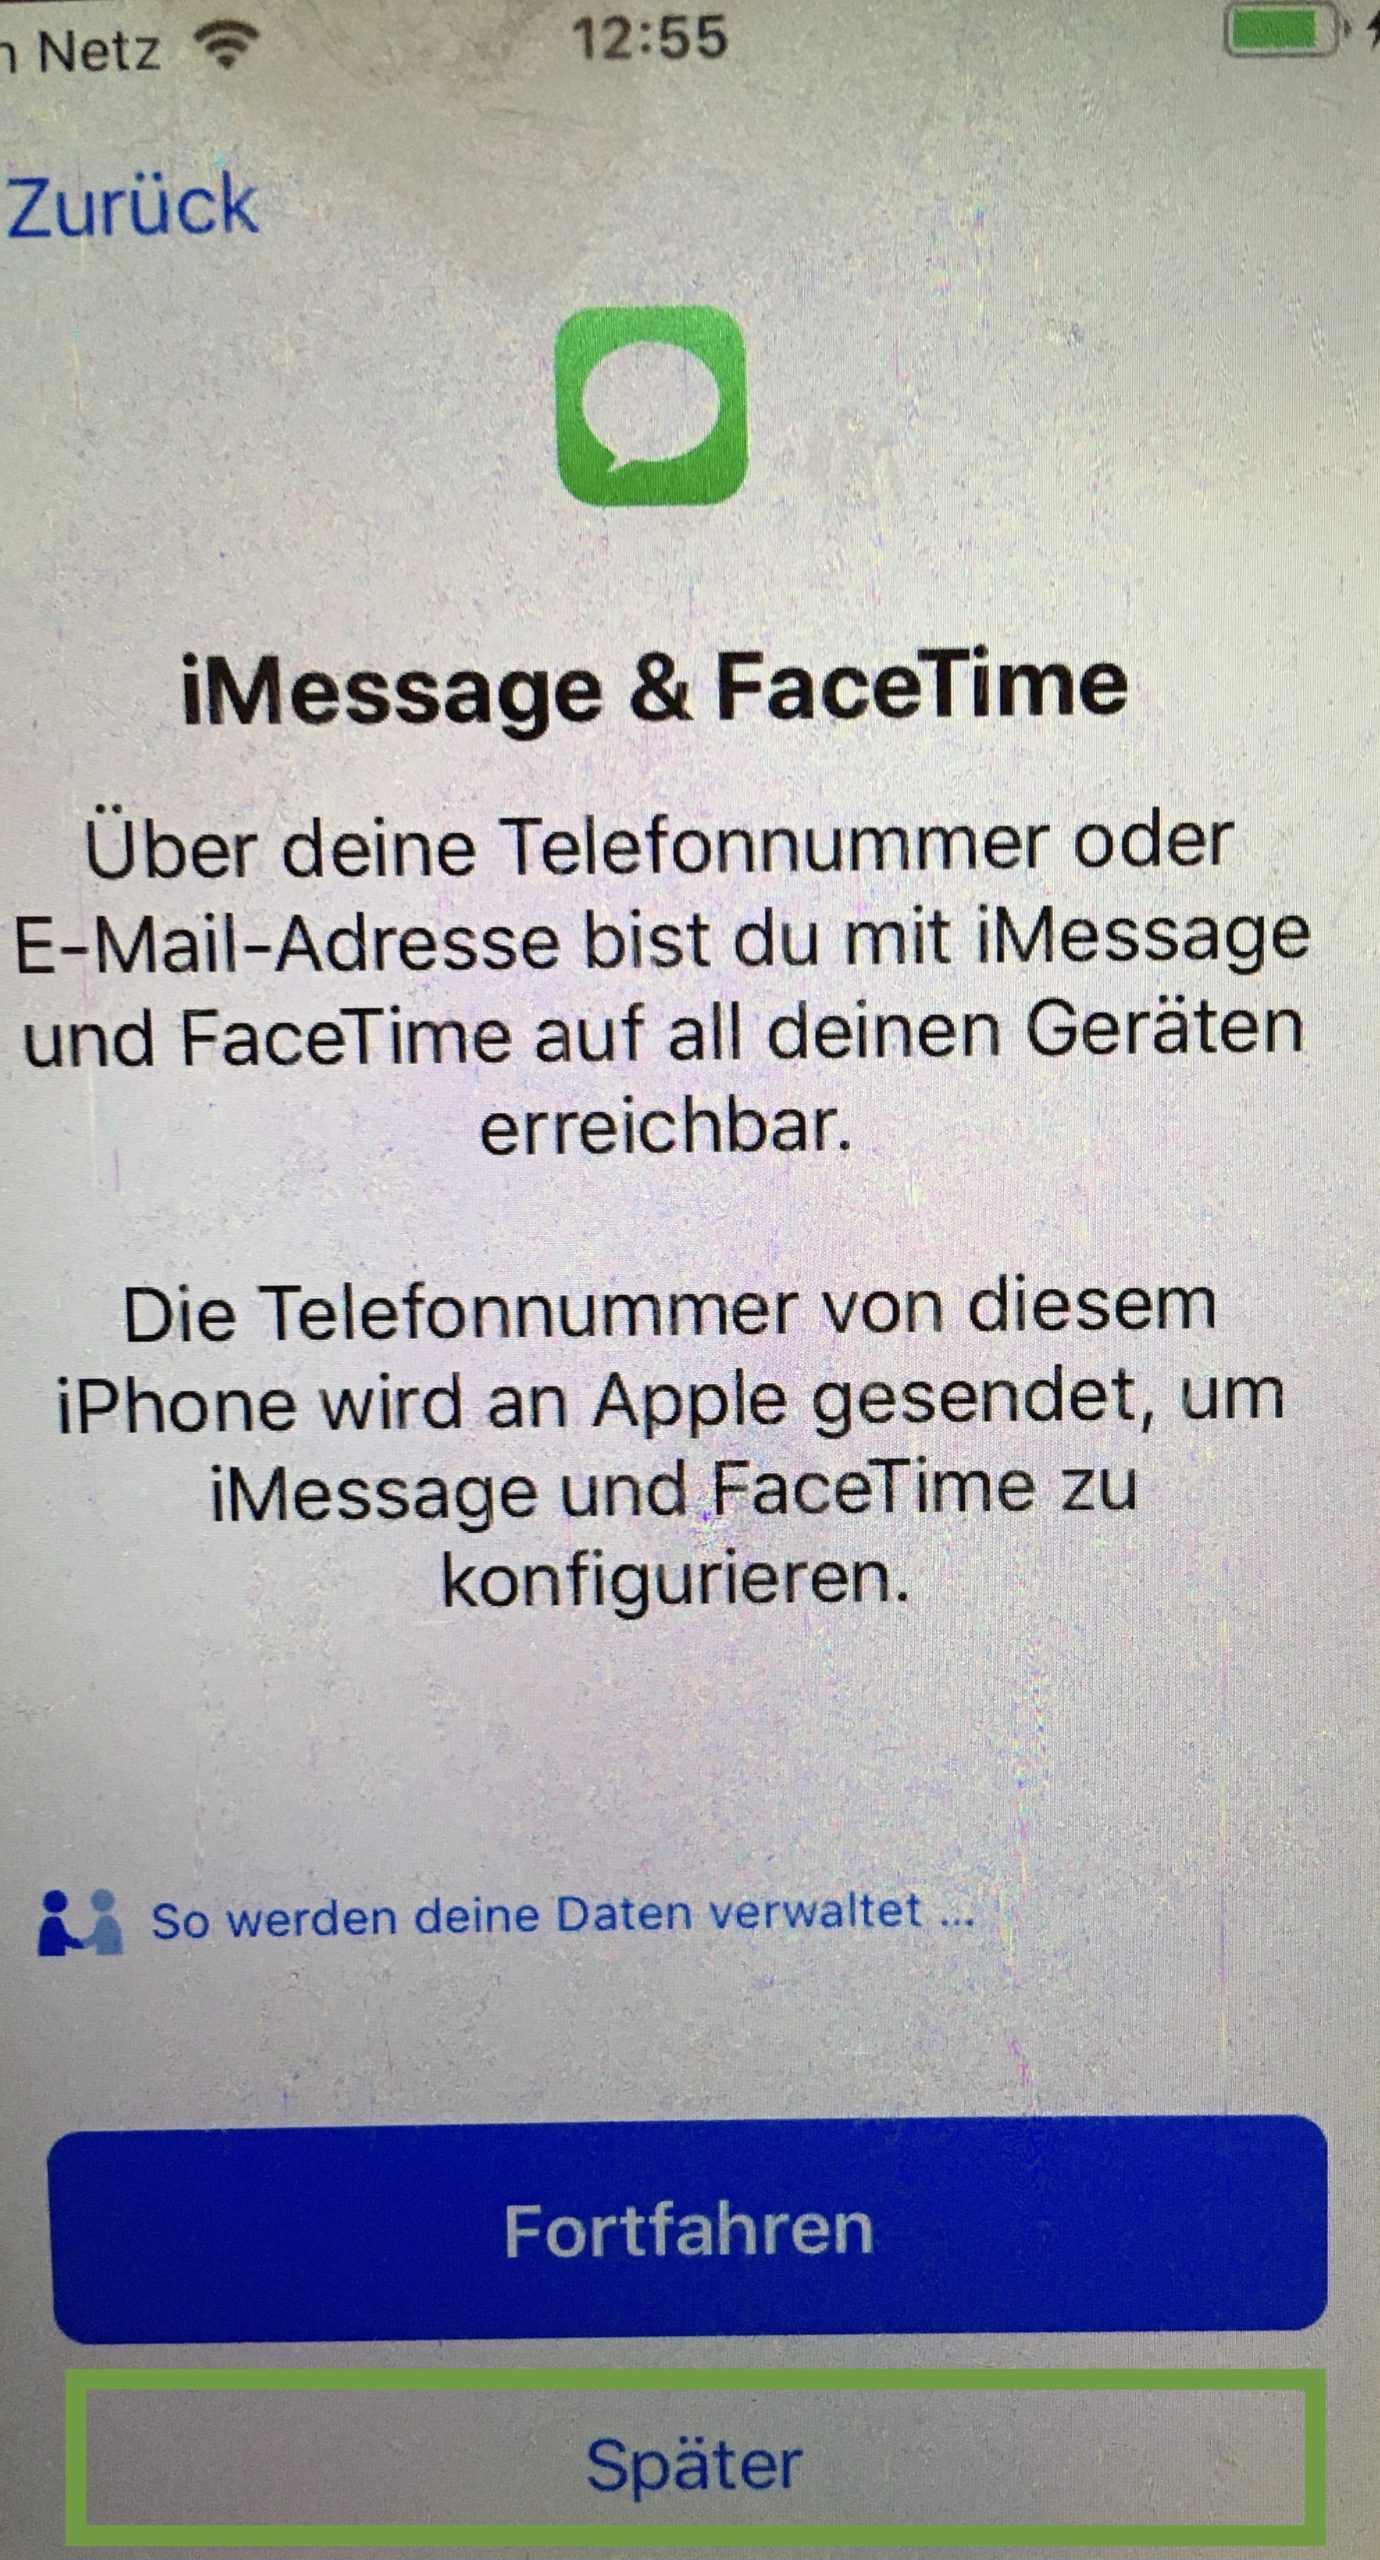
Bild zum Schritt 15 für das Bastel- und DIY-Abenteuer für Kinder: 'Bei iMessages und Facetime auf "später klicken".'

16

Order Services. This is a point to discuss. Because on the one hand Apple has the data about your child's whereabouts. On the other hand, you also have the information where your child's mobile phone is located or where your child is. We recommend activating the order services, but you can understand if you don't want to.
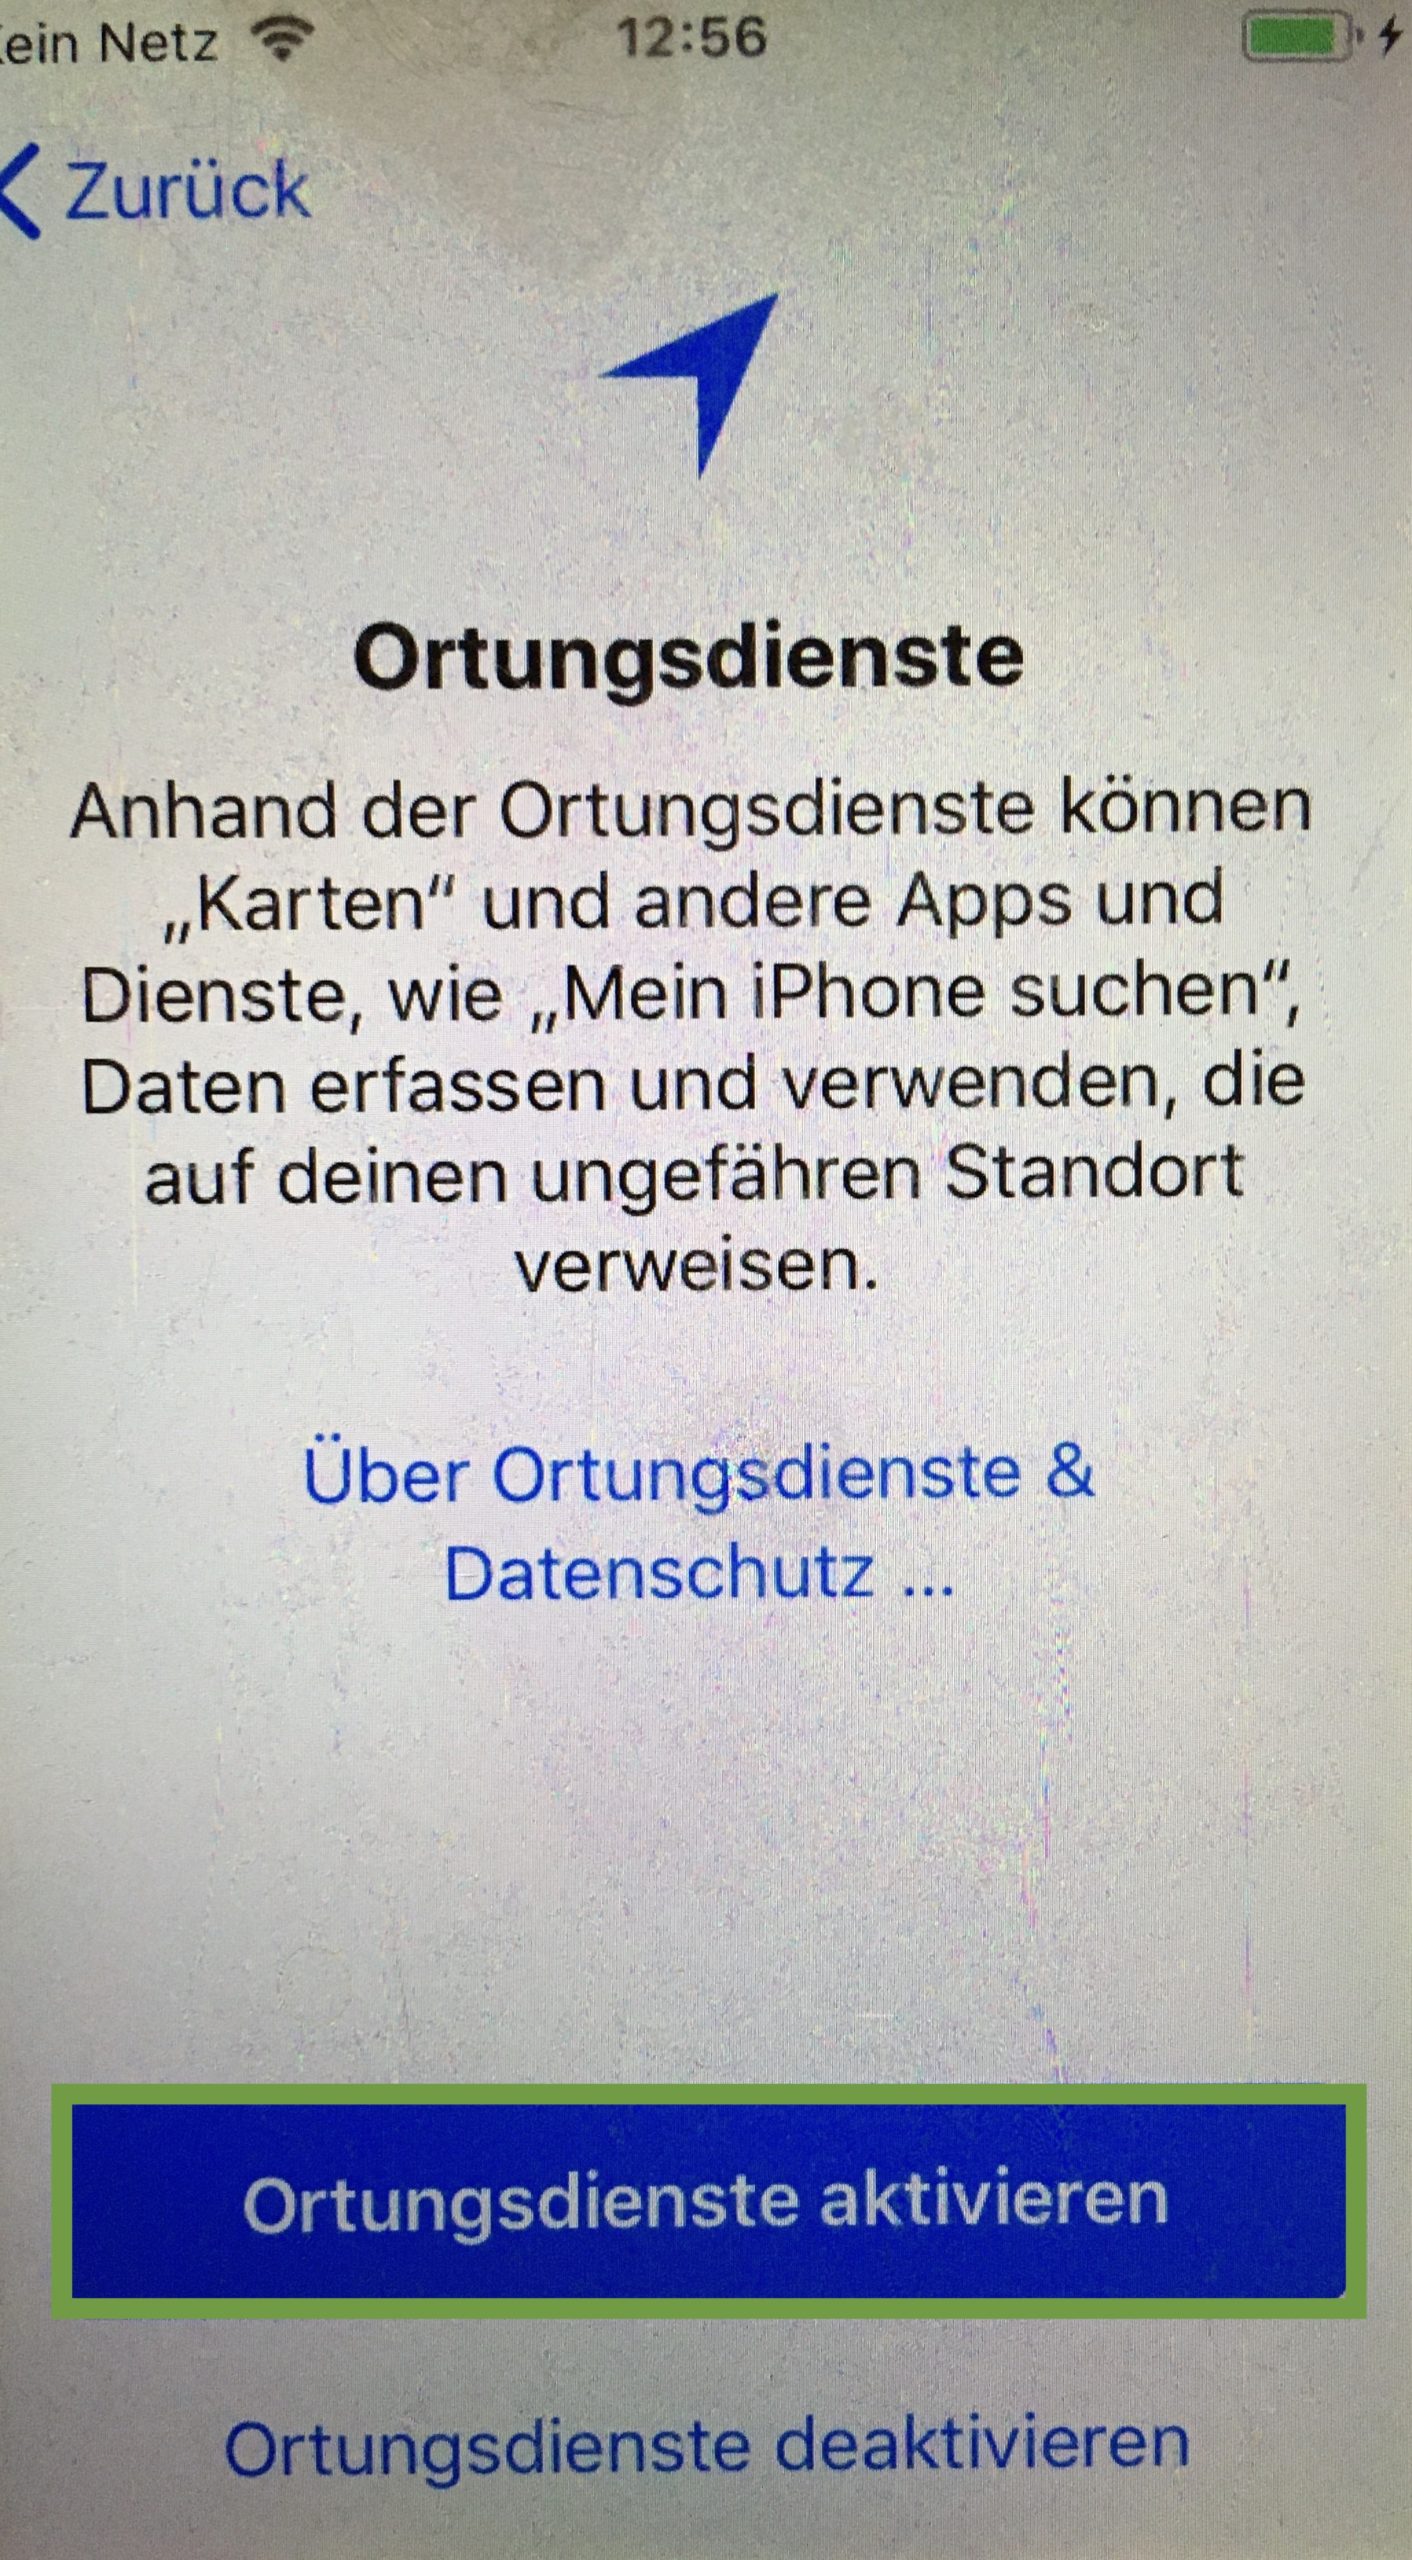
Bild zum Schritt 16 für das Bastel- und DIY-Abenteuer für Kinder: 'Ordnungsdienste. Das ist ein zu diskutierender Punkt. Denn einerseits hat...'

17

Press "configurate later" for Siri.
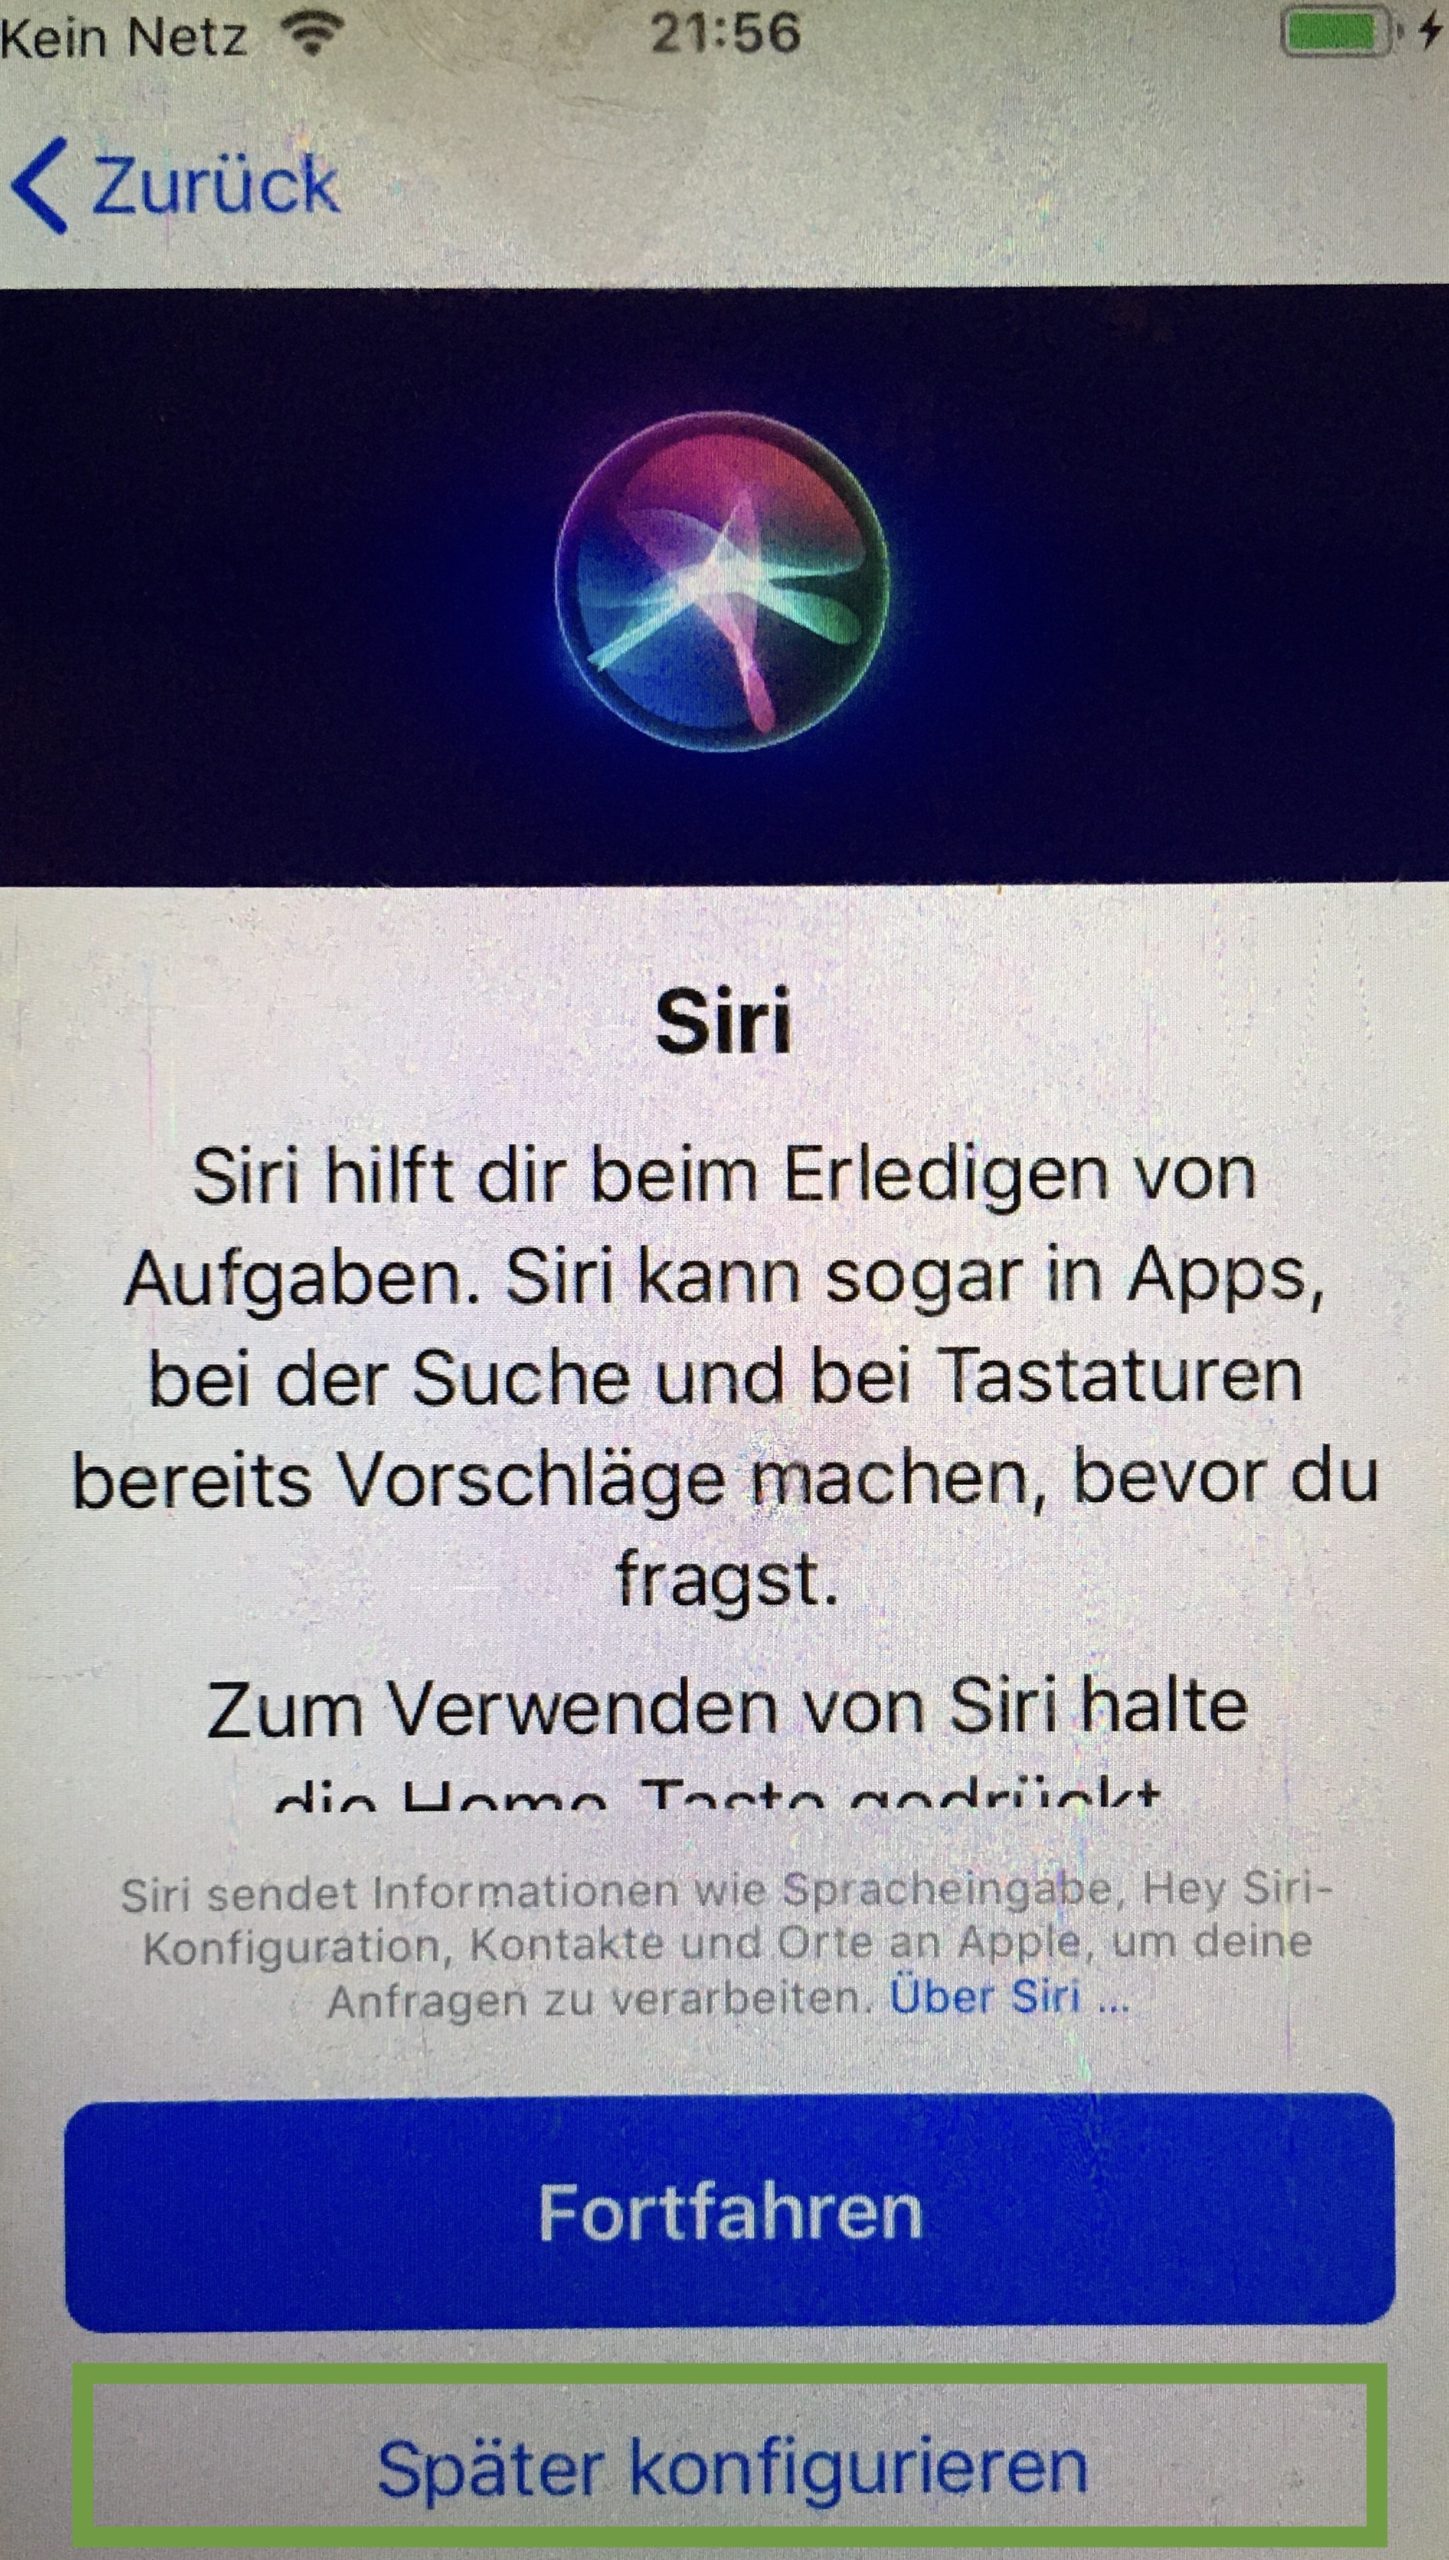
Bild zum Schritt 17 für das Bastel- und DIY-Abenteuer für Kinder: 'Bei Siri auf "später konfigurieren" drücken.'

18

Press "Continue" at screen time.

Bild zum Schritt 18 für das Bastel- und DIY-Abenteuer für Kinder: 'Bei Bildschirmzeit auf "fortfahren" drücken.'

19

Press "do not share" for iPhone analysis.
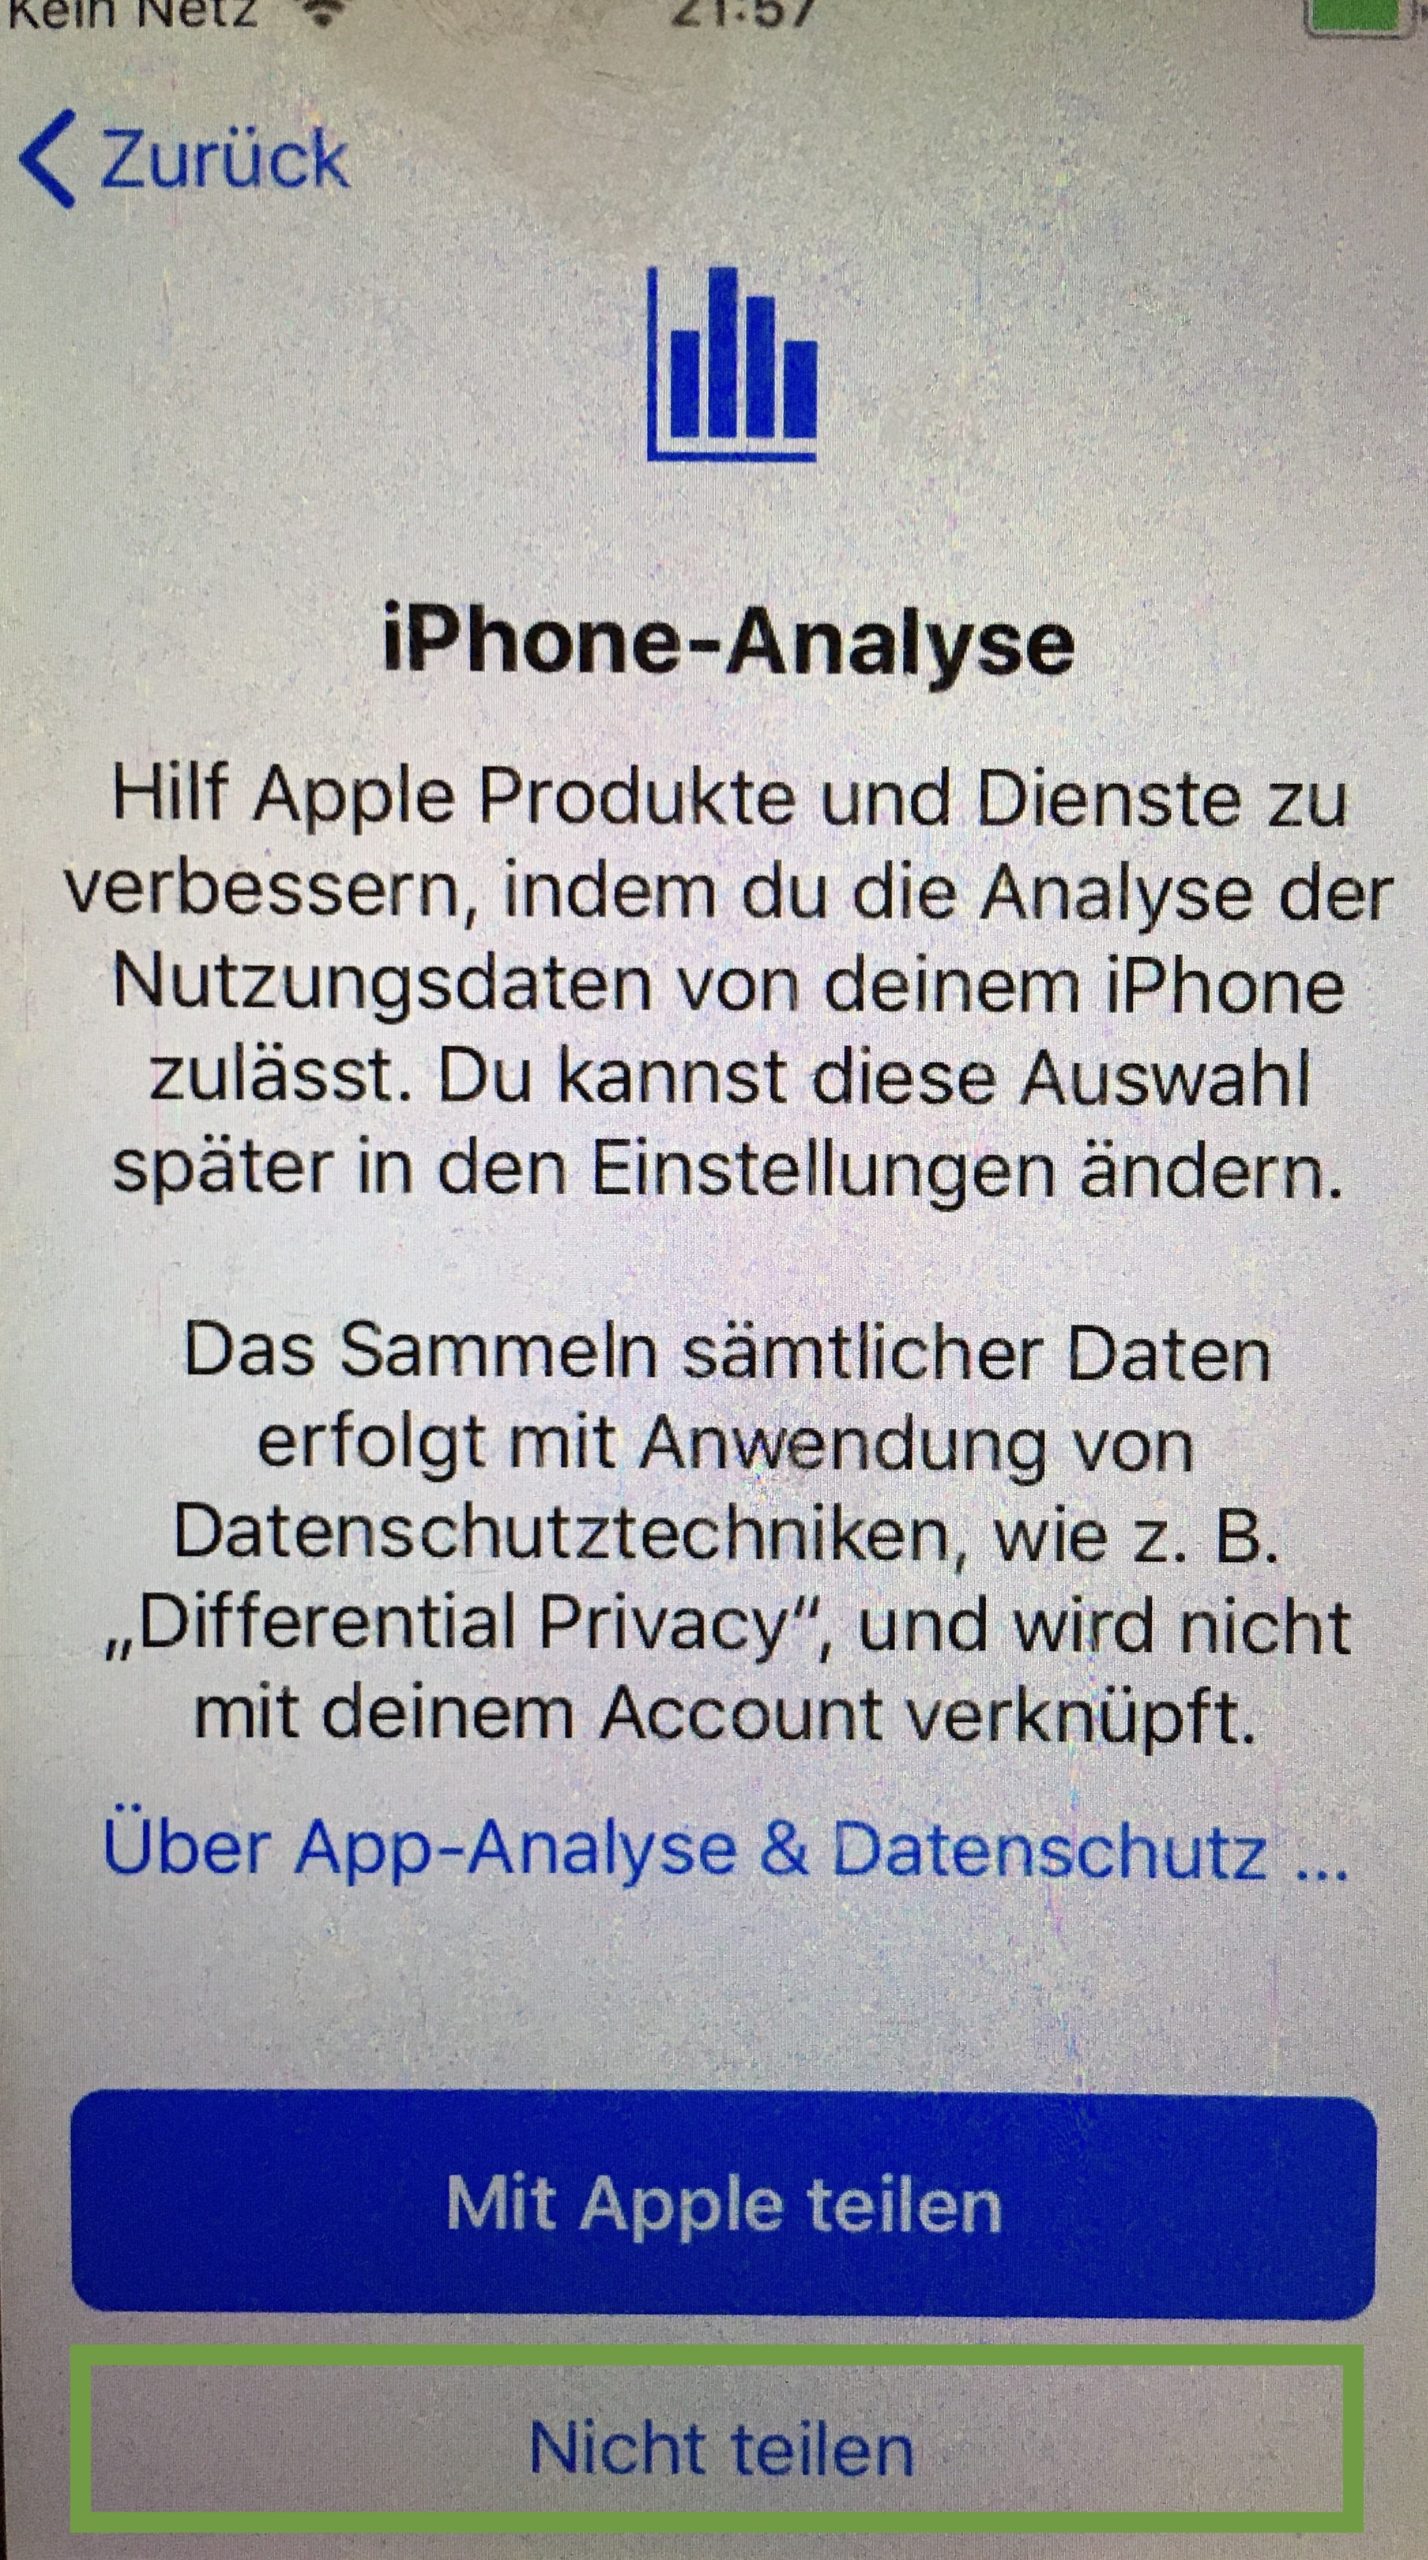
Bild zum Schritt 19 für das Bastel- und DIY-Abenteuer für Kinder: 'Bei iPhone-Analyse auf "nicht teilen" drücken.'

20

Then you've already done it. Now you can remove the SIM card again.

21
Preparing mobile phone (iPhone) for children - Part 2

Follow us on Facebook , Instagram and Pinterest
Don't miss any more adventures: Our bottle mail

Leave a Reply

Your email address will not be published.

The maximum upload file size: 5 MB. You can upload: image, document. Drop file here