Hanging vase

AdventurerKatzi
Rating5.07.6 Thousand times. (3) DifficultyIntermediate

No place on the table? Or are you looking for a flower vase for the outdoors? Then you can quickly make this little hanging vase. You just need an empty jam glass and a string. Make everything step by step, then it's easy. Finally, a few freshly picked flowers and some water in it and you can hang this vase on a tree or shrub. Also looks great on the balcony. Try it out!

Media Education for Kindergarten and Hort

Kind bastelt eine Rassel mit dem Navi
The Adventure Navi, the app for DIY projects, enables media education for the youngest.

Relief in everyday life, targeted promotion of individual children, independent learning and - without any pre-knowledge already usable by the youngest!


Titelbild zur Bastel- und DIY-Idee für Kinder '(769) Hängende Vase'
Material for1 Child
Prep Time5 min.Adv. Time10 min.Total Time15 min.
 1 Screw glassWithout lid
 1 Cordor cord, thick wool
 Water
 Flowers
All links marked with a shopping cart lead to Amazon - here we have selected products that we would order ourselves and in part also ordered. In a qualified purchase via the advertising link, we as Amazon partner receive a commission, for you there are no costs. You thus support our cost- and advertising banner-free, educational offer.
1

First, prepare an empty screw glass and a string.
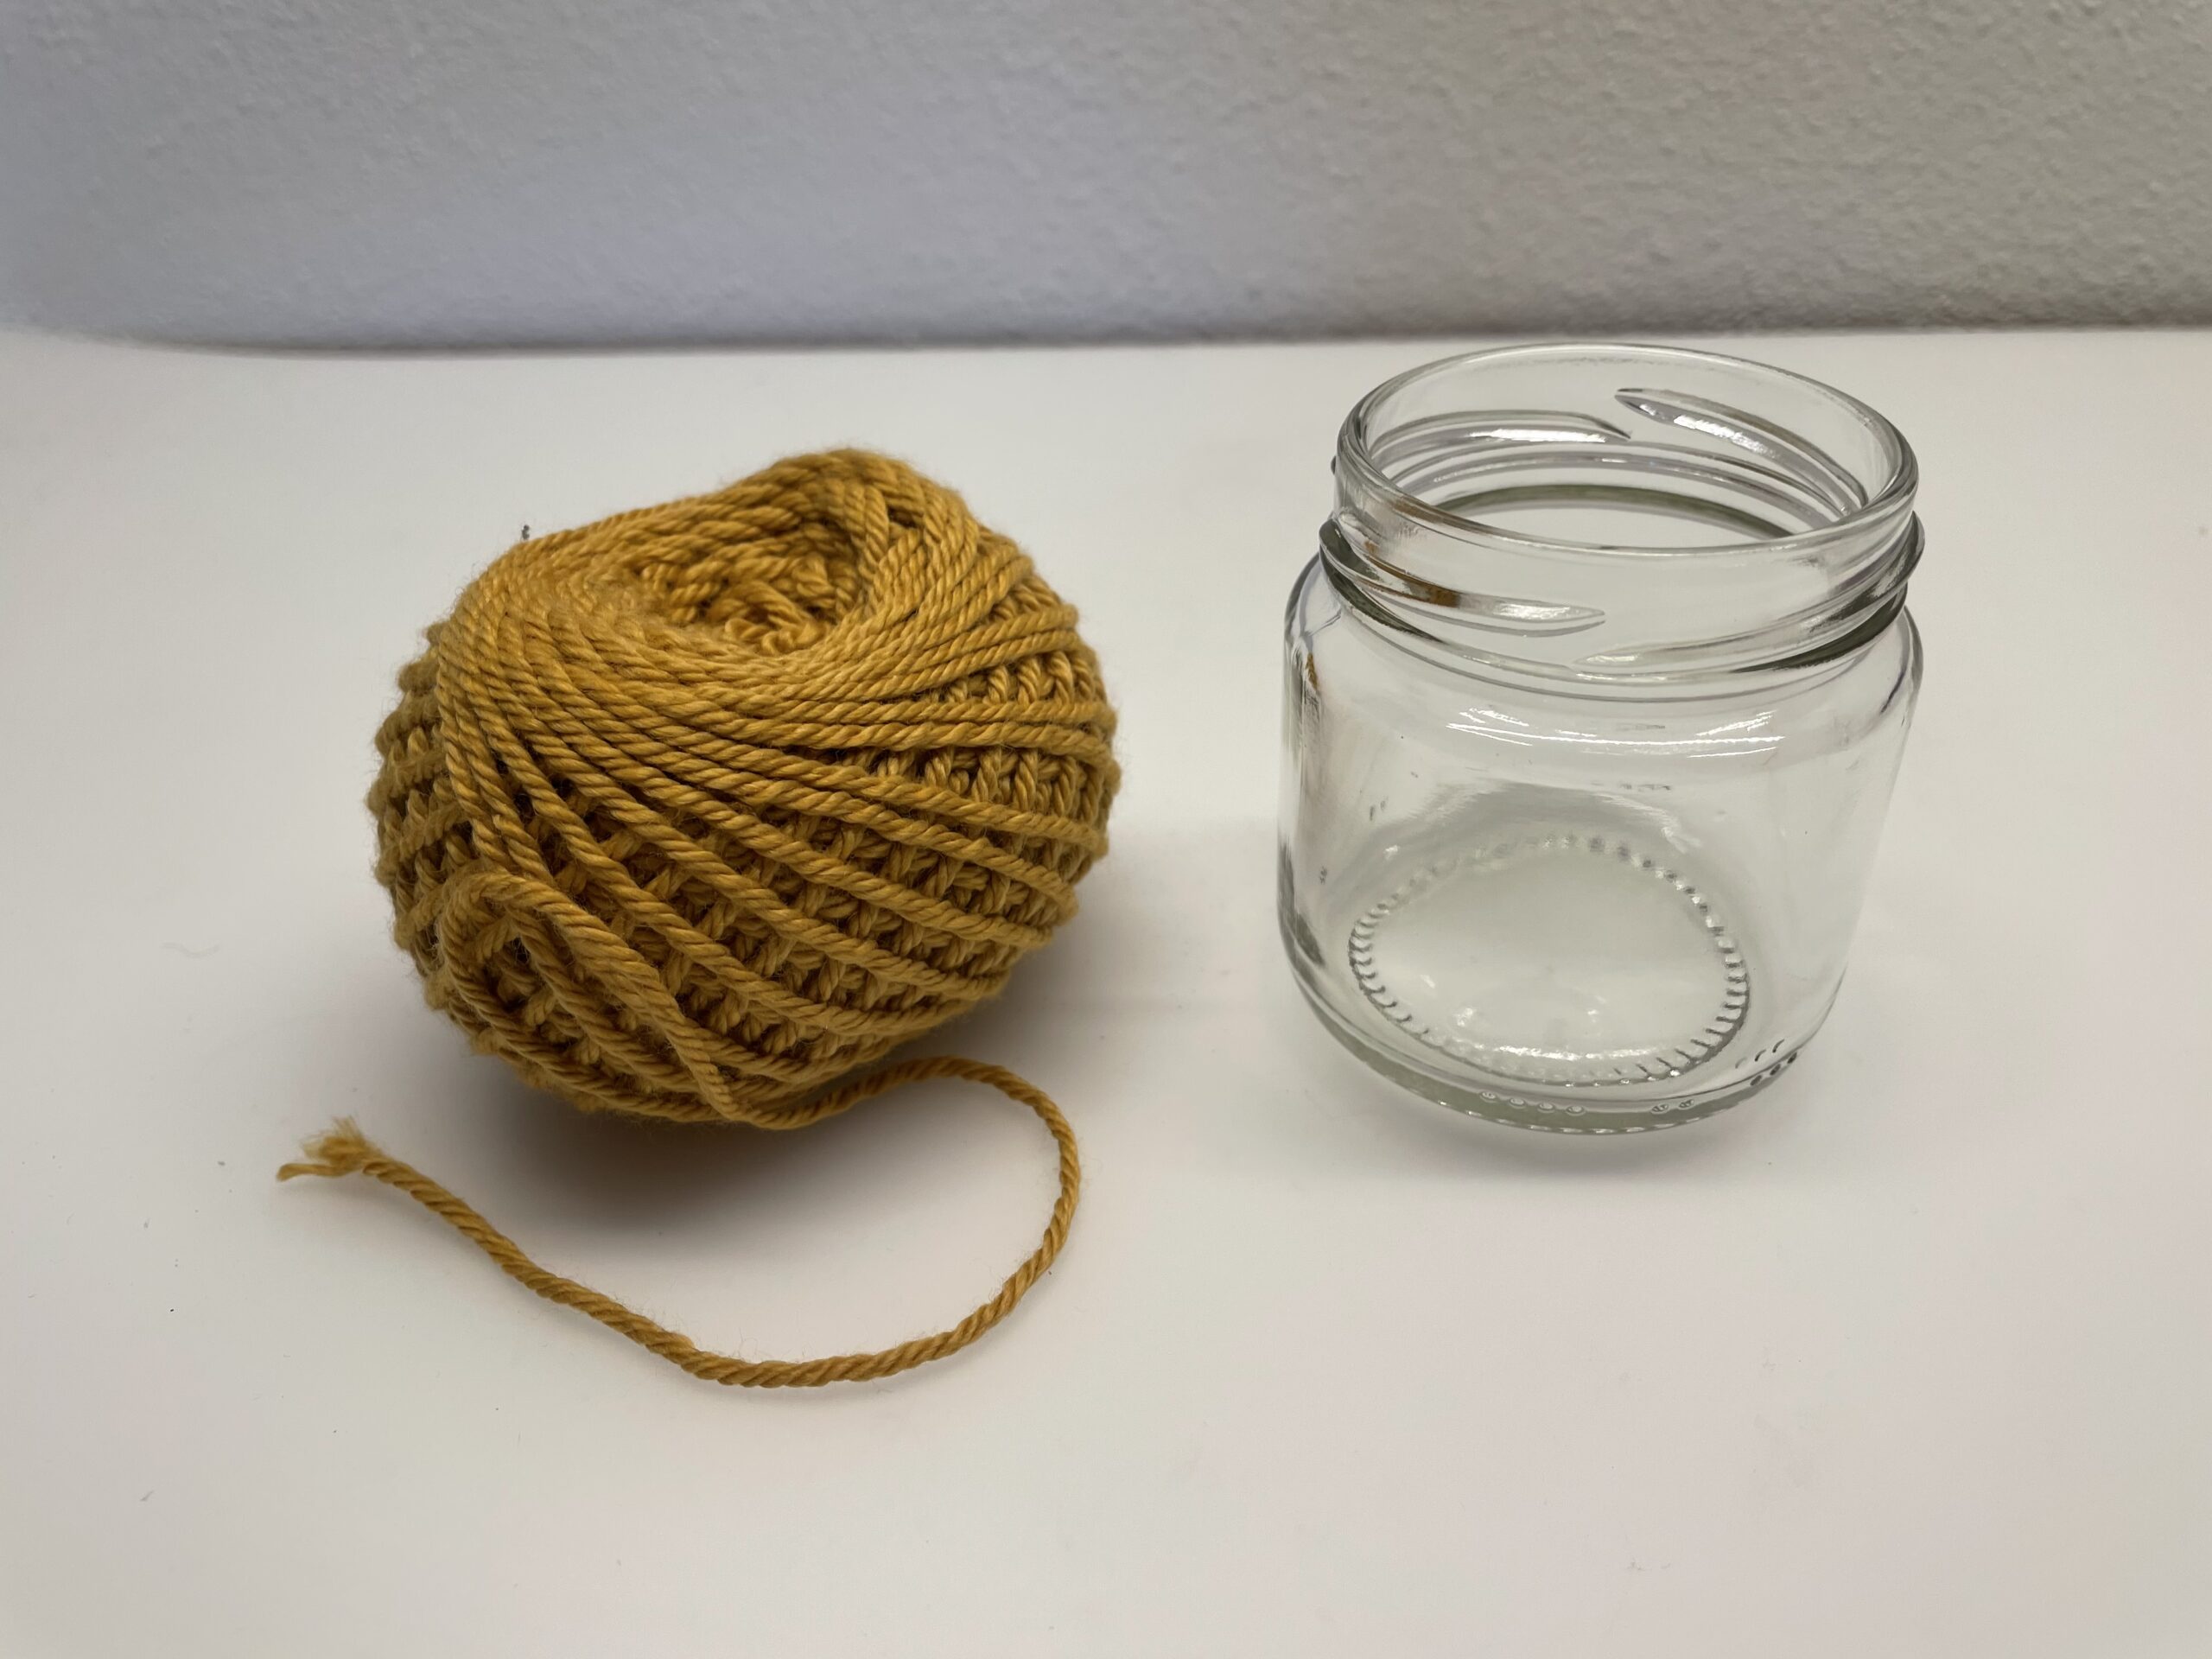
Bild zum Schritt 1 für das Bastel- und DIY-Abenteuer für Kinder: 'Legt zuerst ein leeres Schraubglas und eine Schnur bereit.'

2

Then cut off the cord to a length of approx. 80 cm. Knot the two ends together afterwards.
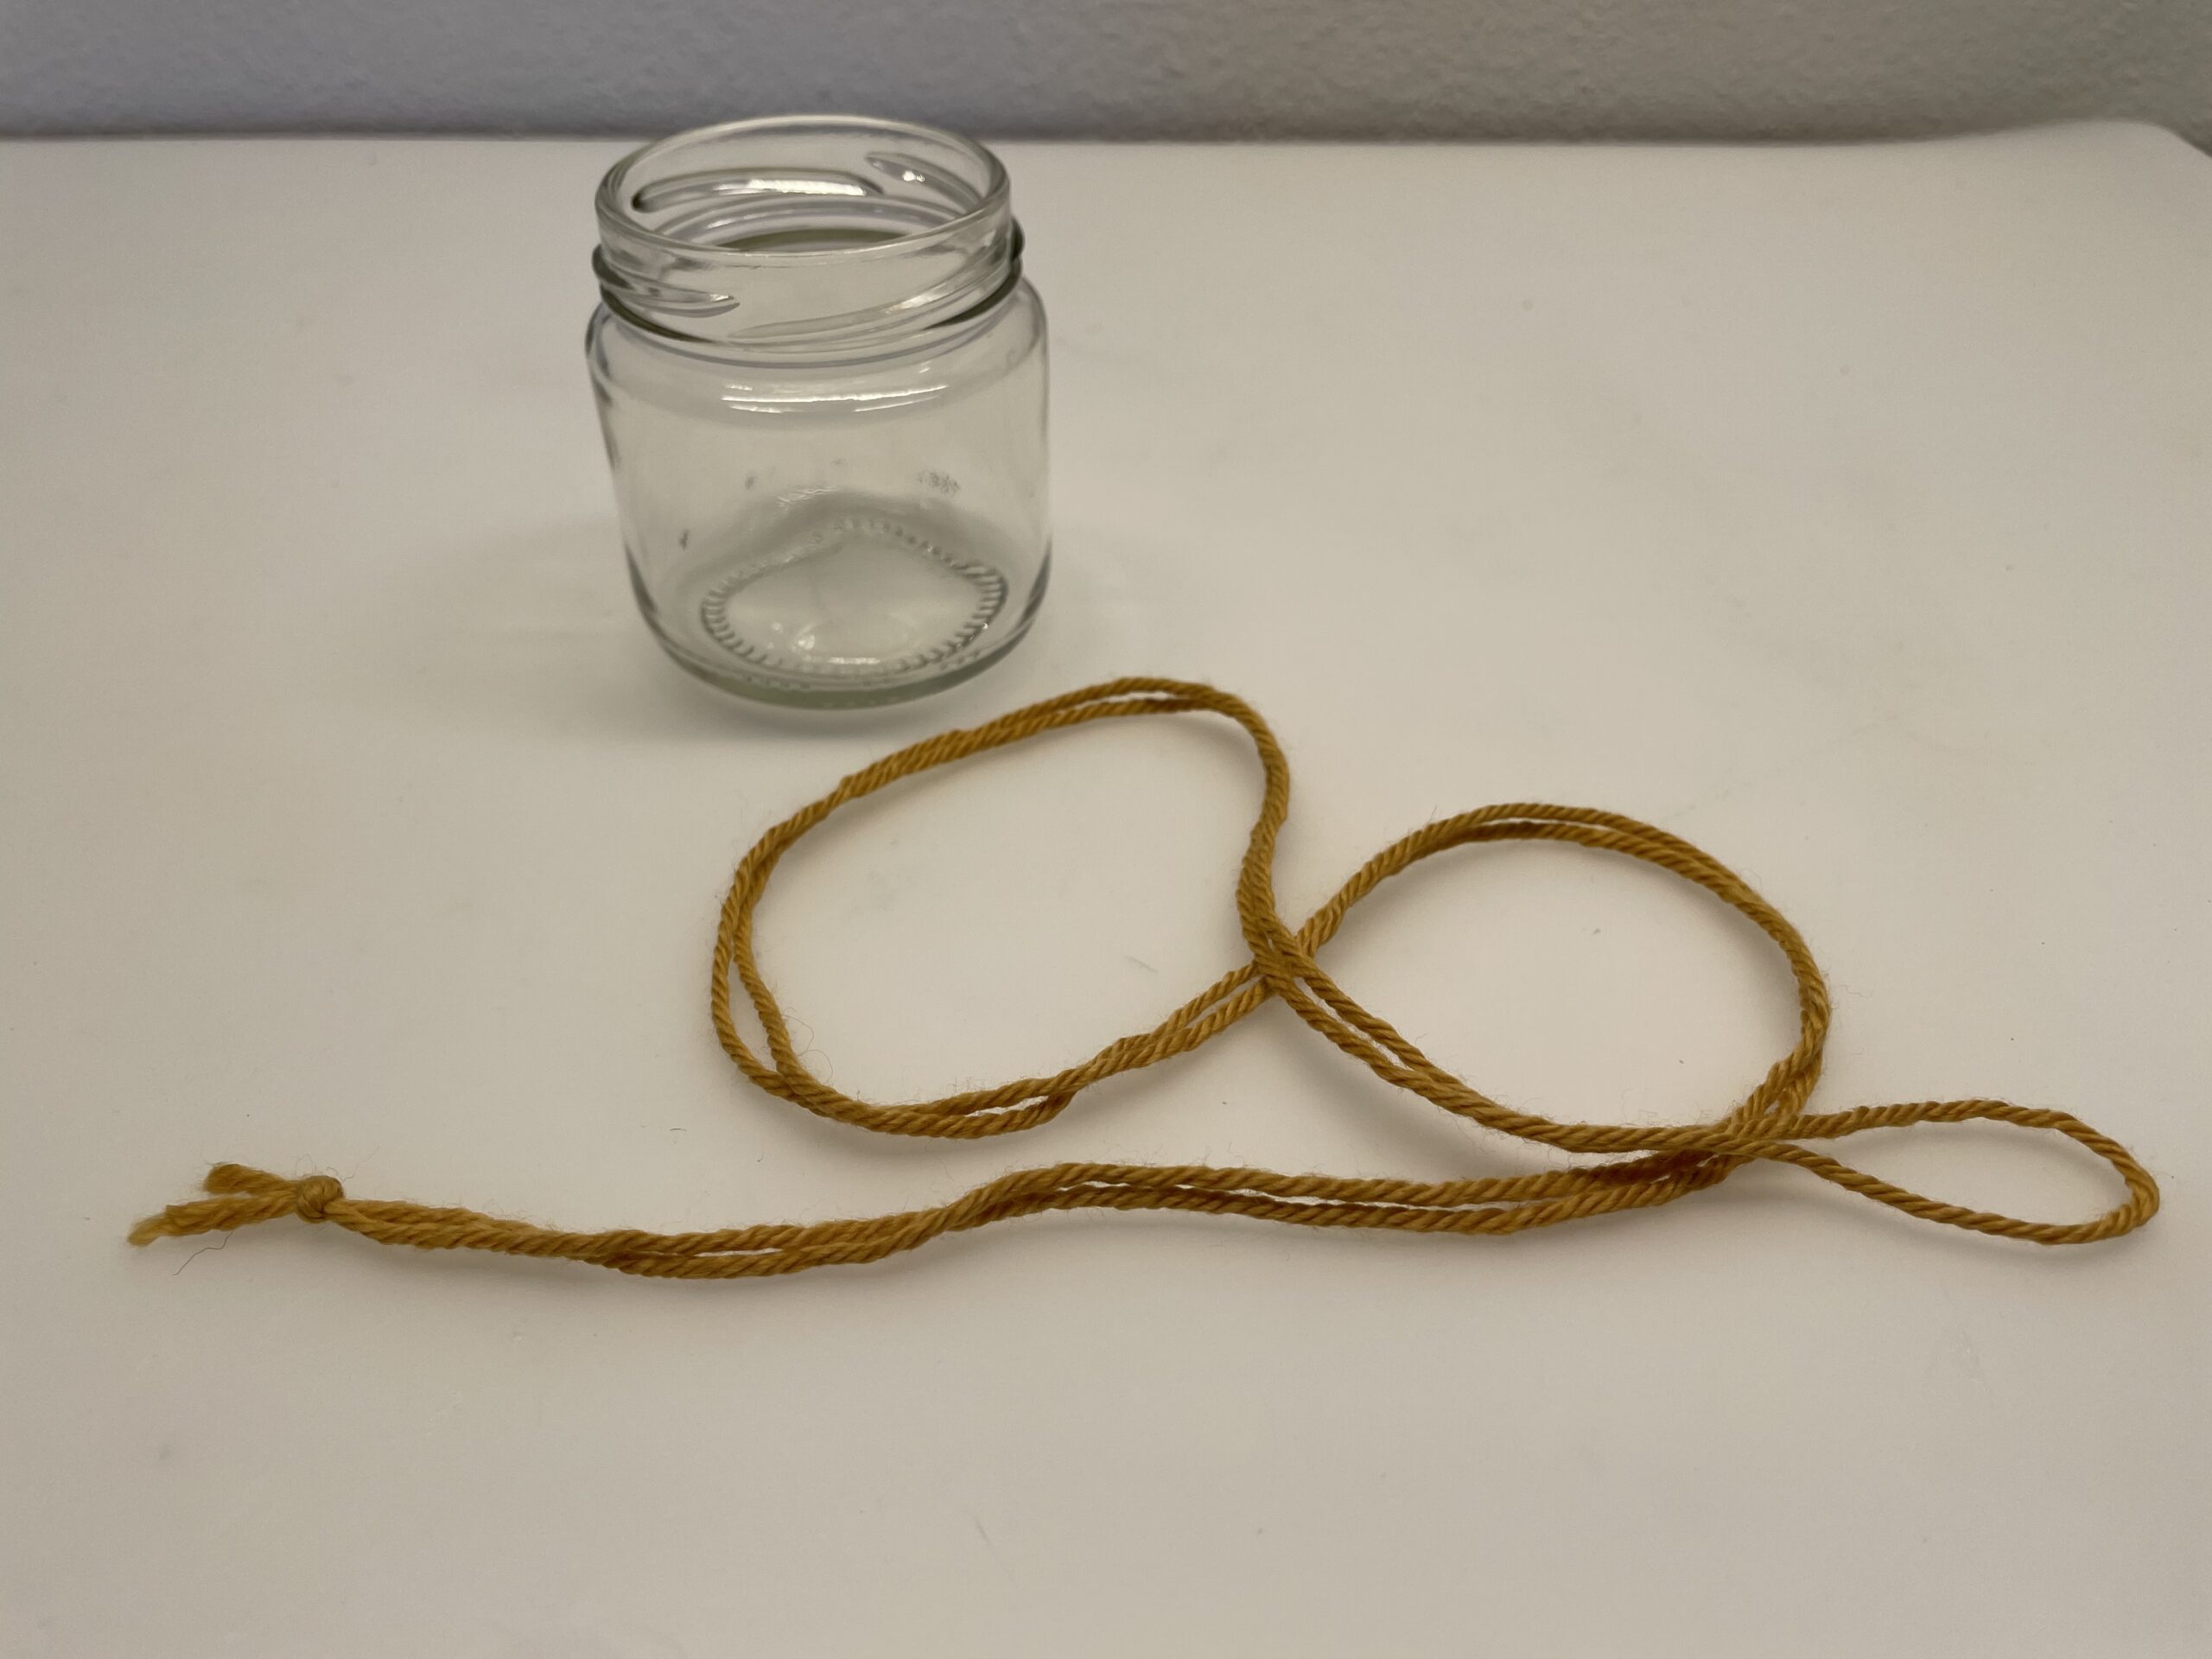
Bild zum Schritt 2 für das Bastel- und DIY-Abenteuer für Kinder: 'Dann schneidet ihr die Schnur auf eine Länge von ca....'

3

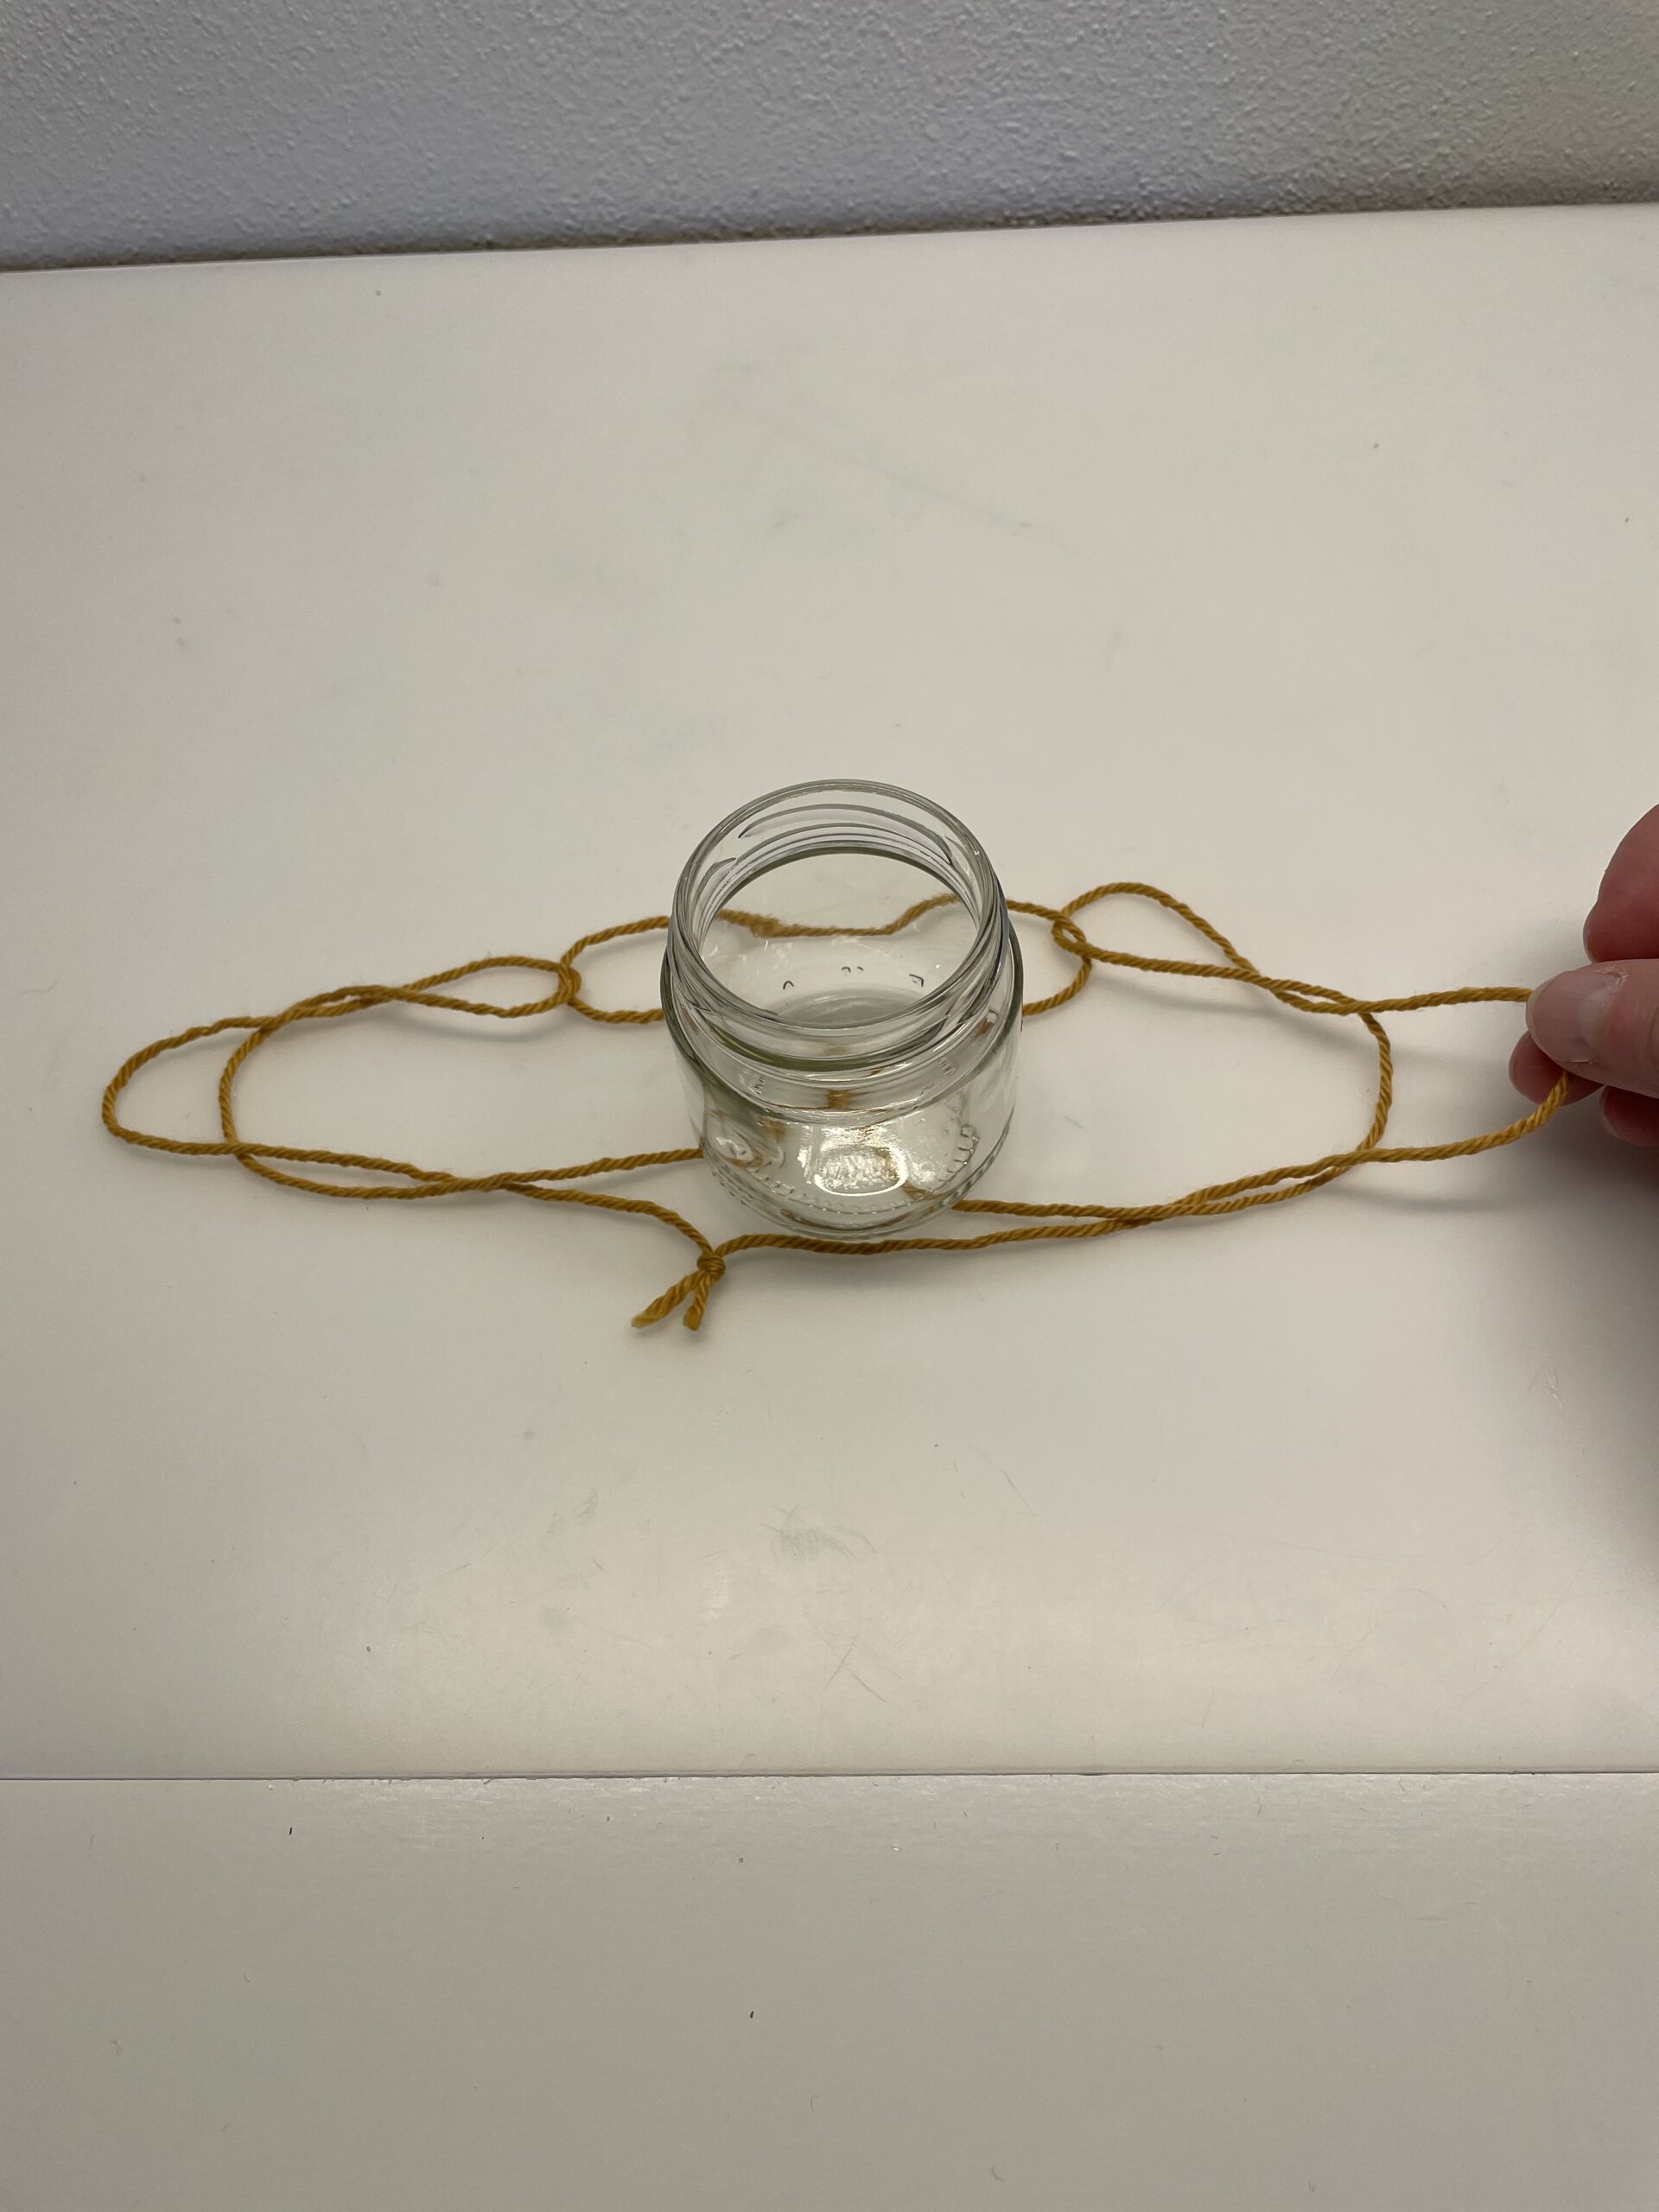
Now you set up the string as in the picture.

Bild zum Schritt 3 für das Bastel- und DIY-Abenteuer für Kinder: 'Jetzt legt ihr die Schnur wie auf dem Bild zurecht.'

4

Then put the glass on the crosshairs.

Bild zum Schritt 4 für das Bastel- und DIY-Abenteuer für Kinder: 'Dann stellt ihr auf das Fadenkreuz das Glas.'

5

Now take the upper thread in your hand.

Bild zum Schritt 5 für das Bastel- und DIY-Abenteuer für Kinder: 'Nun nehmt ihr den oberen Faden  in die Hand.'

6

Put this in the loop above the glass.

Bild zum Schritt 6 für das Bastel- und DIY-Abenteuer für Kinder: 'Legt diesen jetzt in die Schlaufe oberhalb des Glases.'

7

Then you put it through the loop.

Bild zum Schritt 7 für das Bastel- und DIY-Abenteuer für Kinder: 'Dann steckt ihr ihn durch die Schlaufe hindurch.'

8

Pull him up carefully.

Bild zum Schritt 8 für das Bastel- und DIY-Abenteuer für Kinder: 'Zieht ihn vorsichtig nach oben heraus.'

9

Keep the thread in your hand. Now you spread the cord a bit apart and lead it forward over the glass.

Bild zum Schritt 9 für das Bastel- und DIY-Abenteuer für Kinder: 'Behaltet den Faden in der Hand. Jetzt breitet ihr ...'

10

Then drop the cord in front of the glass.

Bild zum Schritt 10 für das Bastel- und DIY-Abenteuer für Kinder: 'Legt die Schnur dann  vor dem Glas ab.'

11

The loops on the left and right now pull something apart in parallel. Pull until they lie over the other cord.

Bild zum Schritt 11 für das Bastel- und DIY-Abenteuer für Kinder: 'Die links und rechts liegenden Schlaufen zieht ihr nun parallel...'

12

Now pull out the thread lying in the loop at the side. Pull out the cord parallel on both sides at the same time.

Bild zum Schritt 12 für das Bastel- und DIY-Abenteuer für Kinder: 'Jetzt zieht ihr den, in der Schlaufe unten liegenden Faden...'

13

2. Bild zum Schritt 12 für das Bastel- und DIY-Abenteuer für Kinder: 'Jetzt zieht ihr den, in der Schlaufe unten liegenden Faden...'

14

Raise the lateral loops slightly and gently pull the thread mesh apart on both sides.

Bild zum Schritt 14 für das Bastel- und DIY-Abenteuer für Kinder: 'Hebt die seitlichen Schlaufen etwas an und zieht beidseitig das...'

15

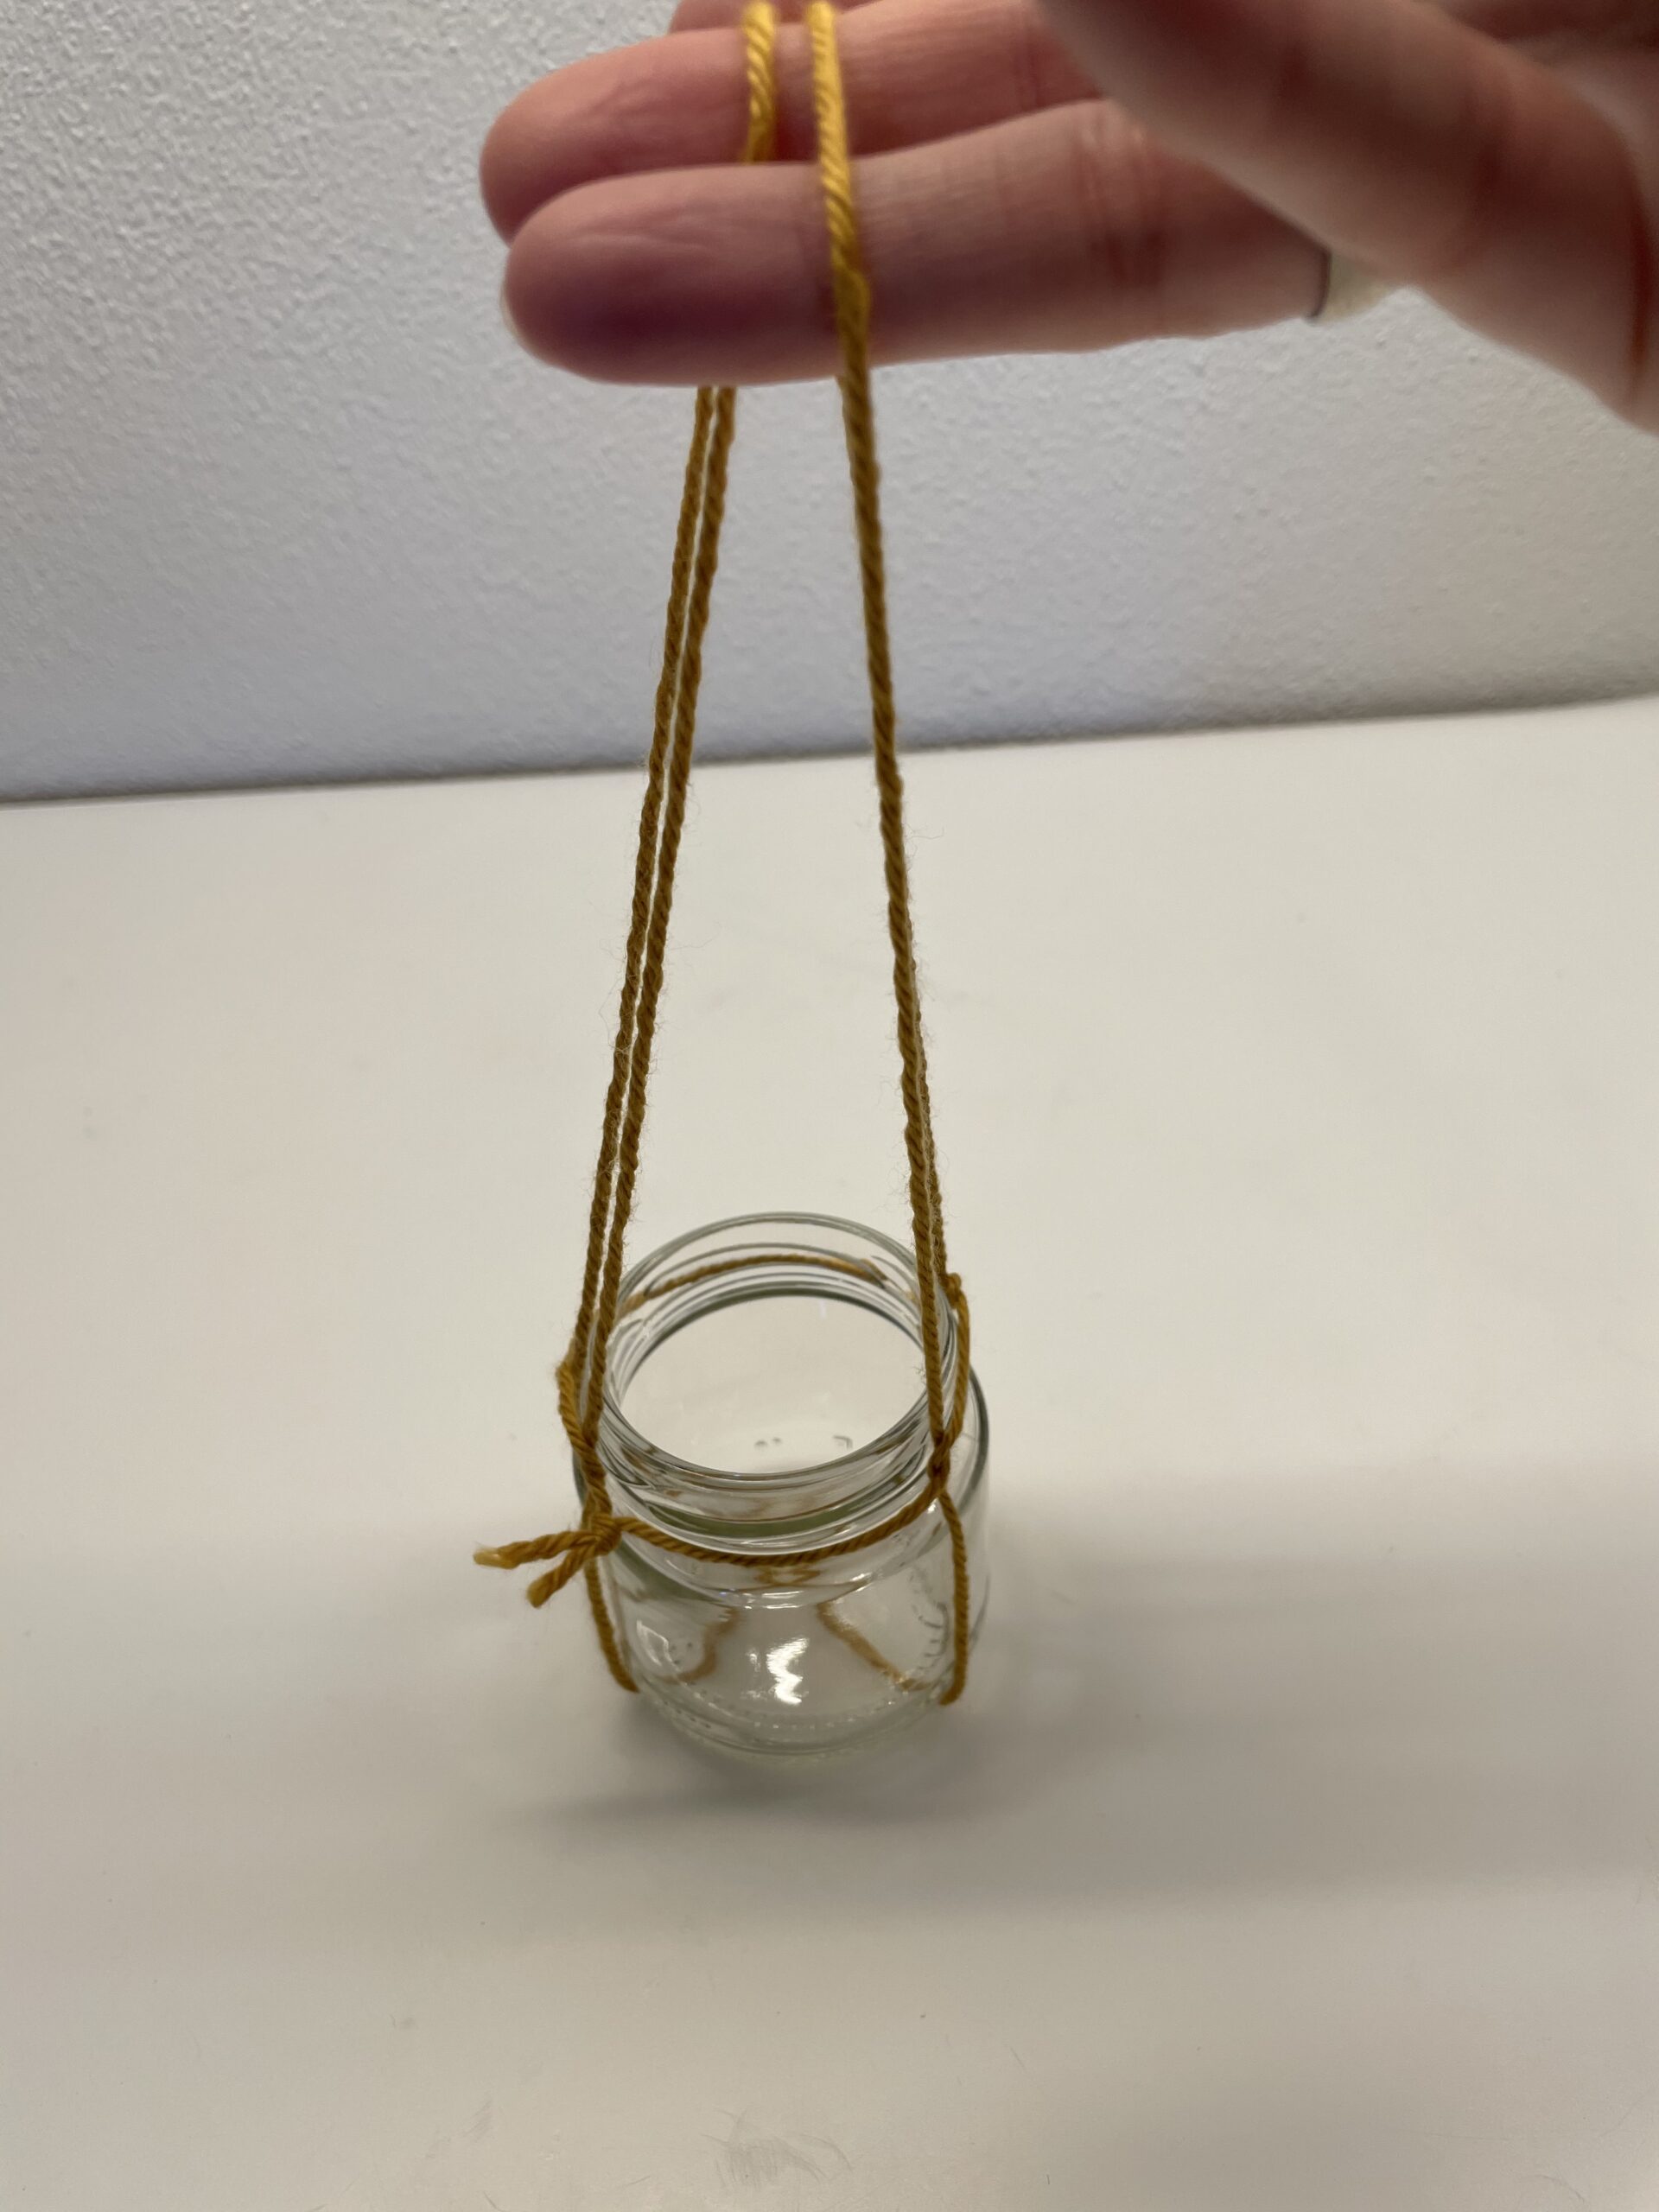
Now you take both loops up. Align the glass in the middle of the thread mesh and make sure that the crosshair is located in the middle of the glass floor.

Bild zum Schritt 15 für das Bastel- und DIY-Abenteuer für Kinder: 'Jetzt nehmt ihr beide Fadenschlaufen nach oben zusammen. Richtet das...'

16

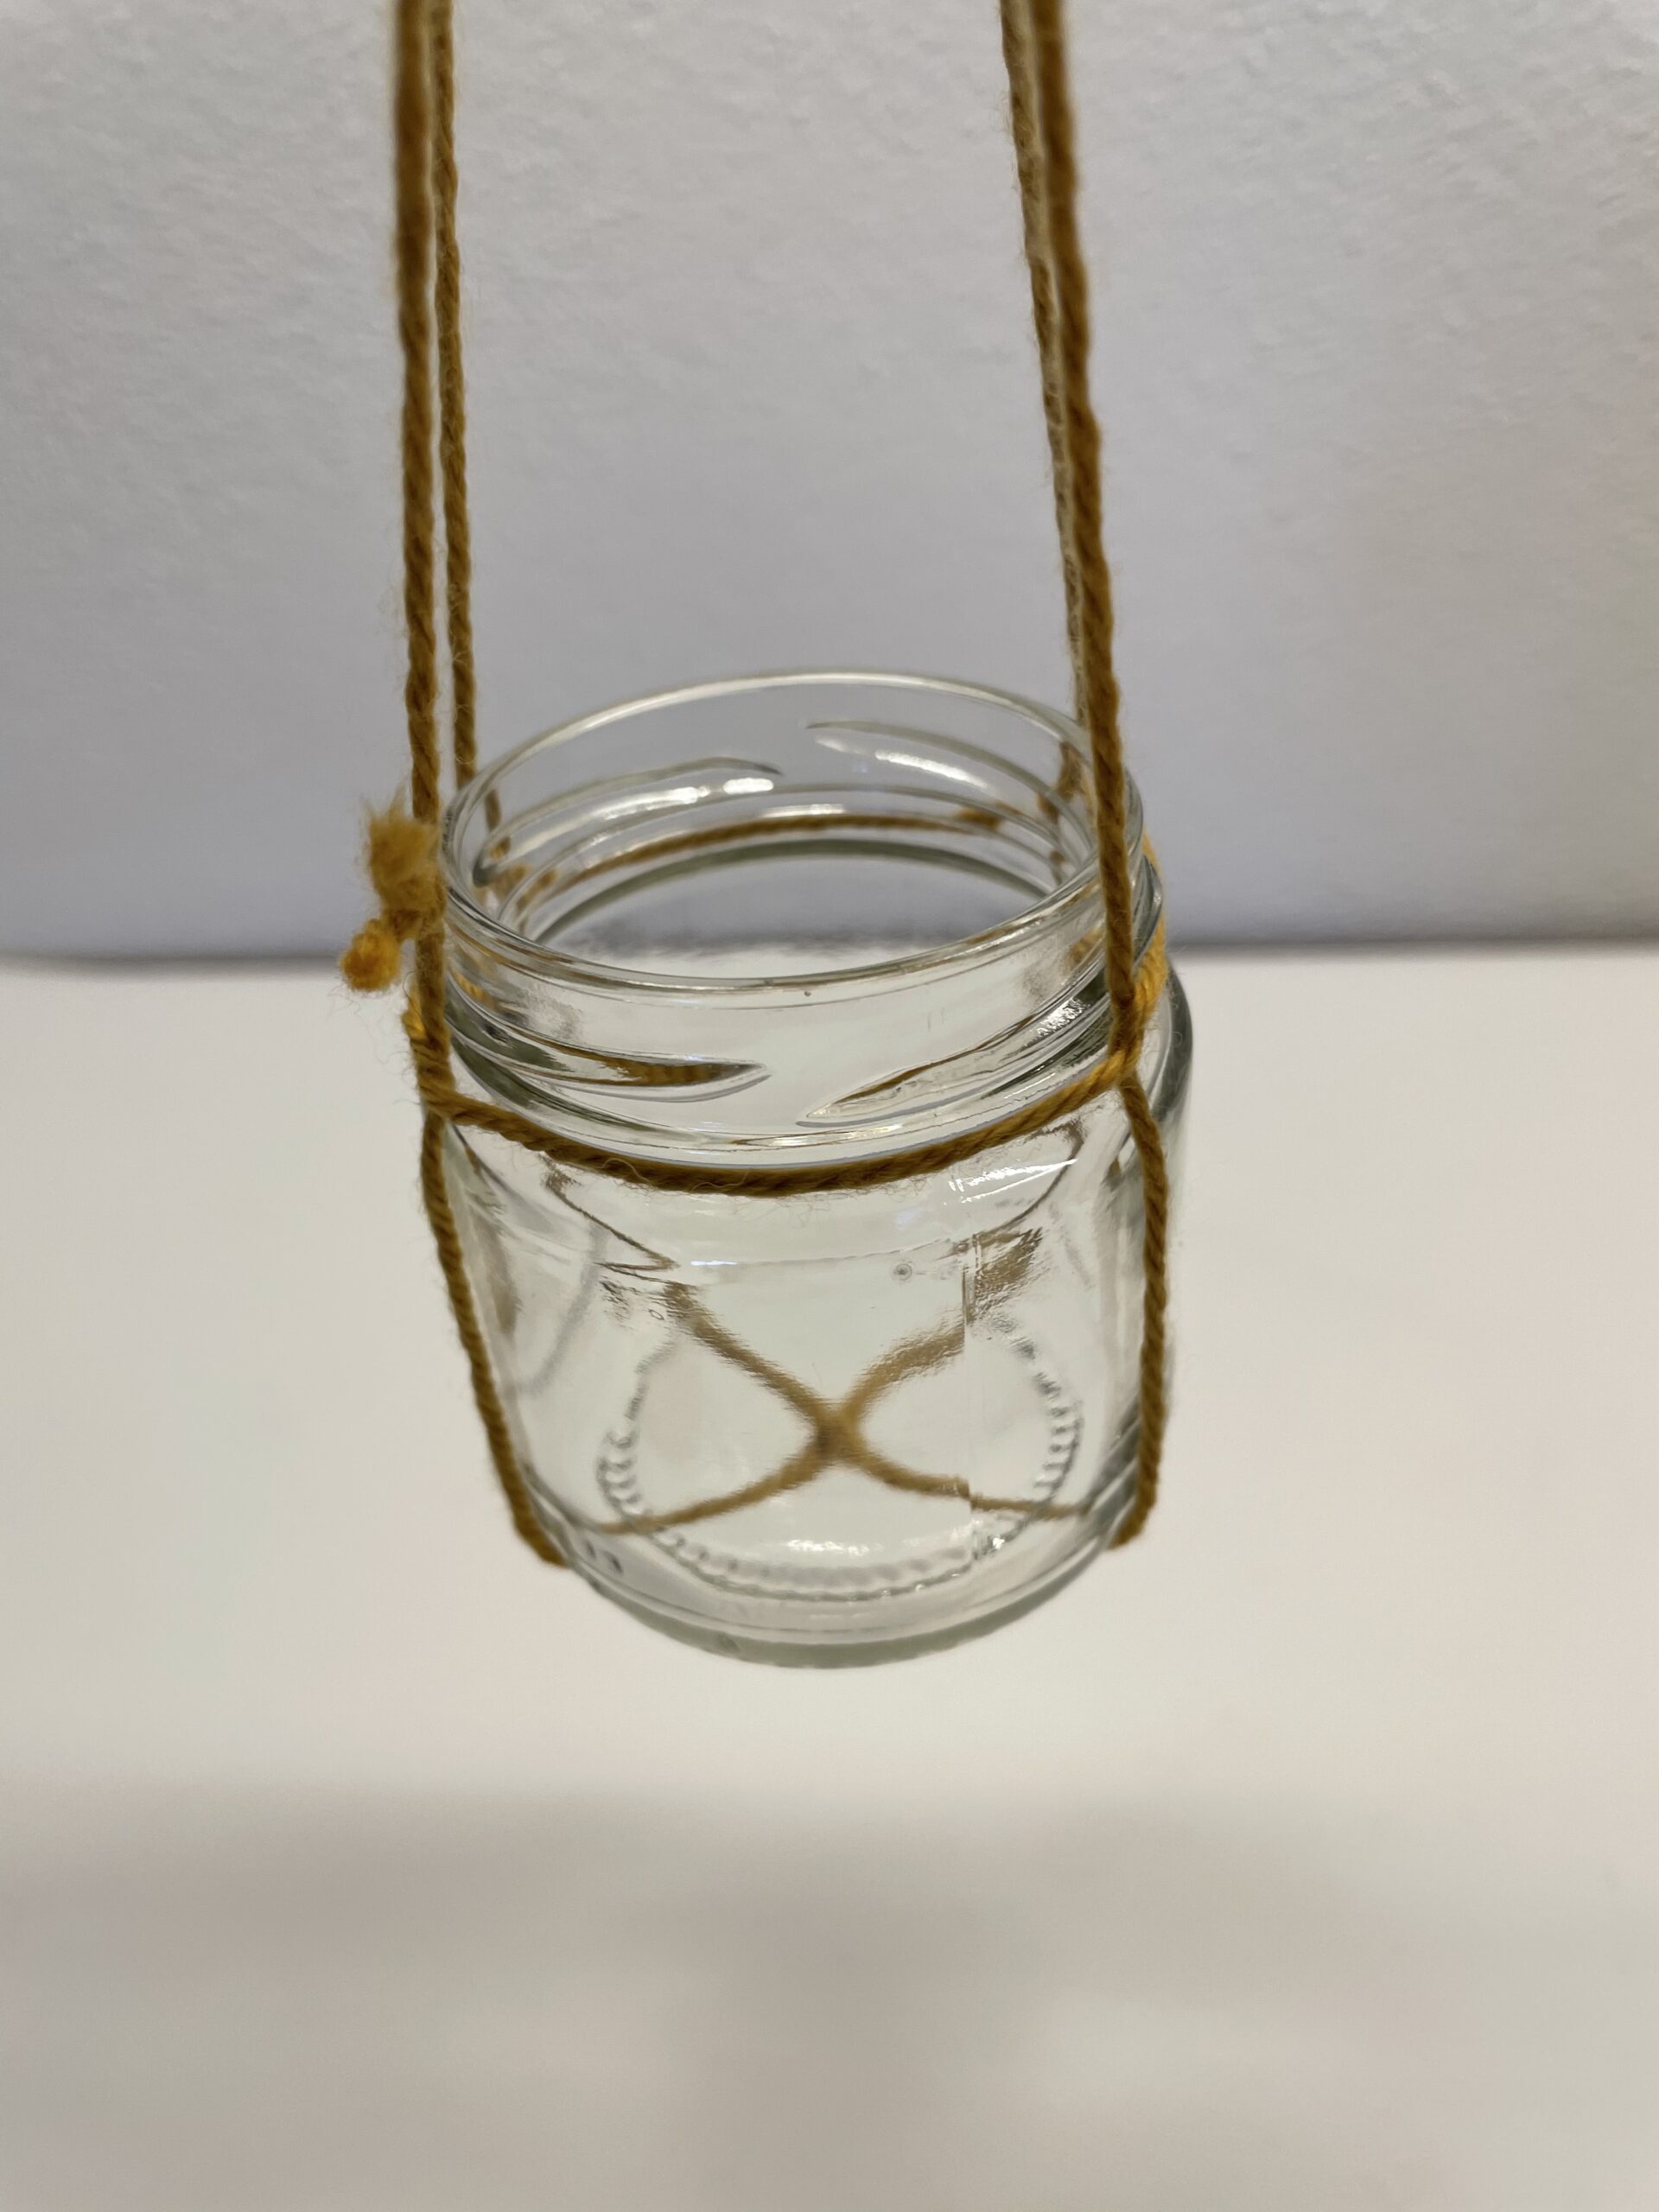
The hanging vase is ready.

Bild zum Schritt 16 für das Bastel- und DIY-Abenteuer für Kinder: 'Fertig ist die hängende Vase.'

17

2. Bild zum Schritt 16 für das Bastel- und DIY-Abenteuer für Kinder: 'Fertig ist die hängende Vase.'

18

Now fill in some water and hang your vase on a branch, shrub or tree. With a few picked flowers, the vase looks beautiful.

Bild zum Schritt 18 für das Bastel- und DIY-Abenteuer für Kinder: 'Nun füllt ihr etwas Wasser hinein und hängt eure Vase...'

19

Your hanging floral decoration is ready.
Tip: This hanging vase is also a nice gift!

Bild zum Schritt 19 für das Bastel- und DIY-Abenteuer für Kinder: 'Fertig ist euer hängender Blumenschmuck.   Tipp: Diese hängende...'

20

Have fun!

Materials

 1 Screw glassWithout lid
 1 Cordor cord, thick wool
 Water
 Flowers
All links marked with a shopping cart lead to Amazon - here we have selected products that we would order ourselves and in part also ordered. In a qualified purchase via the advertising link, we as Amazon partner receive a commission, for you there are no costs. You thus support our cost- and advertising banner-free, educational offer.

Directions

1

First, prepare an empty screw glass and a string.

Bild zum Schritt 1 für das Bastel- und DIY-Abenteuer für Kinder: 'Legt zuerst ein leeres Schraubglas und eine Schnur bereit.'

2

Then cut off the cord to a length of approx. 80 cm. Knot the two ends together afterwards.

Bild zum Schritt 2 für das Bastel- und DIY-Abenteuer für Kinder: 'Dann schneidet ihr die Schnur auf eine Länge von ca....'

3

Now you set up the string as in the picture.

Bild zum Schritt 3 für das Bastel- und DIY-Abenteuer für Kinder: 'Jetzt legt ihr die Schnur wie auf dem Bild zurecht.'

4

Then put the glass on the crosshairs.
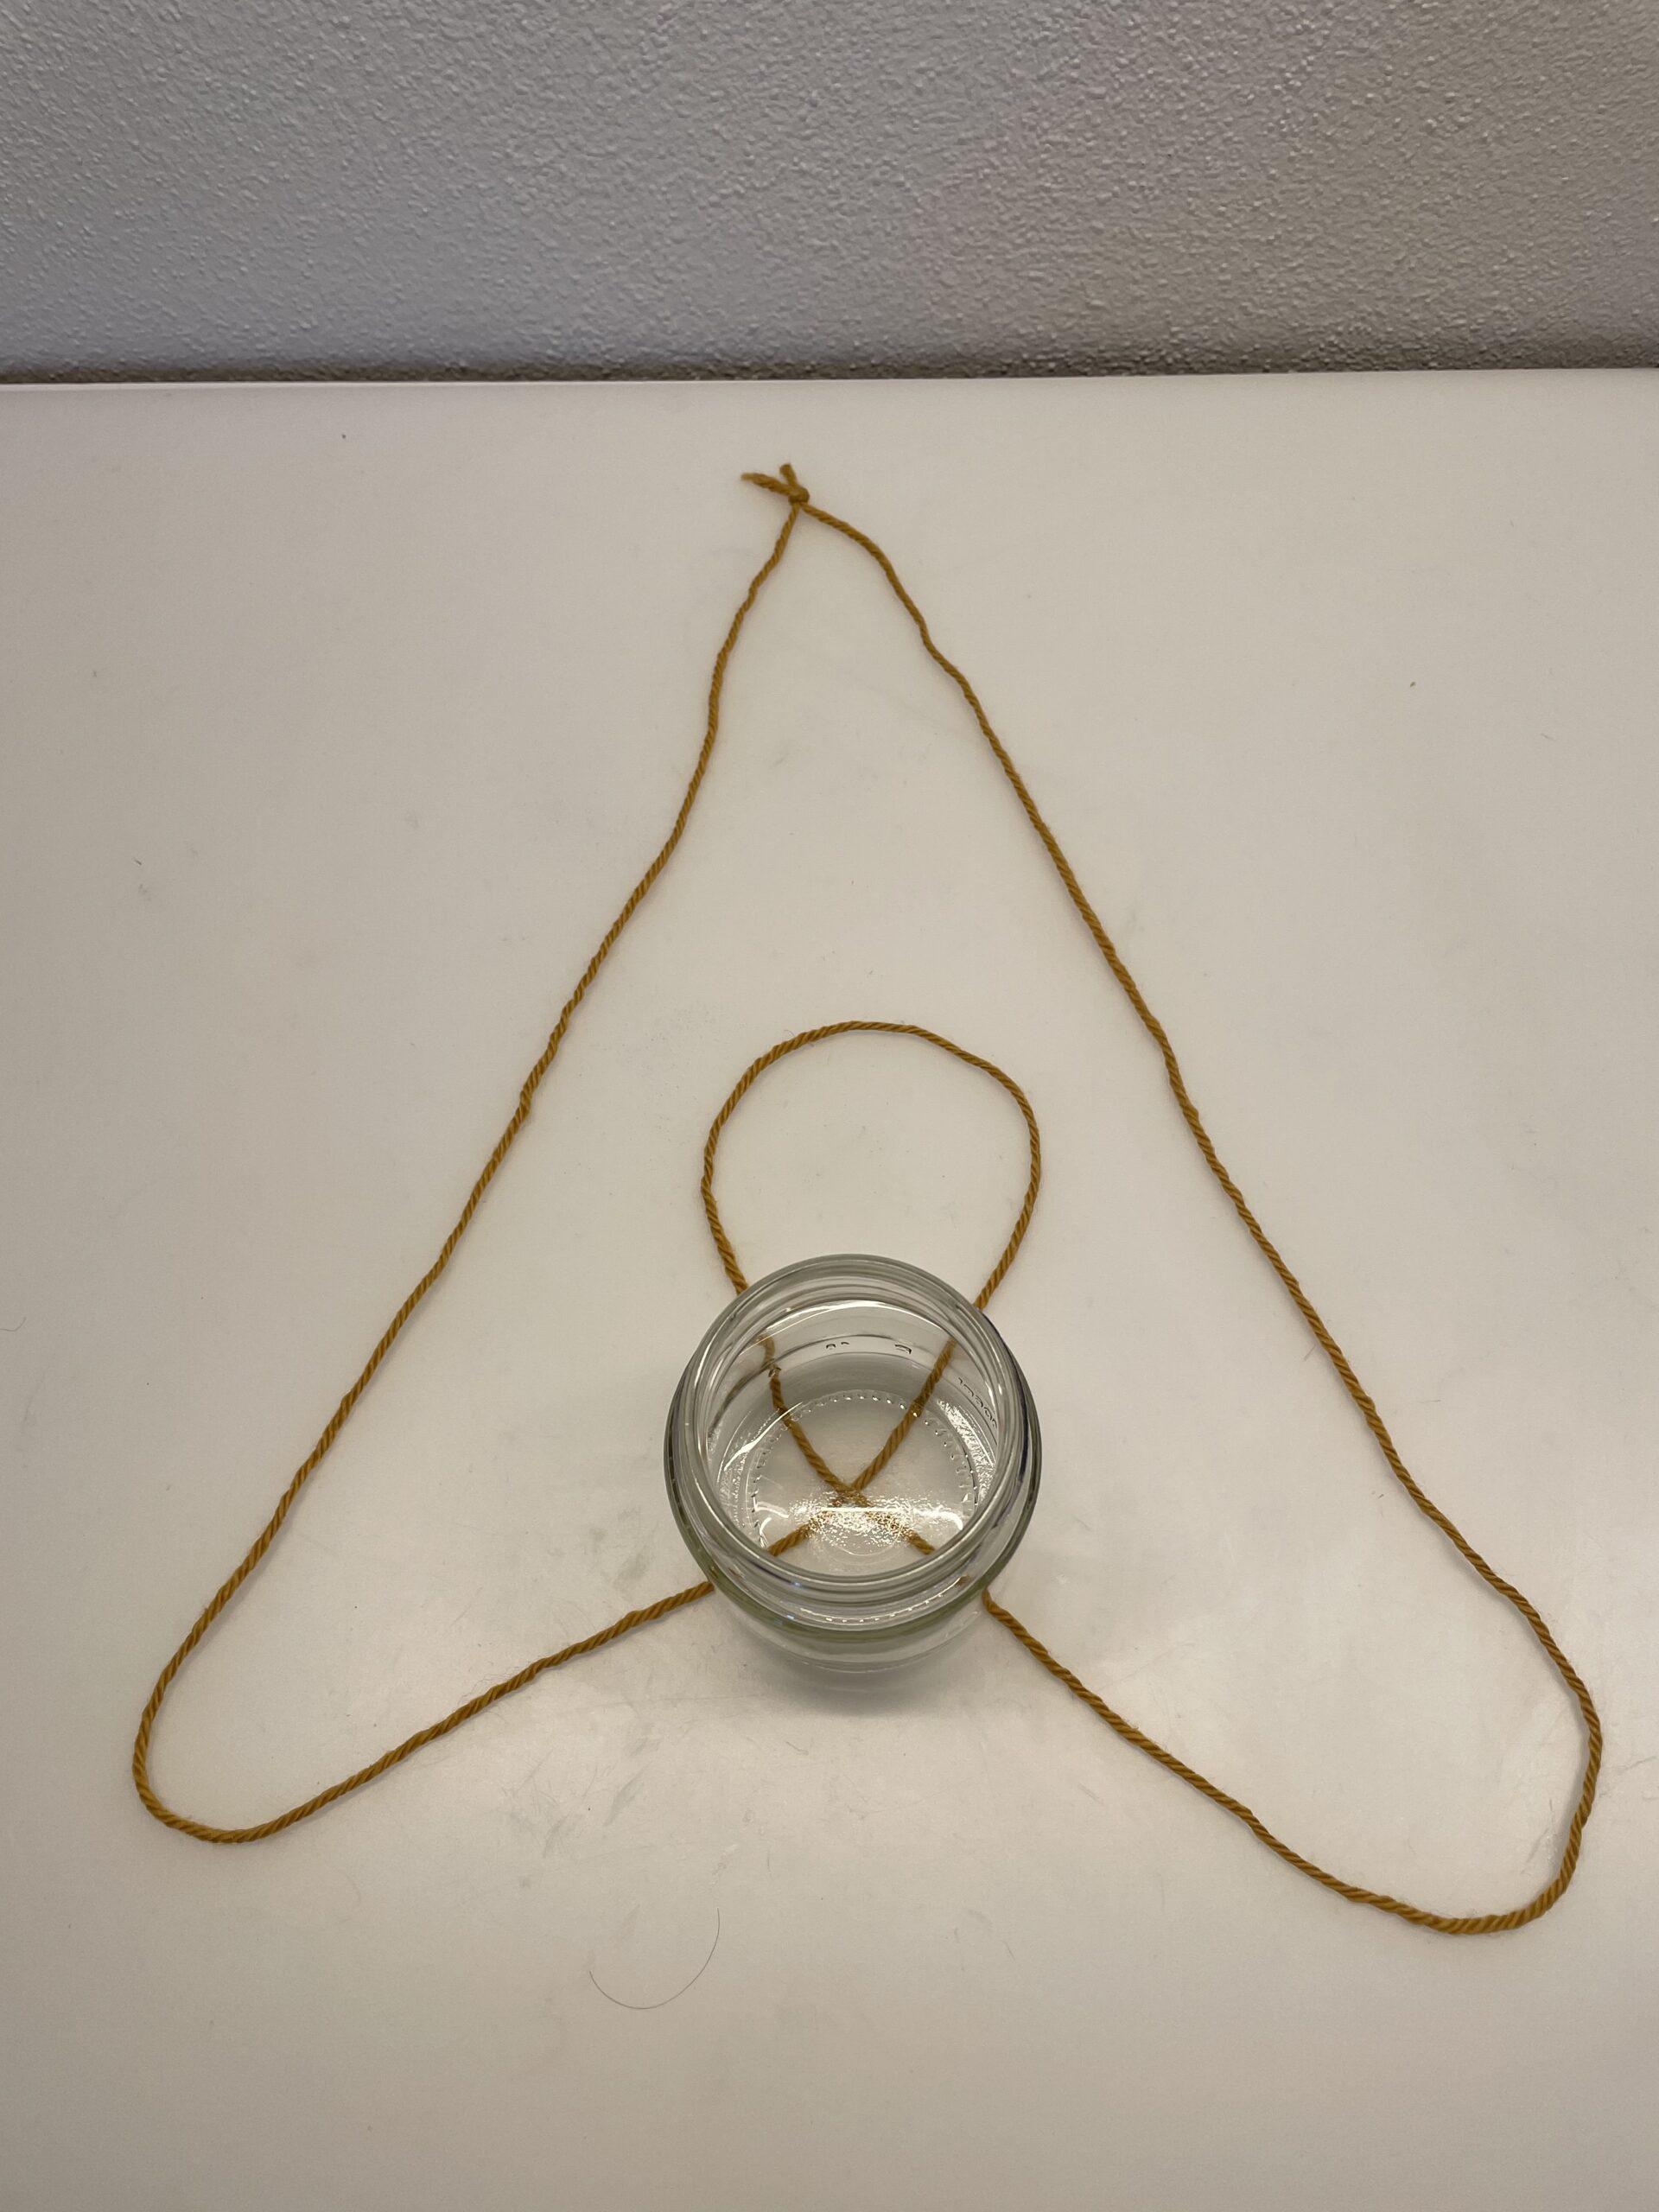
Bild zum Schritt 4 für das Bastel- und DIY-Abenteuer für Kinder: 'Dann stellt ihr auf das Fadenkreuz das Glas.'

5

Now take the upper thread in your hand.
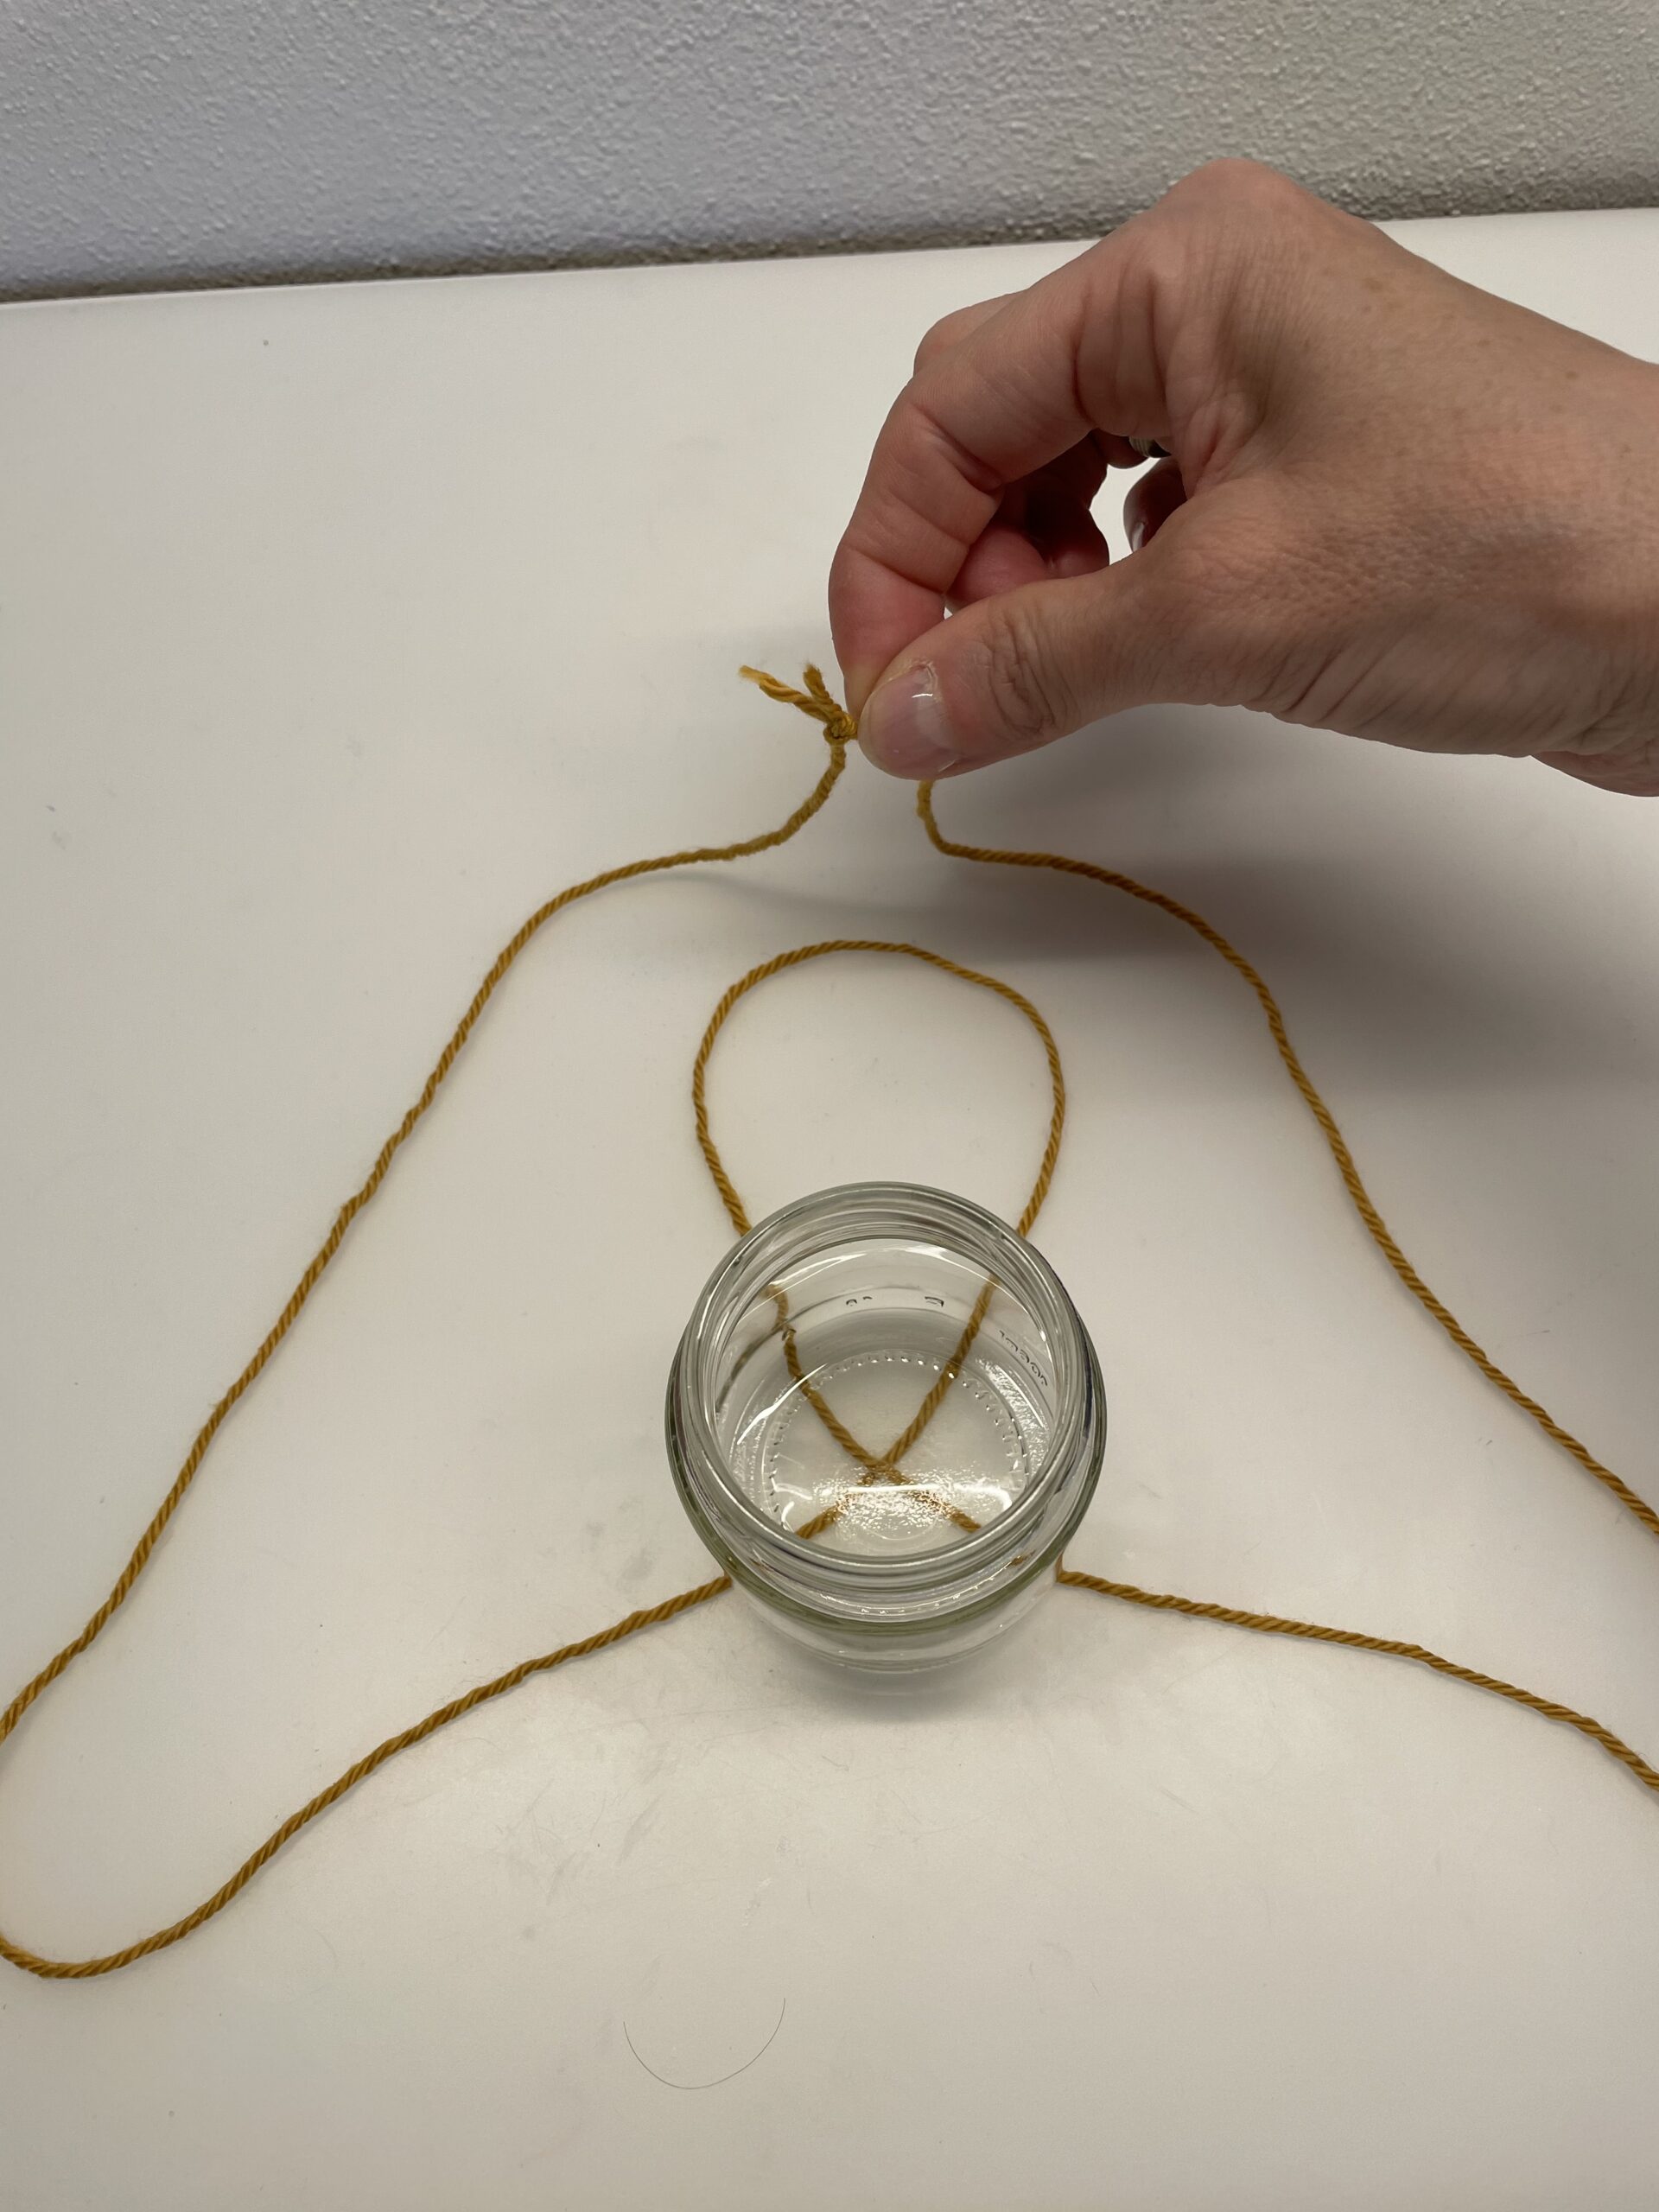
Bild zum Schritt 5 für das Bastel- und DIY-Abenteuer für Kinder: 'Nun nehmt ihr den oberen Faden  in die Hand.'

6

Put this in the loop above the glass.
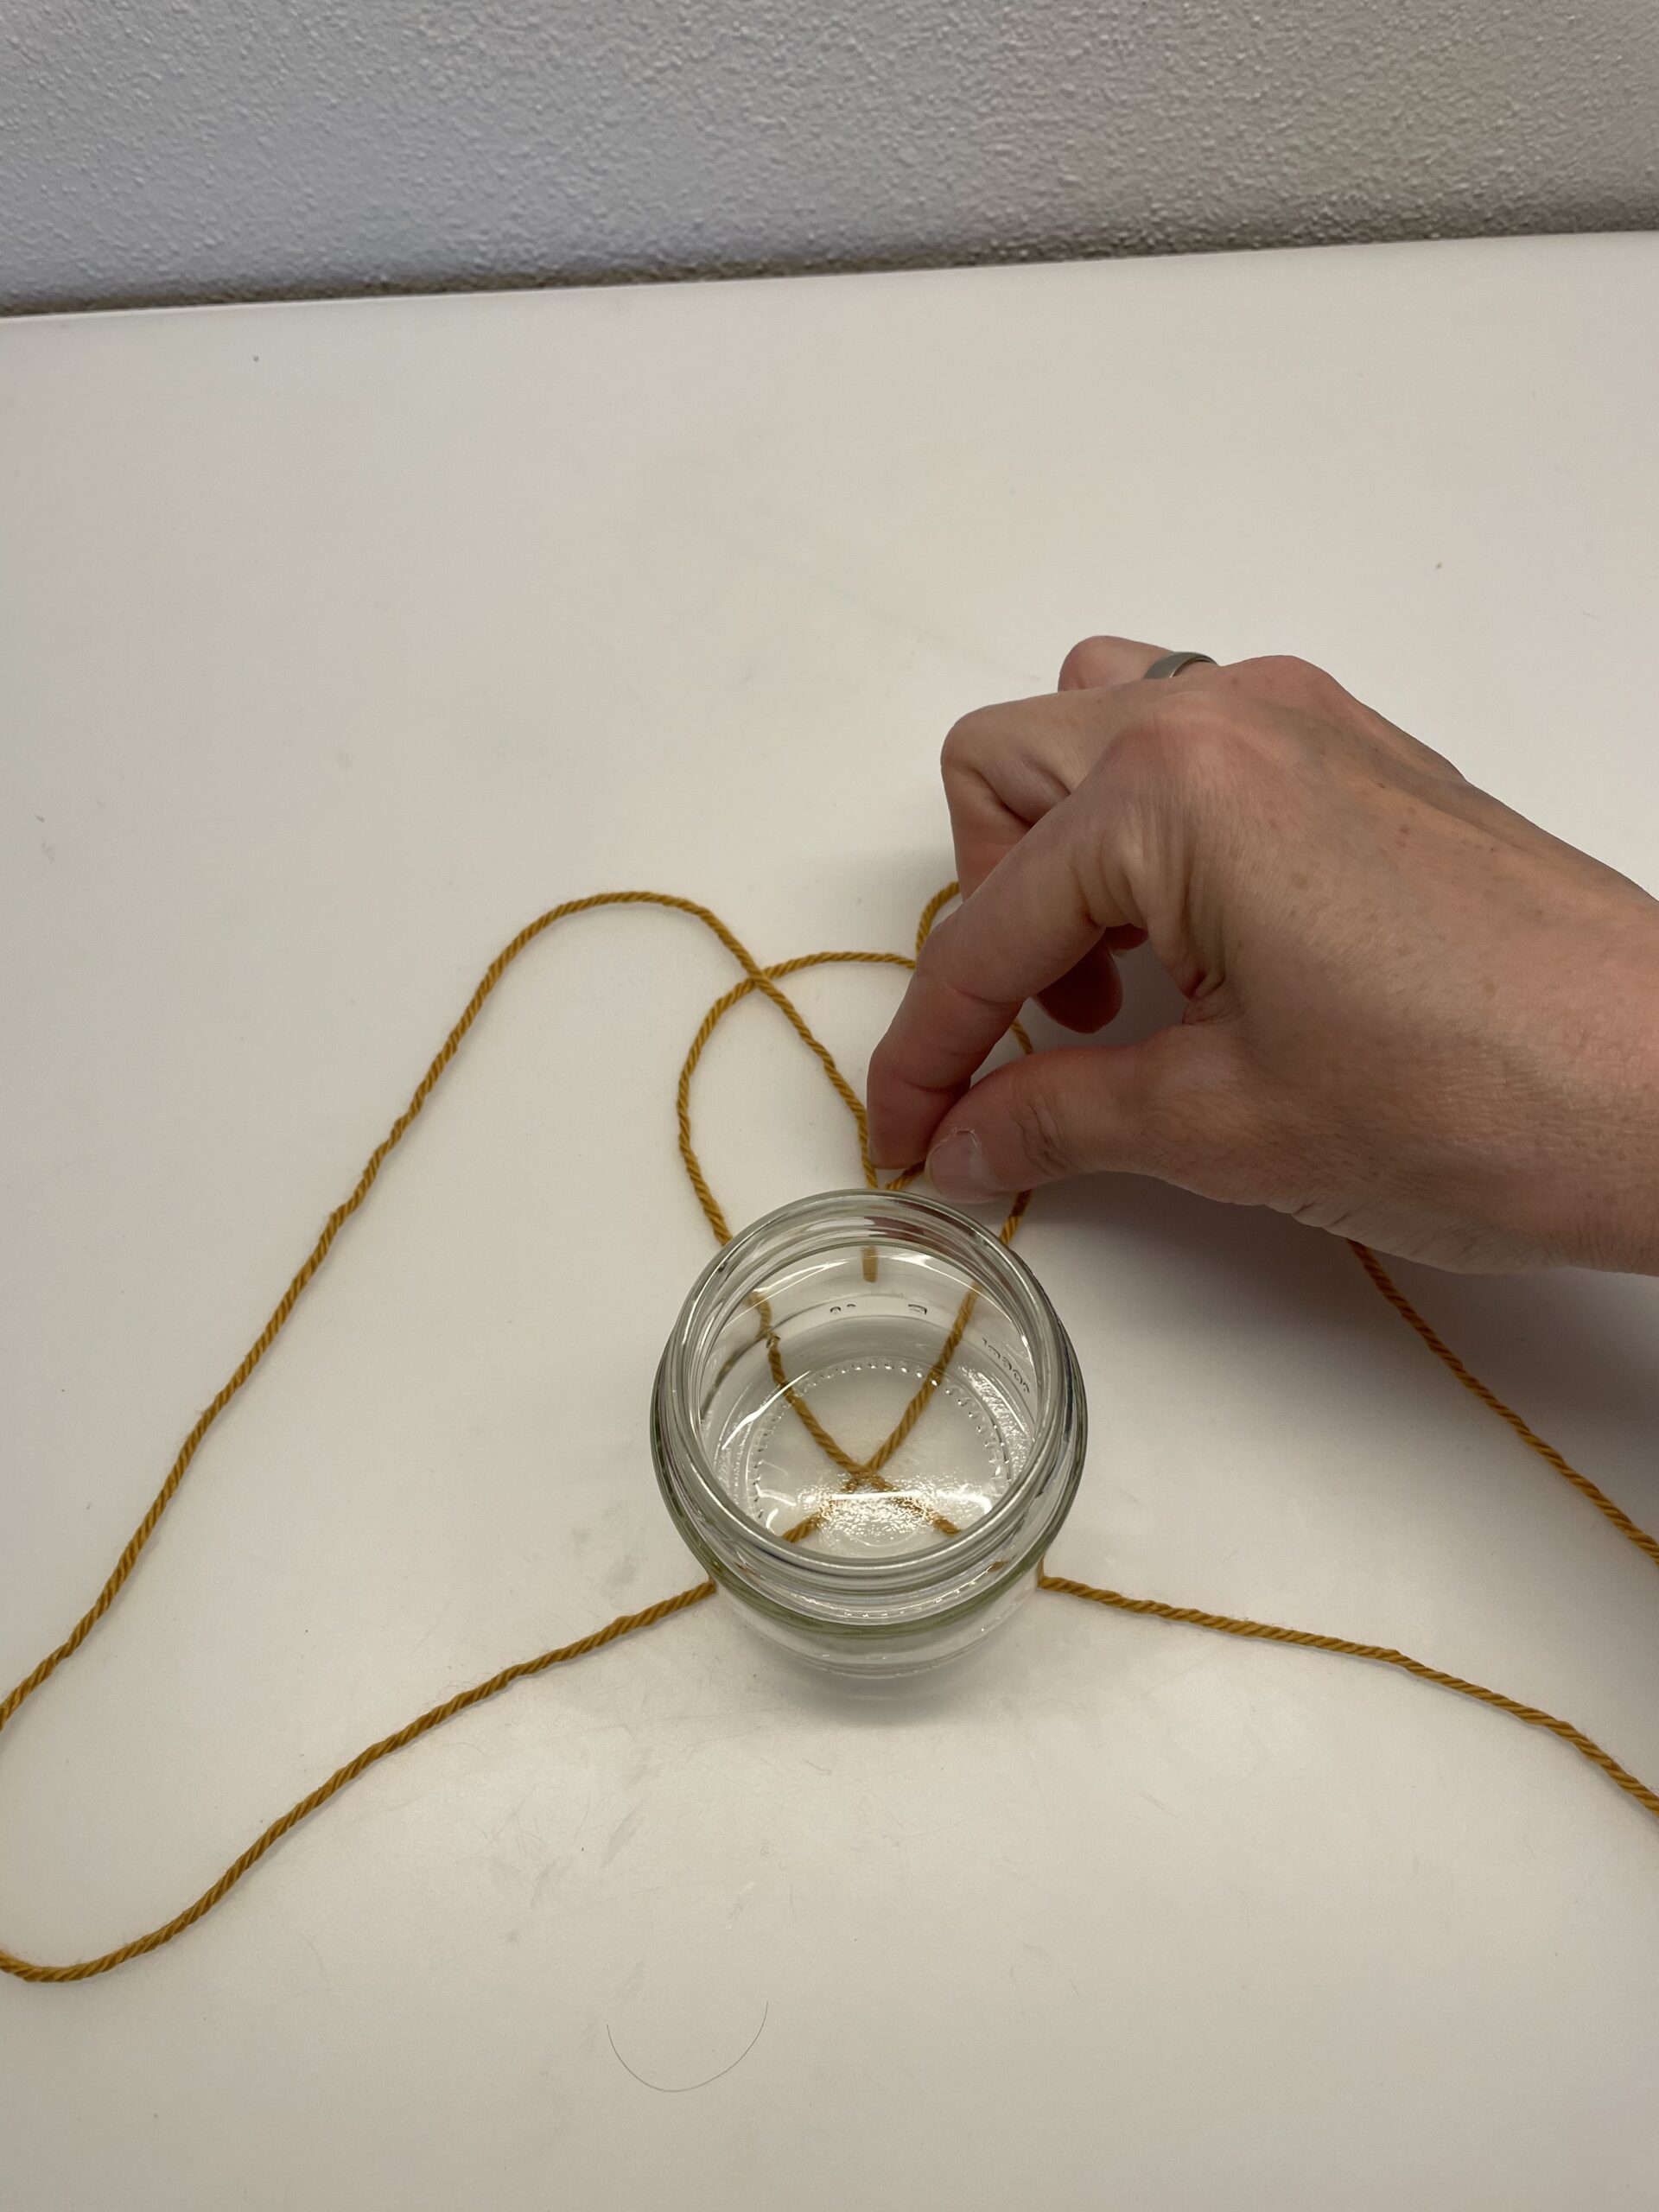
Bild zum Schritt 6 für das Bastel- und DIY-Abenteuer für Kinder: 'Legt diesen jetzt in die Schlaufe oberhalb des Glases.'

7

Then you put it through the loop.
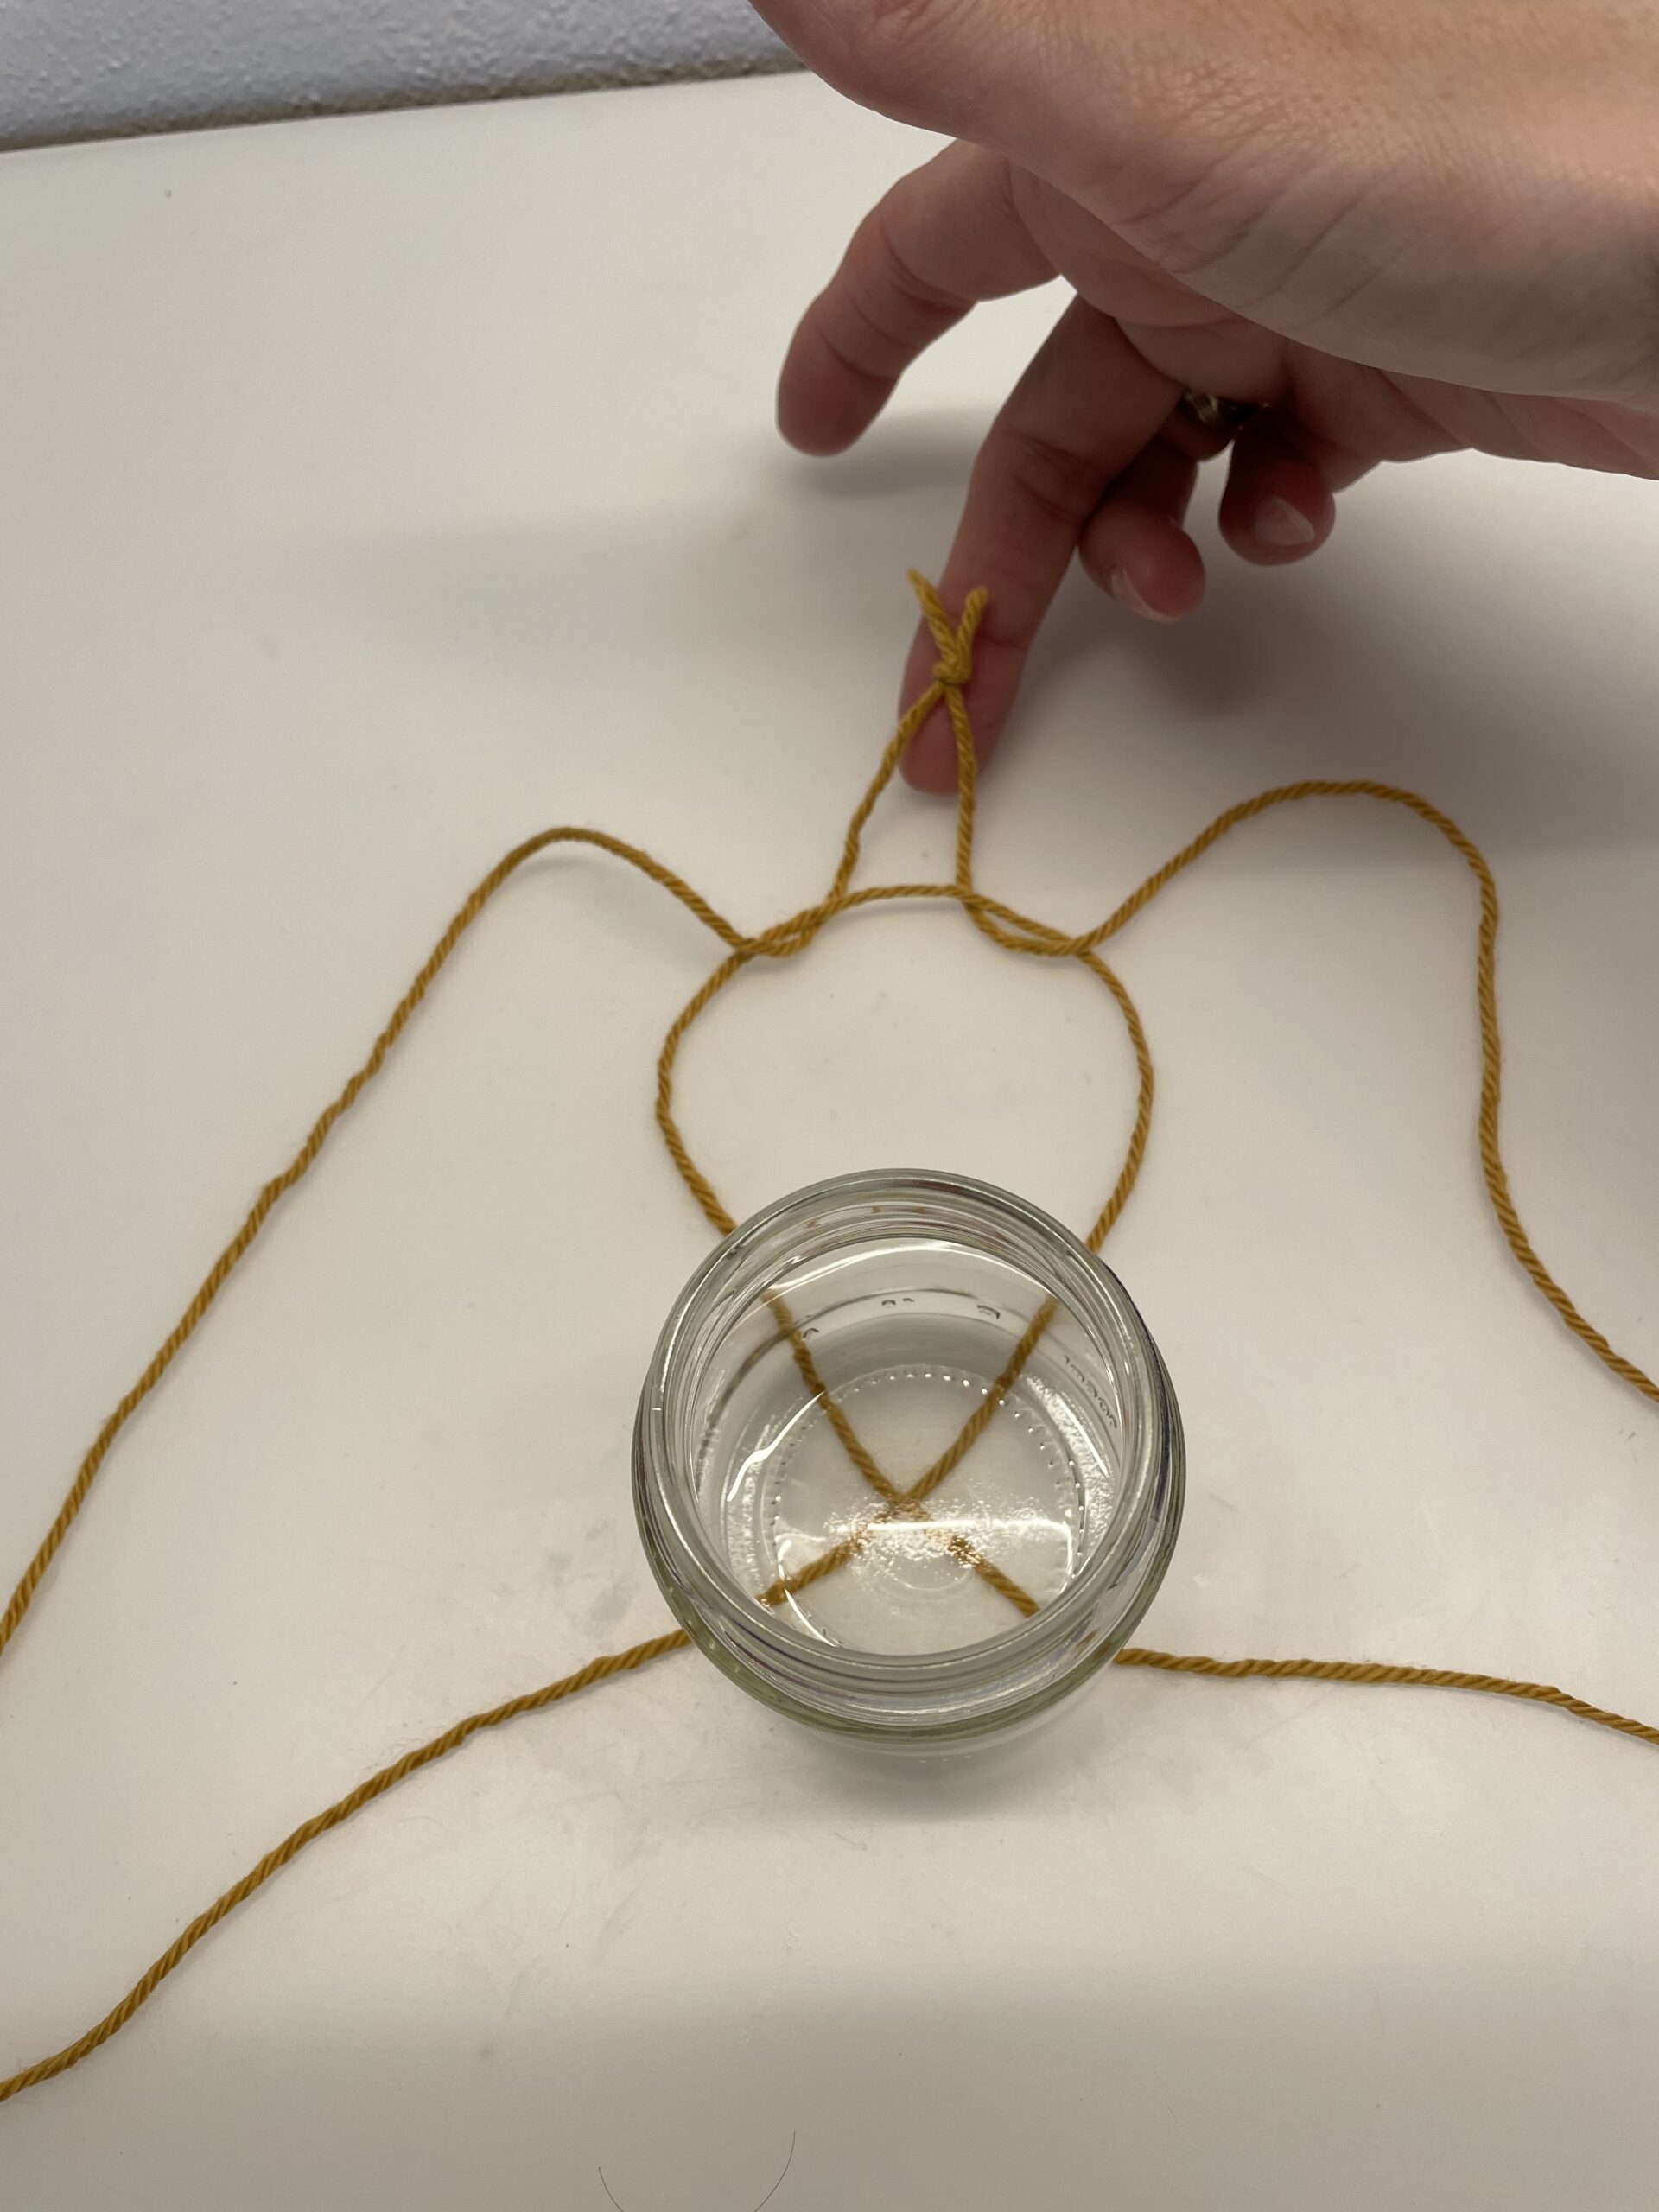
Bild zum Schritt 7 für das Bastel- und DIY-Abenteuer für Kinder: 'Dann steckt ihr ihn durch die Schlaufe hindurch.'

8

Pull him up carefully.

Bild zum Schritt 8 für das Bastel- und DIY-Abenteuer für Kinder: 'Zieht ihn vorsichtig nach oben heraus.'

9

Keep the thread in your hand. Now you spread the cord a bit apart and lead it forward over the glass.
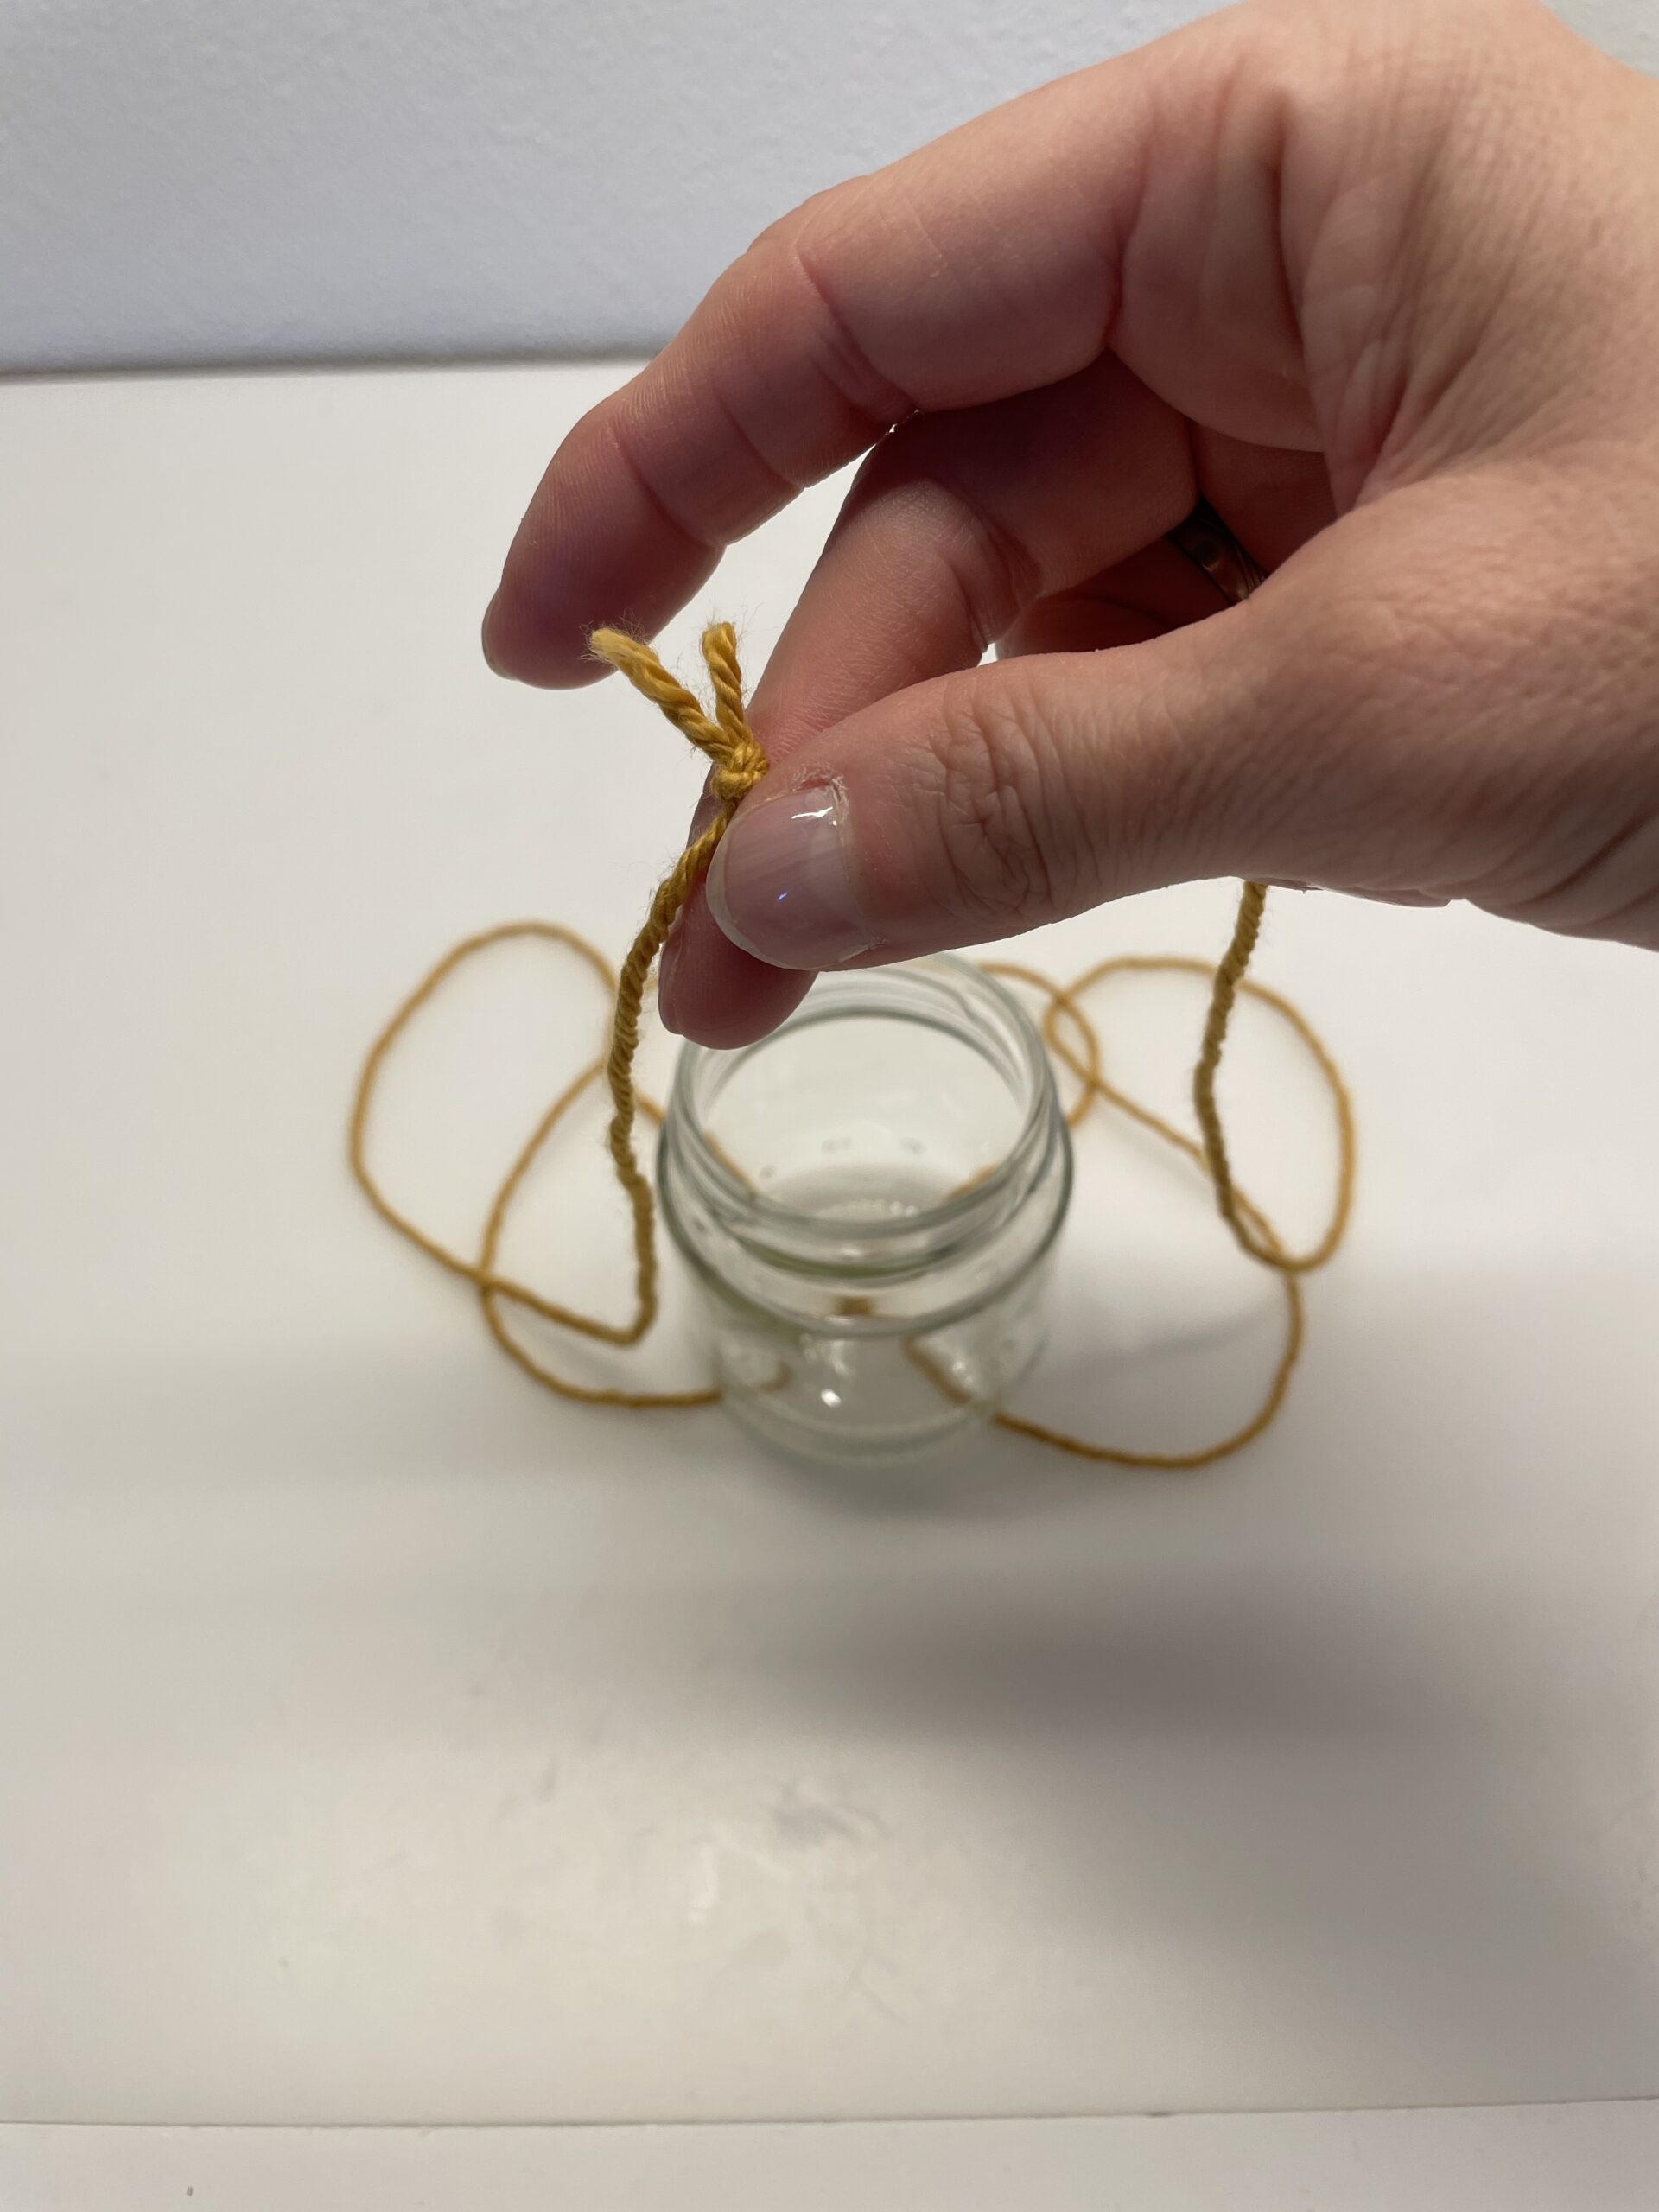
Bild zum Schritt 9 für das Bastel- und DIY-Abenteuer für Kinder: 'Behaltet den Faden in der Hand. Jetzt breitet ihr ...'

10

Then drop the cord in front of the glass.
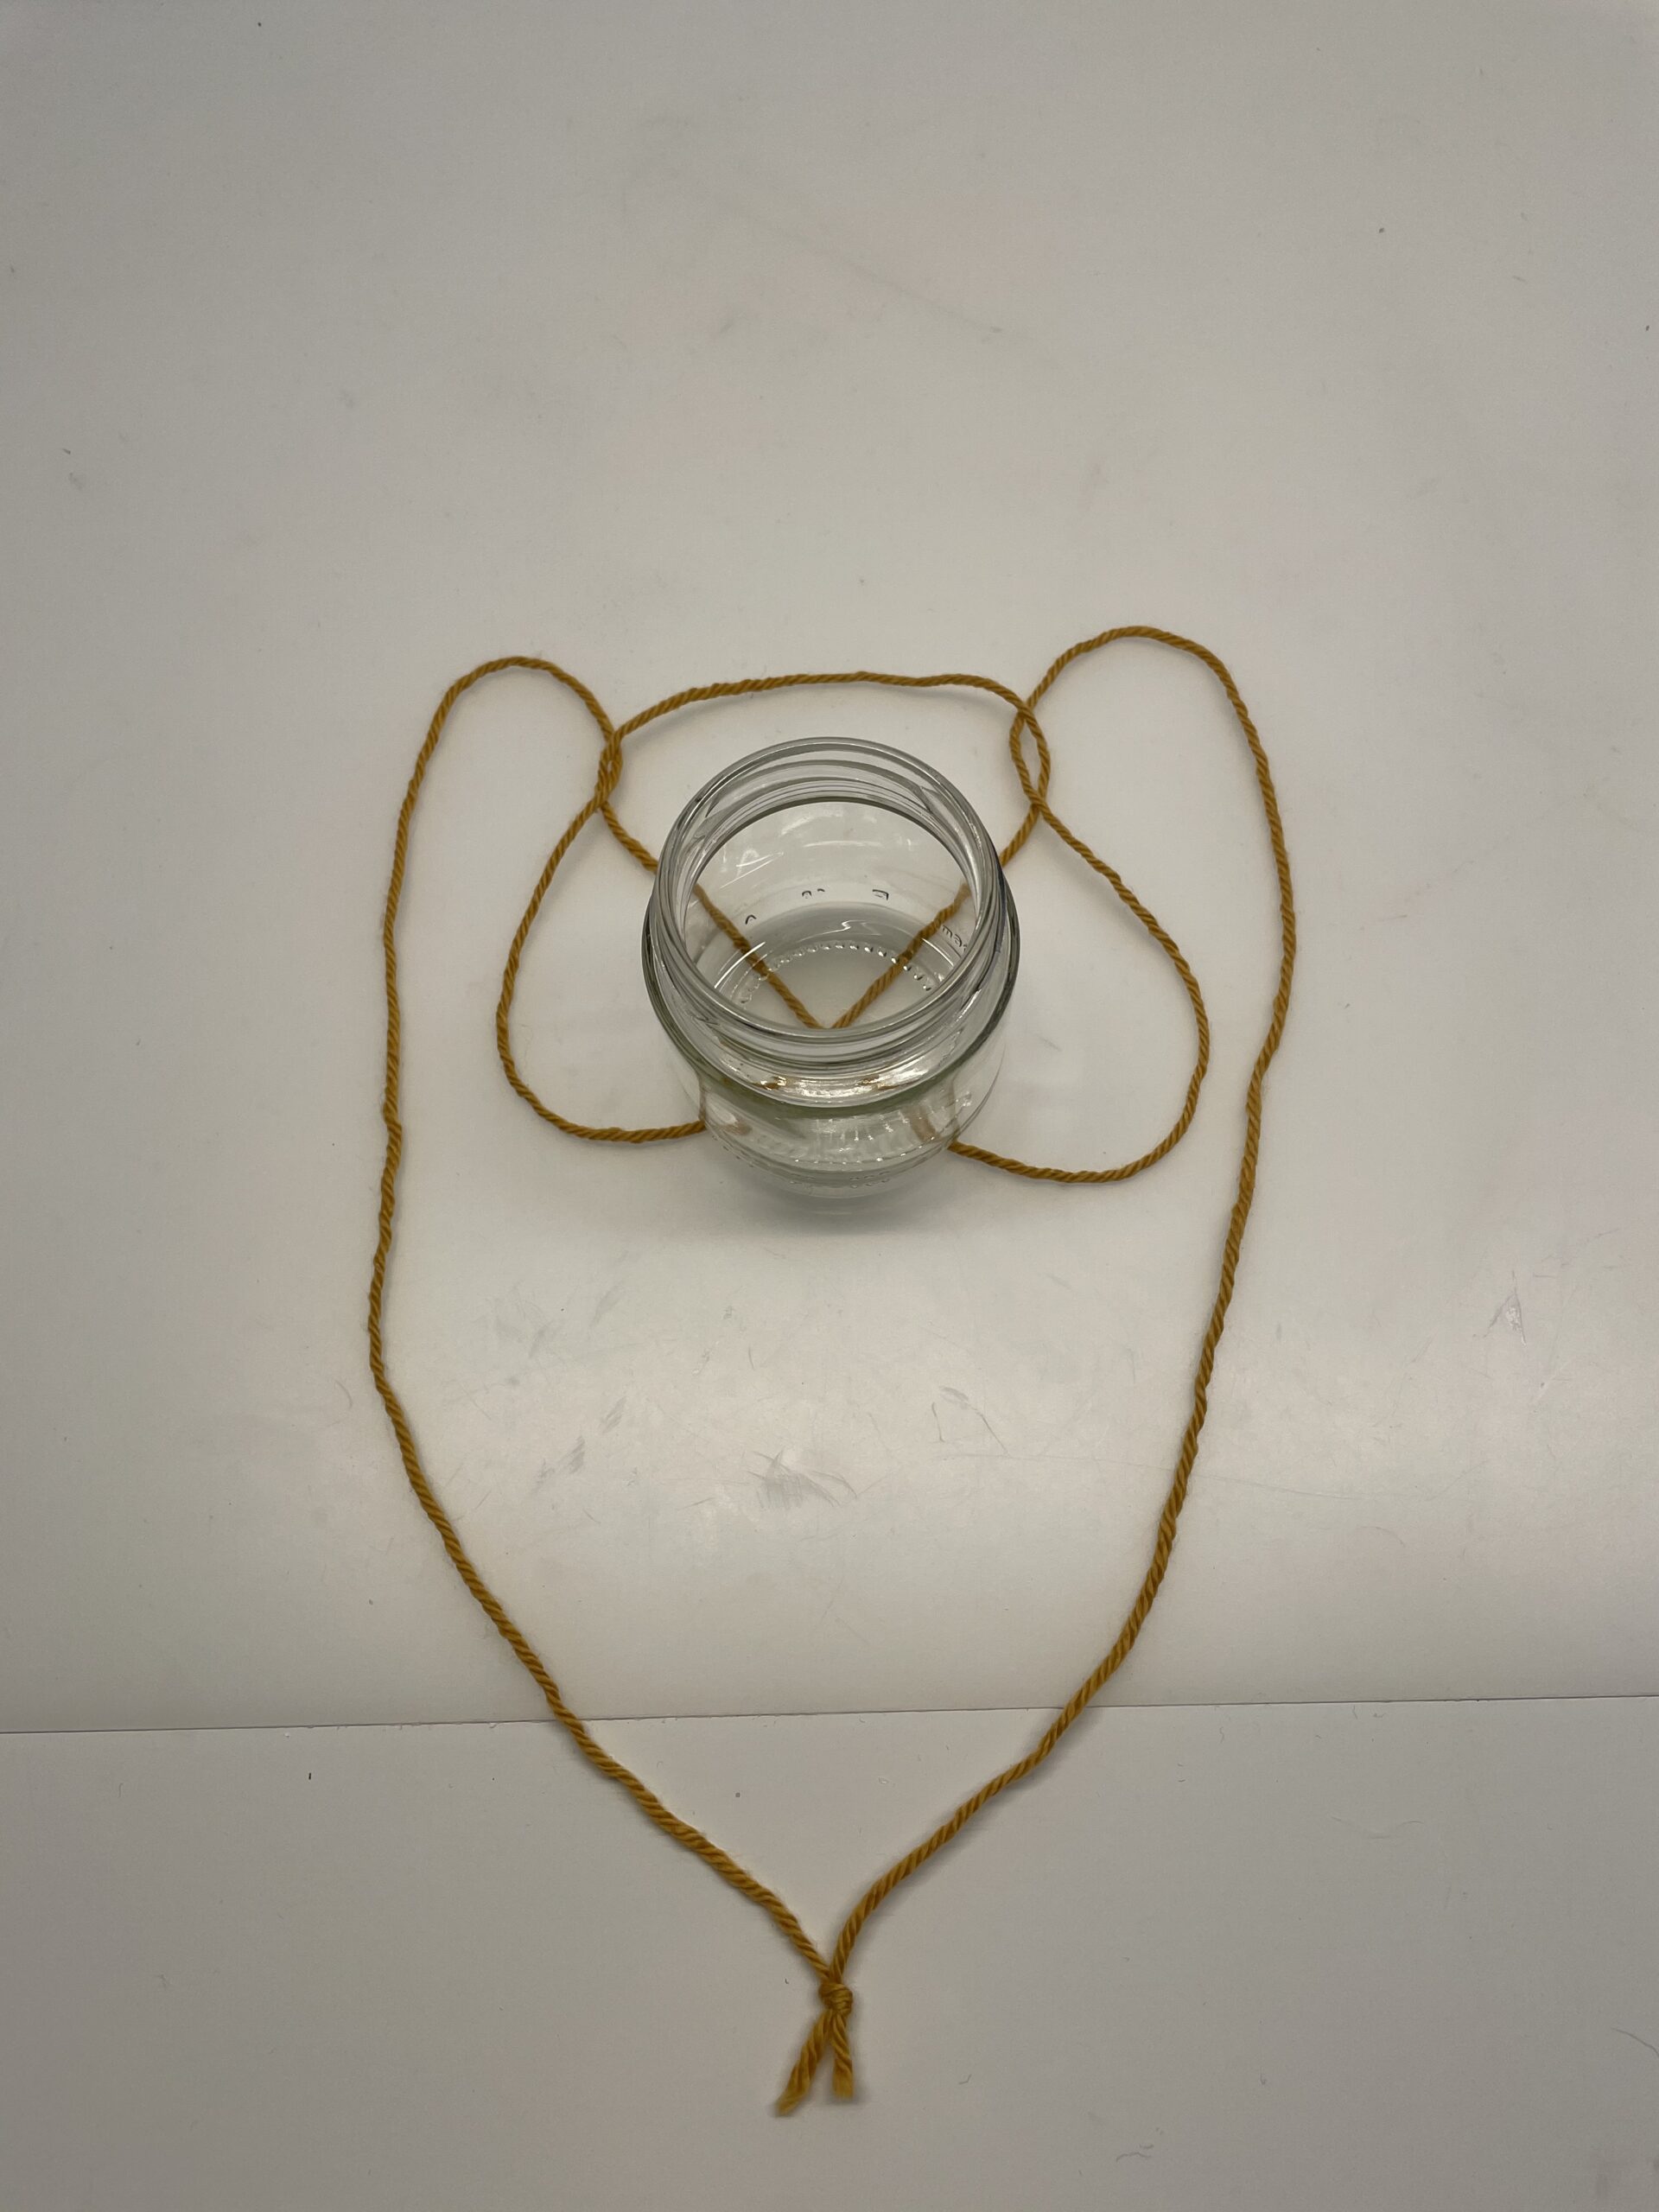
Bild zum Schritt 10 für das Bastel- und DIY-Abenteuer für Kinder: 'Legt die Schnur dann  vor dem Glas ab.'

11

The loops on the left and right now pull something apart in parallel. Pull until they lie over the other cord.
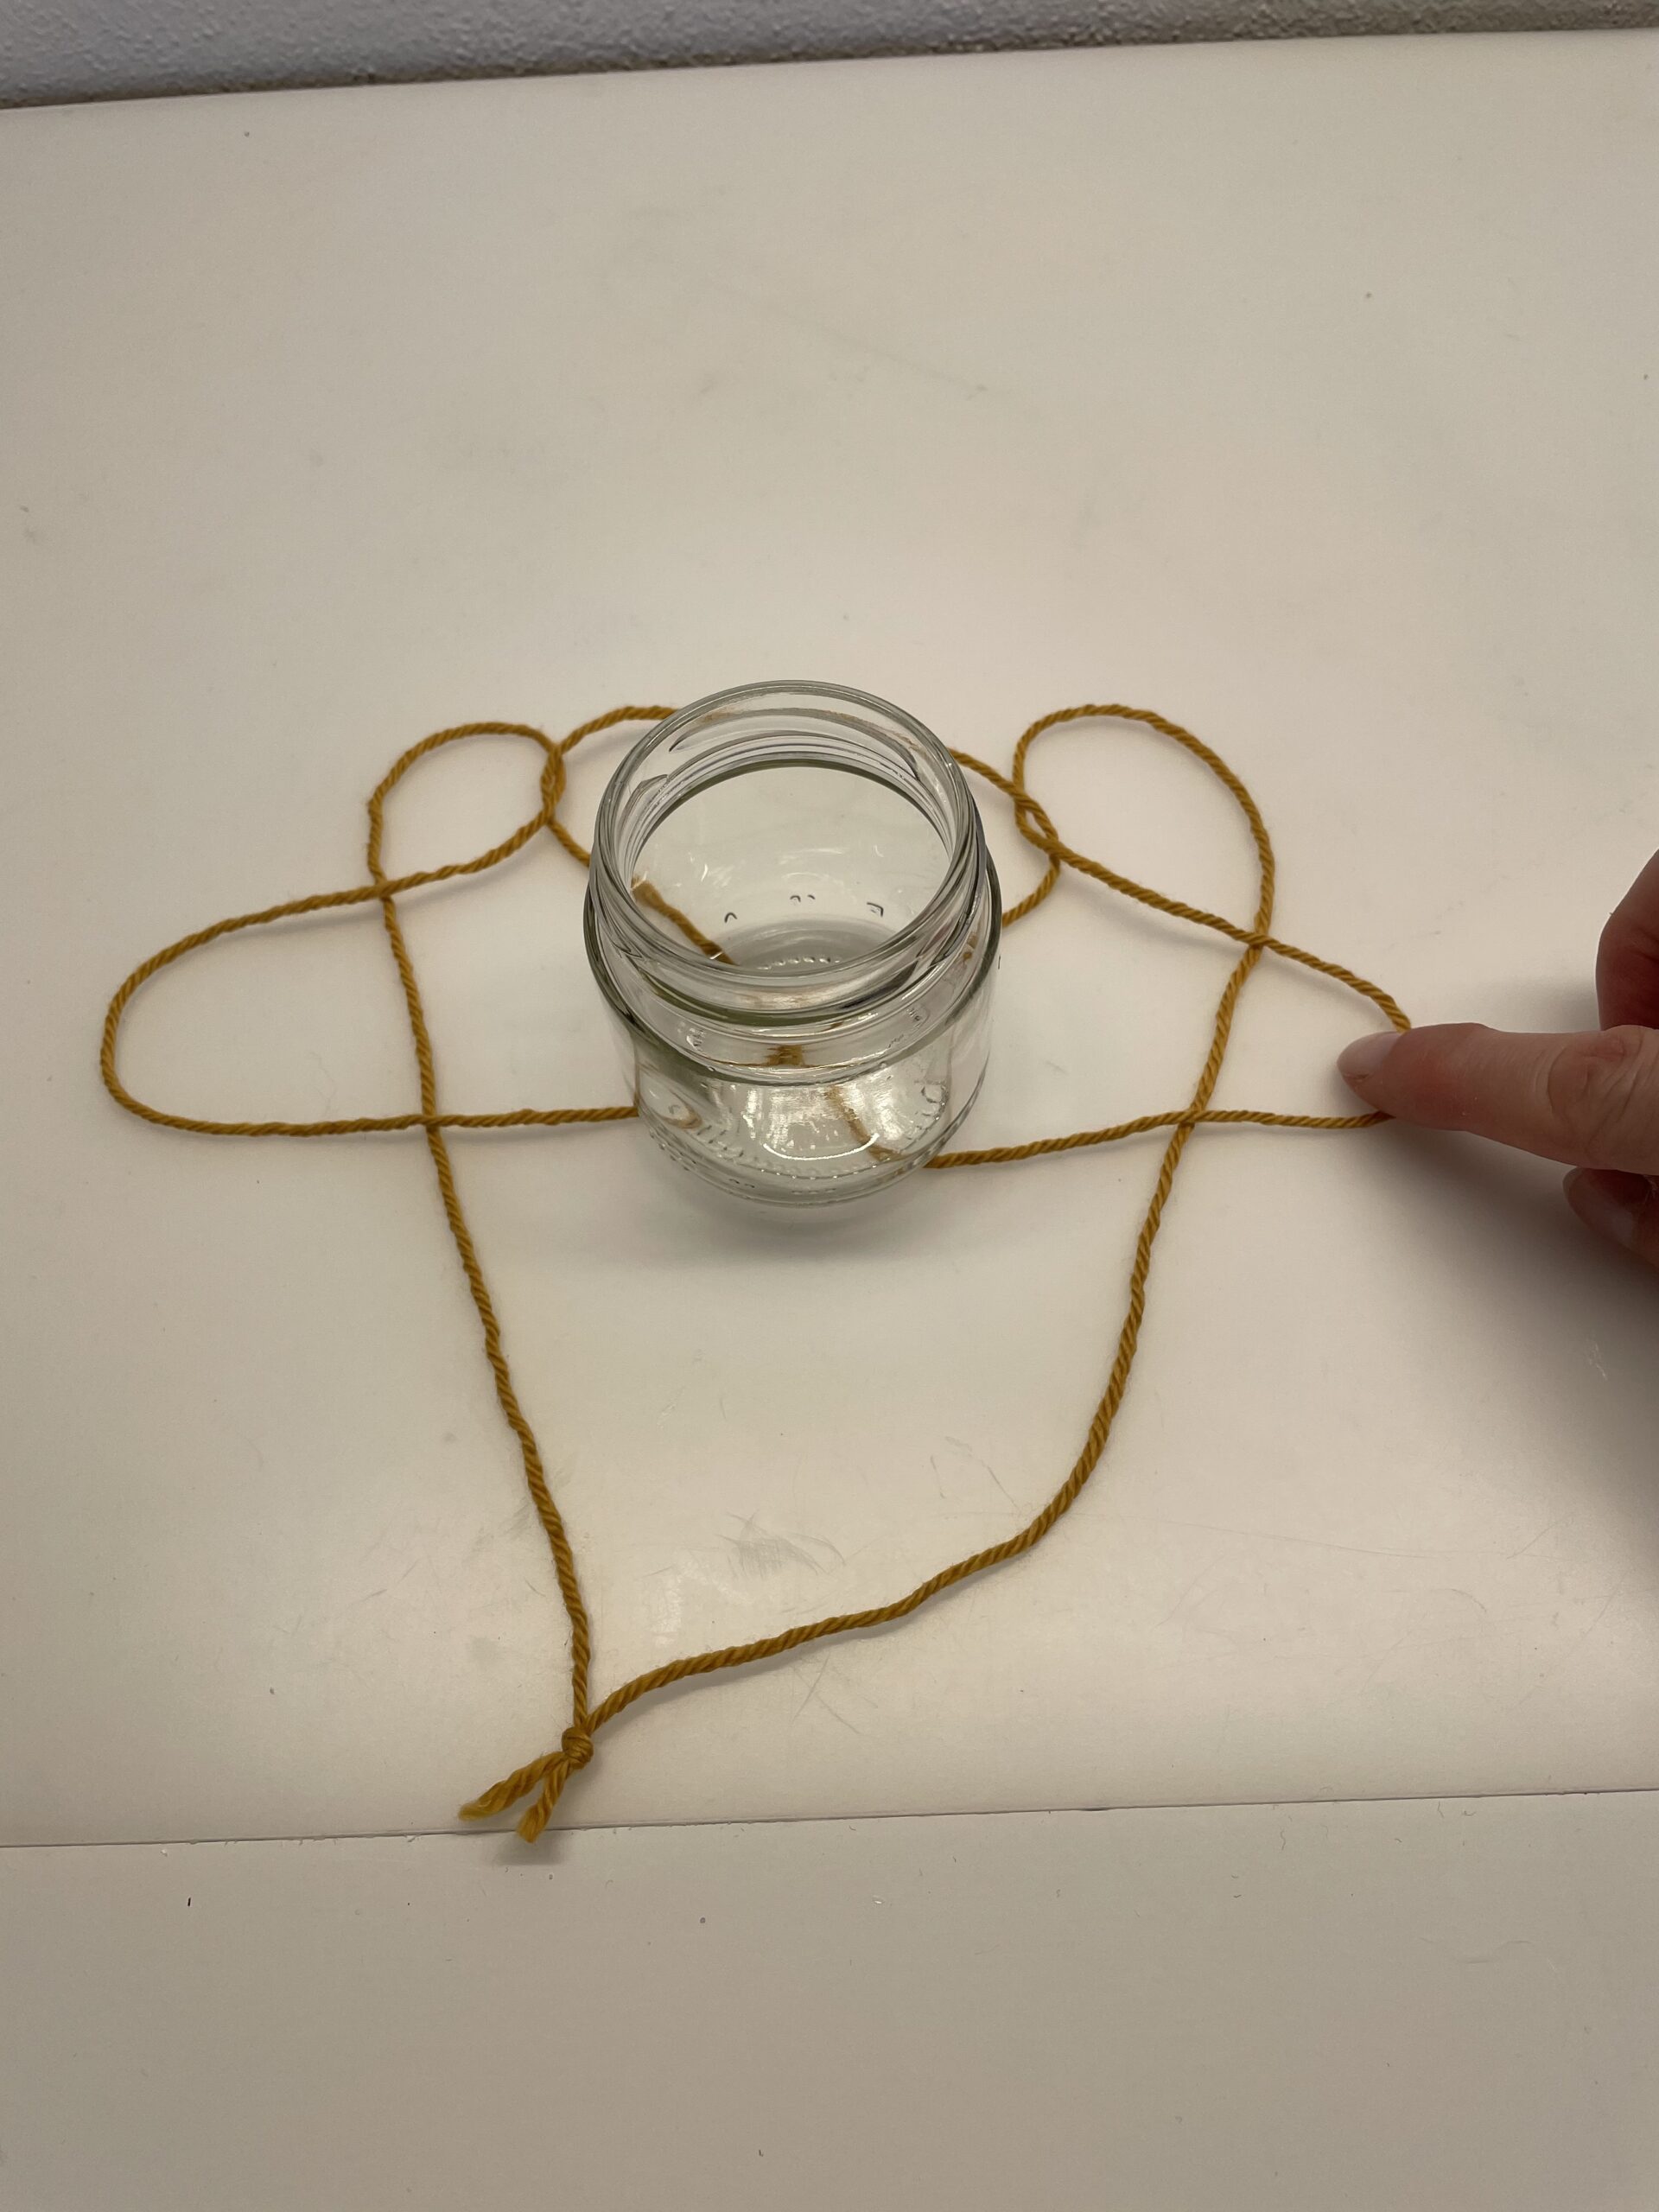
Bild zum Schritt 11 für das Bastel- und DIY-Abenteuer für Kinder: 'Die links und rechts liegenden Schlaufen zieht ihr nun parallel...'

12

Now pull out the thread lying in the loop at the side. Pull out the cord parallel on both sides at the same time.
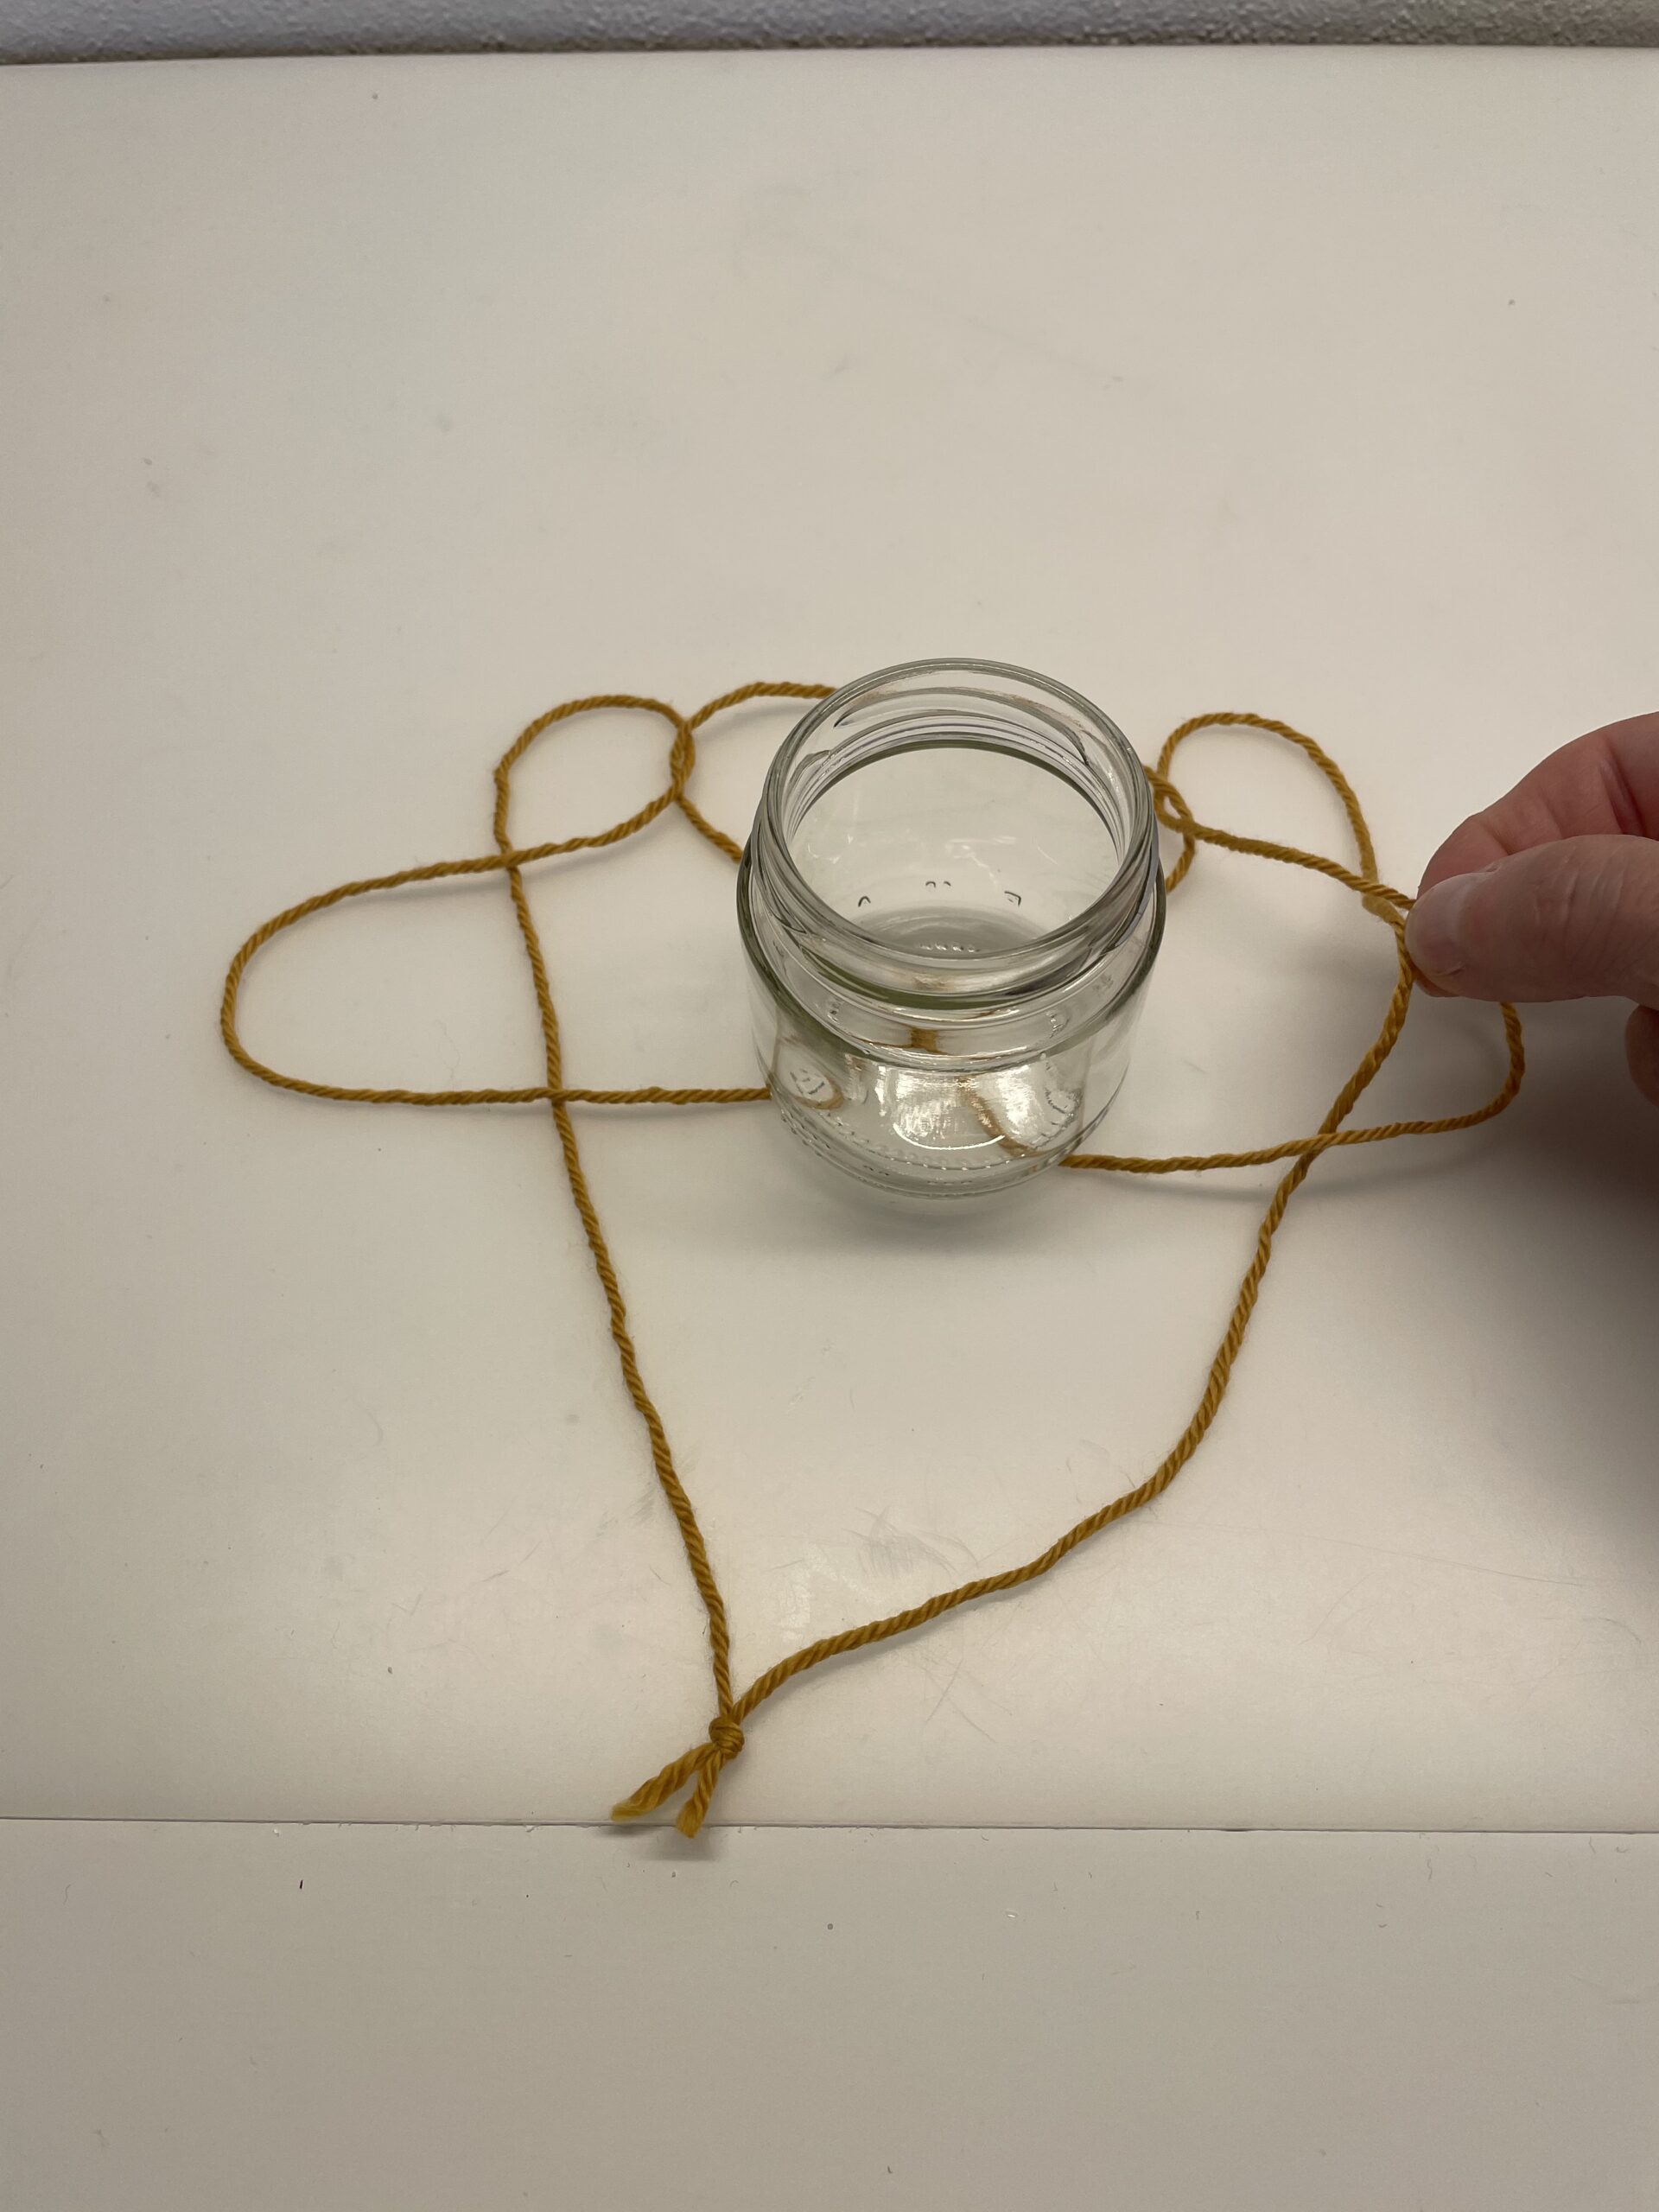
Bild zum Schritt 12 für das Bastel- und DIY-Abenteuer für Kinder: 'Jetzt zieht ihr den, in der Schlaufe unten liegenden Faden...'

13

2. Bild zum Schritt 12 für das Bastel- und DIY-Abenteuer für Kinder: 'Jetzt zieht ihr den, in der Schlaufe unten liegenden Faden...'

14

Raise the lateral loops slightly and gently pull the thread mesh apart on both sides.
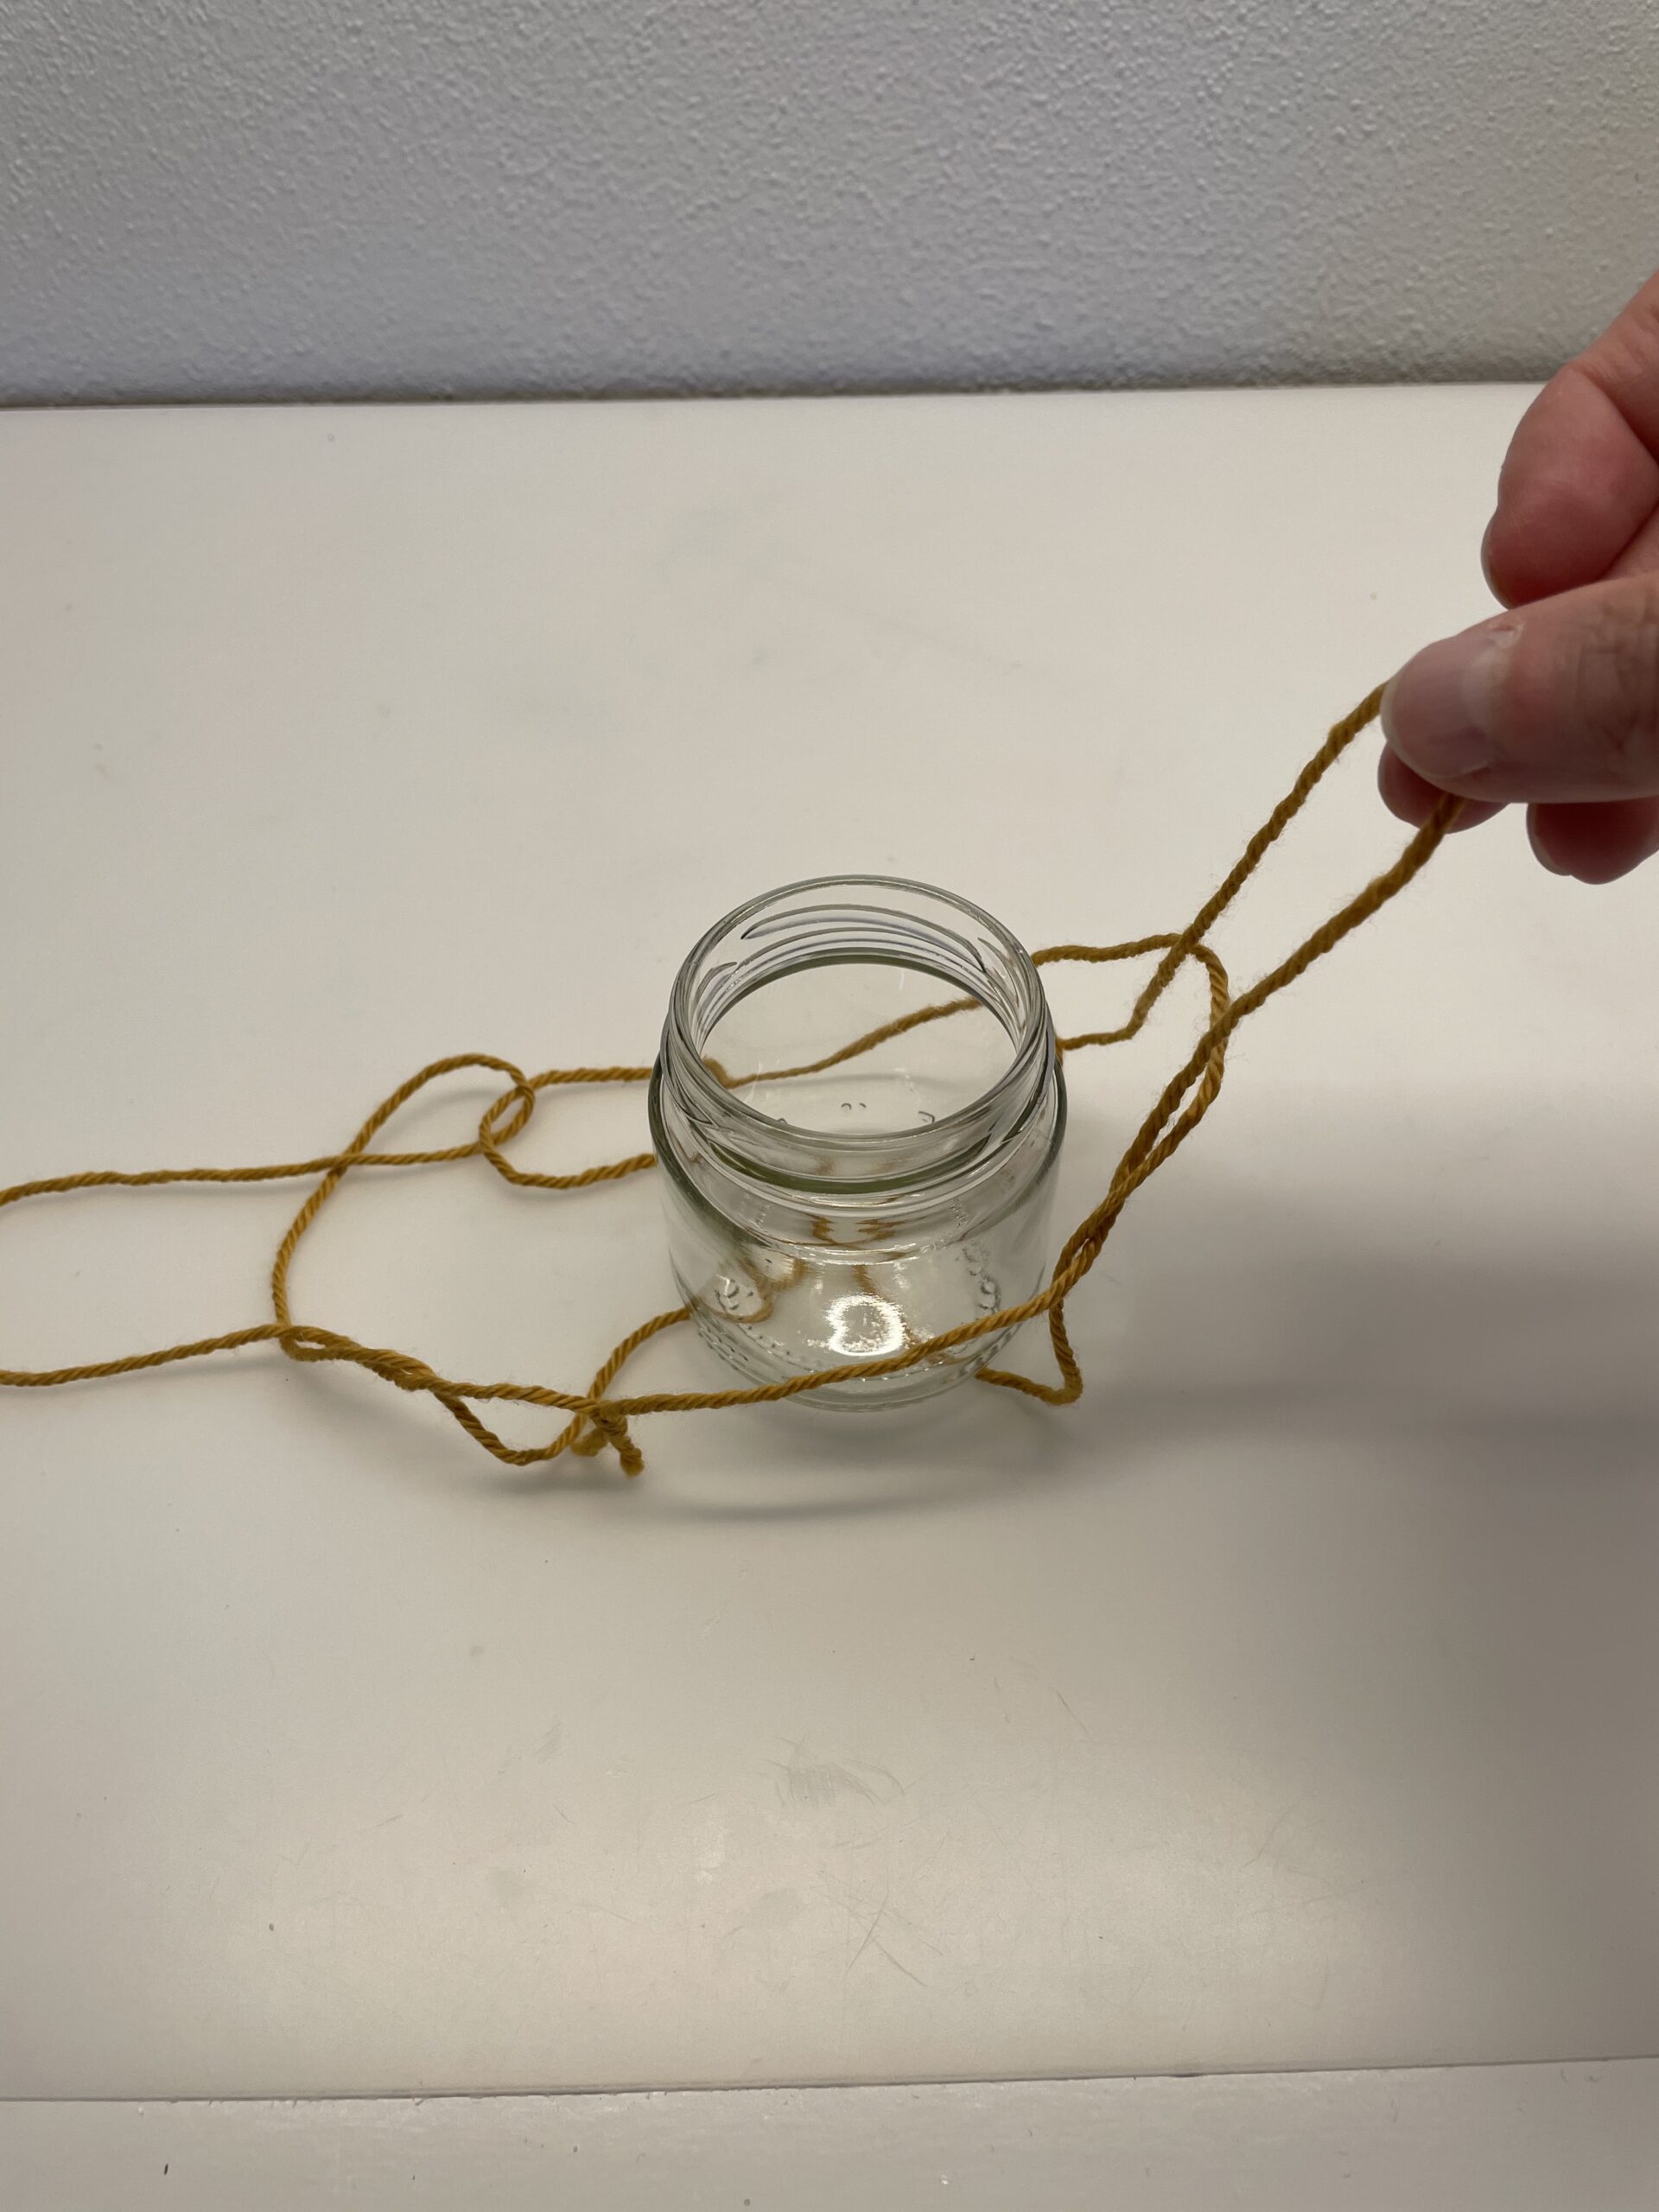
Bild zum Schritt 14 für das Bastel- und DIY-Abenteuer für Kinder: 'Hebt die seitlichen Schlaufen etwas an und zieht beidseitig das...'

15

Now you take both loops up. Align the glass in the middle of the thread mesh and make sure that the crosshair is located in the middle of the glass floor.
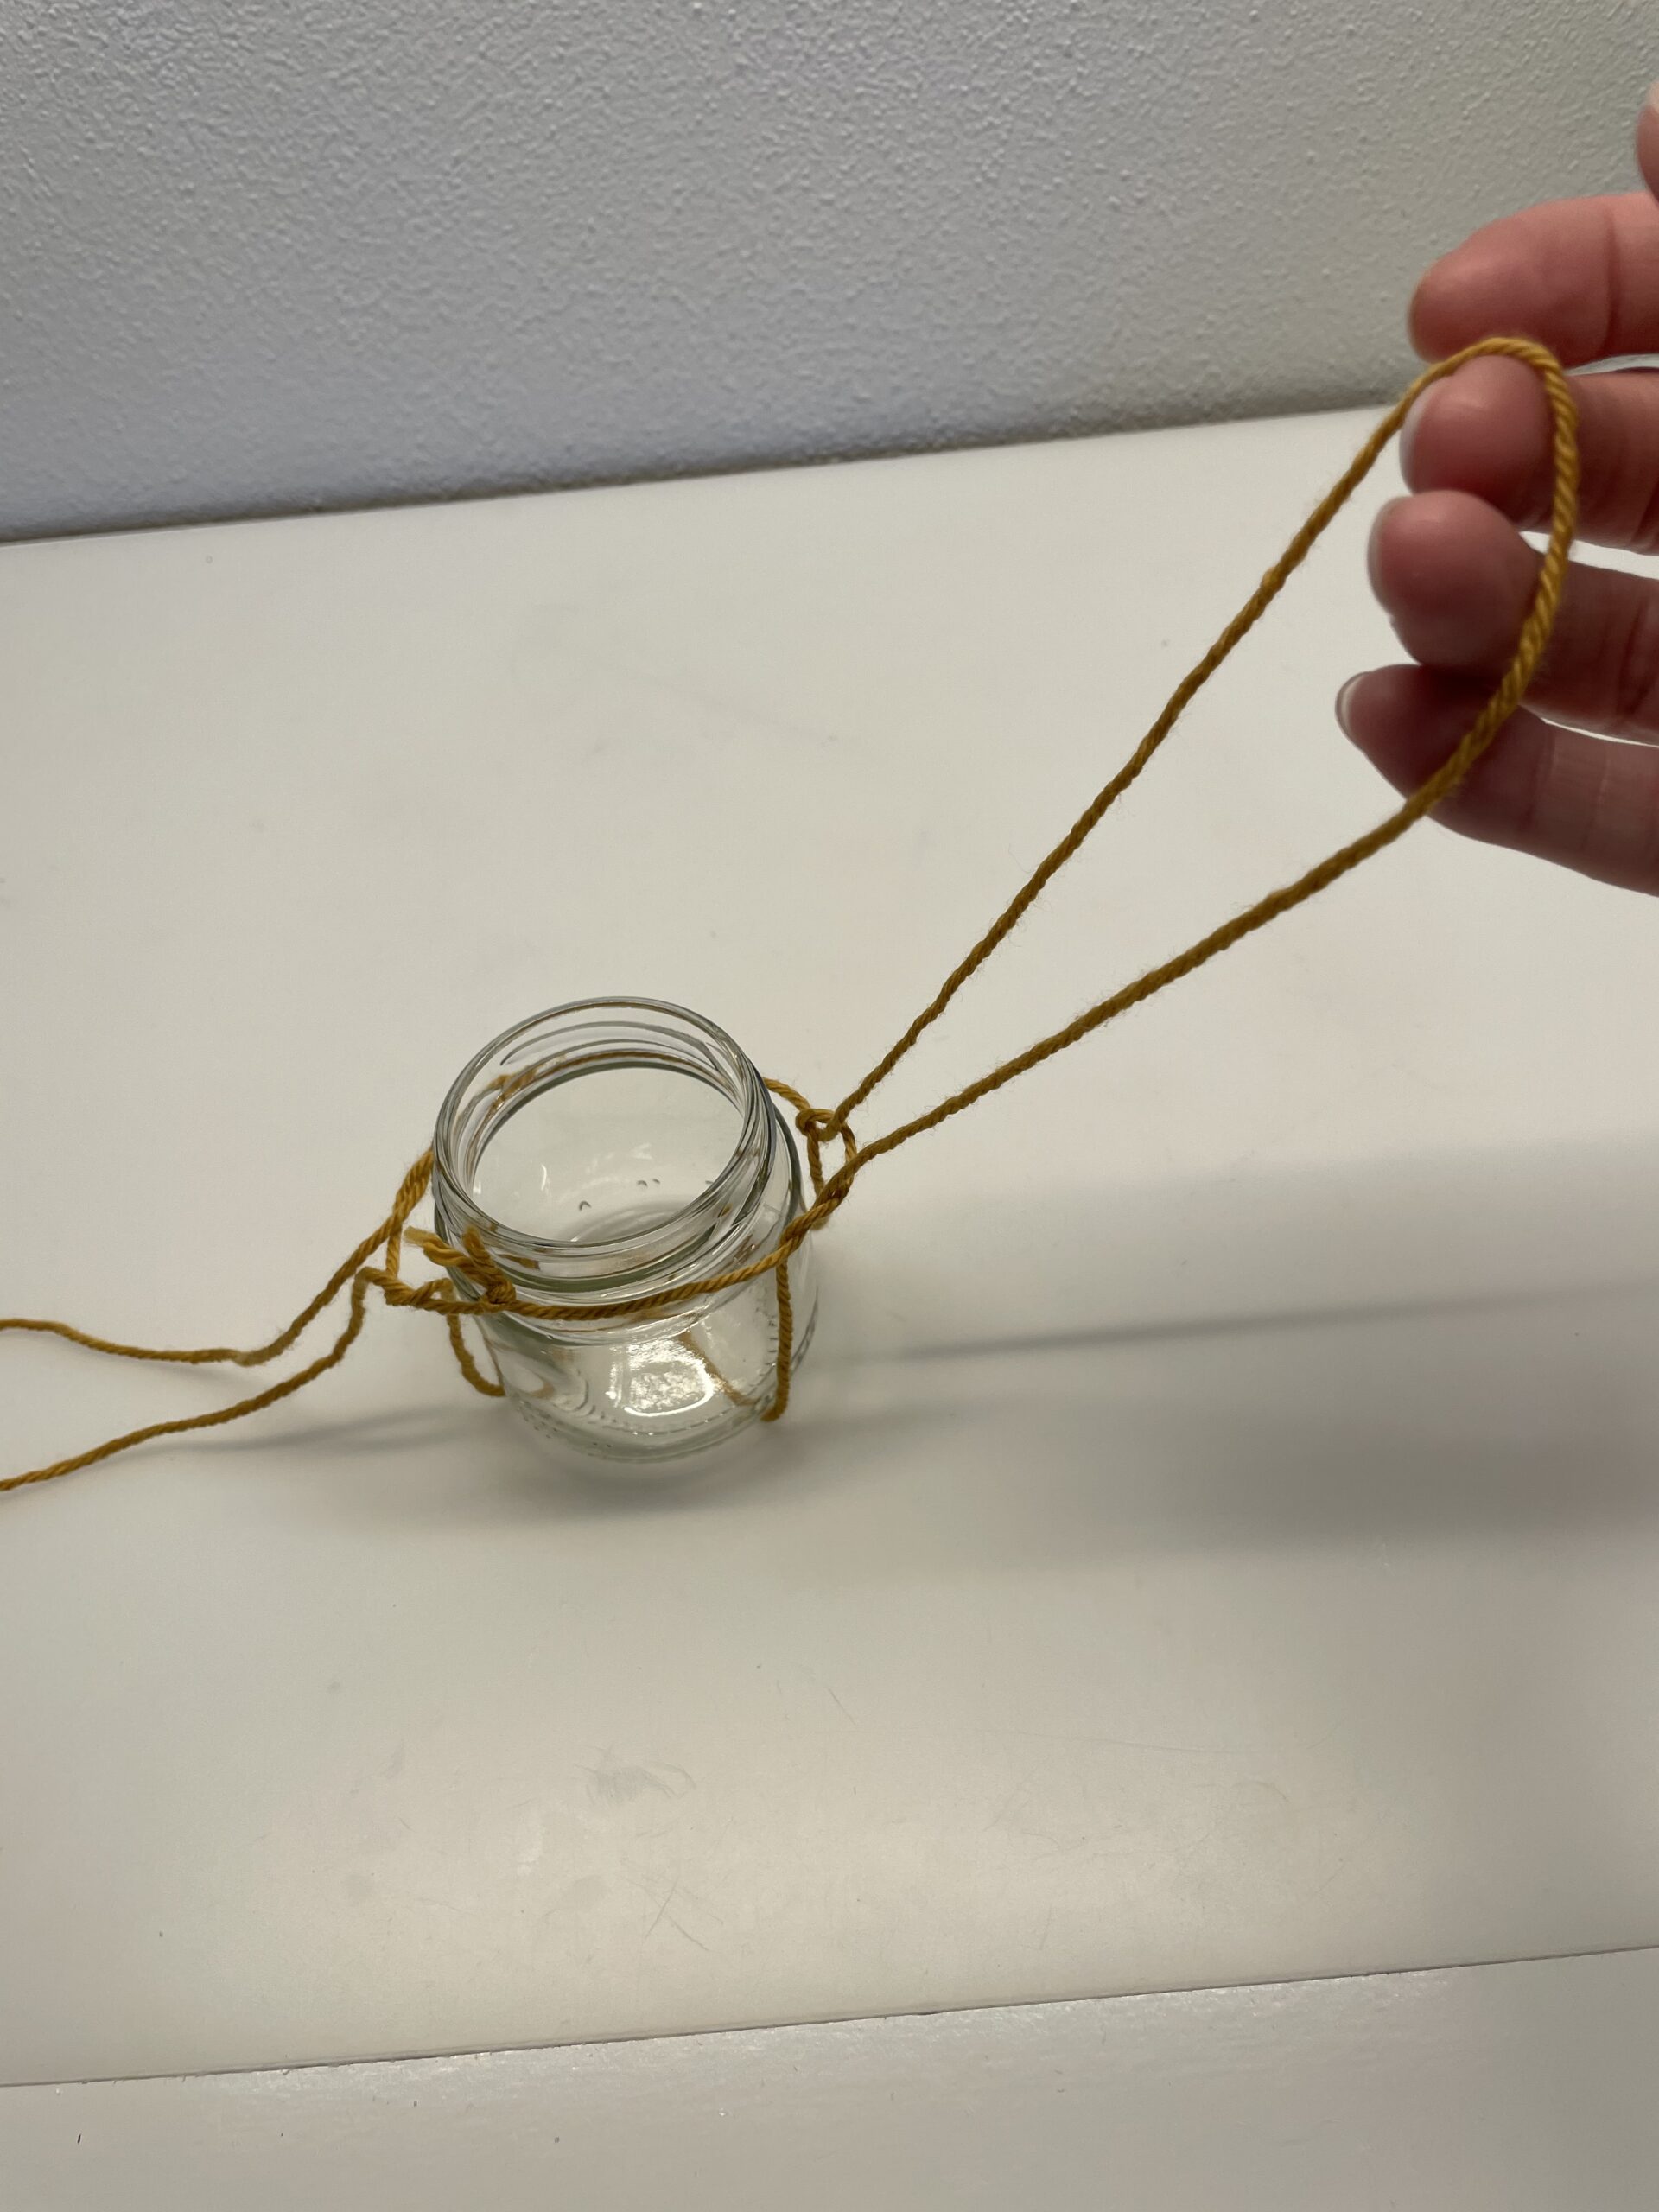
Bild zum Schritt 15 für das Bastel- und DIY-Abenteuer für Kinder: 'Jetzt nehmt ihr beide Fadenschlaufen nach oben zusammen. Richtet das...'

16

The hanging vase is ready.

Bild zum Schritt 16 für das Bastel- und DIY-Abenteuer für Kinder: 'Fertig ist die hängende Vase.'

17

2. Bild zum Schritt 16 für das Bastel- und DIY-Abenteuer für Kinder: 'Fertig ist die hängende Vase.'

18

Now fill in some water and hang your vase on a branch, shrub or tree. With a few picked flowers, the vase looks beautiful.
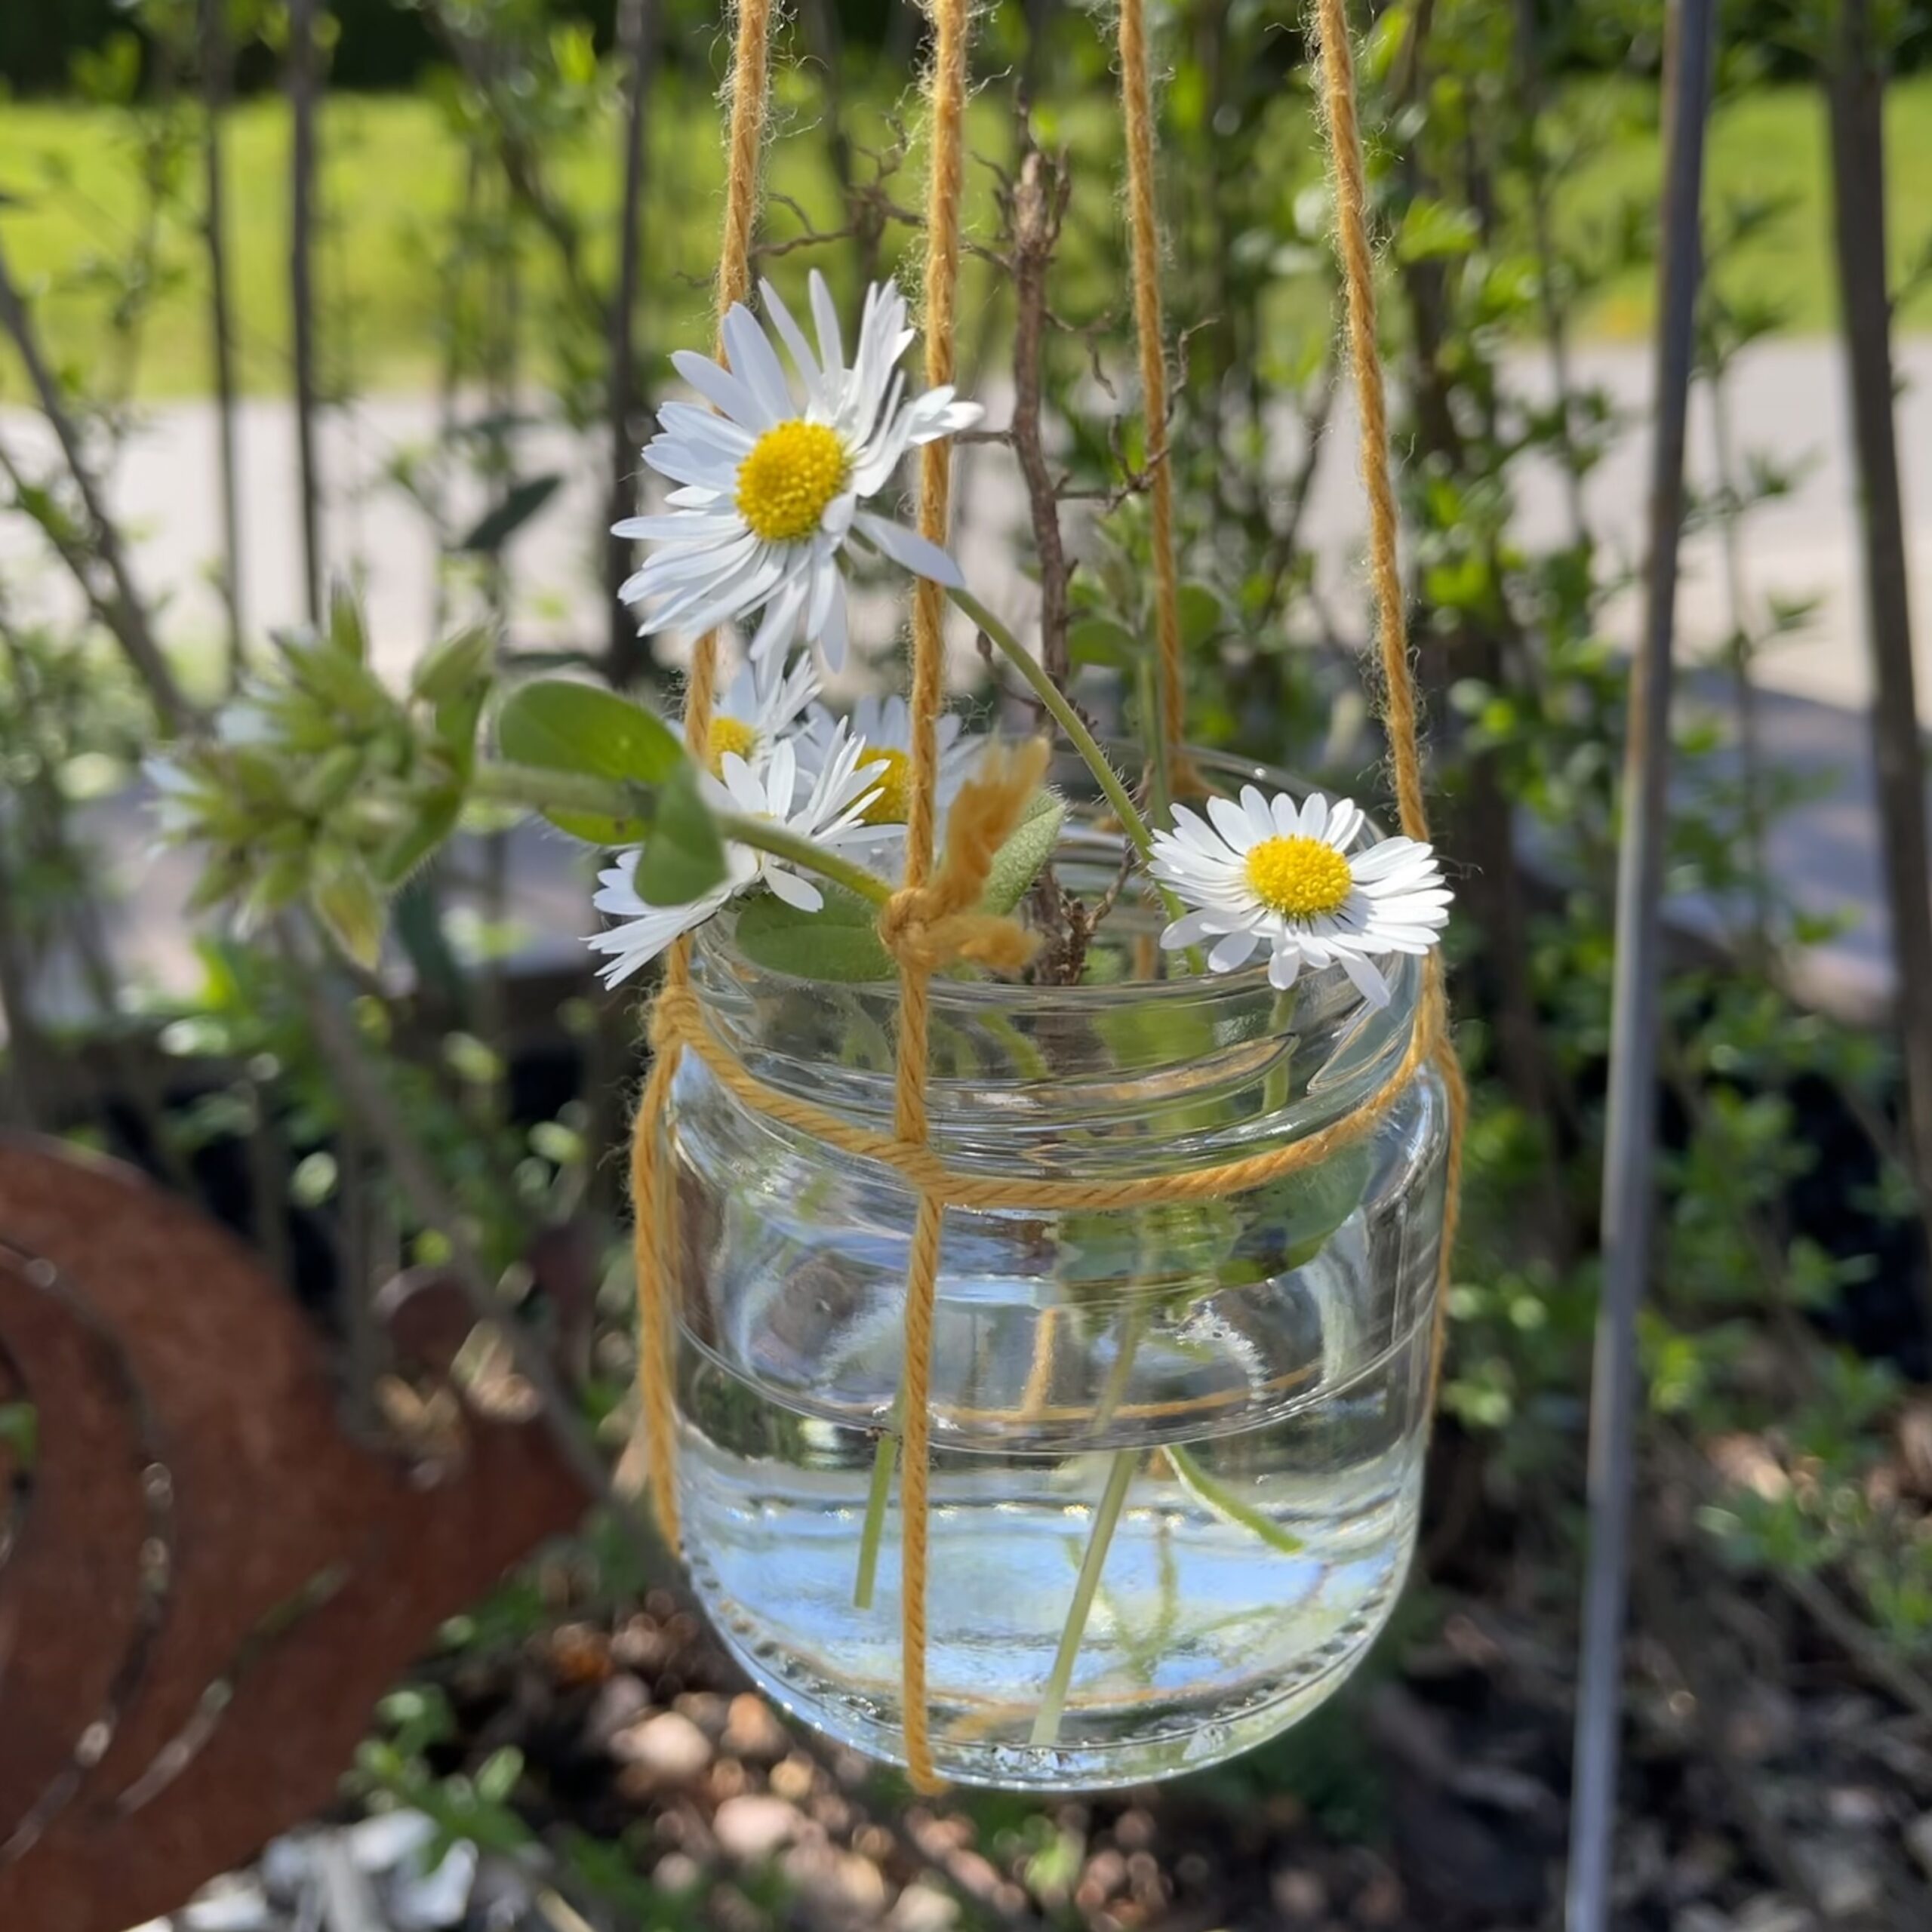
Bild zum Schritt 18 für das Bastel- und DIY-Abenteuer für Kinder: 'Nun füllt ihr etwas Wasser hinein und hängt eure Vase...'

19

Your hanging floral decoration is ready.
Tip: This hanging vase is also a nice gift!
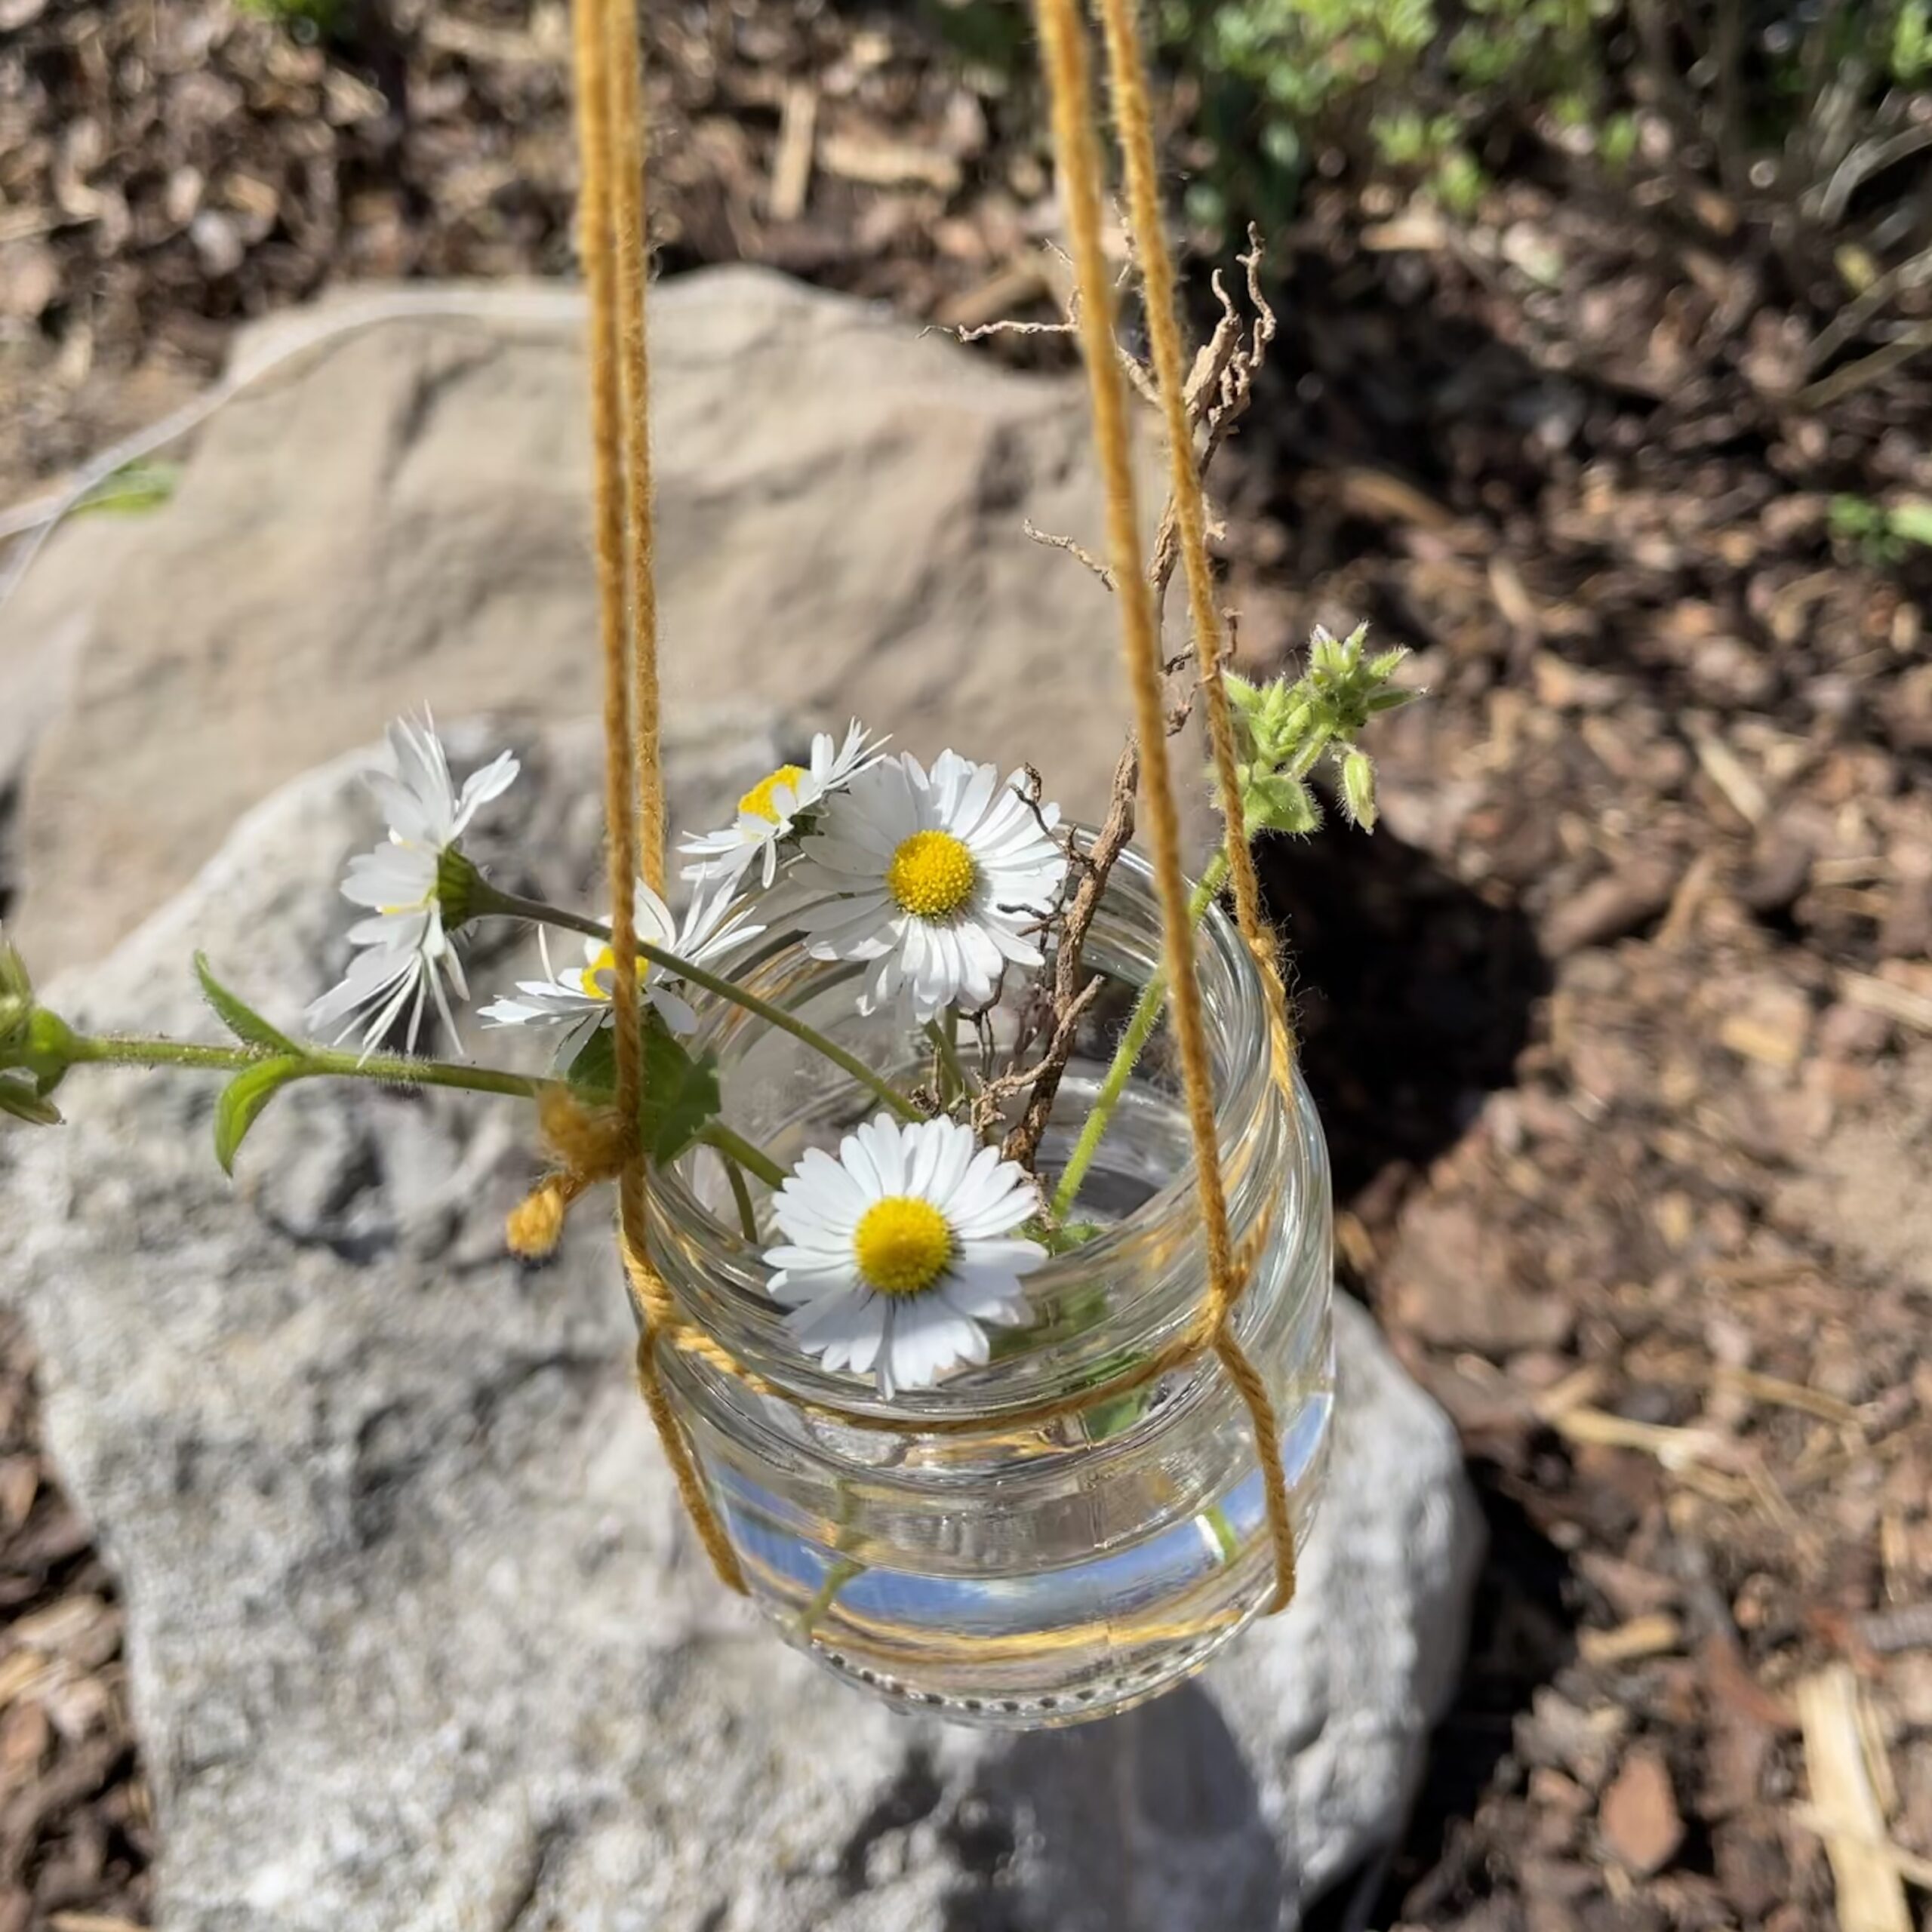
Bild zum Schritt 19 für das Bastel- und DIY-Abenteuer für Kinder: 'Fertig ist euer hängender Blumenschmuck.   Tipp: Diese hängende...'

20

Have fun!

Hanging vase

Follow us on Facebook , Instagram and Pinterest
Don't miss any more adventures: Our bottle mail

Leave a Reply

Your email address will not be published.

The maximum upload file size: 5 MB. You can upload: image, document. Drop file here